まえがき
新しい現場でSwaggerを使うことになったので、備忘録として残す。
やりたいこと
既存のソースコードにSwaggerで提供されているアノテーションをつけて、Swagger UI PageにてAPI仕様を見たい。
仕様(OpenAPI)に対する実装(Swagger)
ぐぐると最初にOpenAPI(Swagger)と出てきた。仕様(OpenAPI)に対する実装(Swagger)という解釈で問題なさそう。JPAとHibernateの関係と同じか。
OpenAPI = Specification(仕様)
Swagger = Tools for implementing the specification(実装)
SpringFox と springdoc-openapi
Swagger UI Pageを見るために必要なもの。
古:SpringFox
新:springdoc-openapi
この記事では新しい方のspringdoc-openapiを使っていく。
2024/01/05追記
swagger-coreとspringdoc-openapi-uiの2つを定義する方法では SwaggerUIを開くことができないことを検知。
公式サイトのGetting Startedを参照したところ、springdoc-openapi-starter-webmvc-uiの依存を追加するやり方に変更されていたので、本記事もそれに倣って修正する。
pom.xml
<dependencies>

   <dependency>
      <groupId>org.springdoc</groupId>
      <artifactId>springdoc-openapi-starter-webmvc-ui</artifactId>
      <version>2.3.0</version>
   </dependency>

</dependencies>
とりあえずSpringBootアプリ起動して、Swagger UI Pageを開いてみる
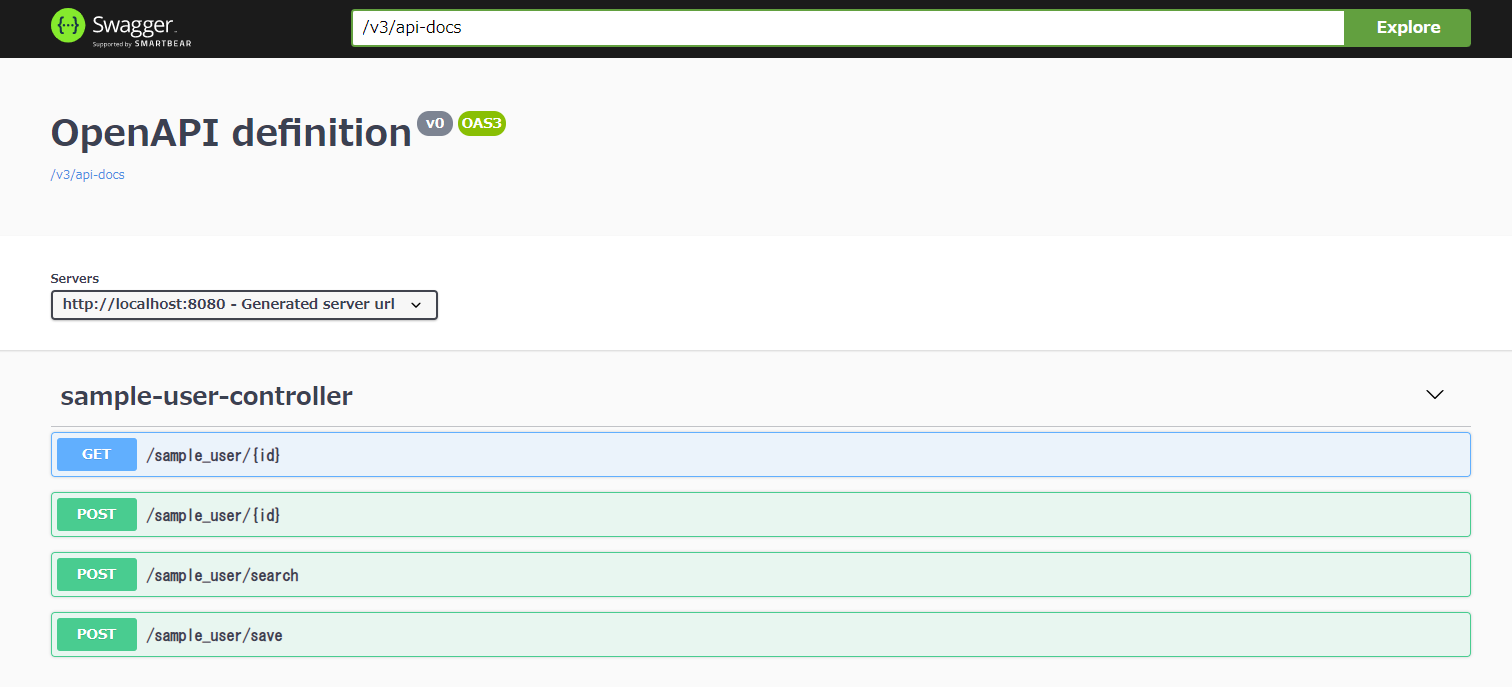
http://server:port/context-path/swagger-ui.htmlにアクセスすれば、Swagger UI Pageが見れるそうなので、SpringBootアプリを起動してさっそくhttp://localhost:8080/swagger-ui.html にアクセスしてみた。
まず、Controllerクラスに定義されているエンドポイント一覧が表示されていることを確認。
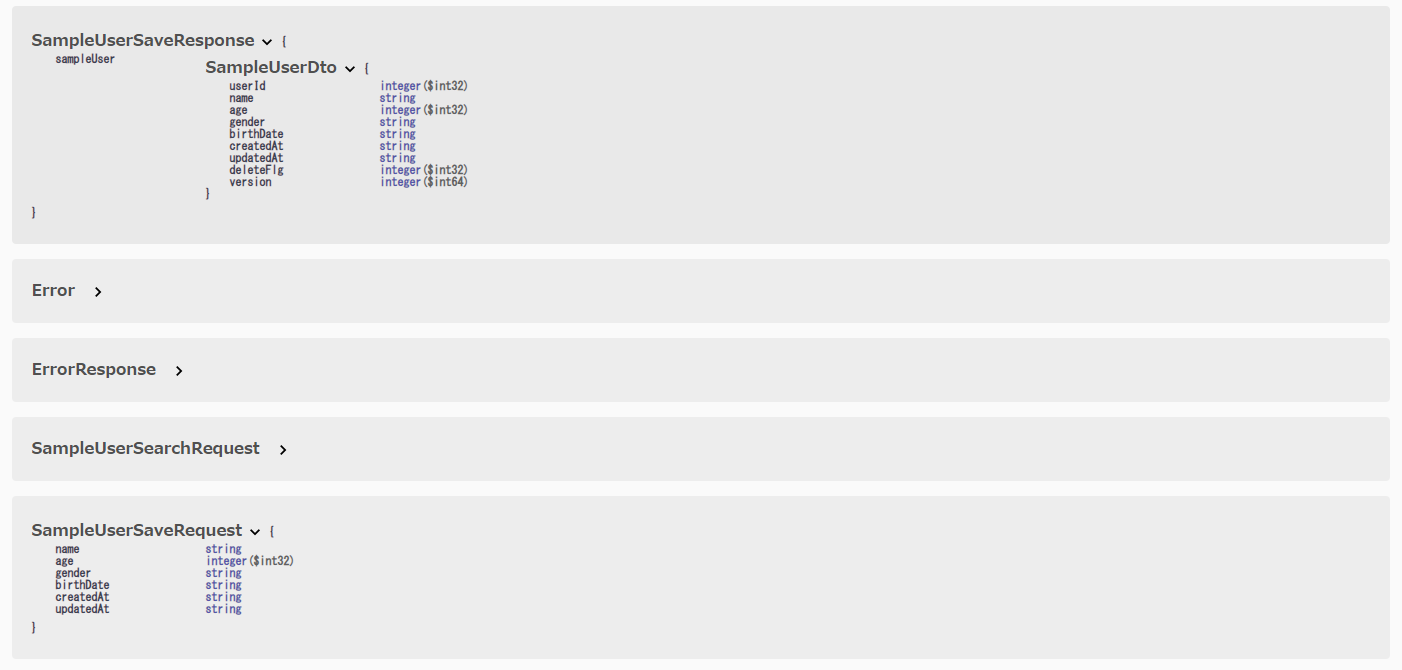
各エンドポイントのリクエスト/レスポンスに設定されているオブジェクトも自動的に一覧で表示してくれるようだ。
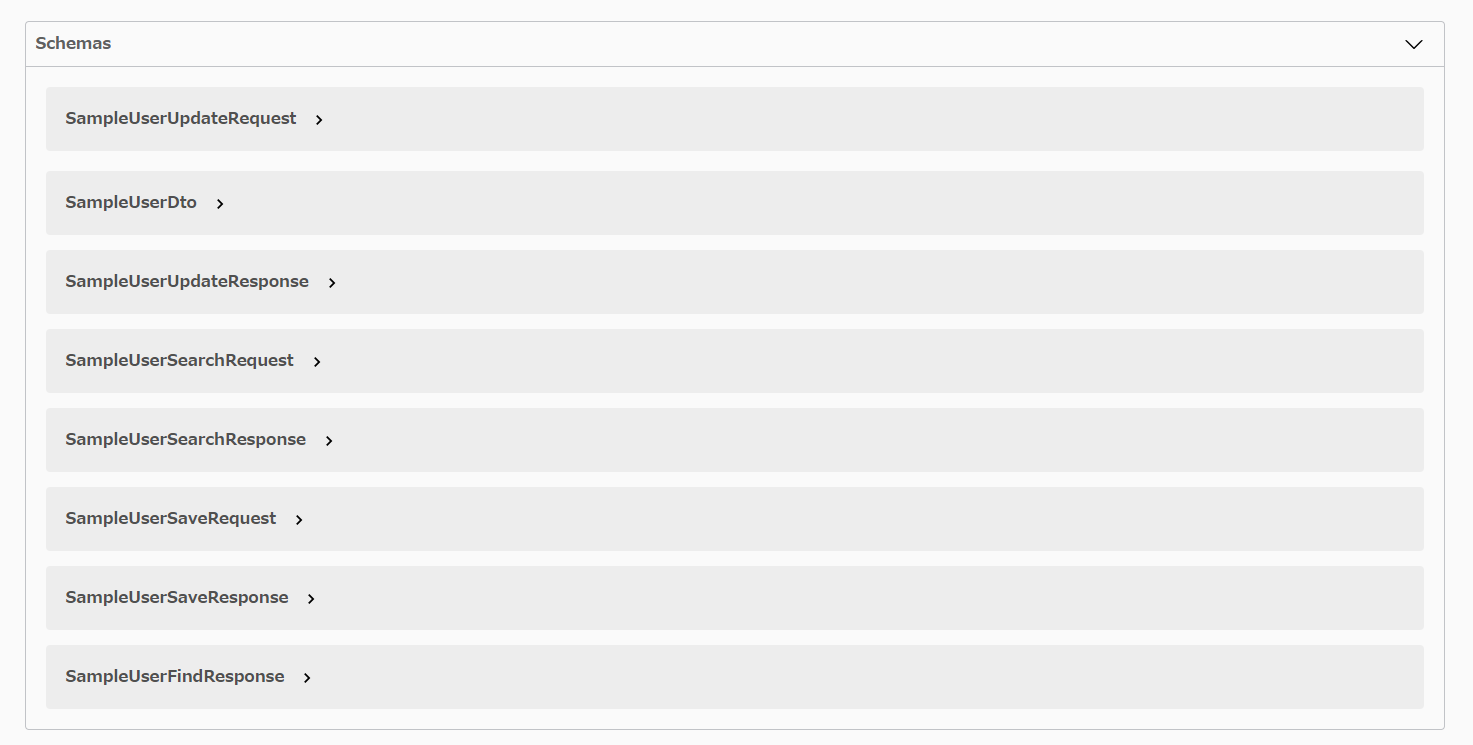
中身を見てみると、各リクエスト/レスポンスで定義されているフィールドとそのデータ型を見れるようだ。
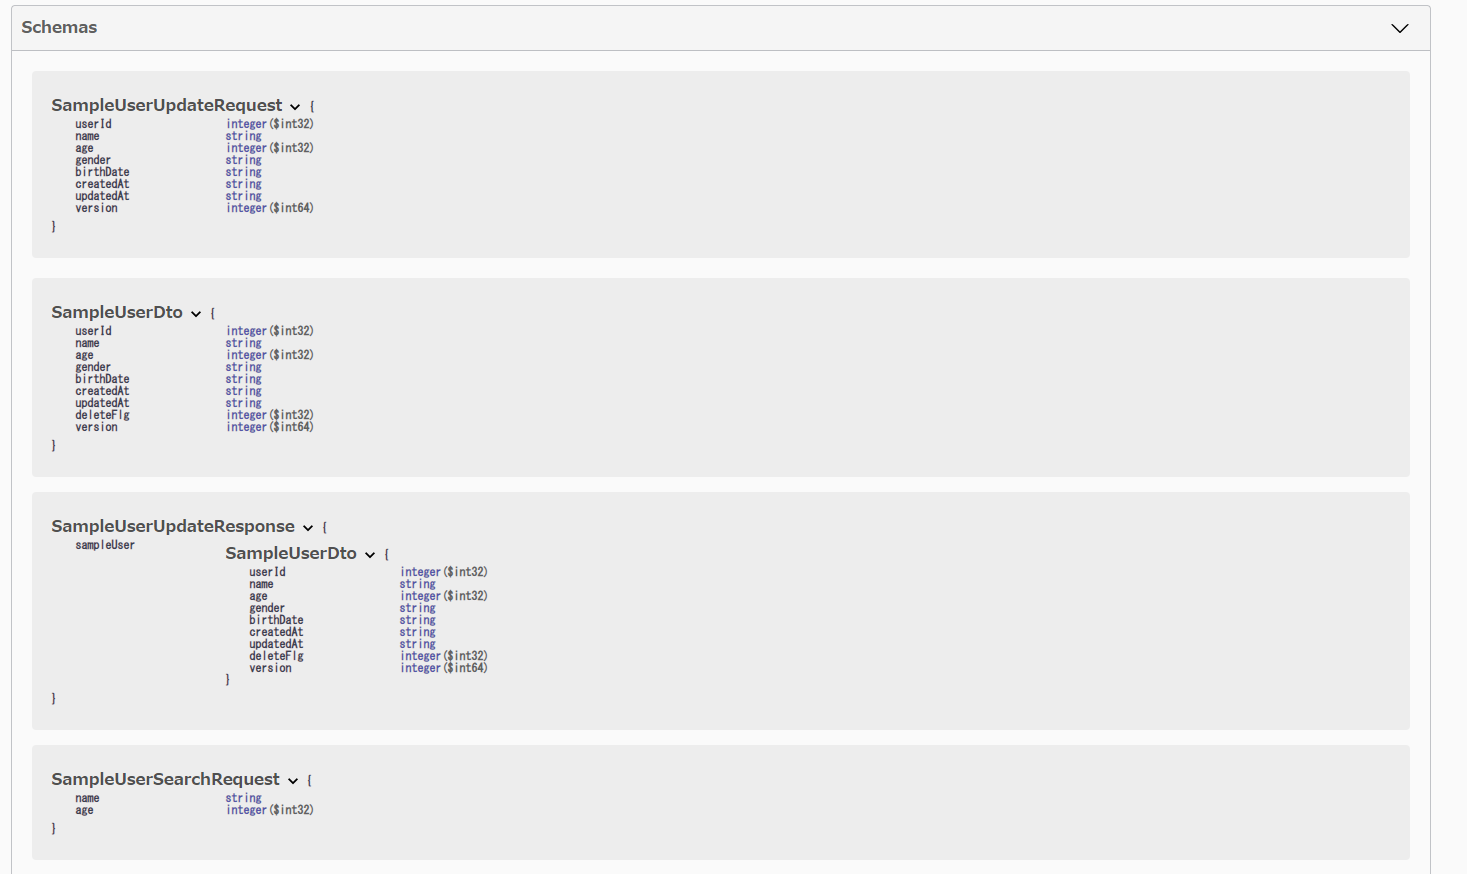
現時点では、swagger-coreで提供されているアノテーションを何もつけていないのだが、
上述したように下記については自動で仕様としておこしてくれるようだ。
・Controllerクラスに定義したエンドポイント
・エンドポイントのリクエスト/レスポンス
swagger-coreのアノテーションをつけていく
Controllerクラスにつける
まず、Controllerクラス上部に@ApiResponsesをつけてみる。
@ApiResponses(
   {
    @ApiResponse(
       responseCode = "500",
       description = "Internal server error",
       content = @Content(schema = @Schema(implementation ErrorResponse.class))),

    @ApiResponse(
       responseCode = "400",
       description = "Bad request",
       content = @Content(schema = @Schema(implementation = ErrorResponse.class)))
   }
)
public class SampleUserController {
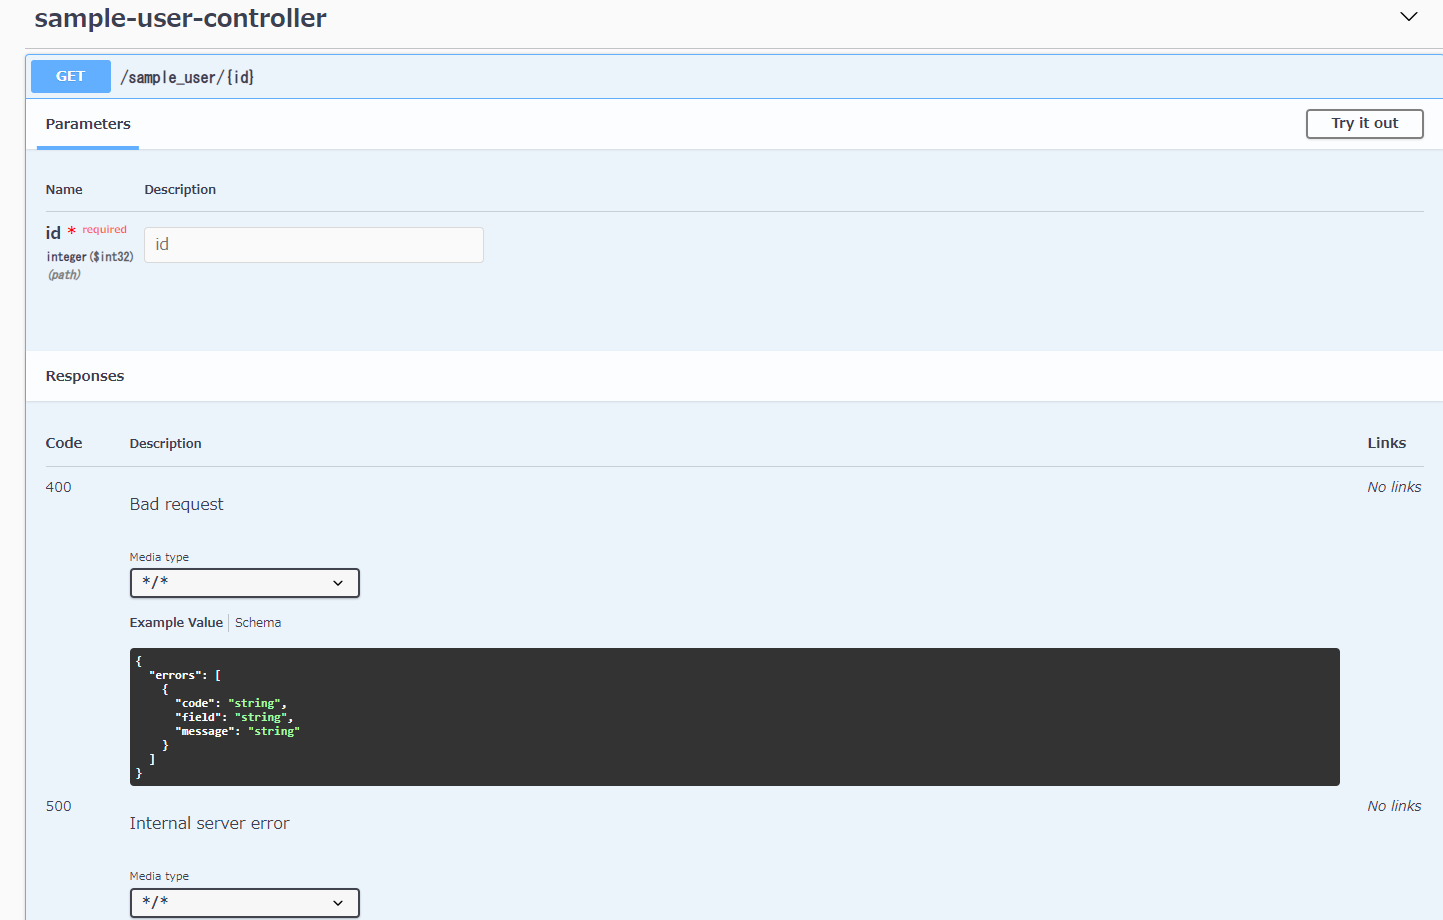
再度Swagger UI Pageを開いてみると、エンドポイントのレスポンスに200だけデフォルトで定義されていたものが、
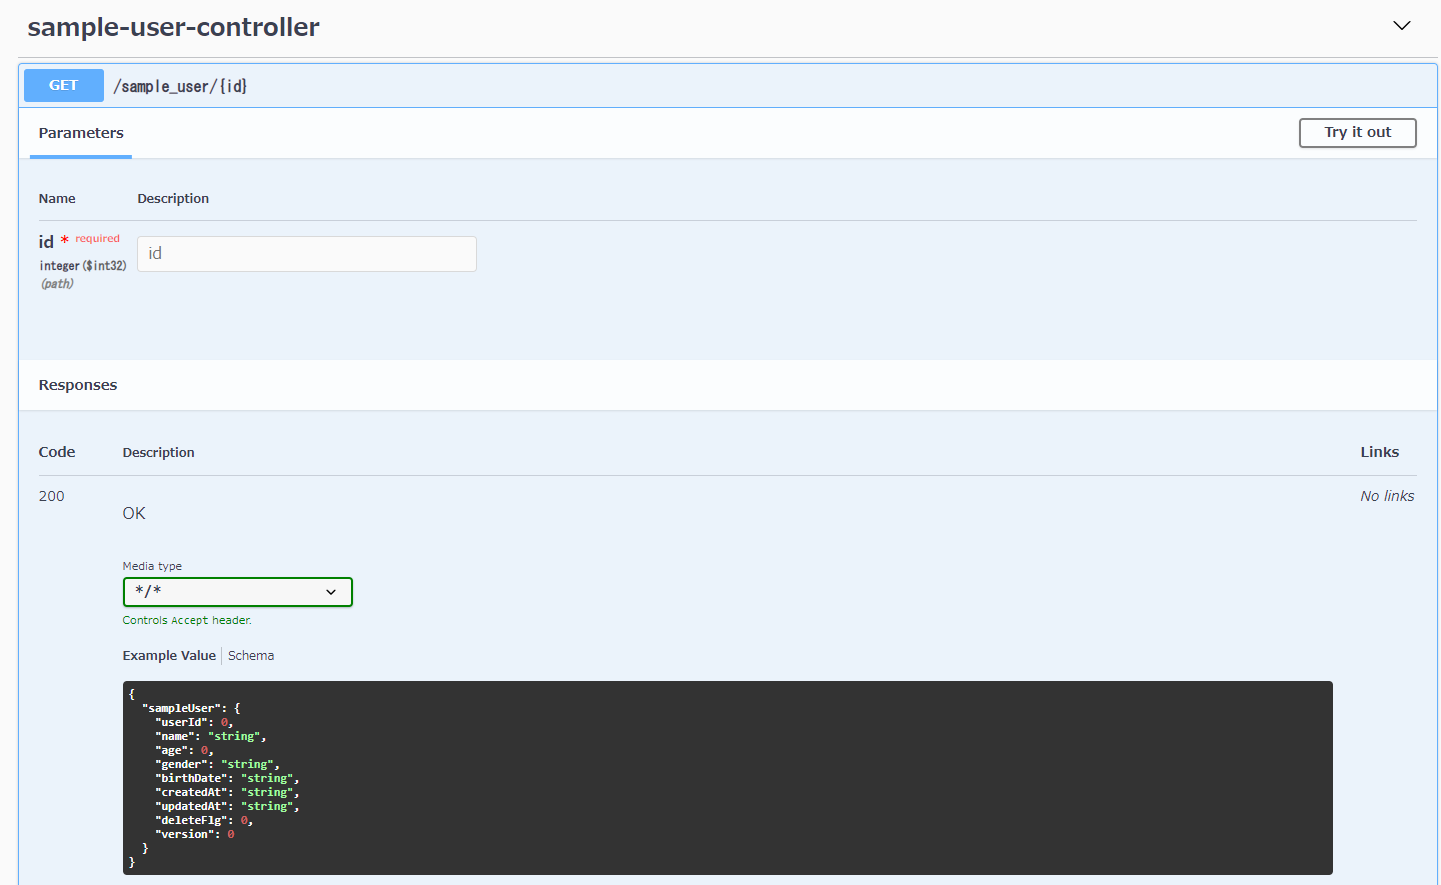
400と500のレスポンス情報が定義されるようになった。
Controllerクラス内の各エンドポイントにつける
次に、各エンドポイントにもつけてみよう。
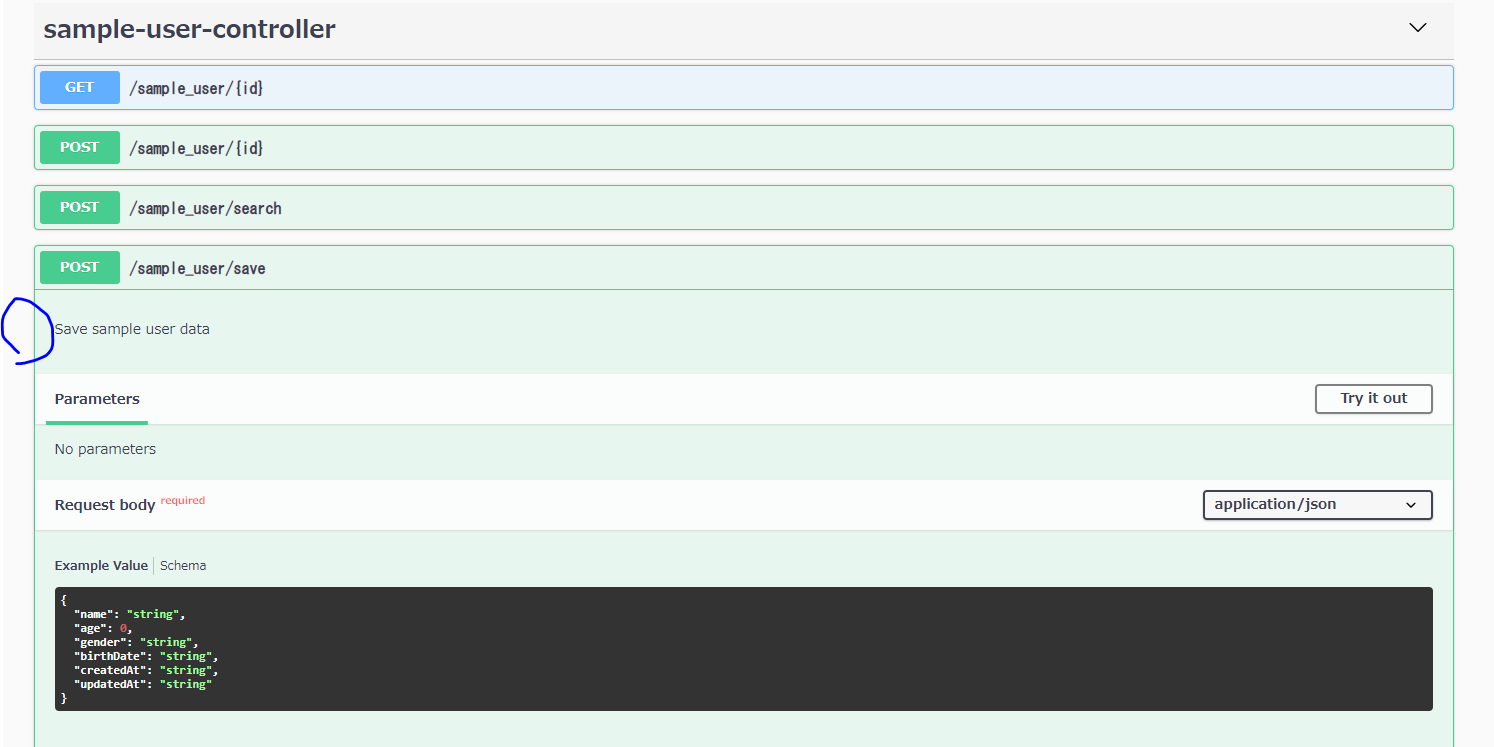
  @Operation(description = "Save sample user data")
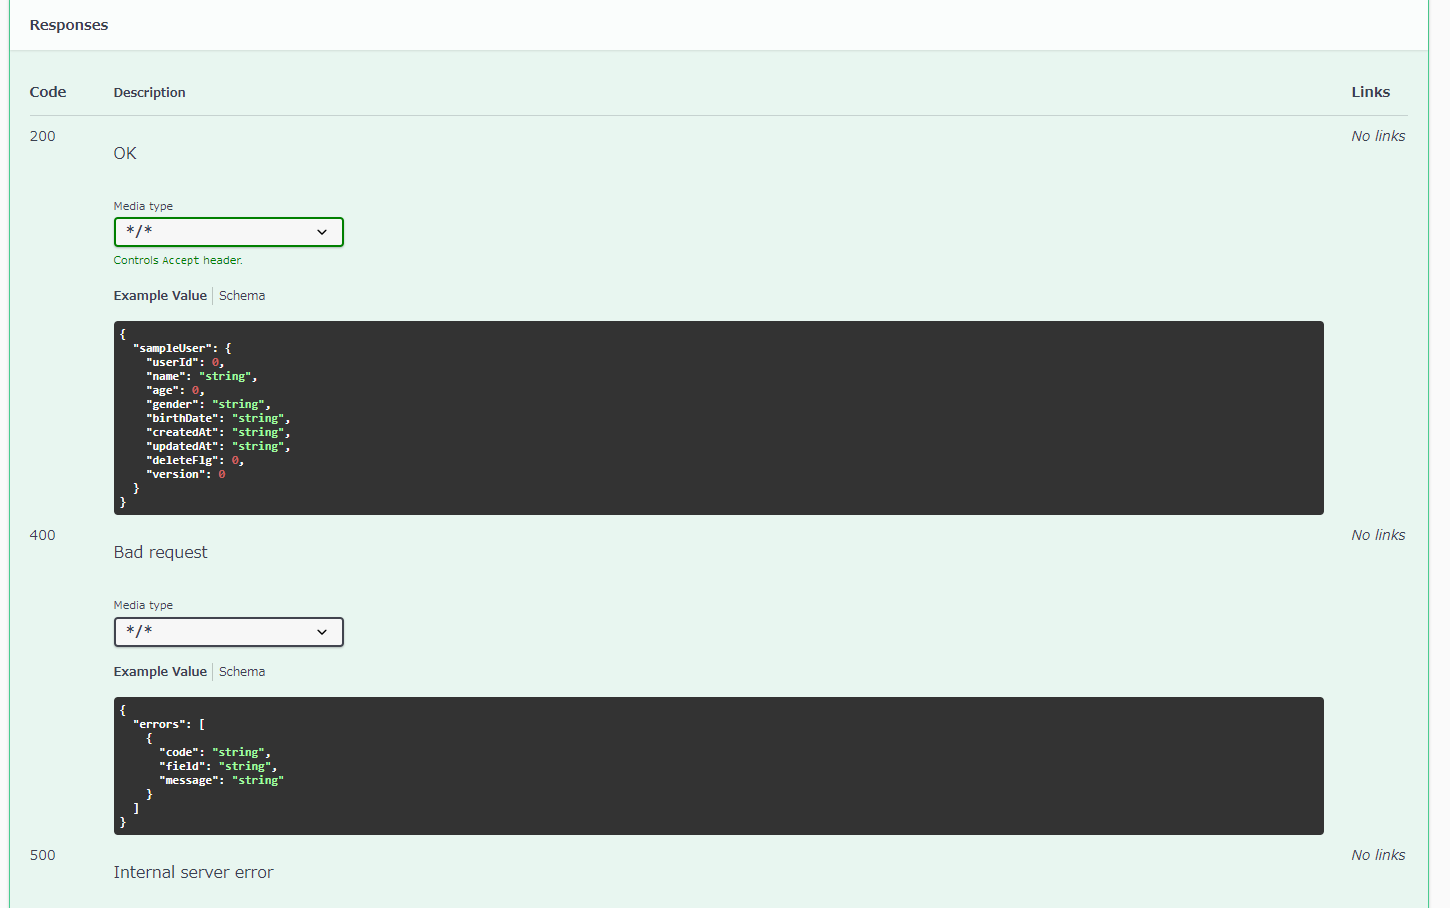
  @ApiResponses(value = {
      @ApiResponse(responseCode = "200", description = "OK",
          content = @Content(
              schema = @Schema(implementation = SampleUserSaveResponse.class))),
  })
  @PostMapping("save")
  public ResponseEntity<SampleUserSaveResponse> save(@RequestBody SampleUserSaveRequest request) {
    return ResponseEntity.ok(sampleUserService.save(request));
  }
再度Swagger UI Pageを開いてみると、@Operationsに定義した説明文が↓のように追加されており、
Responseについては、デフォルトの200が消えてしまっていたので再度追加したものが反映されていることを確認できた。
リクエスト/レスポンスクラスにつけてみる
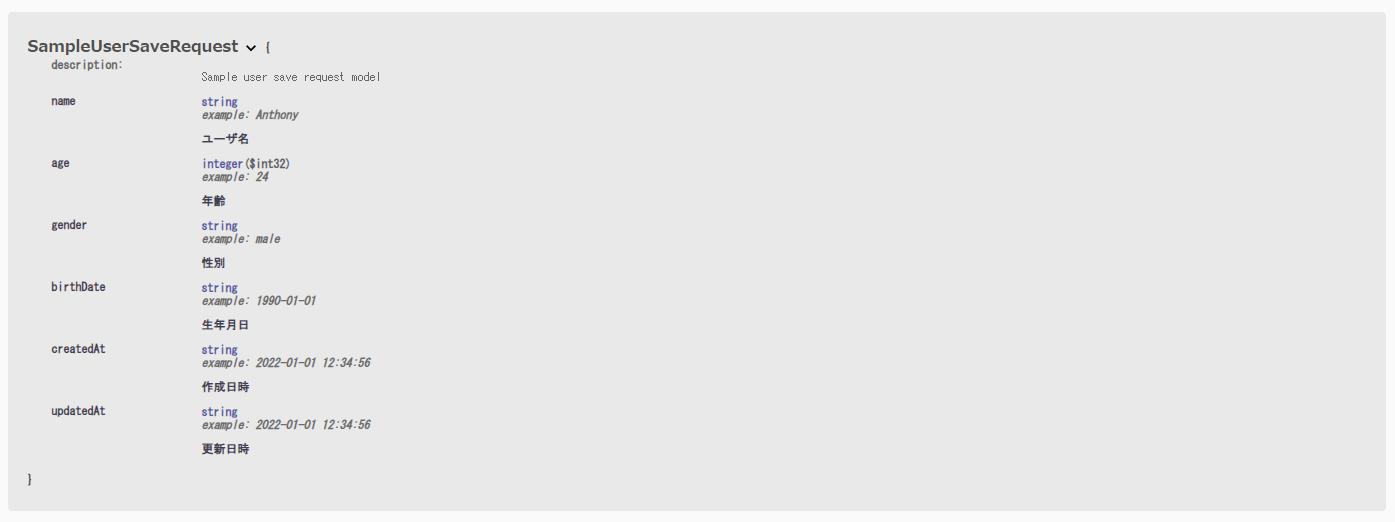
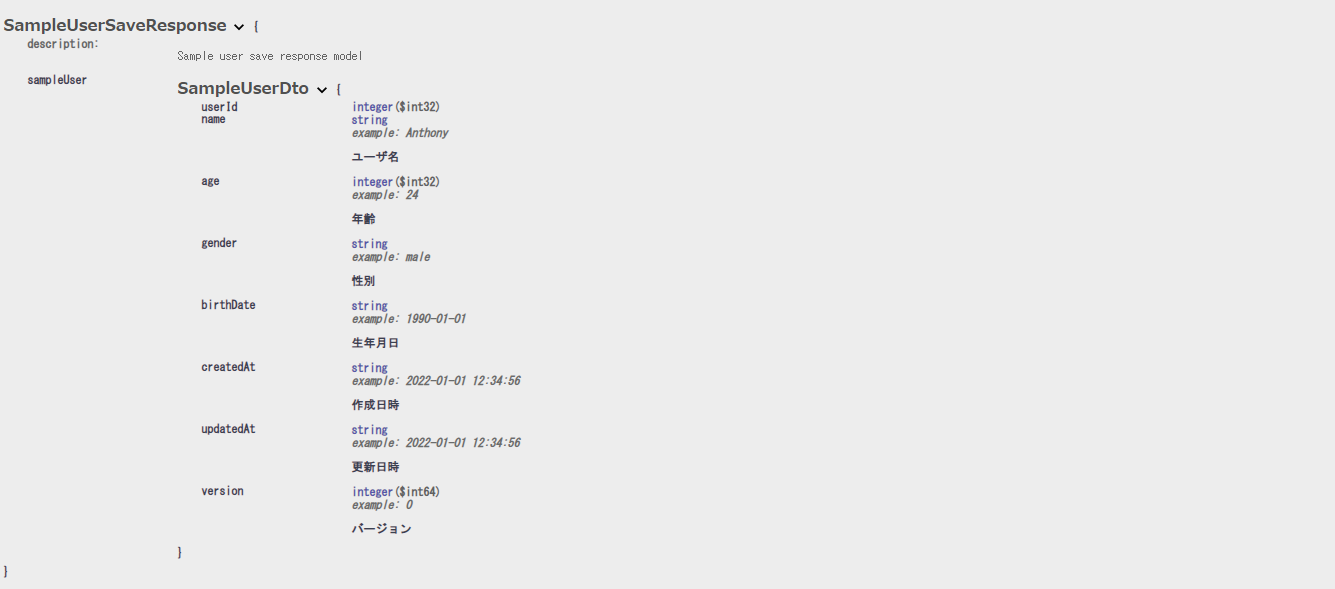
次に、エンドポイントから参照されているリクエスト/レスポンスにもつけてみよう。
リクエスト
@Schema(description = "Sample user save request model")
public class SampleUserSaveRequest {

  @Schema(description = "ユーザ名", type = "string", example = "Anthony")
  private String name;
  @Schema(description = "年齢", type = "integer", example = "24")
  private Integer age;
  @Schema(description = "性別", type = "string", example = "male")
  private String gender;
  @Schema(description = "生年月日", type = "string", example = "1990-01-01")
  private String birthDate;
  @Schema(description = "作成日時", type = "string", example = "2022-01-01 12:34:56")
  private String createdAt;
  @Schema(description = "更新日時", type = "string", example = "2022-01-01 12:34:56")
  private String updatedAt;
}
レスポンス
@Schema(description = "Sample user save response model")
public class SampleUserSaveResponse {
  private SampleUserDto sampleUser;
}

public class SampleUserDto {
  private Integer userId;
  @Schema(description = "ユーザ名", type = "string", example = "Anthony")
  private String name;
  @Schema(description = "年齢", type = "integer", example = "24")
  private Integer age;
  @Schema(description = "性別", type = "string", example = "male")
  private String gender;
  @Schema(description = "生年月日", type = "string", example = "1990-01-01")
  private String birthDate;
  @Schema(description = "作成日時", type = "string", example = "2022-01-01 12:34:56")
  private String createdAt;
  @Schema(description = "更新日時", type = "string", example = "2022-01-01 12:34:56")
  private String updatedAt;
  @Schema(description = "バージョン", type = "long", example = "0")
  private Long version;
}
swagger-coreアノテーションについて
@ApiResponse, @ApiResponses
200以外のレスポンスコードが返る場合の説明を書きます。
@Content
parameter, request, responseのcontentTypeを定義する。
contentTypeをスキーマで表現したかったら、@Content#schemaを使う?
@Schema
スキーマとは何者?
・クラス、フィールドなど、設計書におこしたいデータを1つの概念としてあらわしたもの
クラスにつける場合
@Schema(description = "Hoge search request model")
public class HogeSearchRequestParameter {}
フィールドにつける場合
@Schema(description = "birthDate",
      type = "string",
      example = "202110",
      required = true)
private String birthDate;
@Operation
resource methodにつける。どういったデータを取得できるのかを説明する。
その他単語
OAS
OpenAPI Specfication
