はじめに
個人的意見ですが、Sliderはなんとなく使いにくい印象があります。
10keysキーボードより 断然省スペースですし、UIの印象がソフトになる気がして何度か検討することはあったのですが、結局採用に至っていません。
その原因のひとつとして、Sliderは左右の一次元的操作しかないので、入力できる値のダイナミックレンジが狭いことがあるのかなと思いました。
やりたいUX
ということで、二次元的操作で、値を入力できるUI部品を作ってみました。
Tapするとデフォルトの数字が入力でき、SliderのようにDragするとサイズが大きくなりつつ、入力できる値も大きくなるという仕様にしました。
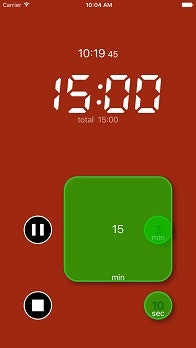
下図は、デフォルトが1分のButtonが、Dragにより入力値が15分に大きくなっているところです。ダイナミックレンジを稼ぐために、10秒、1分、3分と ここで紹介しているボタンを3つ使っています。
コーディング
- ボタン領域内でのtouchDown,Drag,touchUpのイベントを buttonDown(), buttonUp(), buttonDrag()で処理しています。
- buttonUp()では、元のサイズにアニメーションで戻しています。 値(value)を使うのは同じイベントを処理する外部コードを想定しています。(titleラベルはイベント処理の前後関係でリセットされてしまうので、valueプロパティを使ってもらう形です。)
- buttonDown()では、上図のようにボタンを透過することもあるので、 自身を最前面にもってきています。 また、valueプロパティをこのタイミングで初期値(rate)に戻しています。
- buttonDrag()では、ボタンのサイズとラベルを変更をします。 valueはrateの整数倍になります。
slideAreaButton.swift
import UIKit

class slideAreaButton: UIButton { // クラス名が小文字始まりなのはご愛嬌w
    var value:Int = 1
    var rate:Int = 1
    private var size:CGSize = CGSize.zero
    private var origin:CGPoint = CGPoint.zero

    private func init_sub() {
        setOriginSize()
        self.addTarget(self, action:#selector(buttonUp) ,   for: .touchUpInside)
        self.addTarget(self, action:#selector(buttonDown) , for: .touchDown)
        self.addTarget(self, action:#selector(buttonDrag) , for: .touchDragInside)
        self.addTarget(self, action:#selector(buttonCancel),for: [.touchUpOutside, .touchCancel])
        self.setTitle("\(rate)", for: .normal)
    }

    override init(frame:CGRect) {
        super.init(frame:frame)
        init_sub()
    }

    init( _ rate:Int = 1 ) {
        super.init(frame:CGRect.zero)
        init_sub()
    }

    required init?(coder aDecoder: NSCoder) {
        super.init(coder: aDecoder)
    }

    func setOriginSize() {
        origin = self.frame.origin
        size   = self.frame.size
    }

    func buttonResize(_ delay:Double = 0) {
        UIView.animate(withDuration: 0.1, delay: delay, usingSpringWithDamping: 0.3, initialSpringVelocity: 0.2, options: .curveEaseInOut, animations: {()->Void in
            self.frame.origin = self.origin
            self.frame.size   = self.size
        }, completion:{(BOOL)->Void in
            self.isHighlighted = false
        } )

    }

    func buttonUp(bt:UIButton) {
        buttonResize()
    }
    func buttonDown(bt:UIButton, forEvent: UIEvent) {
        self.superview?.bringSubview(toFront: self)
        setOriginSize()
        value = rate
    }
    func buttonDrag(bt:UIButton, forEvent: UIEvent) {
        let p = forEvent.allTouches!.first!.location(in: self.superview)
        let w = origin.x + size.width  - p.x
        let h = origin.y + size.height - p.y
        self.frame = CGRect(x:p.x, y:p.y, width:w , height:h )

        value = Int(w*h/size.width/size.height)*rate
        self.setTitle("\(value)", for: .highlighted)
    }
    func buttonCancel() {
        buttonResize()
    }

}

class ViewController: UIViewController {

    override func viewDidLoad() {
        super.viewDidLoad()
        // Do any additional setup after loading the view, typically from a nib.

        let bt = slideAreaButton()
        bt.frame = CGRect(x: 200, y: 400, width: 60, height: 60)
        bt.backgroundColor = .black
        bt.addTarget(self, action: #selector(printValue(bt:)), for: .touchUpInside)
        self.view.addSubview(bt)
    }

    override func didReceiveMemoryWarning() {
        super.didReceiveMemoryWarning()
        // Dispose of any resources that can be recreated.
    }

    func printValue(bt:slideAreaButton) {
        print(bt.value)
    }

}
読んでいただき、ありがとうございました。
このボタンを使ったタイマーアプリを公開しています。よろしければ是非お試しください。
iTunesで Adjustable Timerを見てみる
