barrierとは?
今回はAndroidのレイアウトの編集でバリア(barrier)の使い方について説明します。
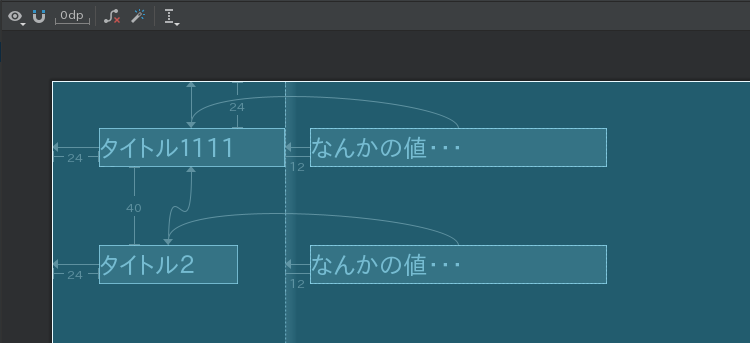
例えばこんなレイアウトがあったとします。
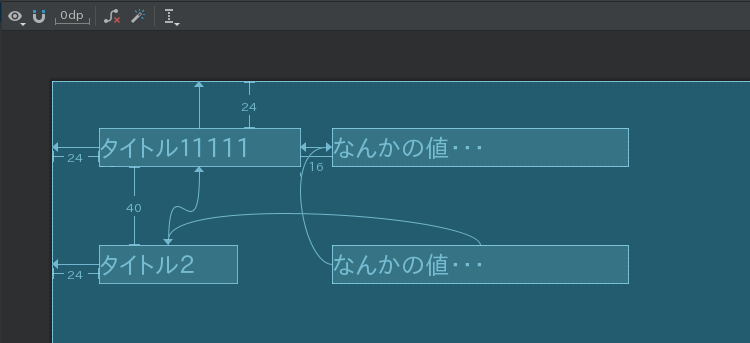
タイトル1に対して、なんかの値1
タイトル2に対して、なんかの値2
があって、これらを全部DBや設定ファイル、あるいはHTTPで他から取ってきて表示するとします。
今上の画面はタイトル1がタイトル2より長いので、タイトル1に合わせて、その右側のなんかの値1、なんかの値2の位置を決めています。
しかし、状況によってはタイトル1とタイトル2の長さが逆転する場合があります。こんな風に・・・
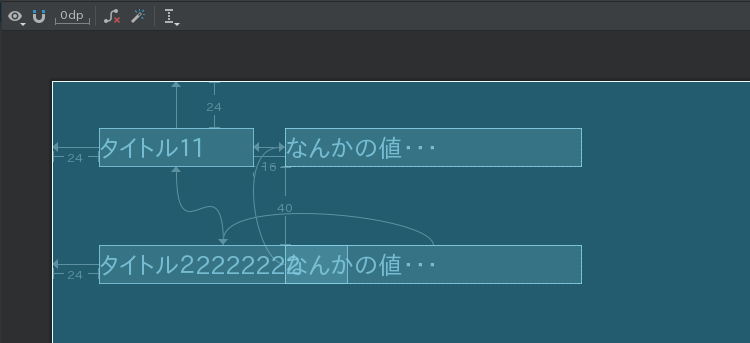
タイトル1に合わせて、その右側のTextViewの位置を決めているので文字が被ってしまいます。
じゃ、タイトル2に合わせて、その右側のTextViewの位置を決めれば・・・いや、いや、状況によってタイトル1とタイトル2のどっちが長いか、都度変わります。こんな時どうするかと言うと、バリア(Barrier)を使います。
barrierを使うとどういうレイアウトになる?垂直バリアの例
レイアウトエディタのComponetTreeで見るとこうなります。
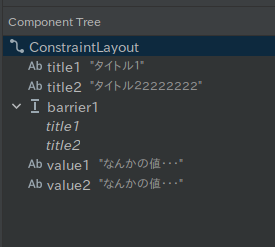
Barrier(Virtical)をドラック&ドロップでComponetTreeに追加します。そのバリアの階層構造で下にタイトル1とタイトル2を付けます。
バリアの属性で、「barrierDrection」に「end」(右端の意味)を指定します。
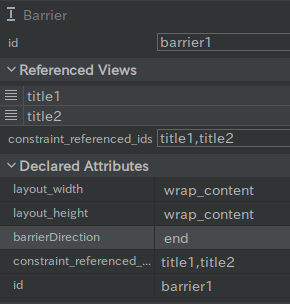
右側のなんかの値1、なんかの値2の左の位置をそのバリアからの相対位置にします。(app:layout_constraintStart_toEndOf)
バリアの横軸はタイトル1かタイトル2のどちらかの長い方の位置になります。
その横のその右側のなんかの値1、なんかの値2はそのバリアの位置に対する相対位置になります。
上の例はタイトル1のほうが長い場合ですが、逆にタイトル2の方が長い場合は、こうなります。
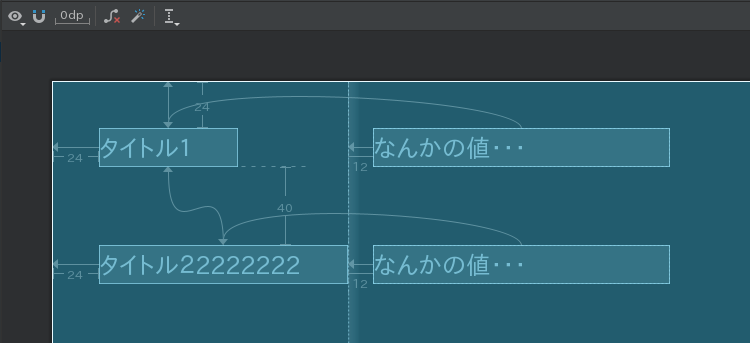
もう、文字がかぶることがありませんね。
LinerLayoutでお互いを囲うという手もありますが、こちらのほうが簡単です。
出来上がりのlayout xmlはこのようになります。
<?xml version="1.0" encoding="utf-8"?>
<androidx.constraintlayout.widget.ConstraintLayout xmlns:android="http://schemas.android.com/apk/res/android"
    xmlns:app="http://schemas.android.com/apk/res-auto"
    xmlns:tools="http://schemas.android.com/tools"
    android:layout_width="match_parent"
    android:layout_height="match_parent"
    tools:context=".MainActivity">

    <TextView
        android:id="@+id/title1"
        android:layout_width="wrap_content"
        android:layout_height="wrap_content"
        android:layout_marginStart="24dp"
        android:layout_marginTop="24dp"
        android:text="タイトル1"
        android:visibility="visible"
        app:layout_constraintStart_toStartOf="parent"
        app:layout_constraintTop_toTopOf="parent" />

    <TextView
        android:id="@+id/title2"
        android:layout_width="wrap_content"
        android:layout_height="wrap_content"
        android:layout_marginStart="24dp"
        android:layout_marginTop="40dp"
        android:text="タイトル22222222"
        android:visibility="visible"
        app:layout_constraintStart_toStartOf="parent"
        app:layout_constraintTop_toBottomOf="@+id/title1" />

    <androidx.constraintlayout.widget.Barrier
        android:id="@+id/barrier1"
        android:layout_width="wrap_content"
        android:layout_height="wrap_content"
        app:barrierDirection="end"
        app:constraint_referenced_ids="title1,title2"
        tools:layout_editor_absoluteX="411dp" />

    <TextView
        android:id="@+id/value1"
        android:layout_width="150dp"
        android:layout_height="wrap_content"
        android:layout_marginStart="12dp"
        android:text="なんかの値・・・"
        app:layout_constraintStart_toEndOf="@+id/barrier1"
        app:layout_constraintTop_toTopOf="@+id/title1" />

    <TextView
        android:id="@+id/value2"
        android:layout_width="150dp"
        android:layout_height="wrap_content"
        android:layout_marginStart="12dp"
        android:text="なんかの値・・・"
        app:layout_constraintStart_toEndOf="@+id/barrier1"
        app:layout_constraintTop_toTopOf="@+id/title2" />

</androidx.constraintlayout.widget.ConstraintLayout>
これは横方向ですが、縦方向についても同じことが言えます。縦の場合は
Barrier(Horizontal)を使います。
水平方向のバリアの例、RecyclerViewとの組み合わせ
同じ理屈で、水平方向のバリア(Barrier(Horizontal))を説明してもあまり面白くありません。例えばこういう画面を想定します。
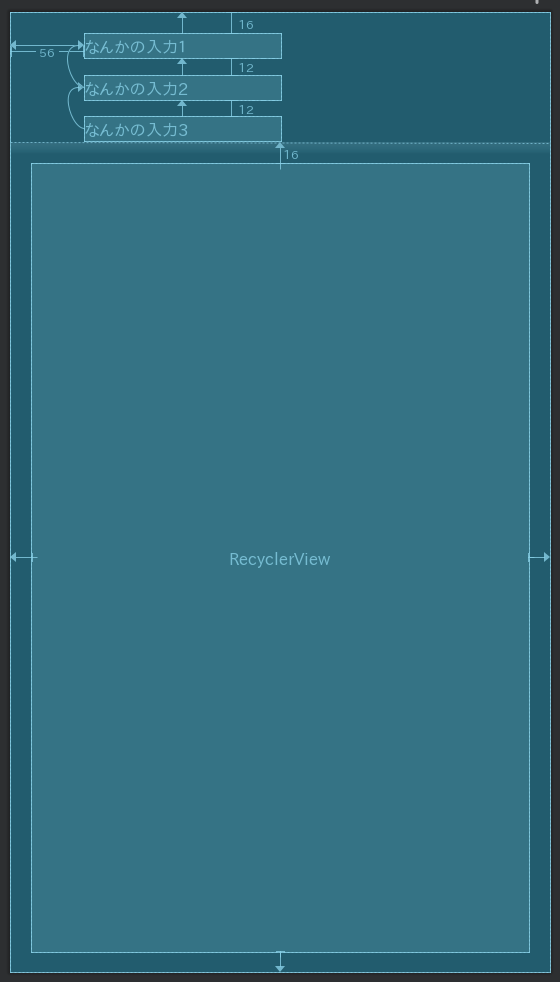
ReCyclerViewがどかんと真ん中にあって、その上にEditTextが3つ並んでいます。スマホは画面が狭いので、ReCyclerViewは極力画面全体を使いたいです。でも、そのReCyclerViewに対してデータを入力する時は、その時だけ、EditTextの入力部分を表示してほしい。余計なときは隠れていて欲しい。こんな場合もバリアが使えます。
ComponetTreeですが、このようになります。
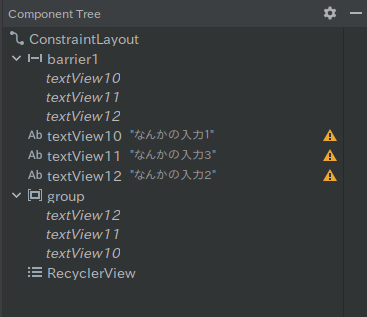
水平バリアの下にEditTextの3つを追加します。ここで、GroupもComponetTreeに追加して、Groupの下にもEditTextの3つを追加します。
水平バリアの「BarrierDirection」は「bottom」を指定します。
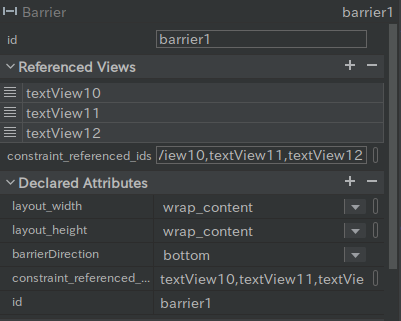
RecyClerViewの上側の位置は水平バリアからの相対位置を指定します。(app:layout_constraintTop_toBottomOf)
この状態で、Groupの「Visibility」を「gone」にすると・・・
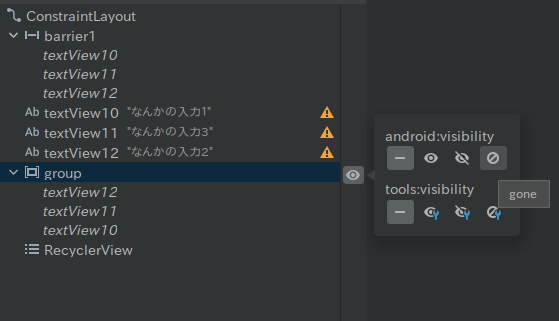
EditTextの3つが非表示になりレイアウトが詰まります。RecyclerViewの上側は水平バリアからの相対位置なので、それに引っ張られてRecyclerViewの上側が伸びます。こんな風に、ほぼ全画面表示になります。

出来上がりのlayout xmlはこのようになります。
<?xml version="1.0" encoding="utf-8"?>
<androidx.constraintlayout.widget.ConstraintLayout xmlns:android="http://schemas.android.com/apk/res/android"
    xmlns:app="http://schemas.android.com/apk/res-auto"
    xmlns:tools="http://schemas.android.com/tools"
    android:layout_width="match_parent"
    android:layout_height="match_parent"
    tools:context=".MainActivity">

    <androidx.constraintlayout.widget.Barrier
        android:id="@+id/barrier1"
        android:layout_width="wrap_content"
        android:layout_height="wrap_content"
        app:barrierDirection="bottom"
        app:constraint_referenced_ids="textView10,textView11,textView12"
        tools:layout_editor_absoluteY="731dp" />

    <TextView
        android:id="@+id/textView10"
        android:layout_width="150dp"
        android:layout_height="wrap_content"
        android:layout_marginStart="56dp"
        android:layout_marginTop="16dp"
        android:text="なんかの入力1"
        app:layout_constraintStart_toStartOf="parent"
        app:layout_constraintTop_toTopOf="parent" />

    <TextView
        android:id="@+id/textView11"
        android:layout_width="150dp"
        android:layout_height="wrap_content"
        android:layout_marginTop="12dp"
        android:text="なんかの入力3"
        app:layout_constraintStart_toStartOf="@+id/textView12"
        app:layout_constraintTop_toBottomOf="@+id/textView12" />

    <TextView
        android:id="@+id/textView12"
        android:layout_width="150dp"
        android:layout_height="wrap_content"
        android:layout_marginTop="12dp"
        android:text="なんかの入力2"
        app:layout_constraintStart_toStartOf="@+id/textView10"
        app:layout_constraintTop_toBottomOf="@+id/textView10" />

    <androidx.constraintlayout.widget.Group
        android:id="@+id/group"
        android:layout_width="wrap_content"
        android:layout_height="wrap_content"
        app:constraint_referenced_ids="textView12,textView11,textView10" />

    <androidx.recyclerview.widget.RecyclerView
        android:layout_width="match_parent"
        android:layout_height="0dp"
        android:layout_marginStart="16dp"
        android:layout_marginTop="16dp"
        android:layout_marginEnd="16dp"
        android:layout_marginBottom="16dp"
        app:layout_constraintBottom_toBottomOf="parent"
        app:layout_constraintEnd_toEndOf="parent"
        app:layout_constraintStart_toStartOf="parent"
        app:layout_constraintTop_toBottomOf="@+id/barrier1" />
</androidx.constraintlayout.widget.ConstraintLayout>
垂直バリアの「BarrierDirection」が「start」の場合、
水平バリアの「BarrierDirection」が「top」の場合も同じ理屈です。
最後に
水平バリアの使いかたは、
AndroidでRecyclerViewの縦方向の自動拡大、縮小も参考にしてください。