はじめに
「DonkeyCarのディープラーニングモデルをMATLABでトレーニングしてみる」では、MATLABを使ってDonkeyCarのディープラーニングモデルの学習を試みてみました。今回は、DonkeCarのデータセットをMATLAB/Simulinkでリプレイし、デープラーニングによる予測モデルを実行してみます。
使用したツール
- MATLAB 2021B (MATLAB Home)
- Deep Learning Toolbox
- Simulink Support Package for Raspberry Pi Add-On (ここではRaspberry PIを使用していませんが、video displayという映像表示ブロックのみ使っています。)
MATLABライブスクリプトを下記、GitHubに公開しています。(リンク先のページにあるコマンドをMATLAB コマンドウインドウにコピー&ペーストすると、自動でファイルを展開します。)
Replay_DonkeyCar_Simulink
トレーニング用データとディープラーニングモデル
GitHubに公開されているこちらのトレーニングデータを使います。
- 使用するデータセット circuit_launch_20210716_1826.tar.gz
デープラーニングモデルとして、以下の*.h5ファイル(Kerasモデル)を使用します。
https://github.com/autorope/donkey_datasets/tree/master/circuit_launch_20210716/models
データセットのダウンロード
以下のMATLABスクリプトを実行し、DonkeyCarのデータセットファイル(*.gz)をGitHubからダウンロードし、カレントフォルダ下に解凍します。
※MATLAB Onlineでの利用を考慮し、No.4のデータのみ再圧縮したファイルのリンクに変更しました。![]()
%Download DonkeyCar dataset on GitHub
% url = 'https://github.com/autorope/donkey_datasets/raw/master/circuit_launch_20210716/';%Original URL
% tarfile = 'circuit_launch_20210716_1826.tar.gz'; %Original data
url = 'https://github.com/covao/donkey_dataset_example/raw/main/';
tarfile = 'circuit_launch_20210716_1826_no4.tar.gz'; %Recompress only No4 data

datapath = './murmurpi4_circuit_launch_20210716_1826/data/';%Data Path

if(~exist(datapath,'file')) %if not unzipped
    disp('Wait a few minutes for downloading and unziping.')
    websave('temp.gz',[url tarfile],weboptions('Timeout',Inf));
    untar('temp.gz');
end
事前学習済みディープラーニングモデルのダウンロード
DonkeyCarの事前学習済みディープラーニングモデルファイル(Kerasモデル)をダウンロードします。ここでは、pilot_21-08-12_7.h5を使います。
%Download Donkeycar deep learning mode
netfile='pilot_21-08-12_7.h5';
websave(netfile,[url 'models/' netfile]);
事前学習済みモデルの読み込み
モデルをワークスペースに読み込みます
donkeyKerasNet = importKerasNetwork(netfile); %Load pre-trained network
save donkeyKerasNet;
catalogファイルの読み込み
DonkeyCarの走行データのリストが、*.catalogファイルに記録されています。画像データファイル名とステアリング値、スロットル値を含むデータセットをMATLABに読み込みます。ここでは、catalog_4.catalogを読み込みます。
%Import catalog
catalogfile = [datapath 'catalog_4.catalog'];%Catalog file
clear dataset;
js = readlines(catalogfile);
for(i = 1:length(js)-1)
    dataset(i) = jsondecode(js(i));
end

%Set image path
imgfolder = [datapath 'images/'];
imgfiles = {dataset.cam_image_array};
imgpath = {};
for(i = 1:length(imgfiles))
    imgpath{i} = strcat(imgfolder,imgfiles{i});
end
信号の構造体を作成
%Create Signal Structure for Simulink
ti = [dataset.x_timestamp_ms]';
ti = (ti-ti(1))/1000;

SigSteering.time = ti;
SigSteering.signals.dimensions = 1;
SigSteering.signals.values = [dataset.user_angle]'

SigThrottle.time = ti;
SigThrottle.signals.dimentions = 1;
SigThrottle.signals.values = [dataset.user_throttle]';
画像信号の構造体を作成
%Create Image Array
for(i=1:length(imgpath))
    img(:,:,:,i)=imread(imgpath{i});
end

%Create Image Signal Structure for Simulink
SigImage.time = ti;
SigImage.signals.dimensions=[120 160 3];
SigImage.signals.values = img;
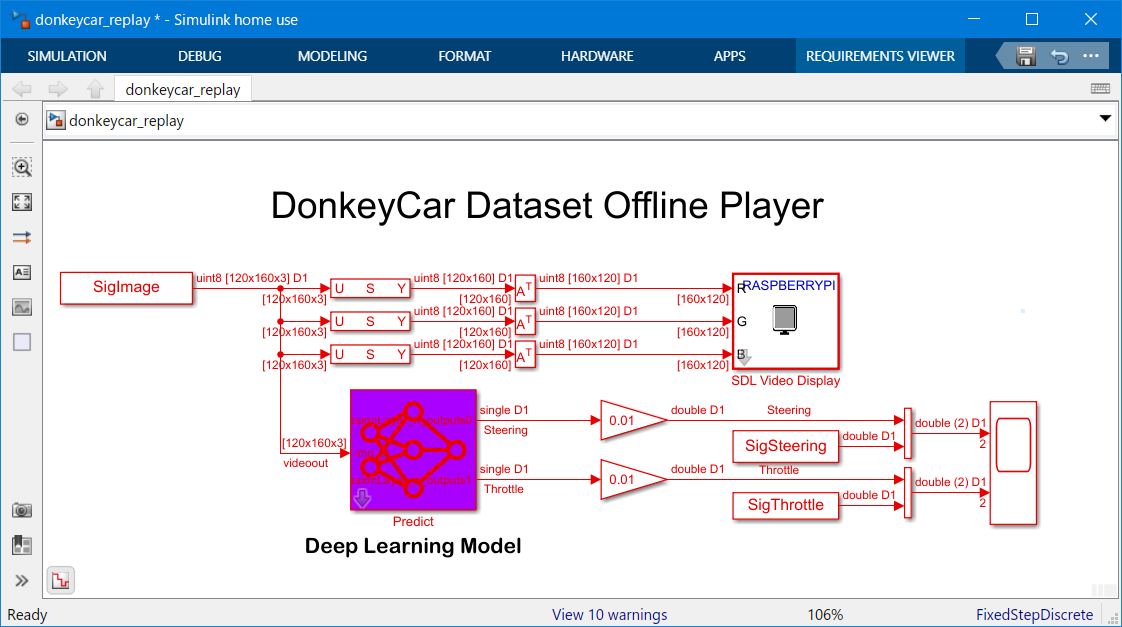
Simulinkモデルのオープンと実行
こちらのモデルファイルを使います。
GitHubのリンク
open('donkeycar_replay.mdl');
さいごに
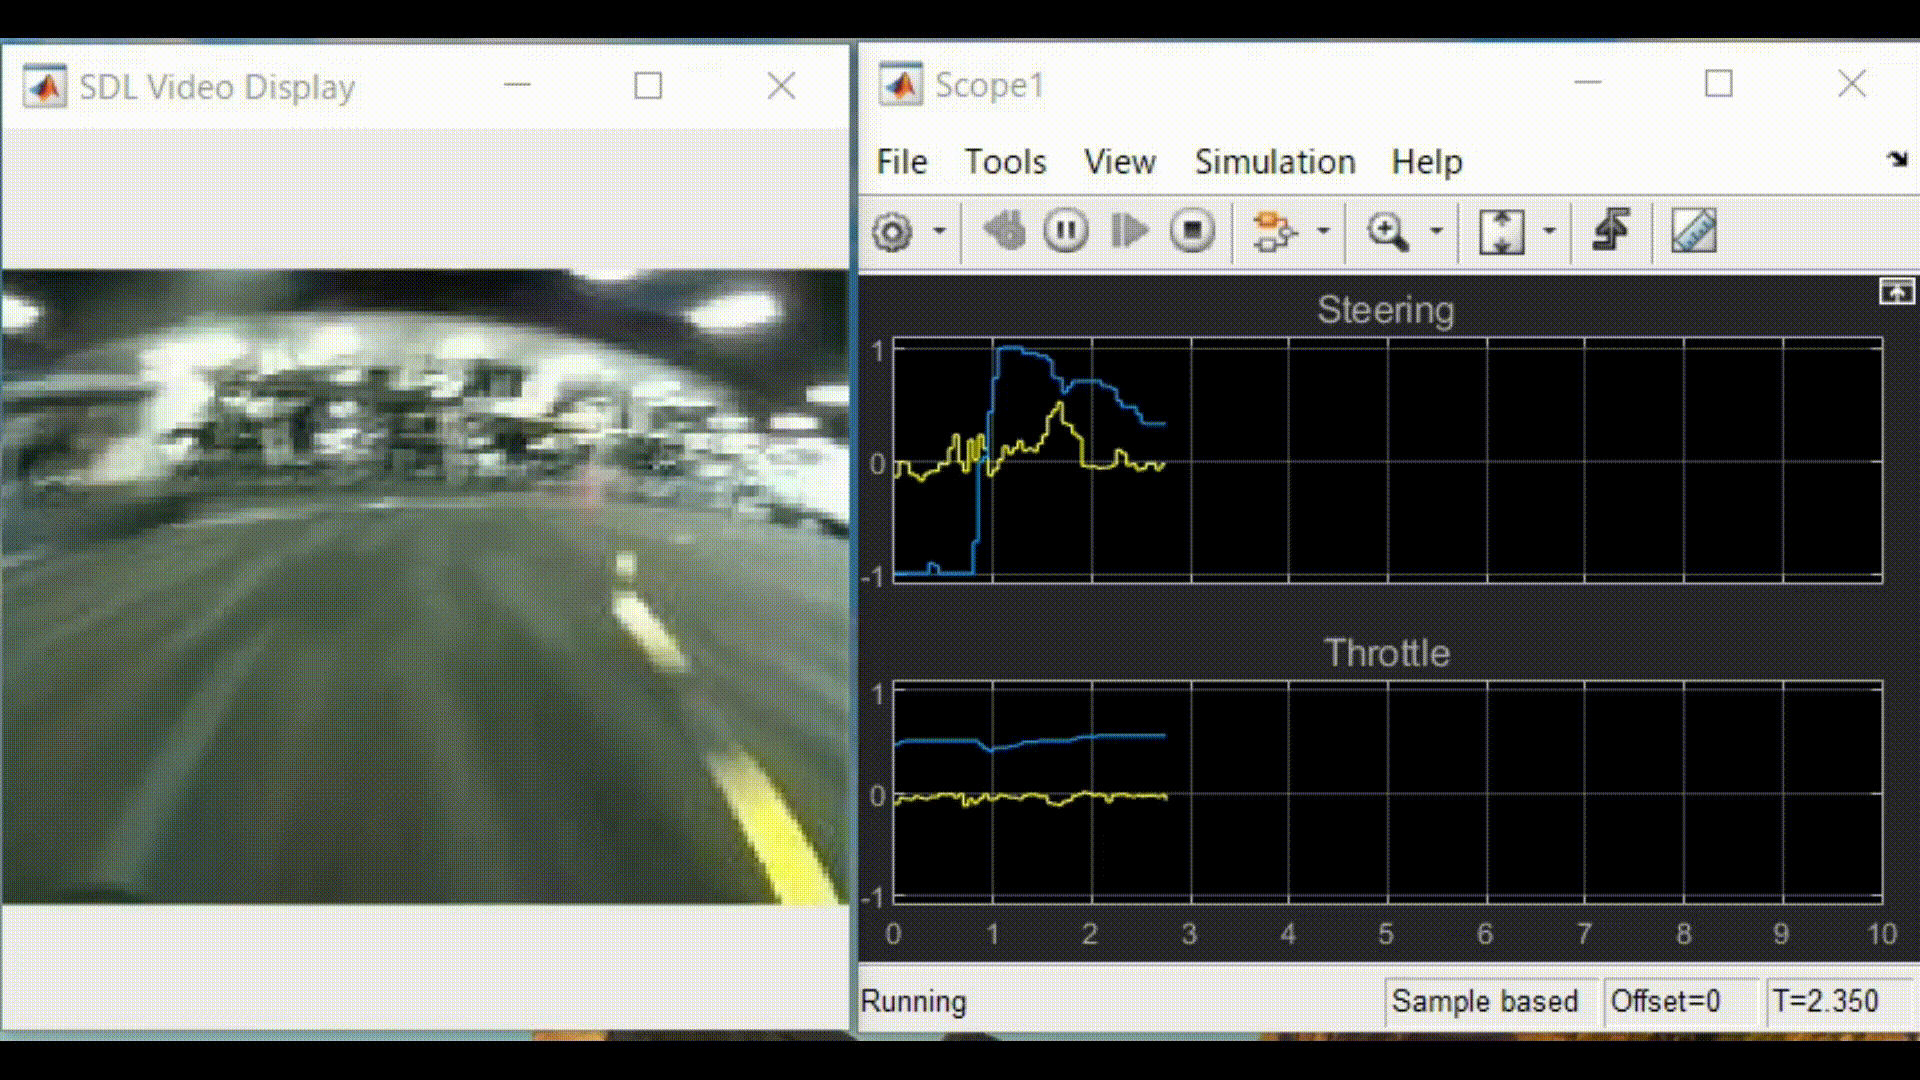
DonkeyCarの走行データをSimulinkでリプレイしてみました。
次回は、DonkeyCarのデープラーニングモデルをRaspberry Piに実装する方法をまとめてみたいと思います。