はじめに
LINEのMessaging APIを使うことで、テキストや画像、動画など様々な種類のメッセージを送ることができます。
しかし、一つのメッセージに盛り込むことができるのは1種類だけです。
(画像とテキストの複合などができない。)
Flex Messageを使うことで送信するメッセージの内容を自由にカスタムすることができます。
その方法についてまとめていきます。
Flex Messageとは
Flex Messageはコンテナ、ブロック、コンポーネントの3つからなる階層構造で構成されています。
最小単位はコンポーネントです。
これがFlex Messageの表示内容になります。
コンポーネントにはテキストや画像、動画のほかボタンなども指定できます。
これらのコンポーネントをひとまとまりにしたものをブロックと呼びます。
ブロックには、ヘッダー、ヒーロー、ボディ、フッターの4種類があります。
すべてを使う必要はありませんが、指定できるのはそれぞれ1つずつです。
そしてブロックをひとまとまりにしたものをコンテナと呼びます。
コンテナにはバブル、カルーセルの2種類があり、単一のコンテナがバブル、複数のコンテナを並列にならべたものがカルーセルです。
様々なコンポーネントを組み合わせ、適切なブロックに配置することで、リッチなメッセージを配信することができます。
Flex Messageの実装
概要
Flex Messageを試しに送信してみます。
Flex Messageは通常のテキストメッセージと基本的な送信方法は変わりません。
そのため、応答メッセージとして設定することもできますし、プッシュメッセージやマルチキャストメッセージのように任意のタイミングで送信するメッセージとしても設定できます。
Messaging APIを使用したメッセージ送信のための環境構築は以下の記事を参考にしてください。
基本の実装
先にソースコードの全文を載せておきます。
ポイントになるのは
app.get("/basic-flex"...の部分からです。
// モジュールのインポート
// モジュールのインポート
const https = require("https");
const express = require("express");
const fs = require("fs");

// 環境変数の取得
// ポート番号
const PORT = process.env.PORT || 3000;
// Messaging APIを呼び出すためのトークン
const TOKEN = process.env.LINE_ACCESS_TOKEN;

const HEADERS = {
  "Content-Type": "application/json",
  Authorization: "Bearer " + TOKEN,
};

const HOSTNAME = "api.line.me";

// Expressアプリケーションオブジェクトの生成
const app = express();

// ミドルウェアの設定
app.use(express.json());
app.use(express.urlencoded({ extended: true }));

// ルーティングの設定-ドメインのルート
app.get("/", (_, res) => {
  res.sendStatus(200);
});

//ルーティングの設定-MessaginAPI
app.post("/webhook", (req, res) => {
  res.send("HTTP POST request sent to the webhook URL!");
  let messages = [];
  switch (req.body.events[0].type) {
    case "follow":
      messages.push({ type: "text", text: "Nice to meet you!" });
      const userData = {
        userId: req.body.events[0].source.userId,
      };
      fs.writeFileSync("./user_data.json", JSON.stringify(userData));
  }
});

app.get("/basic-flex", (req, res) => {
  res.send("Flex request sent to the webhook URL!");
  // headerブロック
  const header = {
    type: "box",
    layout: "vertical",
    contents: [
      // コンポーネント
      { type: "text", text: "Header" },
    ],
  };

  // heroブロック
  const hero = {
    type: "box",
    layout: "vertical",
    contents: [
      // コンポーネント
      { type: "text", text: "hero" },
    ],
  };

  // bodyブロック
  const body = {
    type: "box",
    layout: "vertical",
    contents: [
      // コンポーネント
      { type: "text", text: "body" },
    ],
  };

  // footerブロック
  const footer = {
    type: "box",
    layout: "vertical",
    contents: [
      // コンポーネント
      { type: "text", text: "footer" },
    ],
  };

  const messages = [
    {
      type: "flex",
      altText: "This is a flex message.",
      contents: {
        // コンテナ
        type: "bubble",
        header,
        hero,
        body,
        footer,
        styles: {
          header: {
            backgroundColor: "#FFB5C5",
          },
          hero: {
            backgroundColor: "#B5D8FF",
            separator: true,
            separatorColor: "#FFFFFF",
          },
          body: {
            backgroundColor: "#FFECB3",
            separator: true,
            separatorColor: "#FFFFFF",
          },
          footer: {
            backgroundColor: "#B8E6C0",
            separator: true,
            separatorColor: "#FFFFFF",
          },
        },
      },
    },
  ];
  pushMessage(messages);
});

// リスナーの設定
app.listen(PORT, () => {
  console.log(`Example app listening at http://localhost:${PORT}`);
});

function pushMessage(messages) {
  console.log("pushmessage called");
  const userData = JSON.parse(fs.readFileSync("./user_data.json", "utf-8"));
  const userId = userData.userId;
  const dataString = JSON.stringify({
    to: userId,
    messages: messages,
  });
  const webhookOptions = {
    hostname: HOSTNAME,
    path: "/v2/bot/message/push",
    method: "POST",
    headers: HEADERS,
    body: dataString,
  };
  const request = https.request(webhookOptions, (res) => {
    res.on("data", (d) => {
      process.stdout.write(d);
    });
  });
  request.on("error", (err) => {
    console.error(err);
  });

  request.write(dataString);
  console.log("pushmessage done");
  request.end();
}
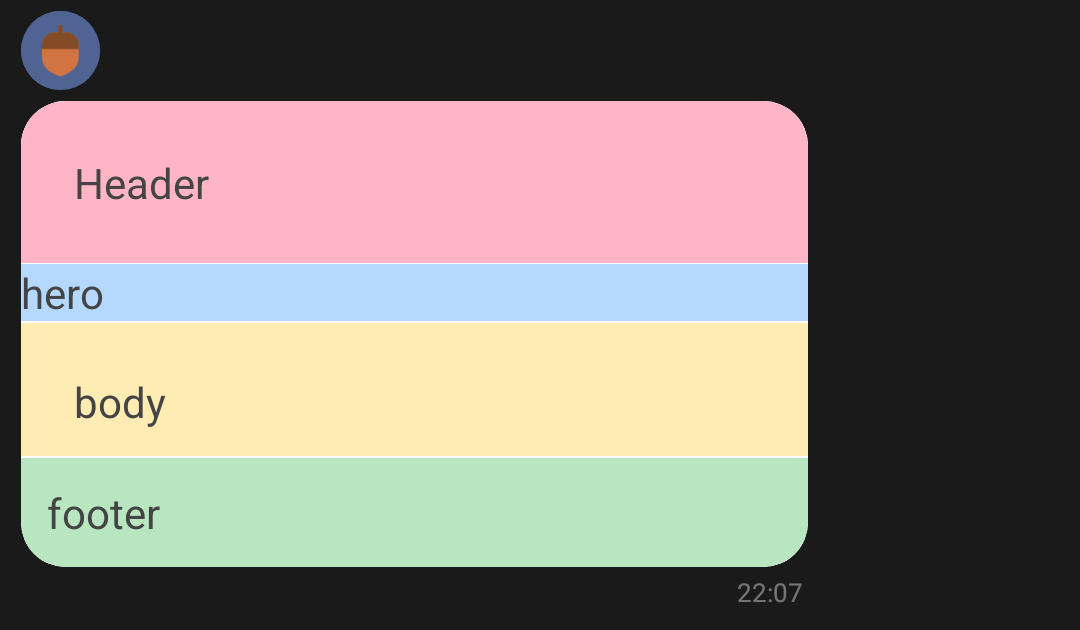
このソースコードで送信されるのは以下のようなメッセージです。

ソースコードについて、個別に解説していきます。
コンテナの定義
contents内がコンテナの定義になります。
  const messages = [
    {
      type: "flex",
      altText: "This is a flex message.",
      contents: {
        // コンテナ
        type: "bubble",
        header,
        hero,
        body,
        footer,
        styles: {
          header: {
            backgroundColor: "#FFB5C5",
          },
          hero: {
            backgroundColor: "#B5D8FF",
            separator: true,
            separatorColor: "#FFFFFF",
          },
          body: {
            backgroundColor: "#FFECB3",
            separator: true,
            separatorColor: "#FFFFFF",
          },
          footer: {
            backgroundColor: "#B8E6C0",
            separator: true,
            separatorColor: "#FFFFFF",
          },
        },
      },
    },
  ];
type
コンテナのタイプを指定します。bubbleかcarouselから選びます。
header、hero、body、footer
各ブロックの内容を設定します。
すべてを指定する必要はないので、いずれか1つだけを指定する事もできます。
styles
各ブロックのスタイルを定義することができます。
スタイルを定義したいブロック名を指定し、backgroundColor、separator、separatorColorの3つのプロパティを設定します。
backgroundColorは背景色、separatorは区切線の指定ができます。
他にはコンテナのパラメータとして、sizeや、action、directionがあります。
Flex Messageは全般的に細かいカスタマイズが可能になっているため、パラメータの数も多くなっています。
詳細はこちらの公式サイトを確認してください。
ブロック、コンポーネントの定義
  // headerブロック
  const header = {
    type: "box",
    layout: "vertical",
    contents: [
      // コンポーネント
      { type: "text", text: "Header" },
    ],
  };
ブロック名:コンポーネントの形で定義します。
各typeごとに設定できるプロパティが異なります。
基本的にすべてのブロックはtype:"box"のコンポーネントをはじめに定義します。
唯一、heroブロックが例外で、type:"image"、type:"video"のコンポーネントを定義することができます。
  hero: {
    type: "video",
    url: "https://example.com/video.mp4",
    previewUrl: "https://example.com/video_preview.jpg",
    altContent: {
      type: "image",
      size: "full",
      aspectRatio: "20:13",
      aspectMode: "cover",
      url: "https://example.com/image.jpg"
    },
    aspectRatio: "20:13"
  }
boxコンポーネントがすべてのコンポーネントの基礎となっています。
boxコンポーネントは様々なレイアウトをプロパティとして指定できるため、このコンポーネントをベースとして、contentsプロパティにテキストや動画などのコンポーネントを付け加えていきます。
まとめ
Flex Messageの基本のキについて解説しました。
本来はここから、それぞれのプロパティの詳細な設定方法について触れていきたいのですが、膨大になってしまうので、今回はここまでとします。
レイアウト次第でわざわざLIFFアプリを作らずとも、Flex Messageだけでも簡潔できそうなアクションが色々ありそうなので、次はもっと実践的な内容を紹介してみたいと思います。