はじめに
前回の記事【Swift4】Realm+Codableを使ったお手軽なDB Part.1(モデル編)の続きです。
今回はネスト化されたJSONのパースや、Realmのリレーションについてまとめたいと思います。
使用するデータ
モデル図
今回は以下のようなモデルを使用します。
(この図はCoreDataですが、わかりやすいので図だけ使いました😅)
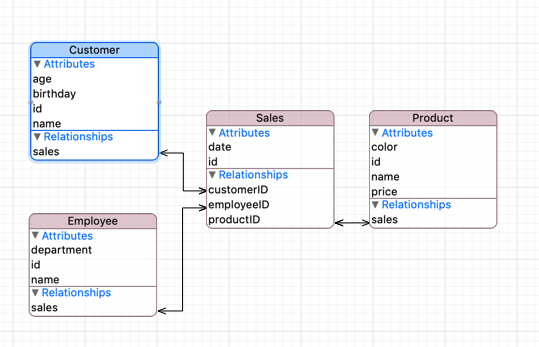
Sales(販売履歴)テーブルを中心に、Customer(客)、Employee(販売員)、Product(商品)へのリレーションを含んでいます。Salesの1レコードに対して、Productは複数含まれているような関係です。
JSONデータ
Customer->SalesとネストされたJSON、EmployeeテーブルのJSON、ProductテーブルのJSON3つに分かれています。
[
        {
        "id": 553,
        "name": "hogehoge",
        "birthday": "1999-01-02T10:45:22+09:00",
        "age": 19,
        "sales":[
            {
                "id": 100,
                "date": "2018-01-02T10:45:22+09:00",
                "product_id": [200],
                "employee_id": 300
            },
            {
                "id": 101,
                "date": "2018-01-04T10:45:22+09:00",
                "product_id": [201],
                "employee_id": 300
            }
        ]
    },
    {
        "id": 554,
        "name": "hoge",
        "birthday": "1980-01-02T10:45:22+09:00",
        "age": 38,
        "sales":[
            {
                "id": 102,
                "date": "2018-01-03T10:45:22+09:00",
                "product_id": [200,201],
                "employee_id": 301
            }
        ]
    }
]
[
    {
        "id": 200,
        "name": "notebook",
        "color": "black",
        "price": 200
    },
    {
        "id": 201,
        "name": "notebook",
        "color": "red",
        "price": 250
    }
]
[
    {
        "id": 300,
        "name": "sato",
        "department": "develop"
    },
    {
        "id": 301,
        "name": "yamada",
        "department": "develop"
    }
]
Realmへの取り込み
クラス定義
今回はネスト化されたJSONに含まれている、CustomerテーブルとSalesテーブルについて説明します。
class Customer: Object, Decodable {
	@objc dynamic var id: Int = 0
	@objc dynamic var name: String = ""
	@objc dynamic var birthday: Date = Date()
	@objc dynamic var age: Int = 0

	var sales = List<Sales>()

	override public static func primaryKey() -> String? {
		return "id"
	}

	private enum CodingKeys: String, CodingKey {
		case id
		case name
		case birthday
		case age
		case sales
	}
	required convenience public init(from decoder: Decoder) throws {
		self.init()
		let container = try decoder.container(keyedBy: CodingKeys.self)

		id = try container.decode(Int.self, forKey: .id)
		name = try container.decode(String.self, forKey: .name)
		age = try container.decode(Int.self, forKey: .age)

		let dateFormatter = DateFormatter()
		dateFormatter.locale = Locale(identifier: "en_US_POSIX")
		dateFormatter.dateFormat = "yyyy-MM-dd'T'HH:mm:ssZZZZZ"
		let birthdayStr = try container.decode(String.self, forKey: .birthday)
		birthday = dateFormatter.date(from: birthdayStr)!

		let salesArray = try container.decode([Sales].self, forKey: .sales)
		sales = salesArray.reduce(List<Sales>()) {$0.append($1); return $0}
	}
}
まずはJSONで親になっている、Customerクラスからです。
必要な変数、プライマリーキー、CodingKeyなどは前回の記事と同じです。
新たに追加したのが、
var sales = List<Sales>()
この部分です。Customerは複数のSalesを持っているために、List型で定義しています。
Codableでパースを行うため、一度Array型の変数として読み込みを行ったあと、Realmに取り込むためにListに変換を行っているのがポイントです。
class Sales: Object, Decodable {
	@objc dynamic var id: Int = 0
	@objc dynamic var date: Date = Date()
	var productID = List<IntObject>()
	@objc dynamic var employeeID: Int = 0

	@objc dynamic var employee: Employee?
	var products = List<Product>()

	let customer = LinkingObjects(fromType: Customer.self, property: "sales")

	override public static func primaryKey() -> String? {
		return "id"
	}

	private enum CodingKeys: String, CodingKey {
		case id
		case date
		case productID = "product_id"
		case employeeID = "employee_id"
	}

	required convenience public init(from decoder: Decoder) throws {
		self.init()
		let container = try decoder.container(keyedBy: CodingKeys.self)

		id = try container.decode(Int.self, forKey: .id)
		employeeID = try container.decode(Int.self, forKey: .employeeID)
		let productIDArray = try container.decode([Int].self, forKey: .productID)
		productID = productIDArray.reduce(List<IntObject>()) {$0.append(IntObject(value: $1)); return $0}

		let dateFormatter = DateFormatter()
		dateFormatter.locale = Locale(identifier: "en_US_POSIX")
		dateFormatter.dateFormat = "yyyy-MM-dd'T'HH:mm:ssZZZZZ"
		let dateStr = try container.decode(String.self, forKey: .date)
		date = dateFormatter.date(from: dateStr)!
	}
}
次に、Salesクラスです。このクラスで新たに追加したのは、
var productID = List<IntObject>()
@objc dynamic var employee: Employee?
var products = List<Product>()
let customer = LinkingObjects(fromType: Customer.self, property: "sales")
productIDですが、Realmには通常の配列を代入出来ないので、IntObjectというテーブルを別に作っています。(コードはしたにリンクを載せてあります)
Employeeは1対多なので、Employee型のオプショナル変数として宣言します。
Productは複数持っているので、先ほどと同様にList型で宣言します。
最後に、LinkingObjectですが、この宣言をしておくことで、Customer->Salesにリレーションを張った段階で自動的にSales->Customerという逆のリレーションを張ってくれます。(便利!!)
また、他クラスも同様にモデルを作成し、Codable準拠を行います。
https://gist.github.com/cottpan/e2d83e9f3430e5ccb47ce390fdab7adc
取り込み
let realm = try! Realm()

let customer_str =
let customer_data = customer_str.data(using: .utf8)!
let customer_obj = try! JSONDecoder().decode([Customer].self, from: customer_data)

let product_str =
let product_data = product_str.data(using: .utf8)!
let product_obj = try! JSONDecoder().decode([Product].self, from: product_data)

let employee_str =
let employee_data = employee_str.data(using: .utf8)!
let employee_obj = try! JSONDecoder().decode([Employee].self, from: employee_data)

try! realm.write {
	realm.add(customer_obj, update: true)
	realm.add(product_obj, update: true)
	realm.add(employee_obj, update: true)
}
上記のように、3つのJSONファイルをそのテーブルのクラスのオブジェクトに変換します。あとは、Realmに書き込むだけです。(書き込みはwriteブロックで囲む必要があります)
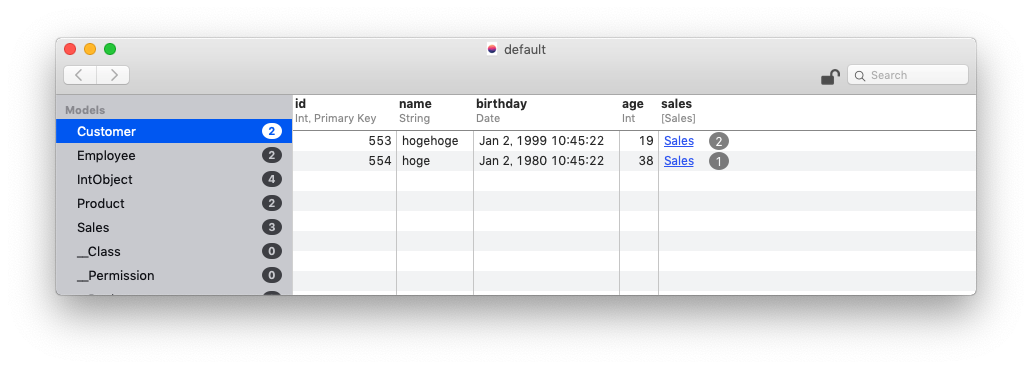
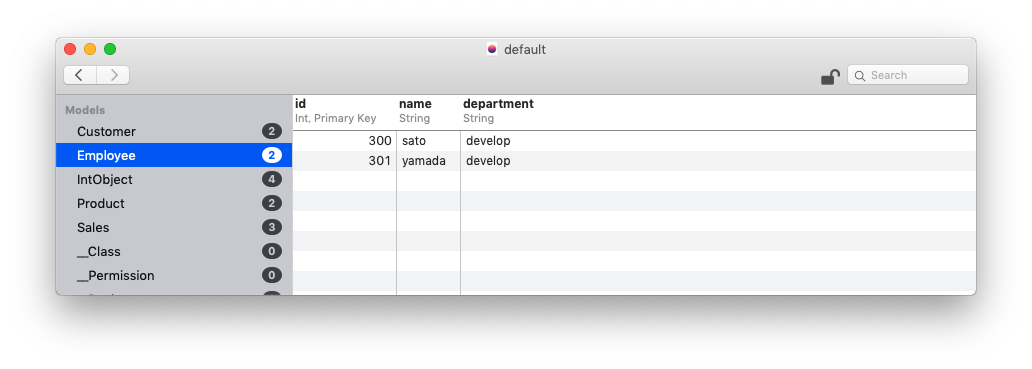
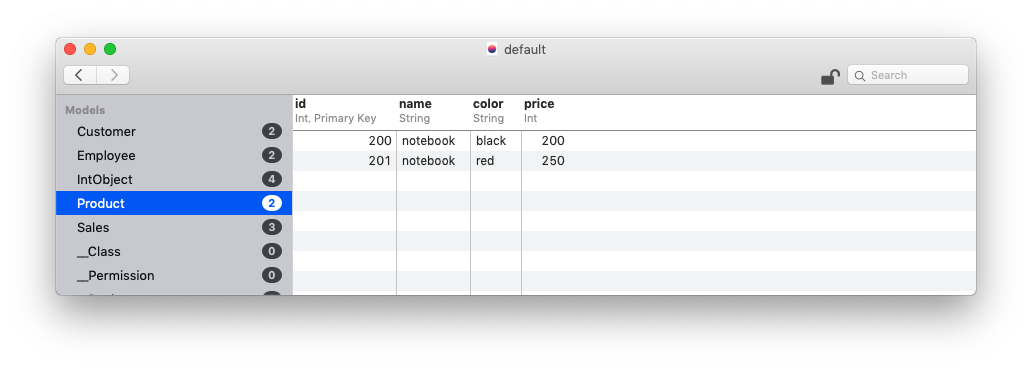
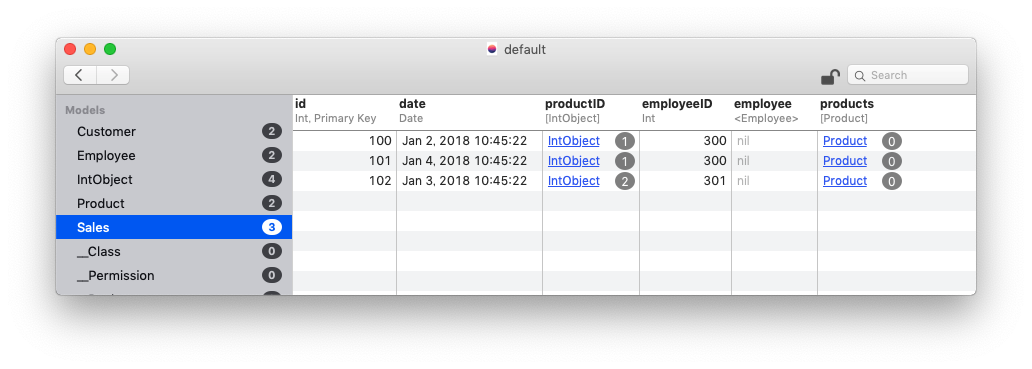
画像のように、Customer->Salesのリレーションと、各テーブルにデータが追加できているのが確認できます。
しかし、最後のSalesテーブルからEmployeeとProductテーブルへのリレーションが貼れていません🙃
リレーション
let sales = realm.objects(Sales.self)
try! realm.write {
	for elem in sales {
		elem.employee = realm.object(ofType: Employee.self, forPrimaryKey: elem.employeeID)
		let productIDs: [Int] = elem.productID.map{$0.value}
		let productArray = realm.objects(Product.self).filter(NSPredicate("id", valuesIn: productIDs as [AnyObject]))
		productArray.forEach{elem.products.append($0)}
	}
}
リレーションを貼るために、上記のようなコードを追加します。
まず、先程追加したSalesテーブルの内容を取得します。各レコードに対して、
-
employeeにemployeeIDを元に取得したEmployeeオブジェクトを設定 -
productIDのIntObjectをArrayに変換 -
productIDを元に取得したProductオブジェクトをListにappend
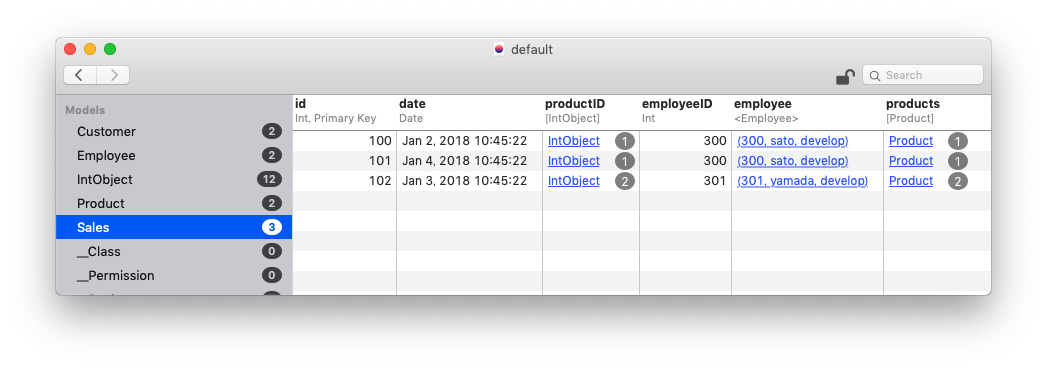
Sales->EmployeeとSales->Productsのリレーションも作成することが出来ました!😀
さいごに
前回と今回の内容を組み合わせることで、どんなデータも取り込めるようになると思います。
説明しきれないところもあったと思うので、コメント、質問お待ちしています🎃
続編書きました!
【Swift4】Realm+Codableを使ったお手軽なDB Part.3(クエリ編)
【Swift4】Realm+Codableを使ったお手軽なDB Part.4(番外編)
株式会社Nexceed にて、一緒に働いてくれる仲間を募集中です![]()
![]()
![]()