はじめに
こんにちは。cosumi77と申します。Qiita初投稿です。
普段はド田舎でSEとしてvb.netの開発に従事しておりますが、PythonやAIについてはつい最近まで「なにそれ?美味しいの?」状態でした。
本記事は、そんな私がナウい(笑)言語を駆使して課題に取り組みましたので、それを紹介するものとなります。
「こんなクソ記事をネット上に公開して誰が一体読むのか…?」という気持ちを抑えつつ、アウトプットの練習として公開いたします。
記載内容に誤り等ありましたら、ご指摘いただけると大変ありがたいです。
どうぞ宜しくお願い致します。
目次
1.実行環境
2.本記事の目的
3.前提となる問題意識
4.モデルの概要
5.目的に至るまでの道のり
6.やってみた
7.次のステップ
8.Appendix
9.振り返り
10.参考文献
1. 実行環境
Windows11 22H2
Visual Studio Code
Python 3.10.4
matplotlib 3.5.2
numpy 1.22.4
keras 2.9.0
tensorflow 2.9.1
2. 本記事の目的
任意の長さのの整数(例:123456789、98765、12 等)の画像を「シーケンス認識によるAI-OCRモデル(OCR model for reading Captchas)」を用いて読み取り、データとして吐き出す。
3. 前提となる問題意識
私は、主に客先などで伝票を見る機会が多いです。
伝票は紙またはpdf形式で受け渡しがされており、受け取った伝票を見ながら別のシステムへチマチマと転記するようなシーンが多く見られます。
そこで、「もしこれをAIで読み取り、データとして起こせると飯の種作業効率化になるよな~…」と思いました。
まずは第一ステップとして、手書きの数値を学習させて、どの程度読み取れるものなのかをやってみたいと思います。
4. モデルの概要
文字データを認識するためのアルゴリズムはいろいろあるようですが、ここではCRNN(CNN + RNN)とCTC損失関数を使ったシーケンス認識(Sequence Recognition)を用いています。
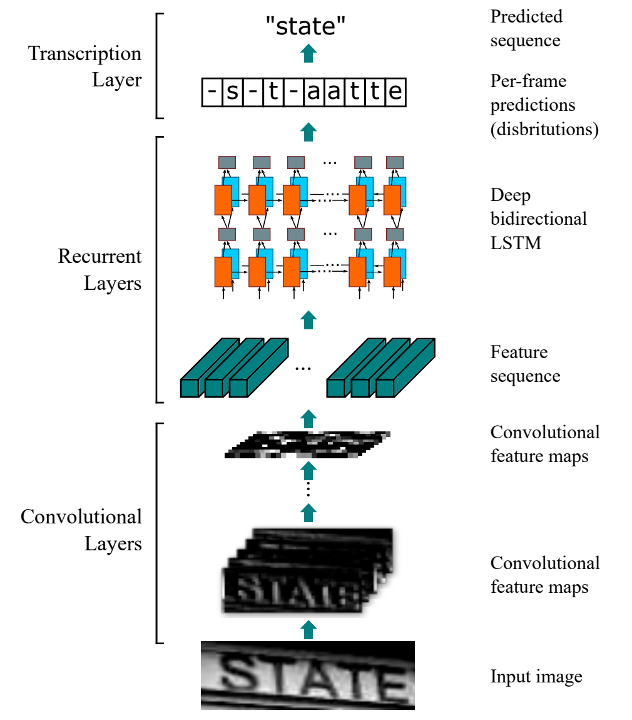
出典: https://arxiv.org/abs/1507.05717
CNNとは「畳み込みニューラルネットワーク」とも呼ばれ、人間の脳の視覚野と似た構造を持つ 「畳み込み層」 という層を使って特徴抽出を行うニューラルネットワークです。主に画像認識の分野で高い性能を発揮します。
このモデルでは、画像内の各数字を識別して画像データ列としてRNNへ渡す役割を担っています。
RNNとは「回帰型ニューラルネットワーク」などとも呼ばれ、数値の時系列データなどのシーケンスデータのパターンを認識するように設計されたニューラルネットワークのモデルです。
このモデルでは、CNNから渡された画像データ列から推定される文字列の算出を行います。
CTC損失関数はRNNの出力および正解データで最適化を行います。
5. 目的に至るまでの道のり
- MNISTから手書き文字を取得し数字のみを抜き取った後でランダムな画像数字列を生成
- シーケンス認識によるAI-OCR(文字認識)モデルを用いた学習
- テストデータによる検証
6. やってみた!
1. MNISTから手書き文字を取得し、ランダムな画像数字列を生成
ポイント
- MNISTから最大10個の画像データをランダムに結合して学習データを作成します
- 生成する画像のサイズを統一するために適宜余白を埋め込んでいます
- 最終目的は「伝票に記載された数値を読み取る事」なので、白黒を反転しています
- 生成した画像のファイル名には、画像に記された数字列をセットします
ただし、ランダムに数値を生成した場合、値が重複するとファイル名も被ってしまうため、これらを識別できるように「(数値)_(識別番号).png」のようなファイル名にしました
#実行前に実行フォルダ直下にcreate_imagesフォルダを作成してください

#各種インポート
import matplotlib.pyplot as plt
import numpy as np
import random
import cv2
import os
import re
import glob

from pathlib import Path
from collections import Counter
from PIL import Image

from keras.datasets import mnist
import tensorflow as tf
from tensorflow import keras
from tensorflow.keras import layers

#作成する画像数
create_data_count = 1000

#MNISTの画像サイズ
mnist_picture_width = 28
mnist_picture_height = 28

#数値列の最大桁数
str_max_length = 10

#作成した画像の保存先
source_path = "./create_images/"
data_dir = Path(source_path)

#余白画像
img_white = np.ones((mnist_picture_width,mnist_picture_height),np.uint8)*255

#################################################################
#データの準備
#################################################################

#---------------------------------------------------------
#MNISTデータの準備、および、加工
#---------------------------------------------------------
(mnist_images, mnist_labels)= mnist.load_data()[0]

#学習データの内、0以外のインデックスを取得
not_zero_index = (np.where(mnist_labels!=0))[0]

#データセットの色の反転
mnist_images = 255 - mnist_images

#---------------------------------------------------------
#MNISTから数字を取得し、最大10桁の画像データを生成
#---------------------------------------------------------
def create_images(mnist_images, mnist_labels, not_zero_index):

    for j in range(0,create_data_count):

        #1から最大桁数の範囲で乱数を生成
        digit_count = random.randint(1, str_max_length)
        label_name = ''

        #画像を結合して任意の数値列を作り出す
        for i in range(0,digit_count):

            if i == 0:
                #MNISTデータを任意に取り出すための乱数(先頭の数値は0以外で)
                choise_not_zero = random.randint(0, len(not_zero_index)-1)
                #初期画像をセット
                img = mnist_images[not_zero_index[choise_not_zero]]
                #ラベル情報をセット
                label_name = str(mnist_labels[not_zero_index[choise_not_zero]])
            else:
                #MNISTデータを任意に取り出すための乱数
                choise_image_index = random.randint(0, mnist_images.shape[0]-1)
                #画像を横に結合
                img = cv2.hconcat([img,mnist_images[choise_image_index]])
                #ラベル情報をセット
                label_name += str(mnist_labels[choise_image_index])

        #余白の挿入
        for k in range(digit_count,str_max_length):
                img = cv2.hconcat([img,img_white])

        #画像データを保存
        cv2.imwrite(source_path + label_name + '_' + str(j) +'.png', img)   #数値列の重複を避けるために末尾に識別子を付与

#学習データ、検証データの生成
create_images(mnist_images, mnist_labels, not_zero_index)
結果、以下のような画像が生成されます。
790467491_880.png

1_462.png

1334361586_422.png

7792_97.png

2. シーケンス認識によるAI-OCR(文字認識)モデルを用いた学習
このあたりは先程ご紹介した以下のページをほとんどパクり流用しながら、少しだけ変えて利用しました。元のコードから変更した箇所を中心にコメントを付しています。
#---------------------------------------------------------
#データ準備
#---------------------------------------------------------

# Get list of all the images
images = sorted(list(map(str, list(data_dir.glob("*.png")))))

#ファイル名の末尾の識別子を除去し、ラベルとして取得
# 【変更後】
labels = [re.split("_[0-9]*.png",img.split(os.path.sep)[-1])[0] for img in images]
# 【変更前】
# labels = [img.split(os.path.sep)[-1].split(".png")[0] for img in images]

# 空白を表す文字sを右に追加する(サンプルコードは固定文字数だが今回のケースは文字数が変動する)
labels = [label.ljust(str_max_length, "s") for label in labels]

characters = set(char for label in labels for char in label)
characters = sorted(list(characters))

print("Number of images found: ", len(images))
print("Number of labels found: ", len(labels))
print(labels[0])
print("Number of unique characters: ", len(characters))
print("Characters present: ", characters)

# Batch size for training and validation
batch_size = 16

# Desired image dimensions
#生成した画像データのサイズを指定
#【変更後】
img_width = mnist_picture_width * 10
img_height = mnist_picture_height
#【変更前】
#img_width = 200
#img_height = 50

# Factor by which the image is going to be downsampled
# by the convolutional blocks. We will be using two
# convolution blocks and each block will have
# a pooling layer which downsample the features by a factor of 2.
# Hence total downsampling factor would be 4.
downsample_factor = 4

# Maximum length of any captcha in the dataset
max_length = max([len(label) for label in labels])

#---------------------------------------------------------
#データ加工
#---------------------------------------------------------
# Mapping characters to integers
char_to_num = layers.StringLookup(
    vocabulary=list(characters), mask_token=None
)

# Mapping integers back to original characters
num_to_char = layers.StringLookup(
    vocabulary=char_to_num.get_vocabulary(), mask_token=None, invert=True
)

def split_data(images, labels, train_size=0.9, shuffle=True):
    # 1. Get the total size of the dataset
    size = len(images)
    # 2. Make an indices array and shuffle it, if required
    indices = np.arange(size)
    if shuffle:
        np.random.shuffle(indices)
    # 3. Get the size of training samples
    train_samples = int(size * train_size)
    # 4. Split data into training and validation sets
    x_train, y_train = images[indices[:train_samples]], labels[indices[:train_samples]]
    x_valid, y_valid = images[indices[train_samples:]], labels[indices[train_samples:]]
    return x_train, x_valid, y_train, y_valid

# Splitting data into training and validation sets
x_train, x_valid, y_train, y_valid = split_data(np.array(images), np.array(labels))

def encode_single_sample(img_path, label):
    # 1. Read image
    img = tf.io.read_file(img_path)
    # 2. Decode and convert to grayscale
    img = tf.io.decode_png(img, channels=1)
    # 3. Convert to float32 in [0, 1] range
    img = tf.image.convert_image_dtype(img, tf.float32)
    # 4. Resize to the desired size
    img = tf.image.resize(img, [img_height, img_width])
    # 5. Transpose the image because we want the time
    # dimension to correspond to the width of the image.
    img = tf.transpose(img, perm=[1, 0, 2])
    # 6. Map the characters in label to numbers
    label = char_to_num(tf.strings.unicode_split(label, input_encoding="UTF-8"))
    # 7. Return a dict as our model is expecting two inputs
    return {"image": img, "label": label}

#---------------------------------------------------------
#TensorFlowデータセットを生成
#---------------------------------------------------------
train_dataset = tf.data.Dataset.from_tensor_slices((x_train, y_train))
train_dataset = (
    train_dataset.map(
        encode_single_sample, num_parallel_calls=tf.data.AUTOTUNE
    )
    .batch(batch_size)
    .prefetch(buffer_size=tf.data.AUTOTUNE)
)

validation_dataset = tf.data.Dataset.from_tensor_slices((x_valid, y_valid))
validation_dataset = (
    validation_dataset.map(
        encode_single_sample, num_parallel_calls=tf.data.AUTOTUNE
    )
    .batch(batch_size)
    .prefetch(buffer_size=tf.data.AUTOTUNE)
)

#---------------------------------------------------------
#今回使用するモデル
#---------------------------------------------------------
class CTCLayer(layers.Layer):

    def __init__(self, name=None):
        super().__init__(name=name)
        self.loss_fn = keras.backend.ctc_batch_cost

    def call(self, y_true, y_pred):
        # Compute the training-time loss value and add it
        # to the layer using `self.add_loss()`.
        batch_len = tf.cast(tf.shape(y_true)[0], dtype="int64")
        input_length = tf.cast(tf.shape(y_pred)[1], dtype="int64")
        label_length = tf.cast(tf.shape(y_true)[1], dtype="int64")

        input_length = input_length * tf.ones(shape=(batch_len, 1), dtype="int64")
        label_length = label_length * tf.ones(shape=(batch_len, 1), dtype="int64")

        loss = self.loss_fn(y_true, y_pred, input_length, label_length)
        self.add_loss(loss)

        # At test time, just return the computed predictions
        return y_pred

def build_model():
    # Inputs to the model
    input_img = layers.Input(
        shape=(img_width, img_height, 1), name="image", dtype="float32"
    )
    labels = layers.Input(name="label", shape=(None,), dtype="float32")

    # First conv block
    x = layers.Conv2D(
        32,
        (3, 3),
        activation="relu",
        kernel_initializer="he_normal",
        padding="same",
        name="Conv1",
    )(input_img)
    x = layers.MaxPooling2D((2, 2), name="pool1")(x)

    # Second conv block
    x = layers.Conv2D(
        64,
        (3, 3),
        activation="relu",
        kernel_initializer="he_normal",
        padding="same",
        name="Conv2",
    )(x)
    x = layers.MaxPooling2D((2, 2), name="pool2")(x)

    # We have used two max pool with pool size and strides 2.
    # Hence, downsampled feature maps are 4x smaller. The number of
    # filters in the last layer is 64. Reshape accordingly before
    # passing the output to the RNN part of the model
    new_shape = ((img_width // 4), (img_height // 4) * 64)
    x = layers.Reshape(target_shape=new_shape, name="reshape")(x)
    x = layers.Dense(64, activation="relu", name="dense1")(x)
    x = layers.Dropout(0.2)(x)

    # RNNs
    x = layers.Bidirectional(layers.LSTM(128, return_sequences=True, dropout=0.25))(x)
    x = layers.Bidirectional(layers.LSTM(64, return_sequences=True, dropout=0.25))(x)

    # Output layer
    x = layers.Dense(
        len(char_to_num.get_vocabulary()) + 1, activation="softmax", name="dense2"
    )(x)

    # Add CTC layer for calculating CTC loss at each step
    output = CTCLayer(name="ctc_loss")(labels, x)

    # Define the model
    model = keras.models.Model(
        inputs=[input_img, labels], outputs=output, name="ocr_model_v1"
    )
    # Optimizer
    opt = keras.optimizers.Adam()
    # Compile the model and return
    model.compile(optimizer=opt)
    return model

# Get the model
model = build_model()
model.summary()

#---------------------------------------------------------
#モデルの学習
#---------------------------------------------------------
epochs = 100
early_stopping_patience = 10
# Add early stopping
early_stopping = keras.callbacks.EarlyStopping(
    monitor="val_loss", patience=early_stopping_patience, restore_best_weights=True
)

# Train the model
history = model.fit(
    train_dataset,
    validation_data=validation_dataset,
    epochs=epochs,
    callbacks=[early_stopping],
)
後で呼び出せるようにモデルを保存しておきます。
#---------------------------------------------------------
#モデルの保存
#---------------------------------------------------------

# モデル全体を SavedModel として保存
model.save('saved_model/my_model')
3. 精度の検証
保存したモデルでどの程度の精度が出るかを確認します。
学習データと検証データは分けずに、最初に生成したMNISTの画像をランダムに取り出して検証してみます。
※モデル学習時とは別の.pyファイルを作成しています
#-------------------------------------------
#作成済みのモデルでテストデータの精度を確認
#-------------------------------------------
import matplotlib.pyplot as plt
import numpy as np
from PIL import Image
import random
import cv2
import os
import re
import glob
from pathlib import Path
from collections import Counter
from keras.datasets import mnist
import tensorflow as tf
from tensorflow import keras
from tensorflow.keras import layers
import pickle
mnist_picture_width = 28
mnist_picture_height = 28
str_max_length = 10
img_width = mnist_picture_width * 10
img_height = mnist_picture_height
# 保存したモデルをロードする
loaded_model = tf.keras.models.load_model('saved_model/my_model')
#テストデータを取得
test_data_dir = "./create_images/"
data_dir = Path(test_data_dir)
test_images = sorted(list(map(str, list(data_dir.glob("*.png")))))
test_labels = [re.split("_[0-9]*.png",img.split(os.path.sep)[-1])[0] for img in test_images] #末尾の識別子を除去してラベルとして取得
test_labels = [label.ljust(str_max_length, "s") for label in test_labels] # 空白を表す文字sを右に追加する
#検証にあたり必要な変数をセット
batch_size = 16
max_length = max([len(label) for label in test_labels])
test_characters = set(char for label in test_labels for char in label)
test_characters = sorted(list(test_characters))
char_to_num = layers.StringLookup(
vocabulary=list(test_characters), mask_token=None
)
num_to_char = layers.StringLookup(
vocabulary=char_to_num.get_vocabulary(), mask_token=None, invert=True
)
x_test = np.array(test_images)
y_test = np.array(test_labels)
#MNISTデータをモデルが読み込めるように型変更
def encode_single_sample(img_path, label):
# 1. Read image
img = tf.io.read_file(img_path)
# 2. Decode and convert to grayscale
img = tf.io.decode_png(img, channels=1)
# 3. Convert to float32 in [0, 1] range
img = tf.image.convert_image_dtype(img, tf.float32)
# 4. Resize to the desired size
img = tf.image.resize(img, [img_height, img_width])
# 5. Transpose the image because we want the time
# dimension to correspond to the width of the image.
img = tf.transpose(img, perm=[1, 0, 2])
# 6. Map the characters in label to numbers
label = char_to_num(tf.strings.unicode_split(label, input_encoding="UTF-8"))
# 7. Return a dict as our model is expecting two inputs
return {"image": img, "label": label}
test_dataset = tf.data.Dataset.from_tensor_slices((x_test, y_test))
test_dataset = (
test_dataset.map(
encode_single_sample, num_parallel_calls=tf.data.AUTOTUNE
)
.batch(batch_size)
.prefetch(buffer_size=tf.data.AUTOTUNE)
)
#画像を入力として受け取り、出力として文字列を返す予測モデルを生成
prediction_model = keras.models.Model(
loaded_model.get_layer(name="image").input, loaded_model.get_layer(name="dense2").output
)
def decode_batch_predictions(pred):
input_len = np.ones(pred.shape[0]) * pred.shape[1]
# Use greedy search. For complex tasks, you can use beam search
results = keras.backend.ctc_decode(pred, input_length=input_len, greedy=True)[0][0][
:, :max_length
]
# Iterate over the results and get back the text
output_text = []
for res in results:
res = tf.strings.reduce_join(num_to_char(res)).numpy().decode("utf-8")
output_text.append(res)
return output_text
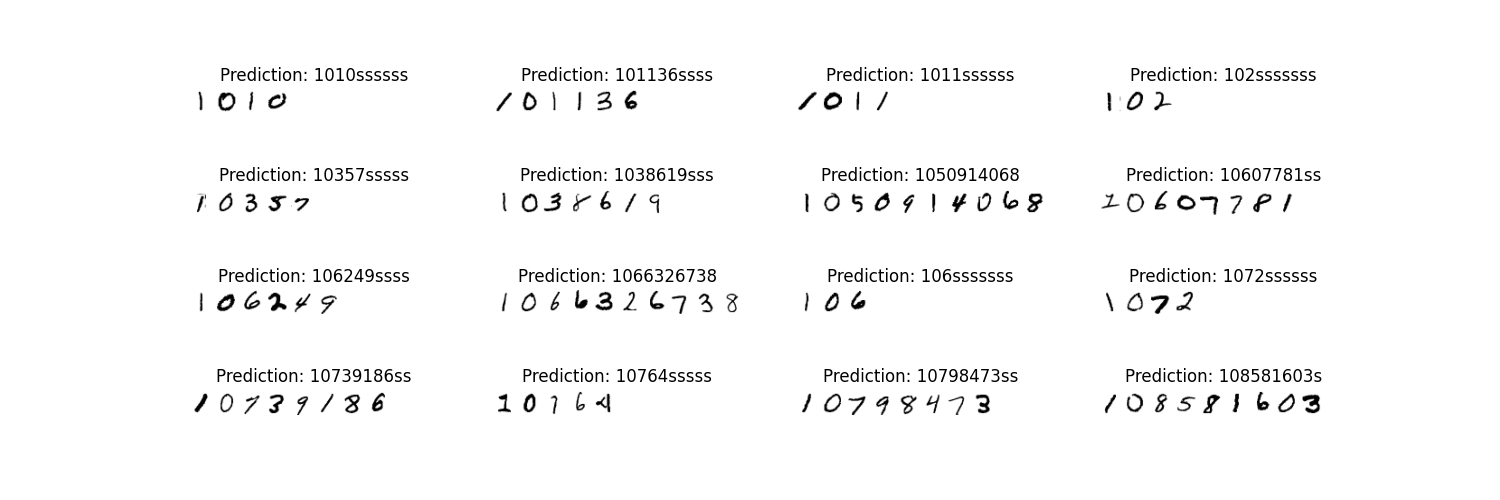
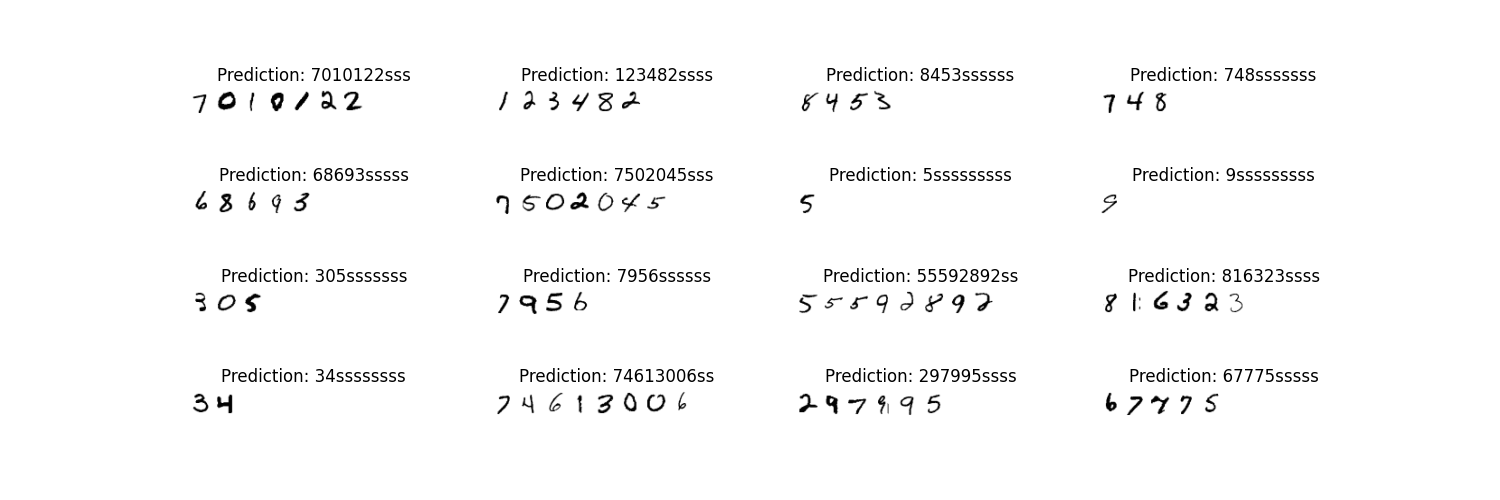
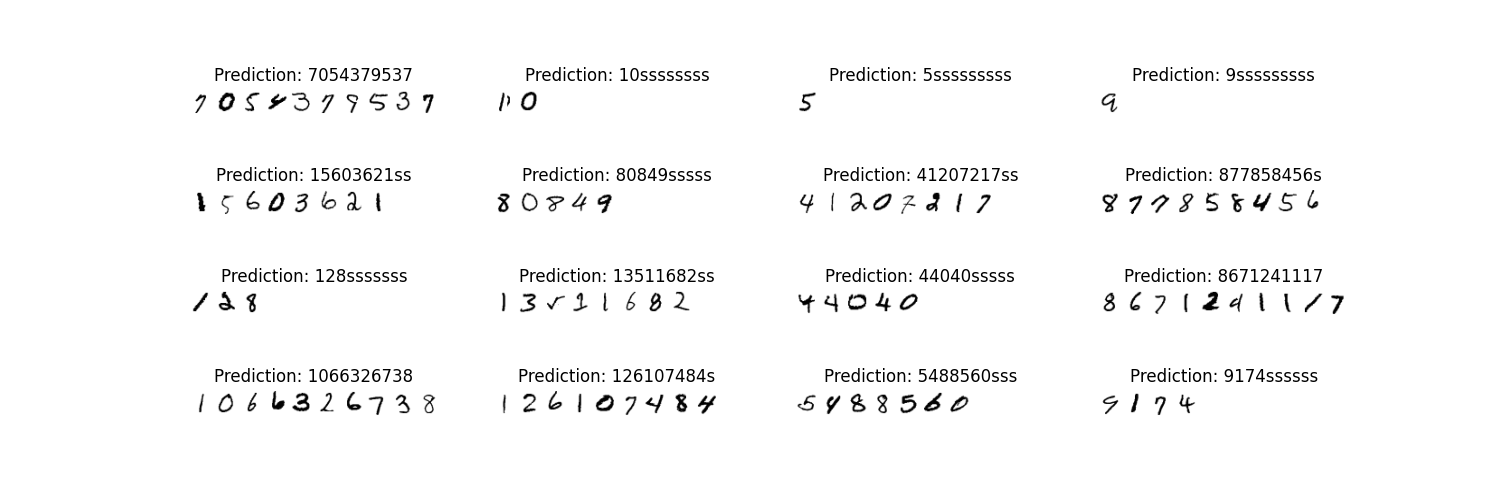
#検証結果の表示
for batch in test_dataset.take(1):
batch_images = batch["image"]
batch_labels = batch["label"]
preds = prediction_model.predict(batch_images)
pred_texts = decode_batch_predictions(preds)
orig_texts = []
for label in batch_labels:
label = tf.strings.reduce_join(num_to_char(label)).numpy().decode("utf-8")
orig_texts.append(label)
_, ax = plt.subplots(4, 4, figsize=(15, 5))
for i in range(len(pred_texts)):
img = (batch_images[i, :, :, 0] * 255).numpy().astype(np.uint8)
img = img.T
title = f"Prediction: {pred_texts[i]}"
ax[i // 4, i % 4].imshow(img, cmap="gray")
ax[i // 4, i % 4].set_title(title)
ax[i // 4, i % 4].axis("off")
plt.show()
4. 結果
3回試してみた結果はなんと全問正解。
たった1000枚程度のテストデータを与えただけなのに、凄い精度です。
7. 次のステップ
本記事の目的は達成したため、ひとまずここまでとさせて頂きますが、実際に私が目標とする「伝票を読み取ってデータを返す」を実現するまでには以下のようなステップが必要と考えています。
- 実際に読み取ろうとするデータには桁区切りのカンマがついているため、そこを考慮する必要がある
- 読み取りたい伝票は手書きだけでなく、PCで出力したものが多いので、整ったデータに対しても精度が出るようにチューニングする必要がある
- 伝票のどの部分にどの数値があるかを指定して読み取らせる
8. Appendix
上記でも触れていますが、実際に読み取りたい画像データはPCで出力したものを想定しています。
この記事の目的とは逸れますが、その画像データを生成するプログラムを付録として置いておきます。
from PIL import Image, ImageDraw, ImageFont
import random

#テストデータの格納先
output_folder_path = "./test_data/"
#数値列の最大桁数
str_max_length = 10
#MNISTを用いて生成した画像のサイズ
mnist_picture_width = 28 * str_max_length
mnist_picture_height = 28
#作成するテストデータ数
test_data_count = 100

# PCローカルのフォントへのパスと、フォントサイズを指定
font = ImageFont.truetype('C:/Windows/Fonts/meiryob.ttc', 24)

#任意な数値列の長さを取得
def random_length():
    return random.randint(1, str_max_length)

#ランダムに数字を取得
def random_number(need_not_zero =False):
    return random.randint(1, 9) if need_not_zero else random.randint(0, 9)

def create_random_value():

    return_value = ''                    #(カンマを含む)数字文字列
    value_length = random_length()      #数値列の長さを任意に指定

    for j in range(0,value_length):
        return_value += str(random_number(True) if j==0 else random_number())

    #カンマを挿入
    return return_value, '{:,}'.format(int(return_value))

# 文字描画の初期位置(画像左上からx, yだけ離れた位置)
x = 0
y = 0

for i in range(0, test_data_count):
    label,text = create_random_value()    #ランダムに数値列を生成

    # RGB, 画像サイズ, 背景色を設定
    im = Image.new("RGB", (mnist_picture_width, mnist_picture_height), (256, 256, 256))

    draw = ImageDraw.Draw(im)
    # 描画位置、描画する文字、文字色、フォントを指定
    draw.text((x, y), text, fill=(0, 0, 0), font=font)

    # ファイルに出力
    im.save(output_folder_path + "./" + label +".png")
出力例
4114420306.png

99454.png

491.png

尚、このコードで生成された画像を上記のモデルで検証させても、精度は全く出ません。
上記と同じ方法で精度確認を行った所、ほとんど0%に近しい結果になりました。
1文字のデータですら間違う有様です。
いわゆる過学習状態なのでしょうか。詳細は不明です。
現状は単にMNISTの画像を単純に張り合わせているだけですが、ランダム性と規則性を考慮し、回転処理や拡大・縮小処理をランダムに含ませたり、横方向の縮小を適用する事が必要かもしれません(近々検証しようと考えています)
ちなみに実はこのコード、「0」のデータを生成できない欠陥コードです。
モデルの仕組みから言って特に問題はないと思いますが、気になる方は修正して使ってください。
9. 振り返り
こんな簡単にOCRが実装できるのは凄いの一言です。Pythonは本当に出来る事が多いですね。
参考にしたkerasのサイトは全て英語だったため、ここが一番苦労しました。英語、大事…
とはいえChatGPTが全部翻訳してくれるんじゃね?という説もありますけどね。
いやー、すごい時代です。
10. 参考文献
https://keras.io/examples/vision/captcha_ocr/
https://www.netforce.co.jp/techblog/entry/0001.shtml
https://magazine.techacademy.jp/magazine/18981
https://qiita.com/YoshikiIto/items/ace92dc9b05e375b8326
https://self-development.info/%E3%80%90%E8%B6%85%E7%B0%A1%E5%8D%98%E3%80%91tensorflow%E3%81%AB%E3%81%8A%E3%81%91%E3%82%8B%E3%83%A2%E3%83%87%E3%83%AB%E3%81%AE%E4%BF%9D%E5%AD%98%E3%83%BB%E5%BE%A9%E5%85%83%E3%83%BB%E5%86%8D%E5%88%A9/