はじめに
前回、「python3.6にsphinxをインストール(Windows)」を書いた時には、実はalabasterテーマのトラブルが嫌で直後にアンインストールして、phython2ベースのstandalone Installer に切り替えてしまっていた。
ところが先日出版された「Sphinxをはじめよう」第2版がpython3.6を前提にしていたので、改めてSurface3にsphinxを導入する。どうせなので、standalone Installer が組み込む同梱パッケージ類をすべてインストールしてみよう。
環境
Surface3 (Windows10 Home ver.1703 x64,メモリ4GB)
python3.6のインストール
https://www.python.org/downloads/ から、python-3.6.3.exe をダウンロードする。
OSがx64なのにx86版をダウンロードするのは古い拡張が互換性問題を引き起こすのをできるだけ避けたいから。
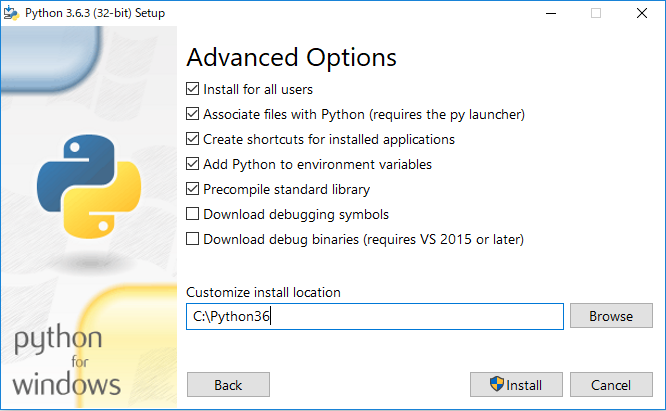
ダウンロードした実行ファイルを起動するとデフォルトで C:\Users\cosmo\AppData\Local\Programs\Python\Python36-32 にインストールしようとするが、長すぎるのは嫌なのでカスタマイズインストールを選択して、インストール先を C:\Python36 に変更してインストールする。
"Install for all users"でセットされる C:\Program Files (x86)\Python36-32 も空白や記号を含んでいてトラブルの元なので避ける。
その他のオプションはスクリーンショットの通り。
Windows環境変数の追加
インストール時に C:\Python36\ と C:\Python36\Scripts\ がシステム環境変数のPATHに追加されているが、C:\Python36\Tools\scripts と C:\Python36\Lib\site-packages も追加する
Sphinxのインストール
コマンドプロンプトから easy_install sphinx を実行する。
記事を書いている時点で Sphinx-1.6.5 がインストールされた。
共連れでインストールされたモジュールは以下の通り。
|#| モジュール名 | ver. | 記事 |
|:-:|:-:|:-:|:-:|:-:|
|1| colorama | 0.3.9 | 文字色指定ライブラリ |
|2| sphinxcontrib-websupport | 1.0.1 | Sphinx API for Web Apps |
|3| requests | 2.18.4 | 使い易いHTTPライブラリ |
|4| imagesize | 0.7.1 | 画像ファイルのヘッダ情報を返すライブラリ |
|5| alabaster | 0.7.10 | HTMLテーマ |
|6| Babel | 2.5.1 | I18Nライブラリ |
|7| snowballstemmer | 1.2.1 | 自然言語処理ライブラリ |
|8| docutils | 0.14 | reStructuredTextライブラリ |
|9| Pygments | 2.2.0 | シンタックスハイライター |
|10| Jinja2 | 2.9.6 | テンプレートエンジン |
|11| six | 1.11.0 | Python 2 と 3 の互換性ライブラリ |
|12| certifi | 2017.7.27.1 | SSL証明書の信頼性検証ライブラリ |
|13| urllib3 | 1.22 | HTTPライブラリ |
|14| idna | 2.6 | IDNA(国際化ドメイン名アーキテクチャ)ライブラリ |
|15| chardet | 3.0.4 | 文字コード判別ライブラリ|
|16| pytz | 2017.2 | タイムゾーンライブラリ |
|17| MarkupSafe | 1.0 | HTML/XHTML/XMLライブラリ|
追加テーマのインストール
easy_installを使って以下のように実行する
easy_install sphinxjp.themecore sphinxjp.themes.bizstyle sphinxjp.themes.dotted sphinxjp.themes.htmlslide sphinxjp.themes.impressjs sphinxjp.themes.s6 sphinxjp.themes.sphinxjp sphinxjp.themes.trstyle
これによりインストールされるモジュールは以下の通り。
| # | モジュール名 | ver. | 記事 |
|---|---|---|---|
| 18 | sphinxjp.themecore | 0.2.0 | |
| 19 | sphinxjp.themes.bizstyle | 0.1.6 | |
| 20 | sphinxjp.themes.dotted | 0.1.2 | |
| 21 | sphinxjp.themes.htmlslide | 0.1.4 | |
| 22 | sphinxjp.themes.impressjs | 0.1.4 | |
| 23 | sphinxjp.themes.s6 | 0.3.0 | |
| 24 | sphinxjp.themes.sphinxjp | 1.0.0 | |
| 25 | sphinxjp.themes.trstyle | 0.1.1 |
他に利用できるテーマの一覧は、https://pypi.python.org/pypi から"sphinx theme"で検索すると良さそう。
動作確認
まずは sphinx-quickstart を実行してプロジェクトが作成されることを確認する
CMD> sphinx-quickstart

Welcome to the Sphinx 1.6.5 quickstart utility.

Please enter values for the following settings (just press Enter to
accept a default value, if one is given in brackets).

Enter the root path for documentation.
> Root path for the documentation [.]:

You have two options for placing the build directory for Sphinx output.
Either, you use a directory "_build" within the root path, or you separate
"source" and "build" directories within the root path.
> Separate source and build directories (y/n) [n]:

Inside the root directory, two more directories will be created; "_templates"
for custom HTML templates and "_static" for custom stylesheets and other static
files. You can enter another prefix (such as ".") to replace the underscore.
> Name prefix for templates and static dir [_]:

The project name will occur in several places in the built documentation.
> Project name: test
> Author name(s): aaaa

Sphinx has the notion of a "version" and a "release" for the
software. Each version can have multiple releases. For example, for
Python the version is something like 2.5 or 3.0, while the release is
something like 2.5.1 or 3.0a1.  If you don't need this dual structure,
just set both to the same value.
> Project version []: 1.00
> Project release [1.00]:

If the documents are to be written in a language other than English,
you can select a language here by its language code. Sphinx will then
translate text that it generates into that language.

For a list of supported codes, see
http://sphinx-doc.org/config.html#confval-language.
> Project language [en]: jp

The file name suffix for source files. Commonly, this is either ".txt"
or ".rst".  Only files with this suffix are considered documents.
> Source file suffix [.rst]:

One document is special in that it is considered the top node of the
"contents tree", that is, it is the root of the hierarchical structure
of the documents. Normally, this is "index", but if your "index"
document is a custom template, you can also set this to another filename.
> Name of your master document (without suffix) [index]:

Sphinx can also add configuration for epub output:
> Do you want to use the epub builder (y/n) [n]:

Please indicate if you want to use one of the following Sphinx extensions:
> autodoc: automatically insert docstrings from modules (y/n) [n]:
> doctest: automatically test code snippets in doctest blocks (y/n) [n]:
> intersphinx: link between Sphinx documentation of different projects (y/n) [n]:
> todo: write "todo" entries that can be shown or hidden on build (y/n) [n]:
> coverage: checks for documentation coverage (y/n) [n]:
> imgmath: include math, rendered as PNG or SVG images (y/n) [n]:
> mathjax: include math, rendered in the browser by MathJax (y/n) [n]:
> ifconfig: conditional inclusion of content based on config values (y/n) [n]:
> viewcode: include links to the source code of documented Python objects (y/n) [n]:
> githubpages: create .nojekyll file to publish the document on GitHub pages (y/n) [n]:

A Makefile and a Windows command file can be generated for you so that you
only have to run e.g. `make html' instead of invoking sphinx-build
directly.
> Create Makefile? (y/n) [y]:
> Create Windows command file? (y/n) [y]:

Creating file .\conf.py.
Creating file .\index.rst.
Creating file .\Makefile.
Creating file .\make.bat.

Finished: An initial directory structure has been created.

You should now populate your master file .\index.rst and create other documentation
source files. Use the Makefile to build the docs, like so:
   make builder
where "builder" is one of the supported builders, e.g. html, latex or linkcheck.
そのまま make html してみる
CMD> cd test
CMD> make html

Running Sphinx v1.6.5
loading pickled environment... done
building [mo]: targets for 0 po files that are out of date
building [html]: targets for 1 source files that are out of date
updating environment: 0 added, 0 changed, 0 removed
looking for now-outdated files... none found
preparing documents... done
writing output... [100%] index
generating indices... genindex
writing additional pages... search
copying static files... done
copying extra files... done
dumping search index in English (code: en) ... done
dumping object inventory... done
build succeeded.

Build finished. The HTML pages are in _build\html.
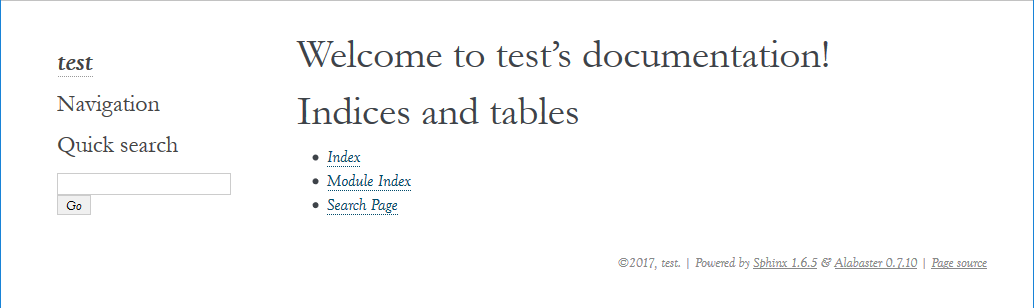
alabasterテーマの以下のようなページが作成される。
次に、conf.py の86行目あたりを以下のように変更する
html_theme = 'classic'

## 途中省略##

# This is required for the alabaster theme
# refs: http://alabaster.readthedocs.io/en/latest/installation.html#sidebars
# html_sidebars = {
    # '**': [
        # 'about.html',
        # 'navigation.html',
        # 'relations.html',  # needs 'show_related': True theme option to display
        # 'searchbox.html',
        # 'donate.html',
    # ]
# }
104~112行目はalabaster固有のオプションなので、 # でコメントアウトする
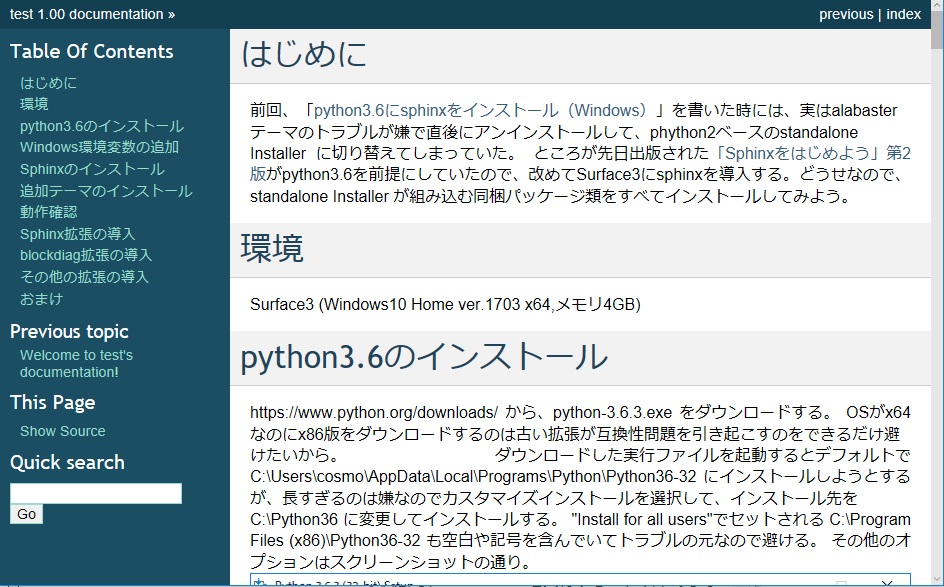
(重要)テーマ固有のオプションは切り替え時に無効化する
再度、make html を実行すると、classicテーマの以下のようなページが作成される

Sphinx拡張の導入
easy_installを使って以下のように実行する
easy_install sphinxcontrib-actdiag sphinxcontrib-blockdiag sphinxcontrib-nwdiag sphinxcontrib-seqdiag
これによりインストールされるモジュールは以下の通り。
| # | モジュール名 | ver. | 記事 |
|---|---|---|---|
| 26 | sphinxcontrib_actdiag | 0.8.5 | |
| 27 | sphinxcontrib_blockdiag | 1.5.5 | |
| 28 | sphinxcontrib_nwdiag | 0.9.5 | |
| 29 | sphinxcontrib_seqdiag | 0.8.5 | |
| 30 | actdiag | 0.5.4 | |
| 31 | blockdiag | 1.5.3 | |
| 32 | webcolors | 1.7 | |
| 33 | pillow | 4.3.0 | |
| 34 | funcparserlib | 0.3.6 | |
| 35 | olefile | 0.44 | |
| 36 | nwdiag | 1.0.4 | |
| 37 | seqdiag | 0.9.5 |
blockdiag拡張の導入
pip search blockdiagcontrib で探すと随分たくさんあるのでこの際全部入れてしまおう。使い方とか動作確認は追々調べながらやる(たぶん)
easy_install blockdiagcontrib-excelhogan blockdiagcontrib-excelshape blockdiagcontrib-octicons blockdiagcontrib-labeledbox blockdiagcontrib-eps blockdiagcontrib-class blockdiagcontrib-square blockdiagcontrib-qb blockdiagcontrib-tex blockdiagcontrib-math blockdiagcontrib-nationalflags blockdiagcontrib-cisco
これによりインストールされるモジュールは以下の通り。
| # | モジュール名 | ver. | 記事 |
|---|---|---|---|
| 38 | blockdiagcontrib-excelhogan | 0.1.0 | imagedrawer plugin for blockdiag |
| 39 | blockdiagcontrib-excelshape | 0.1.0 | imagedrawer plugin for blockdiag |
| 40 | blockdiagcontrib-octicons | 0.2.0 | octicons plugin for blockdiag |
| 41 | blockdiagcontrib-labeledbox | 0.1.1 | noderenderer plugin for blockdiag |
| 42 | blockdiagcontrib-eps | 0.1.1 | EPS imagedrawer plugin for blockdiag |
| 43 | blockdiagcontrib-class | 0.1.3 | noderenderer plugin for blockdiag |
| 44 | blockdiagcontrib-square | 0.1.3 | noderenderer plugin for blockdiag |
| 45 | blockdiagcontrib-qb | 0.1.3 | noderenderer plugin for blockdiag |
| 46 | blockdiagcontrib-tex | 0.2.3 | TeX plugin for blockdiag |
| 47 | blockdiagcontrib-math | 0.9.0 | LaTeX math plugin for blockdiag |
| 48 | blockdiagcontrib-nationalflags | 0.1.6 | noderenderer plugin for blockdiag |
| 49 | blockdiagcontrib-cisco | 0.1.8 | noderenderer plugin for blockdiag |
| 50 | openpyxl | 2.5.0b1 | Excel操作ライブラリ |
| 51 | et_xmlfile | 1.0.1 | XML操作ライブラリ |
| 52 | jdcal | 1.3 | ユリウス通日ライブラリ |
(2017/11/14追記)
imagedrawer plugin for blockdiag については以下を参照
blockdiagcontrib-excelhogan (xlwtでEXCELファイルに書き出す)
- Inside of excel 方眼紙撲滅委員会 #pyfes
blockdiagcontrib-excelshape(OLEを使ってEXCELファイルに書き出す)
- [みずぴー日記 - Excel方眼紙を生成できるblockdiagプラグイン: blockdiag-excelshapeをリリースしました]
(http://mzp.hatenablog.com/entry/2012/12/09/164143)
noderenderer plugin for blockdiag については以下を参照
Hack like a rolling stone - (22日目) blockdiag 拡張の紹介(ノードレンダラ)
その他の拡張の導入
standalone Installer と比較して足りてなさそうなモジュールを以下のコマンドで導入する
easy_install pypng gp.vcsdevelop zc.recipe.egg zc.buildout
これによりインストールされるモジュールは以下の通り。
| # | モジュール名 | ver. | 記事 |
|---|---|---|---|
| 53 | pypng | 0.0.18 | 画像処理ライブラリ |
| 54 | zc.buildout | 2.9.5 | System for managing development buildouts |
| 55 | zc.recipe.egg | 2.0.4 | Recipe for installing Python package distributions as eggs |
| 56 | gp.vcsdevelop | 2.2.3 | ZC buildout extension to checkout eggs from various vcs |
おまけ - Qiita の Markdown を使う
以上で standalone Installer 並みの環境を準備したことになる。
比較の必要もあって導入される拡張の概要を調べて表にしてみたが、結構いろいろなライブラリが導入されていることが分かる。
折角なのでこのMarkDownで書いた記事自体をsphinxでドキュメントに落としてみよう。
ただし、表に互換性がないので書き直しが必要。
表の作成や書き直しは地味にめんどくさいので、Excelからエクスポートできたほうが便利か。(今は後回しにして後で考える)
まずは、pip で recommonmark を導入する
CMD> pip install recommonmark
Collecting recommonmark
  Downloading recommonmark-0.4.0-py2.py3-none-any.whl
Requirement already satisfied: docutils>=0.11 in c:\python36\lib\site-packages\docutils-0.14-py3.6.egg (from recommonmark)
Collecting commonmark<=0.5.4 (from recommonmark)
  Downloading CommonMark-0.5.4.tar.gz (120kB)
    100% |████████████████████████████████| 122kB 408kB/s
Installing collected packages: commonmark, recommonmark
  Running setup.py install for commonmark ... done
Successfully installed commonmark-0.5.4 recommonmark-0.4.0
| # | モジュール名 | ver. | 記事 |
|---|---|---|---|
| 57 | recommonmark | 0.4.0 | commonmarkのdocutil向け拡張 |
| 58 | commonmark | 0.5.4 | 標準化MarkDownライブラリ本体 |
次に、conf.py の43行目あたりを以下のように編集する。
source_suffix = ['.rst', '.md']
from recommonmark.parser import CommonMarkParser
source_parsers = { '.md': CommonMarkParser, }

from recommonmark.transform import AutoStructify
github_doc_root = 'https://github.com/rtfd/recommonmark/tree/master/doc/'
def setup(app):
    app.add_config_value('recommonmark_config', {
            'url_resolver': lambda url: github_doc_root + url,
            'auto_toc_tree_section': 'Contents',
            }, True)
    app.add_transform(AutoStructify)
AutoStructify の定義は、eval_rst を使って表を記述するのに必要
また、日本語の見出しに対してリンクが作成されない不具合があるので、「日本語セクションにアンカーが貼られるようにする」 を参考に recommonmark の paser.py を書き直す。
この書き直した部分は、future を参照しているので、pipで追加する
CMD> pip install future
|#| モジュール名 | ver. | 記事 |
|:-:|:-:|:-:|:-:|:-:|
59| future| 0.16.0| Python2と3の互換性サポート
Qiitaのソースをmain.md ファイルに落として、表を eval_rst の呼び出してSimpleTable か Grid Table で書き直したうえで index.rst に main を呼ぶように変更する。
※eval_rst :コードブロック中にreStructuredTextを埋め込む
.. test documentation master file, created by
   sphinx-quickstart on Tue Jul 25 13:21:22 2017.
   You can adapt this file completely to your liking, but it should at least
   contain the root `toctree` directive.

Welcome to test's documentation!
================================

.. toctree::
   :maxdepth: 2
   :caption: Contents:

   main

Indices and tables
==================

* :ref:`genindex`
* :ref:`modindex`
* :ref:`search`
この状態で、 make html を実行すると、以下のようなページが作成される
(追記:2017/11/08)
GitHub Flavored MD(?) による表の記法
|#| モジュール名 | ver. | 記事 |
|:-:|:-:|:-:|:-:|
|57|recommonmark|0.4.0|commonmarkのdocutil向け拡張|
|58|commonmark|0.5.4|標準化MarkDownライブラリ本体|
対して、eval_rst で使用できるSimpleTableによる表の記法
=== ============= ======  ===========================
 #  モジュール名    ver.    記事
=== ============= ======  ===========================
 57 recommonmark  0.4.0   commonmarkのdocutil向け拡張
 58 commonmark    0.5.4   標準化MarkDownライブラリ本体
=== ============= ======  ===========================
GridTableによる表の記法の場合
+----+--------------+-------+-----------------------------+
| #  | モジュール名  | ver.  | 記事                        |
+====+==============+=======+=============================+
| 57 | recommonmark | 0.4.0 | commonmarkのdocutil向け拡張 |
+----+--------------+-------+-----------------------------+
| 58 | commonmark   | 0.5.4 | 標準化MarkDownライブラリ本体 |
+----+--------------+-------+-----------------------------+
これなら、最初からSimpleTableで書いたほうが楽かな?
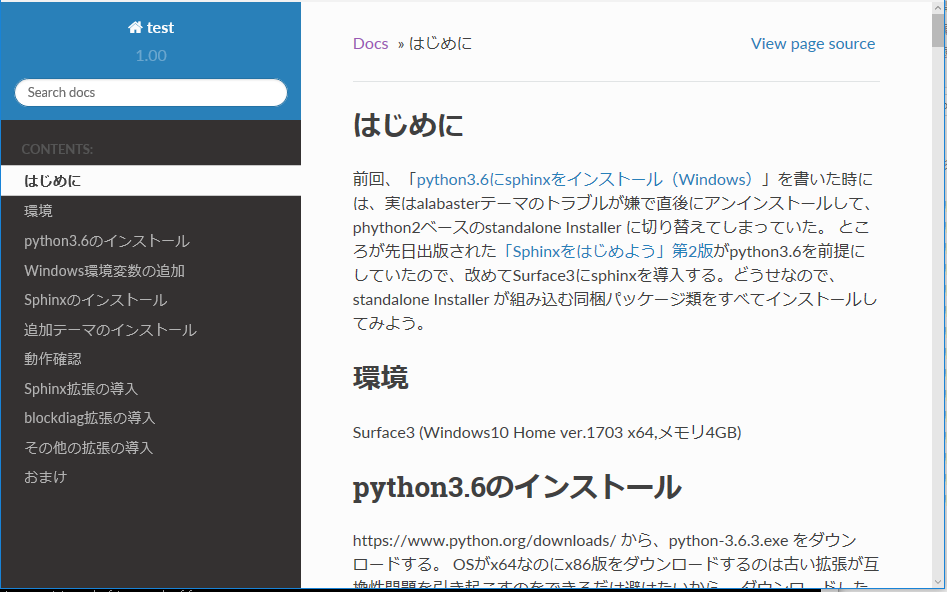
おまけ2 - RTD(Read the Docs)テーマに切り替える
RTDテーマがモダンで使い易そうなので切り替えてみる
CMD> pip install sphinx_rtd_theme
|#| モジュール名 | ver. | 記事 |
|:-:|:-:|:-:|:-:|:-:|
60| sphinx_rtd_theme| 0.2.4| Read the Docs theme for Sphinx
conf.py を以下のように変更する
import sphinx_rtd_theme
html_theme = "sphinx_rtd_theme"
html_theme_path = [sphinx_rtd_theme.get_html_theme_path()]
この状態で、 make html を実行すると、以下のようなページが作成される