大鑑巨砲主義らしくいろいろな機能があるみたいだけど、とりあえずサラッとチュートリアルをやってみる。
webpack インストール
$ npm install webpack -g
ファイルを作成その1
$ mkdir tutorial
$ cd tutorial
$ emacs entry.js
document.write("It works.");
$ emacs index.html
<!doctype html>
<html lang="ja">
    <head>
        <meta charset="utf-8">
        <title>webpack tutorial</title>
    </head>
    <body>
        <script src="bundle.js"></script>
    </body>
</html>
コンパイルしてバンドルするファイルを作成する
$ webpack ./entry.js bundle.js
ブラウザで index.html を表示
ファイルを作成その2
$ emacs content.js
module.exports = "It works from content.js.";
entry.js を修正する
$ emacs entry.js
document.write(require("./content.js"));
再コンパイルする
$ webpack ./entry.js bundle.js
ブラウザで index.html を表示
ローダーを使う
インストール
$ npm install css-loader style-loader
ファイル作成
$ emacs style.css
body {
    background: yellow;
}
entry.js を修正する
$ emacs entry.js
require("!style!css!./style.css");
document.write(require("./content.js"));
再コンパイルする
$ webpack ./entry.js bundle.js
ブラウザで index.html の表示
require("./style.css") と書けるようにする
entry.js を修正する
$ emacs entry.js
require("./style.css");
document.write(require("./content.js"));
オプションを付けて再コンパイルする
$ webpack ./entry.js bundle.js --module-bind 'css=style!css'
ブラウザで index.html の表示
設定ファイルを書いて webpack コマンドのみで再コンパイル
$ emacs webpack.config.js
/* global module, __dirname */

module.exports = {
    entry: "./entry.js",
    output: {
        path: __dirname,
        filename: "bundle.js"
    },
    module: {
        loaders: [
            { test: /\.css$/, loader: "style!css" }
        ]
    }
};
コンパイルする
$ webpack
オプションでプログレスバーや色づけ表示
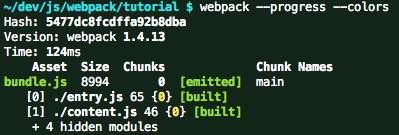
$ webpack --progress --colors
ファイルを監視してコンパイルを自動化
$ webpack --progress --colors --watch
開発サーバ
--watch でファイル監視ではなく、開発サーバを起動してコンパイル自動化もできる。
インストール
$ npm install webpack-dev-server -g
開発サーバ起動
$ webpack-dev-server --progress --colors
次は
参考リンク
大鑑巨砲主義
設定はもちろん分厚くなるが、分割ビルドは魅力的
【第1部】CommonJSの簡単なサンプル
【第2部】Bootstrapを使ったサンプル
【第3部】AngularJSのサンプル
【第4部】CoffeeScriptやLESS、Jadeを使ったサンプル
【第5部】コードスプリット
【第6部】production/develが最適化されたサンプル
【第7部】EcmaScript 6のサンプル
Webpackの特徴としては、
- コード分割
- requireの使い方で、AMDのような非同期のロードもサポート
- Loaderという読み込み時に適用するプラグイン
- require時に変数が入っていてもパースできるような、賢いパース
- Pluginによる拡張
Browserifyが 単一ファイル を作成するのに特化していたのと比較して、Webpackは 複数ファイルを出力すること を念頭に置いている
一回(もしくはwatchの初回)のビルド時間
Browserify => 3〜4分
Webpack => 14〜16秒(!)


