背景
既存のSPAのサイトにおいて、画面を動的に組み立てると同時にSEO効果を上げるために、
SSR化にすると決めました。
やり方
いろいろ情報を調べましたが、aws-serverless-expressの情報がほとんとでした。
ただ、aws-serverless-expressは既に廃止され、その後を受け継いだのは@vendia/serverless-expressです。
今回は@vendia/serverless-expressを使って、nuxtのSSRをaws lambdaにデプロイします。
プロジェクト全体像
Nuxt
Nuxtのサンプルプロジェクトを作成して、ssrをtrue、targetをserverにして、
nuxt buildを実行すれば.nuxtフォルダにserverサイトとclientサイドのファイルが出力されます。
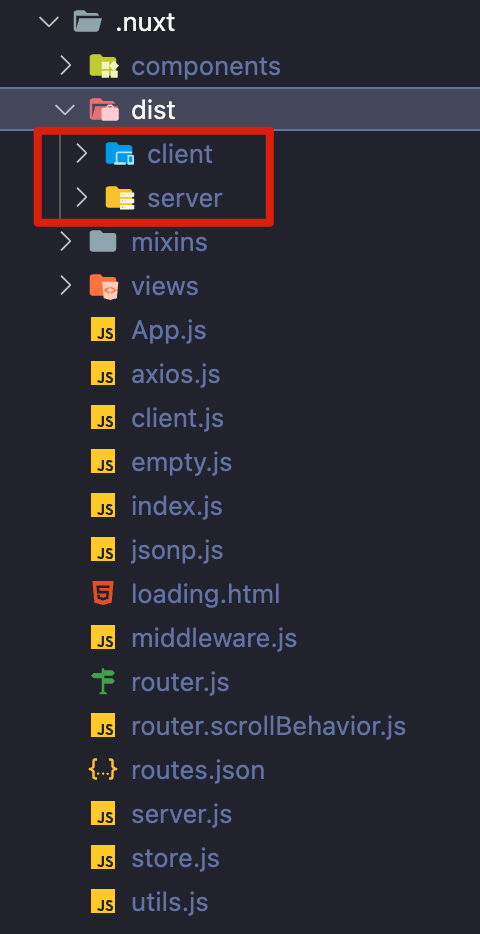
devオプションをfalseにしないと、lambdaからnuxtのコンテンツを返すことができません。
nuxt.config.ts
import type { NuxtConfig } from "@nuxt/types";

const config: NuxtConfig = {
  build: {},
  buildModules: [
    "@nuxt/typescript-build",
    [
      "@nuxtjs/dotenv",
      {
        path: "config/",
        filename: `.env.${process.env.ENV || "local"}`,
      },
    ],
  ],
  ssr: true,
  target: "server",
  css: [],
  env: {},
  head: {
    title: "nuxt-community/typescript-template",
    meta: [
      { charset: "utf-8" },
      { name: "viewport", content: "width=device-width, initial-scale=1" },
      {
        hid: "description",
        name: "description",
        content: "A boilerplate to start a Nuxt+TS project quickly",
      },
    ],
    link: [{ rel: "icon", type: "image/x-icon", href: "/assets/favicon.ico" }],
  },
  srcDir: "src",
  loading: { color: "#0c64c1" },
  modules: ["@nuxtjs/axios"],
  plugins: ["~/plugins/truncate"],
  router: {
    base: "/",
  },
  telemetry: false,
  dev: false,
};

export default config;
インストールしたnode moduleは以下です。
package.json
{
  "name": "nuxt-community-typescript-template",
  "description": "A boilerplate to start a Nuxt+TS project quickly",
  "version": "2.15.8",
  "private": true,
  "scripts": {
    "dev:local": "nuxt",
    "dev:local-http-proxy": "ENV=local-http-proxy nuxt",
    "dev:trial": "ENV=trial nuxt",
    "build:local": "nuxt build",
    "build:local-http-proxy": "ENV=local-http-proxy nuxt build",
    "build:trial": "ENV=trial nuxt build",
    "start:local": "nuxt build && nuxt start",
    "lint": "eslint --max-warnings 0 --ext .ts,.vue .",
    "http-proxy": "node proxy-server.js",
    "deploy:local-http-proxy": "ENV=local-http-proxy nuxt build && serverless offline --stage local start --nos3sync",
    "deploy:local-http-proxy:debug": "ENV=local-http-proxy nuxt build && SLS_DEBUG=* serverless offline --stage local start --nos3sync",
    "deploy:trial": "serverless deploy --stage trial",
    "deploy:trial:debug": "SLS_DEBUG=* serverless deploy --stage trial"
  },
  "dependencies": {
    "@nuxtjs/axios": "^5.13.6",
    "@nuxtjs/dotenv": "^1.4.1",
    "@vendia/serverless-express": "^4.5.4",
    "aws-lambda": "^1.0.7",
    "express": "^4.17.3",
    "nuxt": "2.15.8",
    "nuxt-property-decorator": "2.9.1"
  },
  "devDependencies": {
    "@nuxt/types": "2.15.8",
    "@nuxt/typescript-build": "2.1.0",
    "@nuxtjs/eslint-config-typescript": "9.0.0",
    "@types/aws-lambda": "^8.10.93",
    "eslint": "8.12.0",
    "eslint-config-prettier": "^8.5.0",
    "eslint-plugin-prettier": "^4.0.0",
    "http-proxy": "^1.18.1",
    "prettier": "^2.6.2",
    "serverless": "^2.72.2",
    "serverless-apigw-binary": "^0.4.4",
    "serverless-offline": "^8.5.0",
    "serverless-plugin-typescript": "^2.1.2",
    "serverless-s3-sync": "^2.0.0",
    "typescript": "^4.6.3"
  }
}
Serverless Framework
AWS Lambdaを操るなら、Serverless Frameworkを一番おすすめです。
理由としては主に以下です。
・yamlの静的な設定だけでインフラ設定が可能。(CDKなどプログラミング可能なものは複雑になりやすくかつテストしにくいと個人的に感じています)
・いろいろなプラグインがあって、Cloudformationを書くよりずっと簡単
serverless-offlineを使えば、lambdaにデプロイしたnuxtをローカルで動作確認することができます。
サーバーサイトの処理はLambdaに処理させたいですが、静的コンテンツはS3に入れることでLambdaの処理量を抑える。
serverless-s3-syncプラグインの設定でS3に転送するファイルを確認できます。
provisionedConcurrency設定でLambdaの同時実行数を簡単に設定できます。
定期的にLambdaを呼び出す暖気方法よりAWSはprovisionedConcurrencyの設定を推奨しています。
serverless.yml
service: nuxt-ssr-frontend

provider:
  name: aws
  runtime: nodejs14.x
  stage: ${opt:stage, self:custom.defaultStage}
  region: ap-northeast-1
  memorySize: 256
  logRetentionInDays: 14
  deploymentBucket:
    name: nuxt-ssr-deployment-bucket-${self:provider.stage}
  lambdaHashingVersion: "20201221"
  versionFunctions: false
  tracing:
    lambda: true
    apiGateway: true
  iam:
    role:
      statements:
        - Effect: Allow
          Action:
            - xray:PutTraceSegments # X-Rayにセグメントドキュメントをアップロードする権限を付与する
            - xray:PutTelemetryRecords # X-Rayにテレメトリをアップロードする権限を付与する
          Resource: "*"

functions:
  nuxt:
    handler: server/lambda.handler
    provisionedConcurrency: 2
    events:
      - http:
          path: /
          method: ANY
      - http:
          path: /{proxy+}
          method: ANY

package:
  patterns:
    - ".nuxt"
    - "!.nuxt/dist/client"

plugins:
  - serverless-plugin-typescript
  - serverless-apigw-binary
  - serverless-s3-sync
  - serverless-offline

custom:
  defaultStage: local
  commonResourceService: nuxt-ssr-common-resource
  s3Bucket: ${self:service}-s3bucket-${self:provider.stage}
  serverlessPluginTypescript:
    tsConfigFileLocation: "./tsconfig.server.json"
  apigwBinary:
    types:
      - "*/*"
  s3Sync:
    - bucketName: ${self:custom.s3Bucket}
      bucketPrefix: _nuxt/
      localDir: .nuxt/dist/client/
      params: # optional
        - "**/*.*":
            CacheControl: "no-store"
    - bucketName: ${self:custom.s3Bucket}
      bucketPrefix: assets/
      localDir: src/static/assets/
      params: # optional
        - "**/*.*":
            CacheControl: "no-store"

resources:
  Resources:
    ApiGatewayRestApi:
      Type: AWS::ApiGateway::RestApi
      Properties:
        Name: ${self:service}-restapi-${self:provider.stage}
    ApiGatewayResponse:
      Type: 'AWS::ApiGateway::GatewayResponse'
      Properties:
        ResponseParameters:
          gatewayresponse.header.WWW-Authenticate: "'Basic'"
        ResponseType: UNAUTHORIZED
        RestApiId: !Ref ApiGatewayRestApi
        StatusCode: '401'
    ## Specifying the S3 Bucket
    WebAppS3Bucket:
      Type: AWS::S3::Bucket
      Properties:
        BucketName: ${self:custom.s3Bucket}
        AccessControl: Private
        WebsiteConfiguration:
          IndexDocument: index.html
          ErrorDocument: index.html
    ## Specifying the policies to make sure all files inside the Bucket are avaialble to CloudFront
    WebAppS3BucketPolicy:
      DependsOn:
        - WebAppS3Bucket
      Type: AWS::S3::BucketPolicy
      Properties:
        Bucket:
          Ref: WebAppS3Bucket
        PolicyDocument:
          Statement:
            - Effect: Allow
              Principal:
                AWS:
                  Fn::Join:
                    - " "
                    - - "arn:aws:iam::cloudfront:user/CloudFront Origin Access Identity"
                      - Fn::ImportValue:
                          Fn::Sub: ${self:custom.commonResourceService}-${self:provider.stage}-cloudFront-origin-access-identity
              Action:
                - s3:GetObject
              Resource: arn:aws:s3:::${self:custom.s3Bucket}/*

  Outputs:
    ApiGatewayRestApi:
      Value:
        Ref: ApiGatewayRestApi
      Export:
        Name: ${self:service}-server-${self:provider.stage}
LambdaでNuxtを起動するために、下記ラッピングするソースが必要です。
server/lambda.ts
import { APIGatewayEvent, Context, Handler } from "aws-lambda";
import serverlessExpress from "@vendia/serverless-express";
import express from "express";
import { Nuxt, Builder } from "nuxt";
import config from "../nuxt.config";
import { customDomainAdaptorMiddleware } from "./middleware";

let cachedServer: Handler;

async function bootstrap() {
  if (!cachedServer) {
    const expressApp = express();
    const nuxtApp = new Nuxt(config);
    // Build only in dev mode (Lambdaにデプロイする場合は使えない)
    if (config.dev) {
      const builder = new Builder(nuxtApp);
      await builder.build();
    } else {
      await nuxtApp.ready();
    }

    // Give nuxt middleware to express
    expressApp.use(customDomainAdaptorMiddleware);
    expressApp.use(nuxtApp.render);

    cachedServer = serverlessExpress({ app: expressApp });
  }

  return cachedServer;
}

export const handler = async (
  event: APIGatewayEvent,
  context: Context,
  callback: any
) => {
  event.path = event.path || "/"; // http://localhost:8081 でアクセスすると event.pathがundefinedになるための対応
  const server = await bootstrap();
  return server(event, context, callback);
};
server/middleware.ts
import express from "express";

export const customDomainAdaptorMiddleware = (
  req: express.Request,
  _: express.Response,
  next: express.NextFunction
) => {
  const apigatewayHeader = req.headers["x-apigateway-event"];
  if (apigatewayHeader === undefined) {
    next();
    return;
  }

  req.url = req.originalUrl = `/${req.url}`.replace("//", "/");

  next();
};
nuxt.d.ts
declare module "nuxt" {
  const Nuxt: any;
  const Builder: any;
  export { Nuxt, Builder };
}
Cloudfront
cloudformationのコードを割愛します。
ローカルでcloudfrontの動きを仮想するために、以下シンプルなプロキシサーバーを作りました。
proxy-server.js
/* eslint-disable @typescript-eslint/no-var-requires */
var http = require("http"),
  httpProxy = require("http-proxy");

//
// Create a proxy server with custom application logic
//
var proxy = httpProxy.createProxyServer({});

//
// Create your custom server and just call `proxy.web()` to proxy
// a web request to the target passed in the options
// also you can use `proxy.ws()` to proxy a websockets request
//
var server = http.createServer(function (req, res) {
  // You can define here your custom logic to handle the request
  // and then proxy the request.
  proxy.web(req, res, { target: "http://127.0.0.1:3000/local" });
});

console.log("listening on port 8081");
server.listen(8081);
キャッシュ戦略についてまだ検討中です。
今考えているのは
・静的コンテンツのcache時間を長くして、更新が発生する時に、キャッシュクリア
・サーバーサイドでは状態を持っていなくて、vue storeに持っているので、基本的に返すHTMLページはみんな同じなので、短時間のキャッシュにしたいです。
・ただ、一部クエリパラメータによって、返すページが変わるようなものがあるので、パス + パラメータの組み合わせをキャッシュキーにするつもりです。
性能
cloudfrontによってキャッシュされた時はもちろん非常に早いです。数十ms。
キャッシュが切れて、Lambdaのウォームスタートでも3~4秒はかかります。もしサーバーサイドでさらにAPI呼び出していれば、
6~7秒かかります。さすがにキャッシュをしなければ我慢できない性能です。
※lambdaのメモリを上げれば、CPUのコア数も増えます。もうちょっとスケールアップできるかもしれません。