はじめに
あのChatGPTを開発したOpenAIが、今度はテキストから3次元モデルを生成するAIをオープンソース化して公開しました。
その名も「Point-E」。
普段点群×DeepLearningを研究している私(@comapi5)としては触らない理由がありません。
ということでGoogle Colabで動かしてみました!
Point-Eのざっくり概要
Point-Eは二つのモデルで構成されています。
「テキストから画像を生成するモデル」と「画像から点群を生成するモデル」です。
以下Point-Eの論文1の図を見るとわかりやすいでしょう。
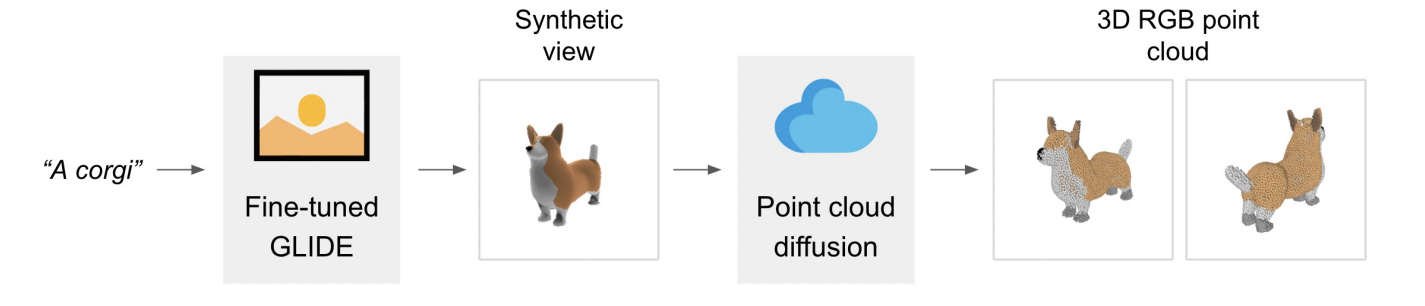
"A corgi"をいうテキスト(画像生成モデルでいう呪文)を入力して画像を取得します。
取得画像を拡散モデルに入力して点群を得るといった流れになっていますね。
動かしてみた
前置きはこれくらいにしてとにかく動かしてみたい!
Point-EのリポジトリにサンプルコードがあるのでそちらをベースにGoogle Colabで動かせるようにしてみました。
サンプルコードには、「画像から点群を生成モデル」だけを動かすコードと「テキストから点群を生成するコードがあるのでどちらも試してみました。
※点群からメッシュを生成するサンプルコードもあるみたいですが、こちらはまたの機会にします。
準備
さて、まずはGoogle Colaboratoryでノートブックを開き、ノートブックの設定をGPU変更しましょう。
続いてPoint-Eのリポジトリをクローンしてきます。
!git clone https://github.com/openai/point-e.git
必要なライブラリのインストール。
!pip install -e ./point-e
これで準備はOK!
画像から点群生成モデルを動かす
まずはPoint-Eの後半部分を担うモデルを試してみます。
今回点群を生成する画像はこちら。

この画像もPoint-Eのリポジトリに含まれているので特にダウンロードする必要はありません。
ではライブラリのインポート。
import sys
sys.path.append("./point-e")

from PIL import Image
import torch
from tqdm.auto import tqdm

from point_e.diffusion.configs import DIFFUSION_CONFIGS, diffusion_from_config
from point_e.diffusion.sampler import PointCloudSampler
from point_e.models.download import load_checkpoint
from point_e.models.configs import MODEL_CONFIGS, model_from_config
from point_e.util.plotting import plot_point_cloud
モデルの準備。
device = torch.device('cuda' if torch.cuda.is_available() else 'cpu')

print('creating base model...')
base_name = 'base40M' # use base300M or base1B for better results
base_model = model_from_config(MODEL_CONFIGS[base_name], device)
base_model.eval()
base_diffusion = diffusion_from_config(DIFFUSION_CONFIGS[base_name])

print('creating upsample model...')
upsampler_model = model_from_config(MODEL_CONFIGS['upsample'], device)
upsampler_model.eval()
upsampler_diffusion = diffusion_from_config(DIFFUSION_CONFIGS['upsample'])

print('downloading base checkpoint...')
base_model.load_state_dict(load_checkpoint(base_name, device))

print('downloading upsampler checkpoint...')
upsampler_model.load_state_dict(load_checkpoint('upsample', device))
sampler = PointCloudSampler(
    device=device,
    models=[base_model, upsampler_model],
    diffusions=[base_diffusion, upsampler_diffusion],
    num_points=[1024, 4096 - 1024],
    aux_channels=['R', 'G', 'B'],
    guidance_scale=[3.0, 3.0],
)
画像を読み込んでモデルに入力。
# Load an image to condition on.
img = Image.open('./point-e/point_e/examples/example_data/corgi.jpg')

# Produce a sample from the model.
samples = None
for x in tqdm(sampler.sample_batch_progressive(batch_size=1, model_kwargs=dict(images=[img]))):
    samples = x
最後に可視化。
pc = sampler.output_to_point_clouds(samples)[0]
fig = plot_point_cloud(pc, grid_size=3, fixed_bounds=((-0.75, -0.75, -0.75),(0.75, 0.75, 0.75)))

できた!
若干ぼやっとしたところはありますが、これは紛れもなくコーギーですね!
ちなみに取得した点群は
pc.coords
pc.channels
で座標とRGBのnumpy配列を得ることができます。
また点群をインタラクティブに可視化するのに「K3D」というライブラリが便利です。(Colabでは使えないかもです。。。)
これだけでも十分すごいですが、次はテキストから画像を生成してみましょう。
テキストから点群生成モデルを動かす
生成に使うテキストはサンプルコードにデフォルトで設定されている"a red motorcycle"として点群を生成してみます。
まずはライブラリのインポート。
import sys
sys.path.append("./point-e")

import torch
from tqdm.auto import tqdm

from point_e.diffusion.configs import DIFFUSION_CONFIGS, diffusion_from_config
from point_e.diffusion.sampler import PointCloudSampler
from point_e.models.download import load_checkpoint
from point_e.models.configs import MODEL_CONFIGS, model_from_config
from point_e.util.plotting import plot_point_cloud
モデル準備。
device = torch.device('cuda' if torch.cuda.is_available() else 'cpu')

print('creating base model...')
base_name = 'base40M-textvec'
base_model = model_from_config(MODEL_CONFIGS[base_name], device)
base_model.eval()
base_diffusion = diffusion_from_config(DIFFUSION_CONFIGS[base_name])

print('creating upsample model...')
upsampler_model = model_from_config(MODEL_CONFIGS['upsample'], device)
upsampler_model.eval()
upsampler_diffusion = diffusion_from_config(DIFFUSION_CONFIGS['upsample'])

print('downloading base checkpoint...')
base_model.load_state_dict(load_checkpoint(base_name, device))

print('downloading upsampler checkpoint...')
upsampler_model.load_state_dict(load_checkpoint('upsample', device))
sampler = PointCloudSampler(
    device=device,
    models=[base_model, upsampler_model],
    diffusions=[base_diffusion, upsampler_diffusion],
    num_points=[1024, 4096 - 1024],
    aux_channels=['R', 'G', 'B'],
    guidance_scale=[3.0, 0.0],
    model_kwargs_key_filter=('texts', ''), # Do not condition the upsampler at all
)
テキストをモデルに入力。
# Set a prompt to condition on.
prompt = 'a red motorcycle'

# Produce a sample from the model.
samples = None
for x in tqdm(sampler.sample_batch_progressive(batch_size=1, model_kwargs=dict(texts=[prompt]))):
    samples = x
そして可視化。
pc = sampler.output_to_point_clouds(samples)[0]
fig = plot_point_cloud(pc, grid_size=3, fixed_bounds=((-0.75, -0.75, -0.75),(0.75, 0.75, 0.75)))
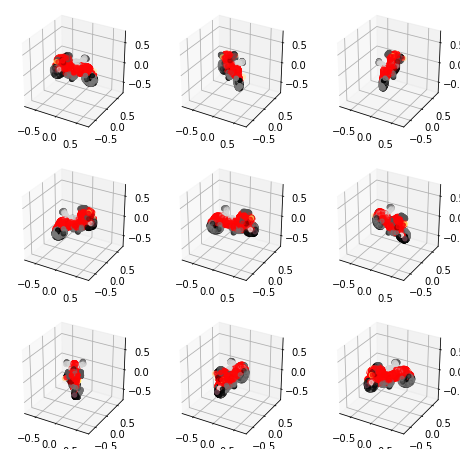
うん。ちょっといびつなところもあるが赤いバイクと言われたらそう見えるでしょう。
こちらも先ほど紹介したK3Dを使えばぐるぐる回転させたりすることができます。
最後に
ここまで読んでいただきありがとうございます。
簡単に触ってみた感想としましては、今回生成した点群は4096点で表現力が足りないといった印象です。(増やせるのかな?)
また他にも自作でテキストを入力してみましたがあんまりうまくいかないことが多々。
ただ1分くらいで点群を生成できてしまうのは驚きですね。
今後の発展に大いに期待です。