Flutterのダイアログについてまとめます。
結論としては、こんな感じです。
・選択肢ダイアログ : SimpleDialog
・ボタンつきまたはカスタマイズ : AlertDialog
・それでも実現できない場合 : 新規ページにダイアログを実装する
Material編
SimpleDialog
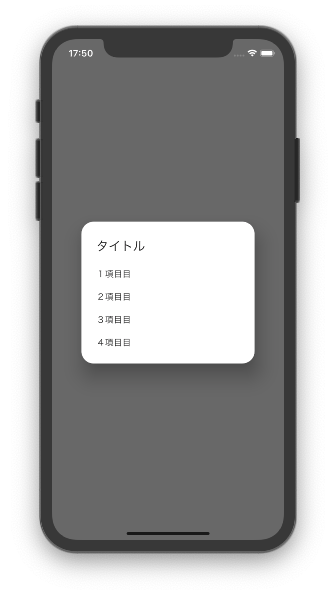
SimpleDialogは、基本的に選択肢から選ぶようなダイアログの場合に使用します。
選択肢はSimpleDialogOptionを使って実装できます。
また、Dialogを表示する際にはshowDialog()メソッドを呼び出します。
これはDialogの種類に関わらず共通事項です。
showDialog(
  context: context,
  builder: (context) {
    return SimpleDialog(
      title: Text("タイトル"),
      children: <Widget>[
        // コンテンツ領域
        SimpleDialogOption(
          onPressed: () => Navigator.pop(context),
          child: Text("1項目目"),
        ),
          :
          :
      ],
    );
  },
);
念のため、以下の公式のSimpleDialogの文章です。
A simple dialog offers the user a choice between several options.
(和訳)
"SimpleDialogで、ユーザーはいくつかのオプションから選択できます。"
AlertDialog
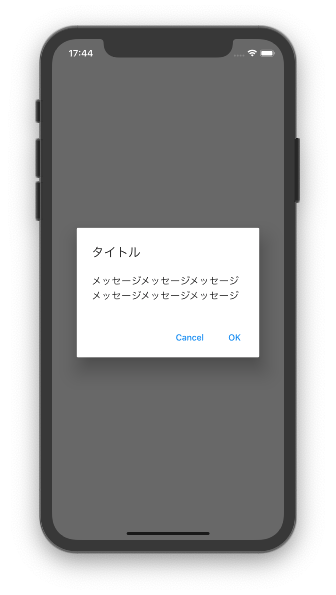
タイトル、メッセージ、ボタンがある一般的なダイアログです。
showDialog(
  context: context,
  builder: (_) {
    return AlertDialog(
      title: Text("タイトル"),
      content: Text("メッセージメッセージメッセージメッセージメッセージメッセージ"),
      actions: <Widget>[
        // ボタン領域
        FlatButton(
          child: Text("Cancel"),
          onPressed: () => Navigator.pop(context),
        ),
        FlatButton(
          child: Text("OK"),
          onPressed: () => Navigator.pop(context),
        ),
      ],
    );
  },
);
また、ある程度カスタマイズしたダイアログも実装できます。
その際には、SingleChildScrollViewなどを使用することが推奨されています。
その中で、ColumnやRowなどを使って複数Widgetを配置することで様々なダイアログを実装できます。

showDialog(
  context: context,
  builder: (context) {
    Column(
      children: <Widget>[
        AlertDialog(
          title: Text("タイトル"),
          content: SingleChildScrollView(
            child: ListBody(
              children: <Widget>[
                Column(
                  // コンテンツ
                ),
              ],
            ),
          ),
          actions: <Widget>[
            // ボタン
          ],
        ),
      ],
    );
  }
);
新規画面上にダイアログを実装する

画像がはみ出したりするなど、AlertDialogやSimpleDialogで実現できなかった場合はこの方法になると思います。
ModalRouteを継承したページを実装します。
一枚の画面となりますのでpush()やpushNamed()で表示します。
import 'package:flutter/material.dart';

class OverlayDialogPage extends ModalRoute<void> {
  @override
  Duration get transitionDuration => Duration(milliseconds: 100);

  @override
  bool get opaque => false;
  :
  :
少しコードが長いので、実装したい方はこちらをご確認ください。
補足情報
Dialog
Dialog Widgetも用意されていますが、執筆現在では以下の表記があり、直接使用するのは避けたほうがよさそうです。
Rather than using this widget directly, consider using AlertDialog or SimpleDialog, which implement specific kinds of material design dialogs.
(和訳)
このウィジェットを直接使用するのではなく、特定の種類のダイアログを実装するAlertDialogまたはSimpleDialogの使用を検討してください。
AboutDialog
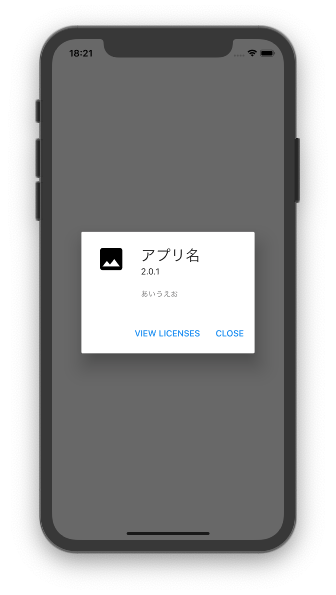
アプリ名やアプリバージョンなどを表示して、OSSのライセンスページに遷移できるダイアログです。
このダイアログは、以下のようにshowAboutDialog()で呼び出せます。
(showLisencePage()で開くことができるライセンスページになりますが、ここでは詳細は割愛します。)
showAboutDialog(
  context: context,
  applicationIcon: Icon(Icons.photo),
  applicationName: "アプリ名",
  applicationVersion: "2.0.1",
  applicationLegalese: "あいうえお",
);
Material編 まとめ
・選択肢ダイアログ : SimpleDialog
・ボタンつきまたはカスタマイズ : AlertDialog
・それでも実現できない場合 : 新規ページにダイアログを実装する
Cupertino編
CupertinoAlertDialog
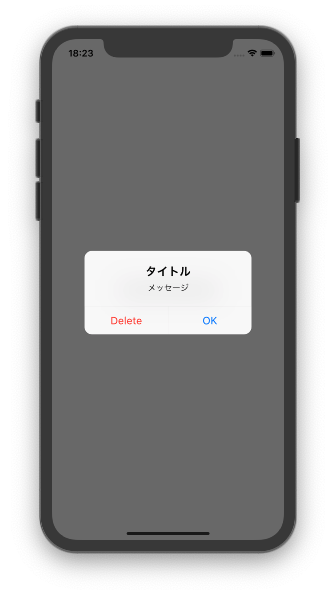
実装方法はAlertDialogと同じで、titleやcontent、actionsなどにWidgetを配置することで、簡単にiOSダイアログが組めます。
showDialog(
  context: context,
  builder: (context) {
    return CupertinoAlertDialog(
      title: Text("タイトル"),
      content: Text("メッセージ"),
      actions: <Widget>[
        CupertinoDialogAction(
          child: Text("Delete"),
          isDestructiveAction: true,
          onPressed: () => Navigator.pop(context),
        ),
        CupertinoDialogAction(
          child: Text("OK"),
          onPressed: () => Navigator.pop(context),
        ),
      ],
    );
  },
);
CupertinoDialog
CupertinoDialogの使用はやめたほうがよさそうです。
Rather than using this widget directly, consider using CupertinoAlertDialog, which implement a specific kind of dialog."
(和訳)
”このウィジェットを直接使用するのではなく、特定の種類のダイアログを実装するCupertinoAlertDialogを使用することを検討してください。"
(現在Deprecatedになっているようです。)
Cupertino編まとめ
実質、CupertinoAlertDialogのみ用意されていますので、素直にこれを使いましょう。
カスタマイズしたい場合には、先ほどの新規画面上にダイアログを実装する方法くらいでしょうか。
その他参考
・Widget Catalog
・stackoverflow how-to-make-a-full-screen-dialog-in-flutter
以上です!!
間違い等ありましたら、ご指摘お願いします。