概要
Google が提供する音声合成サービス「Cloud Text-to-Speech」の導入メモです。APIサービスの有効化から、認証ファイルの取得、自作プログラム(C#またはPython)から呼び出して利用するまでの流れをできるだけ詳しく説明しました。
基本的には公式の「クイックスタート:クライアント ライブラリの使用」の内容をスクリーンショット付きで解説したものです(なお、不要と思われるステップは飛ばしています)。
Cloud Text-to-Speech は、テキストデータ(日本語OK)から、読みあげ音声データ (.mp3) を生成してくるクラウドサービスです。かなり人間に近い自然な音声出力が可能です。品質については こちら から、任意のテキスト(日本語もOK)を与えて確認することができます。
Google Cloud Platform に登録
Google Cloud ( https://cloud.google.com/?hl=ja ) からユーザー登録します。
お手持ちの Googleカウント を使って無料トライアル利用が可能です。ただし、登録時にクレジットカードが必要です。とはいえ、期間終了後に、有料アカウントに自動移行されることもないので、また、有料カウントに移行しても料金は(個人的には)非常にリーズナブルだと思いますので、あまり構えずに登録しましょう。

利用料金の目安
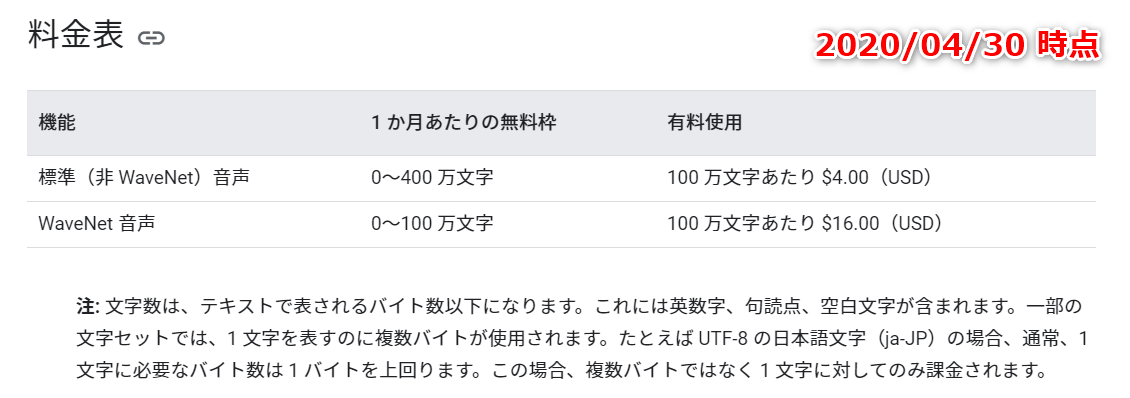
以下、Google Cloud に登録済みとして説明を進めていきます。
Text-to-Speech のサービス有効化と認証ファイルの取得
Google Cloud Platform にアクセして、ログインします。
ダイアログが表示されるので「新しいプロジェクト」を選択します。
適当なプロジェクト名(ここでは Text To Speech 20xxx とします)を入力して「作成」をクリックします。
ダッシュボードに戻ってくるので、いま作成したプロジェクトに切り替えます。
左上のメニューをクリックして「APIとサービス」、「ダッシュボード」に進みます。
「APIとサービスを有効化」を選択します。
テキストボックスに「Text to Speech」と入力します。
「Cloud Text-to-Speech API」を選択します。

「有効にする」を選択します。
自作のプログラムからサービスを利用するために必要となる「認証情報を作成」を選択します。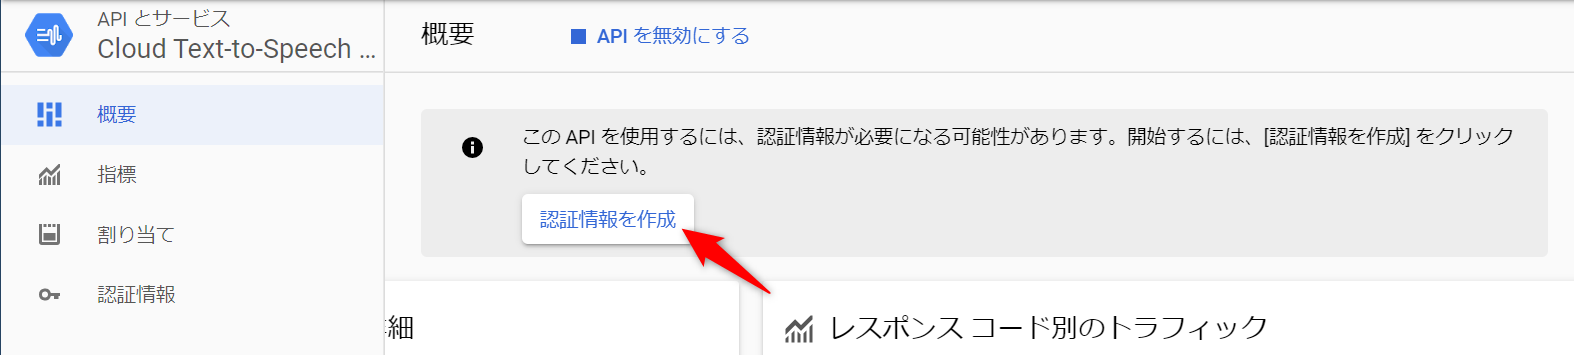
「プロジェクトへの認証情報の追加」という画面に移動するので、下記のドロップダウンリストから「Cloud Text-to-Speech API」を選択してから「必要な認証情報」をクリックします。
※ この画面は「APIとサービス」、「認証情報」、「認証情報を作成」、「+認証情報を作成」、「ウィザードで選択」と選択していっても呼び出すことができます。

表示が切り替わるので「いいえ、使用していません」を選択して、再度「必要な認証情報」をクリックします。
適当なサービスアカウント名を入力します(ここでは test としました)。ロールは特に選択しません。また「サービスアカウントID」は自動で生成されます。「次へ」を選択します。
次のようなダイアログが表示されますが「ロールなしで作成」を選択します。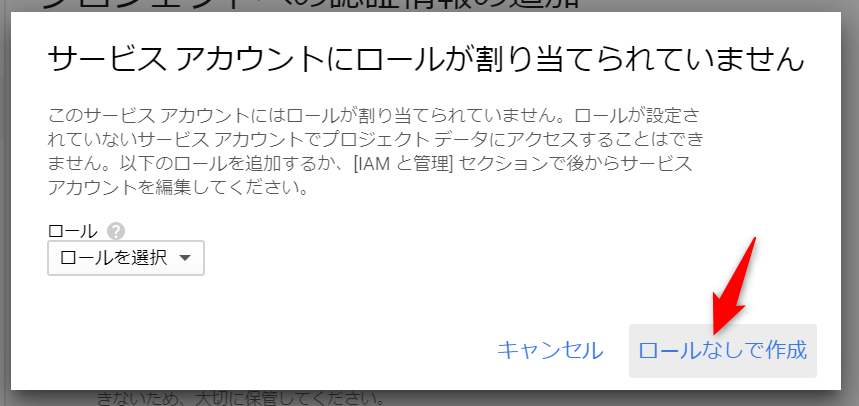
次のようなダイアログが表示されて、認証情報が入ったJSONファイルが、PCにダウンロードされます。
このファイルの名前を「credentials.json」に変更して「C:\Users\xxx\Desktop」に配置するものとします。
なお、公式のクイックスタート では、このファイルのパスを 環境変数 GOOGLE_APPLICATION_CREDENTIALS として登録し、プログラムでは環境変数経由で情報を参照するという方法を説明しています。一方、ここでは環境変数には登録せず、プログラムから直接パスを指定して情報を参照する方法をとります。
C#(.NET Core)プログラムから呼び出す
VisualStudio を起動し[ファイル]-[新規作成]-[プロジェクト]で、「Visual C#」の「コンソールアプリ(.NET Core)」を選択します。
メニューの[ツール]-[NuGetパッケージマネージャ]-[パッケージ マネージャー コンソール]を選択します。コンソールに Install-Package Google.Cloud.TextToSpeech.V1 -Pre を入力して実行します。
PM> Install-Package Google.Cloud.TextToSpeech.V1 -Pre
Program.cs の内容を以下に書き換えます。
using System;
using System.IO;
using Google.Cloud.TextToSpeech.V1;
using System.Diagnostics;

public class QuickStart {
  public static void Main(string[] args) {

    var credentialsFilePath = @"C:\Users\xxx\Desktop\credentials.json";

    var textToSpeechClientBuilder = new TextToSpeechClientBuilder() {
      CredentialsPath = credentialsFilePath
    };
    var client = textToSpeechClientBuilder.Build();

    // 読み上げテキストの設定
    SynthesisInput input = new SynthesisInput {
      Text = "目的地は、日本橋です。"
    };

    // 音声タイプの設定
    VoiceSelectionParams voice = new VoiceSelectionParams {
      Name = "ja-JP-Wavenet-D",
      LanguageCode = "ja-JP",
      SsmlGender = SsmlVoiceGender.Neutral
    };

    // オーディオ出力の設定
    AudioConfig config = new AudioConfig {
      AudioEncoding = AudioEncoding.Mp3,
      Pitch = -2.0
    };

    // Text-to-Speech リクエストの生成
    var response = client.SynthesizeSpeech(new SynthesizeSpeechRequest {
      Input = input,
      Voice = voice,
      AudioConfig = config
    });

    // Text-to-Speech レスポンス(音声ファイル)の保存
    var fileName = DateTime.Now.ToString("yyyy-MM-dd_HHmmss") + ".mp3";
    using (Stream output = File.Create(fileName)) {
      response.AudioContent.WriteTo(output);
      Console.WriteLine($"音声コンテンツを '{fileName}' として保存しました。");
    }

    Console.WriteLine("ファイルを出力したフォルダを開きますか [Y]/n");
    var k = Console.ReadKey();
    if (k.Key != ConsoleKey.N && k.Key != ConsoleKey.Escape) {
      Process.Start("explorer.exe", Directory.GetCurrentDirectory());
    }
  }
}
実行すると「もくてきちは、にほんばしです。」という MP3 ファイルが生成されます。
なお、音声合成マークアップ言語(SSML)にも対応しており、以下のように変更すると
「もくてきちは、にほんばしではなく、にっぽんばしです。」と読み上げてくれます。また、<break time="200ms"/> などにより 間 を挿入することもできます。
SynthesisInput input = new SynthesisInput {
  Ssml = "<speak>目的地は、日本橋、ではなく、<sub alias='にっぽんばし'>日本橋</sub>です。</speak>".Replace("'", "\"")
};
Python プログラムから呼び出す
pip install --upgrade google-cloud-texttospeech
from datetime import datetime
from pytz import timezone
from google.cloud import texttospeech
from google.oauth2 import service_account

credentials = service_account.Credentials.from_service_account_file('credentials.json')
client = texttospeech.TextToSpeechClient(credentials=credentials)

synthesis_input = texttospeech.types.SynthesisInput(
  text='目的地は、秋葉原です。')

voice = texttospeech.types.VoiceSelectionParams(
  language_code='ja-JP',
  name='ja-JP-Wavenet-D',
  ssml_gender=texttospeech.enums.SsmlVoiceGender.NEUTRAL)

audio_config = texttospeech.types.AudioConfig(
  audio_encoding=texttospeech.enums.AudioEncoding.MP3,
  pitch = -2.0
  )

response = client.synthesize_speech(synthesis_input, voice, audio_config)

now = datetime.now(timezone('Asia/Tokyo'))
filename = now.strftime('%Y-%m-%d_%H%M%S.mp3')
with open(filename, 'wb') as out:
  out.write(response.audio_content)
  print(f'Audio content written to file {filename}')