Arduinoは一部の互換品を除いて、ほぼ5V出力なので、3.3VのSDカードにはそのまま使えない。
抵抗で分圧する方法もあるようだけれど、双方向ロジック変換器なるものがずいぶん安く売っていたのでそれを使ってみた。
■参考サイト
第21回 Arduinoでパーツやセンサを使ってみよう~SDカード編(その1)
↑ピンの配置やmicroSDの接続も書かれているのでとても参考になる
■使ったもの
- Elegoo Arduino Nanoボード V3.0 CH340/ATmega328P、Arduino Nano V3.0互換 (3)(Amazon)
- EasyWordMall SDカードスロットソケットリーダーモジュールArduino用(Amazon)
- HiLetgo IIC I2C ロジック レベル 変換 双方向モジュール 5V Arduinoに対応 (10個セット)(Amazon)
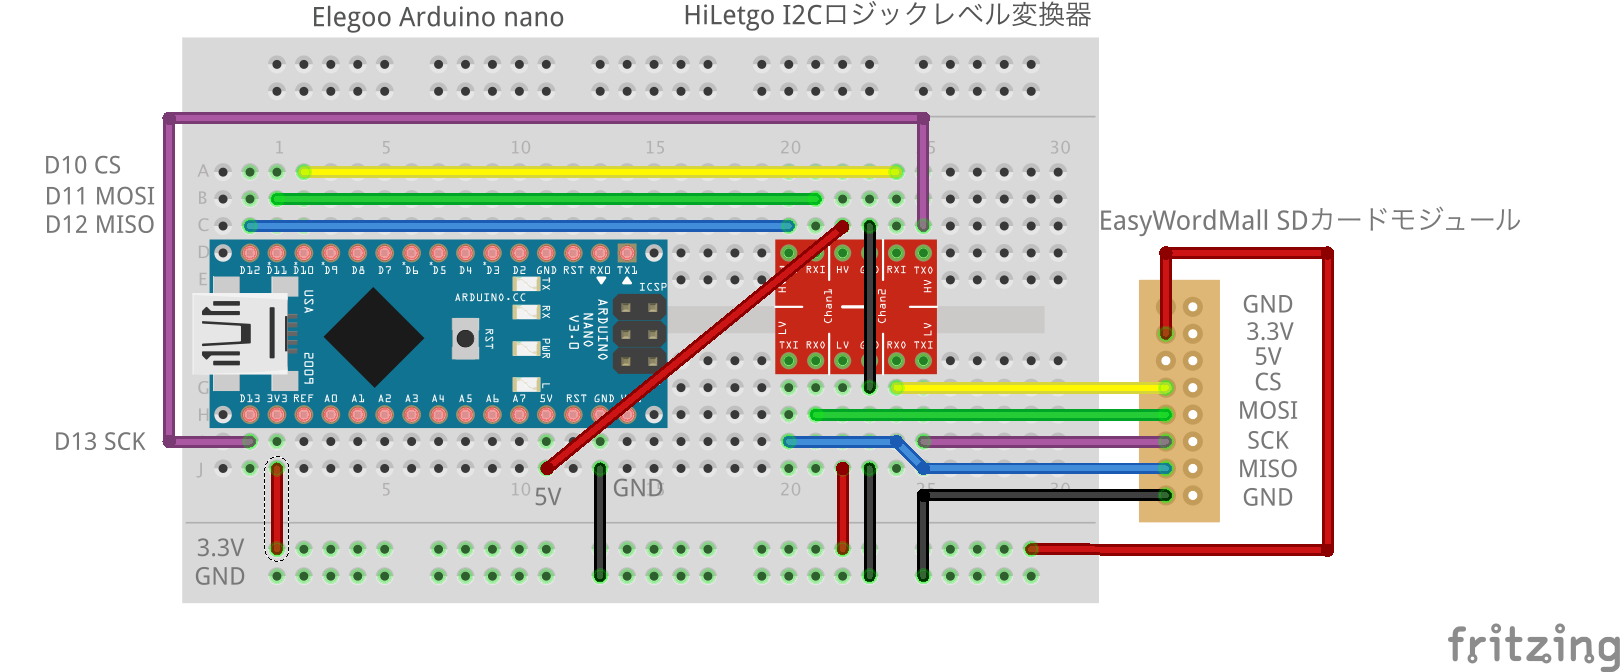
■ブレッドボード図
SDカードの図はなかったので配線だけ。
■スケッチ
ファイル→スケッチ例→SD→ReadWriteにて確認。
サンプルプログラムでは、** CS - pin 4 (for MKRZero SD: SDCARD_SS_PIN)とコメントで書かれているように、CSピンを4としている。
一方、 Arduino nanoではCSは10ピン なので4を10に変更する必要がある。
中段のif (!SD.begin(10)) {のところで、4→10に変更した。
これはArduinoの種類に応じて4だったり10だったりするので自分の環境に合わせること。
/*
  SD card read/write

 This example shows how to read and write data to and from an SD card file
 The circuit:
 * SD card attached to SPI bus as follows:
 ** MOSI - pin 11
 ** MISO - pin 12
 ** CLK - pin 13
 ** CS - pin 4 (for MKRZero SD: SDCARD_SS_PIN)

 created   Nov 2010
 by David A. Mellis
 modified 9 Apr 2012
 by Tom Igoe

 This example code is in the public domain.

 */

# include <SPI.h>
# include <SD.h>

File myFile;

void setup() {
  // Open serial communications and wait for port to open:
  Serial.begin(9600);
  while (!Serial) {
    ; // wait for serial port to connect. Needed for native USB port only
  }


  Serial.print("Initializing SD card...");

  if (!SD.begin(10)) {
    Serial.println("initialization failed!");
    return;
  }
  Serial.println("initialization done.");

  // open the file. note that only one file can be open at a time,
  // so you have to close this one before opening another.
  myFile = SD.open("test.txt", FILE_WRITE);

  // if the file opened okay, write to it:
  if (myFile) {
    Serial.print("Writing to test.txt...");
    myFile.println("testing 1, 2, 3.");
    // close the file:
    myFile.close();
    Serial.println("done.");
  } else {
    // if the file didn't open, print an error:
    Serial.println("error opening test.txt");
  }

  // re-open the file for reading:
  myFile = SD.open("test.txt");
  if (myFile) {
    Serial.println("test.txt:");

    // read from the file until there's nothing else in it:
    while (myFile.available()) {
      Serial.write(myFile.read());
    }
    // close the file:
    myFile.close();
  } else {
    // if the file didn't open, print an error:
    Serial.println("error opening test.txt");
  }
}

void loop() {
  // nothing happens after setup
}
特に問題がなければ、シリアルモニタに以下のように表示され、test.txtが書き込まれているはず。
initializInitializing SD card...initialization done.
Writing to test.txt...done.
test.txt:
testing 1, 2, 3.
Macで読み込むと表示された。(動作チェックで起動した分だけ追記されている)

サンプルプログラムには、ADCピンの値を読み込んでロギングするサンプルもあるようなので、環境センサの取得にはそれを改造すれば簡単な気がする。
とりあえずここまで。
