概要
CloudFront の署名付きURLで時限付きのダウンロードURLの発行を行うことを目的としてダウンロードURLを Node.jsで発行する手法について説明する。
準備
必要な準備として AWS 側に以下の準備を行う。
- S3バケット
CloudFront経由してアクセスを行う、S3バケットを準備する。
- CloudFront ディストリビューション
ディストリビューションは作成済みの場合は設定に合わせて変更を行い、新規の場合はWebで作成を行い設定を行う。
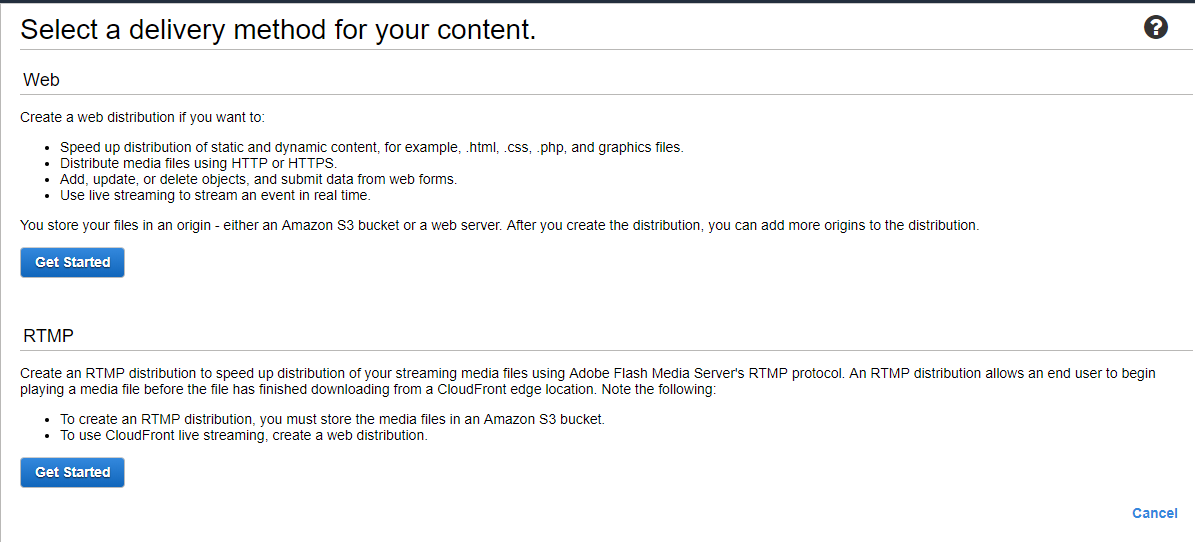
設定箇所として以下の内容を修正する。
Restrict Bucket Access は S3 から直接リクエストを送らないように対応するため、Yesにする。
また、Query String で response-content-disposition をWhiteListに登録する。このパラメータが attachment の場合はダウンロードすべきファイルとしてクライアント側が認識し、ダウンロードを行う。
| パラメータ | 値 |
|---|---|
| Restrict Bucket Access | Yes |
| Cache Based on Selected Request Headers | Whitelist |
| Whitelist Headers | origin |
| Query String Forwarding and Caching | Forward all, cache based on whitelist |
| Query String Whitelist | response-content-disposition |
| Restrict Viewer Access (Use Signed URLs or Signed Cookies) |
Yes |
| Trusted Signers | self |
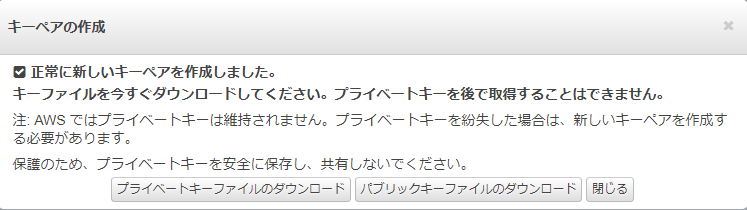
- CloudFront のキーペア
署名付きURLの発行には CloudFront 用のキーペアを発行する必要がある。
発行にはAWSのマネージドコンソールにルートアカウントでログインして発行する必要がある。
発行後下記のモーダルが上がってくるため、秘密鍵のダウンロードを行う。
(公開鍵は使用しない。このモーダルで秘密鍵をダウンロードしないと以後、ダウンロードを行えなくなる。)
Node.js側実装
Node.js 側に実装を行う。
必要なモジュールとして aws-sdk, moment があるためnpmなどでインストールを行う。
response-content-disposition=attachment を外すことでクライアント側に画像や動画を表示することが可能となる。
moment().add() は値を変えることで該当するURLが有効な時間を設定することができるが、過去の時間を指定することはできない。
var aws = require('aws-sdk');
var moment = require('moment');
var fs = require('fs');

const key_pair_id = 'XXXXXXXXXXXXXXXXXXX';
const private_key = fs.readFileSync('./pk-XXXXXXXXXXXXXXXXXXX.pem', 'utf-8');

const cloudfront = new aws.CloudFront.Signer(key_pair_id, private_key);

const fileName = 'test.png';
const url = 'https://xxxxxxxxxxxxxx.cloudfront.net/'+fileName+'?response-content-disposition=attachment';

// 5min 後に設定
const time = moment().add('+5', 'minute');
const expire = time.unix();

console.log('Expire time: ' + time.format());

let cloudfront_url;

cloudfront.getSignedUrl({url: url, expires: expire}, (err, url) =>{
    if(err){
        return;
    }
    cloudfront_url = url;
});

console.log(cloudfront_url);
上のコードを実際に実行するとURLとExpire time が出力される
clom@MyComputer:~$ node cloudfront.js
Expire time: 2018-12-31T21:44:45+09:00
https://xxxxxxxxxxxxxx.cloudfront.net/test.png?response-content-disposition=attachment&Expires=1546260285&Key-Pair-Id=XXXXXXXXXXXXXXXXXXX&Signature=xxxxxx__
clom@MyComputer:~$
出力されたリンクを実行することでファイルのダウンロードが行われる。
なお時間経過後に実行した場合は Access Denied の旨が出力される。
これにより、CloudFront の署名付きURLで時限式のダウンロードURLの発行を行えた。
期間外のファイルのダウンロードを行えなくすることで様々なサービスに利用できると考えている。