はじめに
Amazon SageMaker Studio になんで R(その他 Julia, TF最新バージョンなど)のカーネルがないんだ!と嘆いていらっしゃる方に朗報です。
この記事では、Amazon SageMaker Studio のノートブック環境をカスタムする方法をご紹介します。Amazon SageMaker は環境構築に Docker イメージを使っているので、自分で作成した Docker イメージを Amazon SageMaker Studio に設定してやれば、そのイメージをノートブックで使うことができるという寸法です。
Amazon SageMaker Studio のセットアップ方法は こちら の記事をご参照ください。
Docker イメージの作成
それでは早速、Docker イメージを作ります。今回は こちら のサンプルを拝借して、Tensorflow 2.3 を使うためのイメージを作ります。
AWS Cloud9 の起動
今回は Docker イメージ作成環境として AWS Cloud9 を使用します。お手元の PC に Docker と AWS CLI 環境が構築されていればそちらを使うことももちろん可能です。AWS のコンソールから Cloud9 のコンソールに移動して [Create environment] をクリックし、以下の手順で環境を作成します。
- [Name] に任意の名前を設定して [Next step] をクリック
- 何も変更せず [Next step] をクリック
- 内容を確認し [Create environment] をクリック
ブラウザの新しいタブが作成され、1, 2 分するとそこに AWS Cloud9 の画面が表示されます。
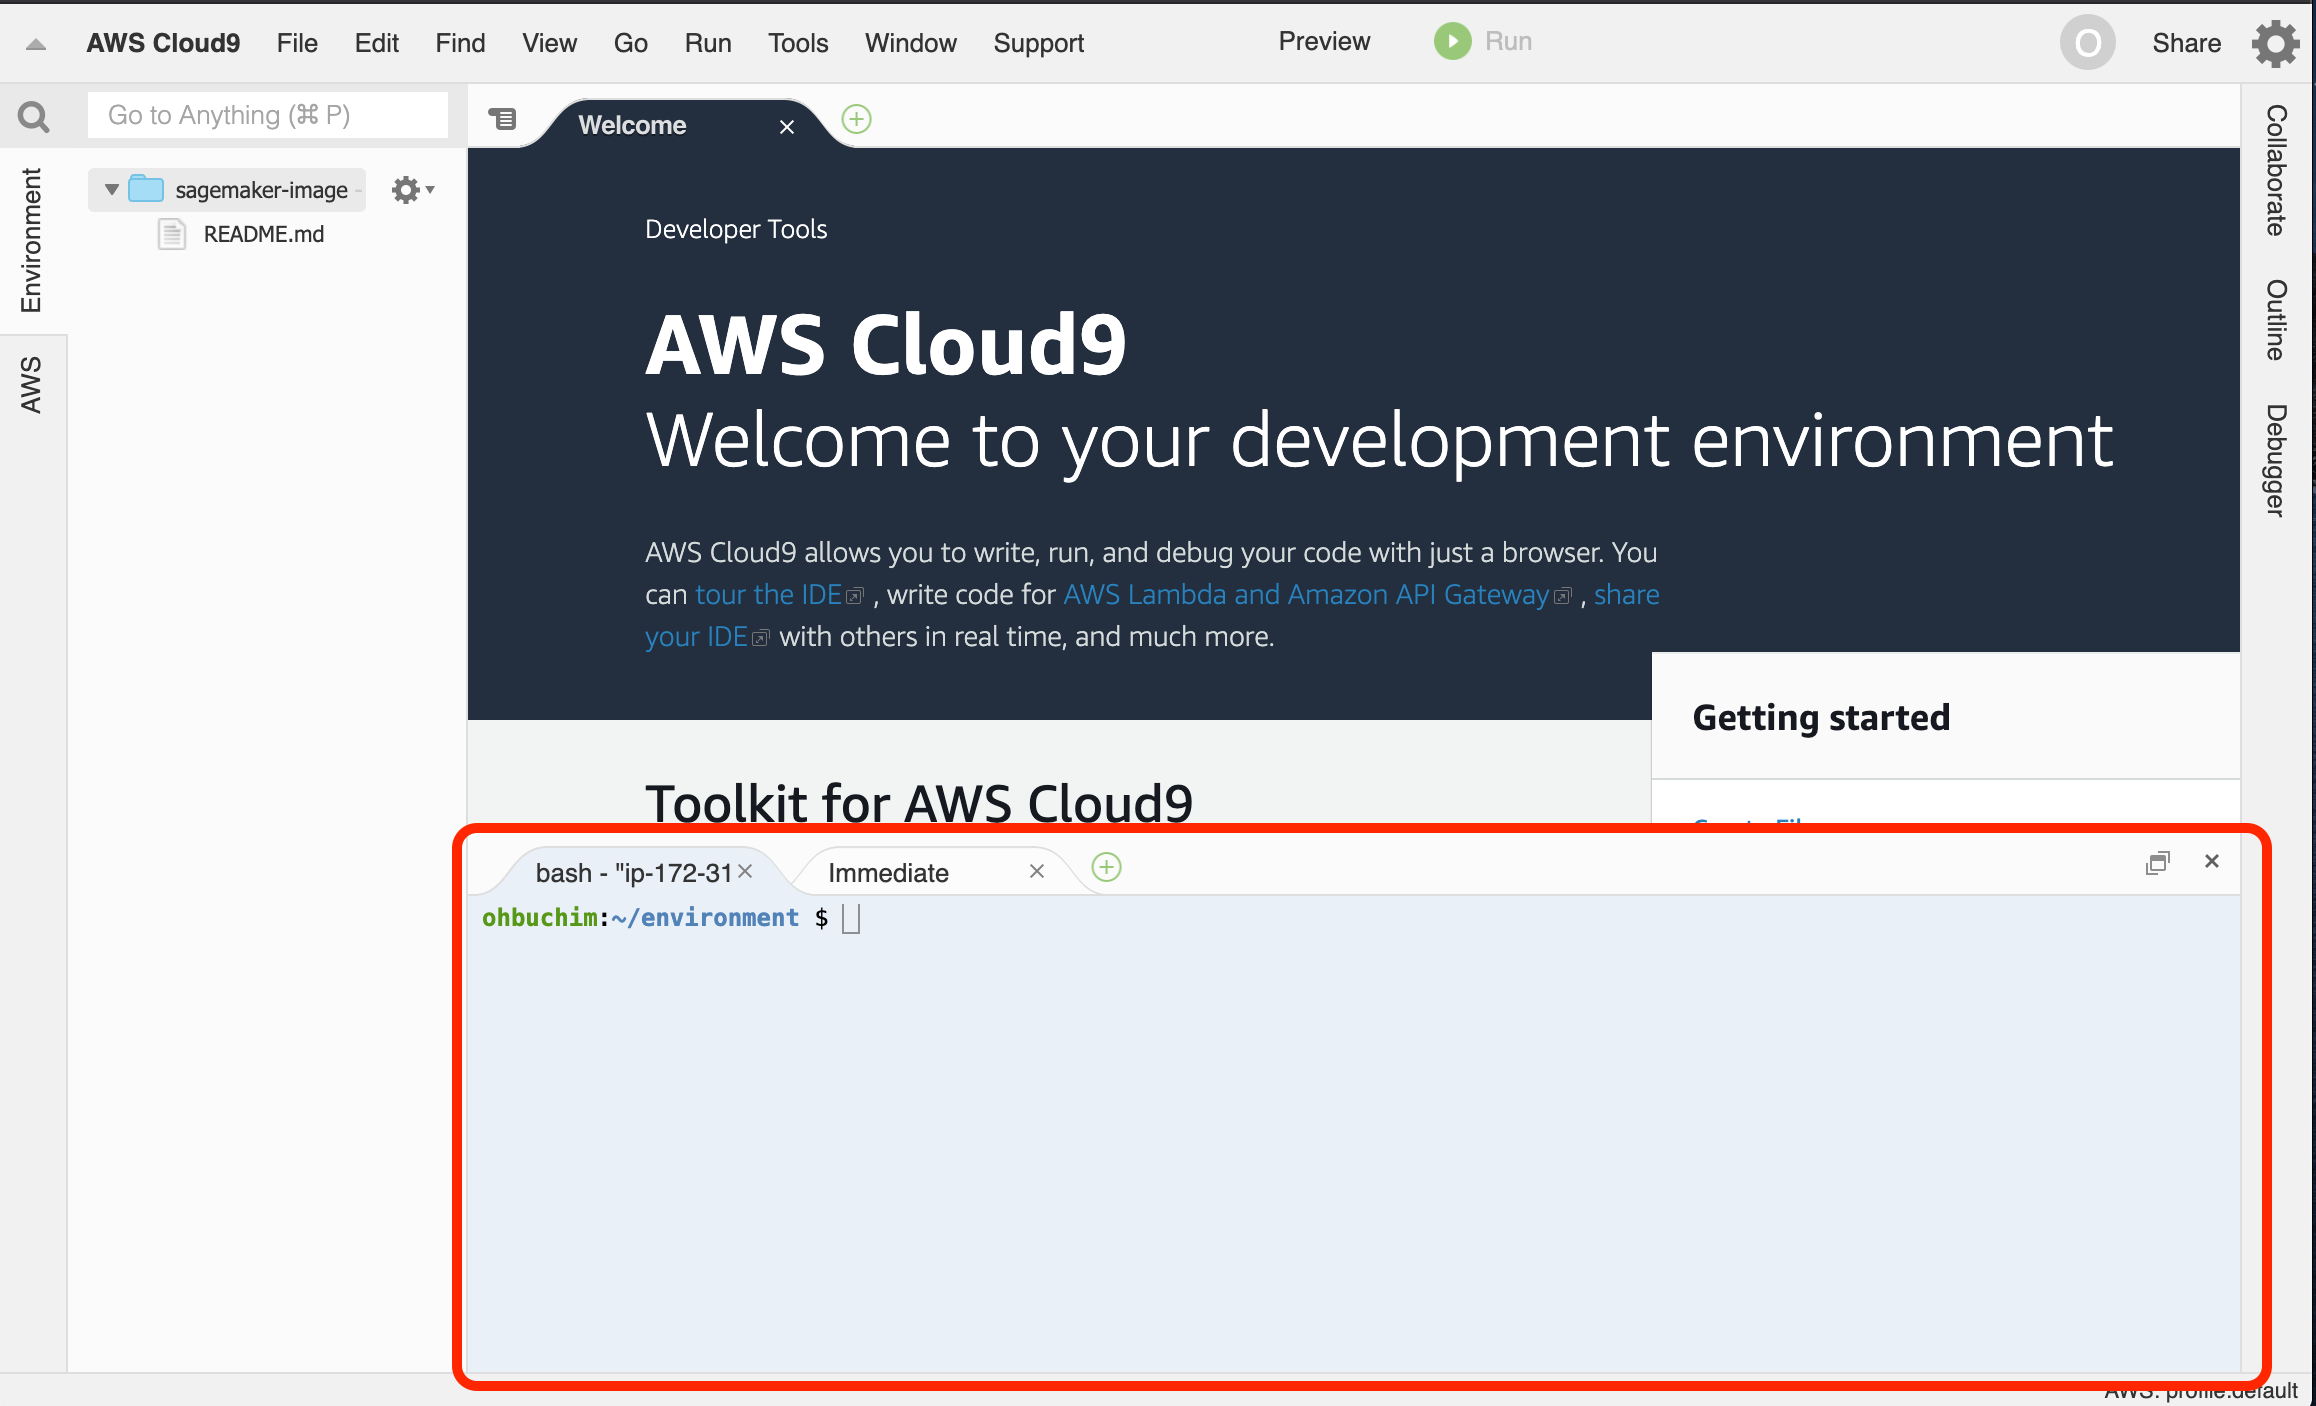
以下の画像の赤枠で囲んだ部分でコマンドを実行していきます。はじめはエリアが狭いですが、マウスで枠をドラッグすればサイズを変えられます。

Cloud9 のストレージのサイズを拡張
まずはじめに、Docker イメージを作る際に容量が足りなくなることがあるので、Cloud9 のストレージサイズを拡張します。以下のスクリプトを resize.sh などの名前で /home/ec2-user/environment に保存し、 sh resize.sh 30 などのように実行します。引数の数字は、ストレージを何GB に拡張するかを指定するものです。スクリプトは こちら から拝借しました。
# !/bin/bash

# Specify the desired volume size in GiB as a command-line argument. If not specified, default to 20 GiB.
SIZE=${1:-20}

# Get the ID of the environment host Amazon EC2 instance.
INSTANCEID=$(curl http://169.254.169.254/latest/meta-data/instance-id)

# Get the ID of the Amazon EBS volume associated with the instance.
VOLUMEID=$(aws ec2 describe-instances \
  --instance-id $INSTANCEID \
  --query "Reservations[0].Instances[0].BlockDeviceMappings[0].Ebs.VolumeId" \
  --output text)

# Resize the EBS volume.
aws ec2 modify-volume --volume-id $VOLUMEID --size $SIZE

# Wait for the resize to finish.
while [ \
  "$(aws ec2 describe-volumes-modifications \
    --volume-id $VOLUMEID \
    --filters Name=modification-state,Values="optimizing","completed" \
    --query "length(VolumesModifications)"\
    --output text)" != "1" ]; do
sleep 1
done

# Check if we're on an NVMe filesystem
if [ $(readlink -f /dev/xvda) = "/dev/xvda" ]
then
  # Rewrite the partition table so that the partition takes up all the space that it can.
  sudo growpart /dev/xvda 1

  # Expand the size of the file system.
  # Check if we are on AL2
  STR=$(cat /etc/os-release)
  SUB="VERSION_ID=\"2\""
  if [[ "$STR" == *"$SUB"* ]]
  then
    sudo xfs_growfs -d /
  else
    sudo resize2fs /dev/xvda1
  fi

else
  # Rewrite the partition table so that the partition takes up all the space that it can.
  sudo growpart /dev/nvme0n1 1

  # Expand the size of the file system.
  # Check if we're on AL2
  STR=$(cat /etc/os-release)
  SUB="VERSION_ID=\"2\""
  if [[ "$STR" == *"$SUB"* ]]
  then
    sudo xfs_growfs -d /
  else
    sudo resize2fs /dev/nvme0n1p1
  fi
fi
Amazon ECR のリポジトリ作成
ここでは、Docker イメージを push するための Amazon ECR のリポジトリを作成します。REGION を使いたいリージョン名で書き換えてから、以下のコマンドを Cloud9 で実行します。
REGION=<aws-region>
aws --region ${REGION} ecr create-repository \
    --repository-name smstudio-custom
イメージのビルドとプッシュ
ここからは、イメージを作っていきます。まずサンプルコードを GitHub リポジトリからクローンします。Cloud9 で以下のコマンドを実行します。
git clone https://github.com/aws-samples/sagemaker-studio-custom-image-samples.git
今回は Tensorflow 2.3 を作るサンプルを使うので、以下のコマンドでカレントディレクトリを変更します。
cd sagemaker-studio-custom-image-samples/examples/tf23-image
次に、Docker イメージをビルドします。ACCOUNT_ID をご自身の AWS アカウント ID で書き換えてから、以下のコマンドを実行します。今回、Cloud9 のインスタンスタイプはデフォルトの t2.micro のため、大きなイメージをビルドする際は非常に時間がかかります。今回のイメージビルドには 1-2分程度かかりました。大きなイメージをビルドする場合は、よりスペックの高いインスタンスタイプを選択してください。
# Modify these as required. The Docker registry endpoint can be tuned based on your current region from https://docs.aws.amazon.com/general/latest/gr/ecr.html#ecr-docker-endpoints
ACCOUNT_ID=<account-id>

# Build the image
IMAGE_NAME=custom-tf23
aws --region ${REGION} ecr get-login-password | docker login --username AWS --password-stdin ${ACCOUNT_ID}.dkr.ecr.${REGION}.amazonaws.com/smstudio-custom
docker build . -t ${IMAGE_NAME} -t ${ACCOUNT_ID}.dkr.ecr.${REGION}.amazonaws.com/smstudio-custom:${IMAGE_NAME}
ビルドしたイメージをローカルでテストする方法は こちら をご参照ください。のちの設定で使用する UID や GIU の確認方法も記載されています。
さらに、以下のコマンドを実行して、ビルドしたイメージを Amazon ECR にプッシュします。
docker push ${ACCOUNT_ID}.dkr.ecr.${REGION}.amazonaws.com/smstudio-custom:${IMAGE_NAME}
作成したイメージを Amazon SageMaker に登録
Amazon ECR にプッシュしたイメージを Amazon SageMaker で使えるようにします。ROLE_ARN に SageMakerFullAccess がついた SageMaker 用の IAM ロールの ARN を設定してから以下のコマンドを実行します。Amazon SageMaker Studio のドメインを作成した際に作成した IAM ロールを使用しても OK です。新規で IAM ロールを作成する場合は こちら をご参照ください。IAM ロール作成の際のユースケースの選択部分は SageMaker を選択してください。
# Role in your account to be used for the SageMaker Image
ROLE_ARN=<role-arn>

aws --region ${REGION} sagemaker create-image \
    --image-name ${IMAGE_NAME} \
    --role-arn ${ROLE_ARN}

aws --region ${REGION} sagemaker create-image-version \
    --image-name ${IMAGE_NAME} \
    --base-image "${ACCOUNT_ID}.dkr.ecr.${REGION}.amazonaws.com/smstudio-custom:${IMAGE_NAME}"

# Verify the image-version is created successfully. Do NOT proceed if image-version is in CREATE_FAILED state or in any other state apart from CREATED.
aws --region ${REGION} sagemaker describe-image-version --image-name ${IMAGE_NAME}
作成したイメージの AppImageConfig を作成
このコンフィグファイルでは、作成したイメージをノートブックで使用する際のカーネル名や、マウントディレクトリが定義されます。app-image-config-input.json で指定している KernelSpecs/Name には、作成したイメージをローカルで起動してから jupyter-kernelspec list を実行した際に表示されるカーネルから選択します。詳しい手順は こちら をご参照ください。
aws --region ${REGION} sagemaker create-app-image-config --cli-input-json file://app-image-config-input.json
イメージをドメインにアタッチ
Amazon SageMaker に登録したイメージを AppImageConfig で指定して Amazon SageMaker ドメインにアタッチします。
update-domain-input.json の中の DomainId にドメイン ID(AWS コンソールでは Studio ID と記載。SSO を使っている場合は Studio のアドレスと書かれた部分の d-xxxxx 部分)を設定してから、以下のコマンドを実行します。
aws --region ${REGION} sagemaker update-domain --cli-input-json file://update-domain-input.json
これで、作成したイメージを Amazon SageMaker Studio で使用できるようになりました。Amazon SageMaker コンソールの左側のメニューから Amazon SageMaker Studio をクリックして SageMaker Studio コントロールパネルを表示すると、一番下の「ドメインにアタッチされたカスタムイメージ」のところにイメージが追加されていることが確認できます。

新しいイメージをアタッチしたら、Amazon SageMaker Studio のメニューから File -> shutdown でいったん Jupyter server を停止し、再度 Amazon SageMaker Studio を起動してください。これを忘れると、カーネル一覧に新しいカーネルが表示されません。
作成したイメージを Amazon SageMaker Studio ノートブックで使用
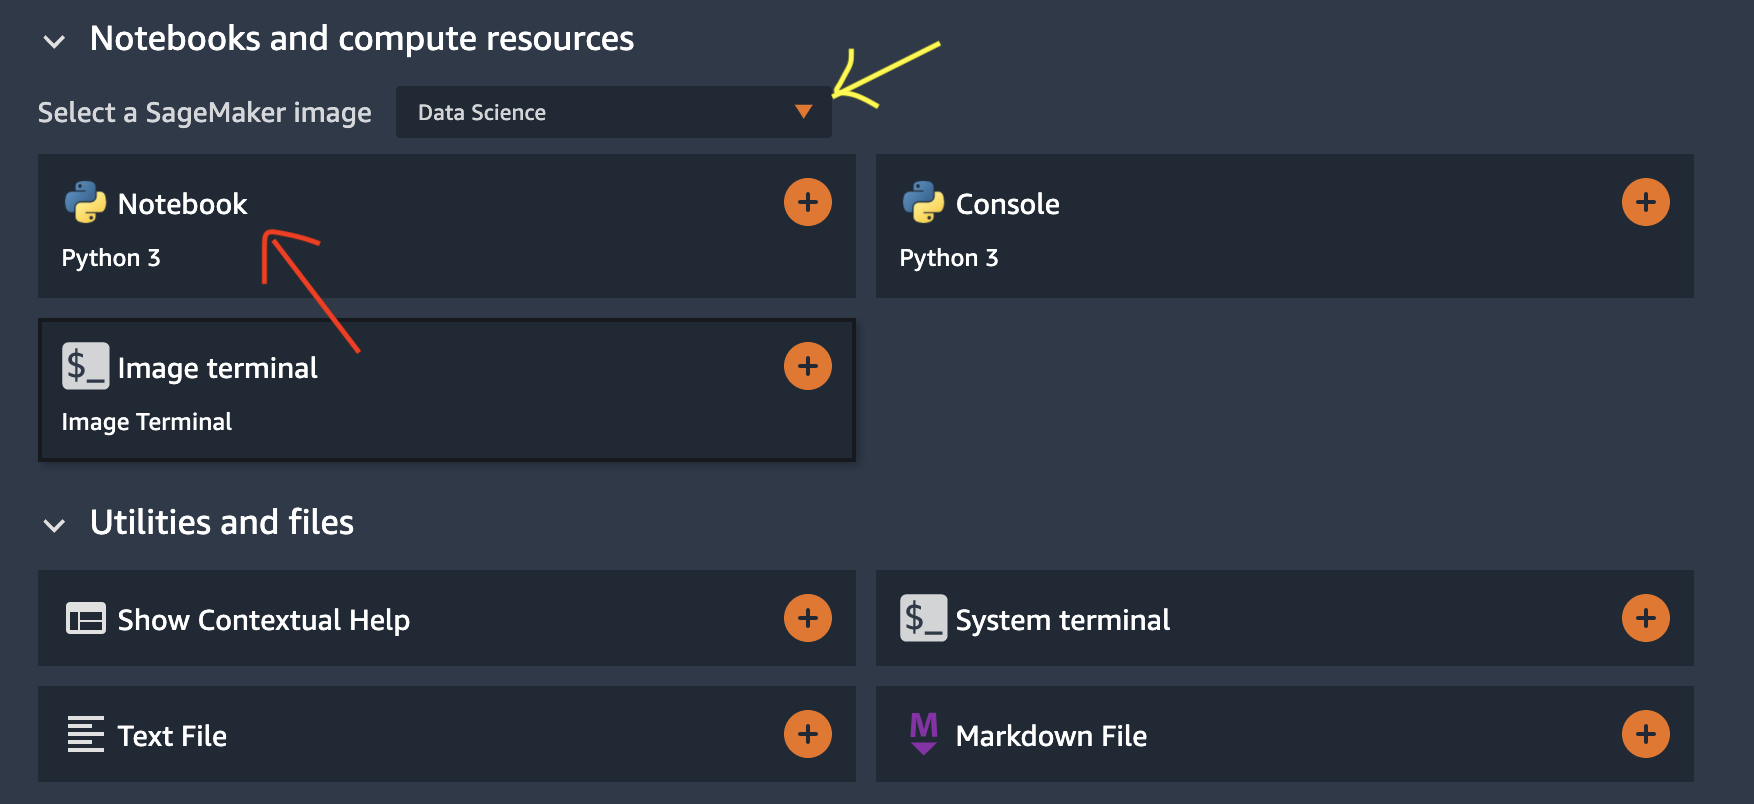
SageMaker Studio コントロールパネルから、Amazon SageMaker Studio を起動します。ノートブックを新規作成する場合は、Launcher の下の方に Notebooks and compute resources
という項目があるので、そこの Select a SageMaker Image のプルダウンメニュー(画像の黄色い矢印)で作成したイメージを選択して Notebook ボタン(画像の赤い矢印)をクリックします。
すでに作成済みのノートブックでイメージを選択する場合は、ノートブック上部にあるカーネル名のエリア(画像の黄色い矢印)をクリックし、プルダウンメニューから所望のカーネルを選択します。

まとめ
本記事では、Amazon SageMaker Studio で独自のカスタムイメージをノートブックのカーネルとして使用する方法をご紹介しました。この機能によって、自分の使いたい環境を簡単にセットアップできます。
