はじめに
AWS VPC 内のリソースに安全にアクセスするために、VPC 内の EC2 に SoftEther VPN Server をインストールし、VPN 経由でリソースにアクセスできるようにする。VPN プロトコルは、通信にあたり特別なクライアントソフトウェアをインストールする必要がない L2TP/IPsec を採用し、認証方式は事前共有鍵による認証とした。
ところで、VPN 通信には「フルトンネリング方式」と「スプリットトンネリング方式」がある。「フルトンネリング方式」は、すべての通信が VPN サーバを経由する方式で、「スプリットトンネリング方式」は、VPN 接続が必要な宛先への通信のみ VPN サーバを経由させ、それ以外の通信は直接通信させる方式である。EC2 では、インスタンスからインターネットへのデータ転送量に応じて費用が発生するため、可能な限りコストを抑えるべく「スプリットトンネリング方式」で設定を行うこととした。
なお、今回の目的は AWS が提供する AWS Client VPN を利用することでも達成できると考えられるが、個人で利用するにはコストが高い(1 か月あたり 1 万円程度かかる)ため、今回は使用しないことにした。
※ 本稿の記載内容は十分に検証されておりませんので、あくまで自己責任で参考程度にご利用ください。
SoftEther VPN Server のインストール
まずは SoftEther VPN Server をインストールする EC2 インスタンスを起動する。
インスタンスタイプは、本稿執筆時点で最もコストが安い t4g.nano インスタンスを選択した(数日間稼働させているが当方の利用状況では特にスペック不足は感じないため、このサイズで十分と思われる)。また、VPN 通信のために セキュリティグループで UDP 500 と UDP 4500 を開放する必要があることに注意。インスタンスの構築中は SSH 通信のために TCP 22 も開放する必要があるが、作業終了後は閉じることを推奨する。また、グローバル IP アドレスが変更されるとクライアント側で再設定が必要になるため、Elastic IP アドレスを割り当ててグローバル IP アドレスを固定しておくことを推奨する。
インスタンスが起動したら SSH 接続して以下のコマンドを実行する。
sudo yum update
sudo yum install gcc
https://www.softether-download.com から SoftEther VPN Server のダウンロードとインストールを行う。今回は ARM ベースの CPU を搭載した T4g インスタンスファミリーを使用しているため、それに対応するパッケージをダウンロードしている。
wget https://github.com/SoftEtherVPN/SoftEtherVPN_Stable/releases/download/v4.38-9760-rtm/softether-vpnserver-v4.38-9760-rtm-2021.08.17-linux-arm64-64bit.tar.gz
tar zxvf softether-vpnserver-v4.38-9760-rtm-2021.08.17-linux-arm64-64bit.tar.gz
cd vpnserver
make
cd ..

sudo mv vpnserver /opt
sudo chown root:root -R /opt/vpnserver
systemd による自動起動を行うため、以下の内容で /etc/systemd/system/vpnserver.service ファイルを作成する。
[Unit]
Description=SoftEther VPN Server Service
After=network.target

[Service]
Type=forking
User=root
ExecStartPre=/sbin/ip link set dev eth0 promisc on
ExecStart=/opt/vpnserver/vpnserver start
ExecStop=/opt/vpnserver/vpnserver stop
Restart=on-abort
WorkingDirectory=/opt/vpnserver/

[Install]
WantedBy=multi-user.target
SoftEther VPN Server を起動し、systemd による自動起動を有効にする。
sudo systemctl daemon-reload
sudo systemctl start vpnserver
sudo systemctl enable vpnserver
SoftEther VPN Server の設定
SoftEther VPN Server の設定を行うには以下の方法がある。
- コマンドラインツール vpncmd を使用する方法
- GUI アプリケーション (SoftEther VPN Server Manager for Windows/Mac) を使用する方法
今回は前者のコマンドラインツール vpncmd を使用して設定を行う。
sudo /opt/vpnserver/vpncmd を実行すると対話式のユーザーインターフェースで SoftEther VPN の設定を行うことができる。今回は SoftEther VPN Server の設定を行うため、Select 1, 2 or 3: では 1 と入力する。
vpncmd command - SoftEther VPN Command Line Management Utility
SoftEther VPN Command Line Management Utility (vpncmd command)
Version 4.38 Build 9760   (English)
Compiled 2021/08/17 22:32:49 by buildsan at crosswin
Copyright (c) SoftEther VPN Project. All Rights Reserved.

By using vpncmd program, the following can be achieved.

1. Management of VPN Server or VPN Bridge
2. Management of VPN Client
3. Use of VPN Tools (certificate creation and Network Traffic Speed Test Tool)

Select 1, 2 or 3: 1
そのあとの 2 つの質問はそのまま何も入力せずに Enter キーを押下。
Specify the host name or IP address of the computer that the destination VPN Server or VPN Bridge is operating on.
By specifying according to the format 'host name:port number', you can also specify the port number.
(When the port number is unspecified, 443 is used.)
If nothing is input and the Enter key is pressed, the connection will be made to the port number 8888 of localhost (this computer).
Hostname of IP Address of Destination:

If connecting to the server by Virtual Hub Admin Mode, please input the Virtual Hub name.
If connecting by server admin mode, please press Enter without inputting anything.
Specify Virtual Hub Name:
Connection has been established with VPN Server "localhost" (port 443).

You have administrator privileges for the entire VPN Server.
HubCreate コマンドで仮想 HUB を作成する。管理用パスワードを設定するよう求められるので、設定する。
VPN Server> HubCreate main
HubCreate command - Create New Virtual Hub
Please enter the password. To cancel press the Ctrl+D key.

Password: ********
Confirm input: ********


The command completed successfully.
上で作成した main という名前の仮想 HUB を設定するモードに入る。
VPN Server> Hub main
Hub command - Select Virtual Hub to Manage
The Virtual Hub "main" has been selected.
The command completed successfully.
UserCreate コマンドで VPN 接続を行うユーザーを作成する。
VPN Server/main> UserCreate user001 /GROUP:none /REALNAME:none /NOTE:none
UserCreate command - Create User
The command completed successfully.
UserPasswordSet コマンドで作成したユーザーのパスワードを設定する。
VPN Server/main> UserPasswordSet user001
UserPasswordSet command - Set Password Authentication for User Auth Type and Set Password
Please enter the password. To cancel press the Ctrl+D key.

Password: ********
Confirm input: ********


The command completed successfully.
Windows や Android などのクライアントから接続できるようにするため、IPsecEnable コマンドで L2TP を有効化する。ここで事前共有鍵を設定するよう求められるので、設定する。ここで入力した値は、後でクライアントから VPN 接続する際に必要となる。なお、SoftEther のマニュアルでは
Google Android 4.0 にはバグがあり、PSK の文字数が 10 文字を超えた場合は VPN 通信に失敗することがあります。そのため、PSK の文字数は 9 文字以下にすることを推奨します。
との記載があるが、特に Android 4.0 への配慮が必要なければ、より長い文字数の事前共有鍵を設定すべきであろう。
VPN Server/main> IPsecEnable /L2TP:yes /L2TPRAW:no /ETHERIP:no /DEFAULTHUB:main
IPsecEnable command - Enable or Disable IPsec VPN Server Function
Pre Shared Key for IPsec (Recommended: 9 letters at maximum): ********

The command completed successfully.
SecureNatEnable コマンドで、Secure NAT 機能を有効化する。
VPN Server/main> SecureNatEnable
SecureNatEnable command - Enable the Virtual NAT and DHCP Server Function (SecureNat Function)
The command completed successfully.
DhcpSet コマンドで、VPC 内のリソースに対する通信を SoftEther VPN 経由にするために、ルーティングを設定する。/PUSHROUTE: に続く 172.31.0.0/255.255.0.0 の部分は、実際の VPC の CIDR に合わせて書き換えが必要である。なお、ルーティングは必ずしも VPN サーバ側で設定しなくても、クライアント側のルーティングテーブルを直接編集しても構わない。クライアント側で設定する場合は、このコマンドの実行はスキップすることができる。
VPN Server/main> DhcpSet /START:192.168.30.10 /END:192.168.30.200 /MASK:255.255.255.0 /EXPIRE:7200 /GW:192.168.30.1 /DNS:192.168.30.1 /DNS2:none /DOMAIN:none /LOG:yes /PUSHROUTE:"172.31.0.0/255.255.0.0/192.168.30.1"
DhcpSet command - Change Virtual DHCP Server Function Setting of SecureNAT Function
The command completed successfully.
exit と入力して vpncmd を終了する。なお、設定後に SoftEther VPN Server の再起動などを行う必要はない。
VPN Server/main> exit
以上で SoftEther VPN Server の設定は完了となる。
クライアント (Windows 10) の設定
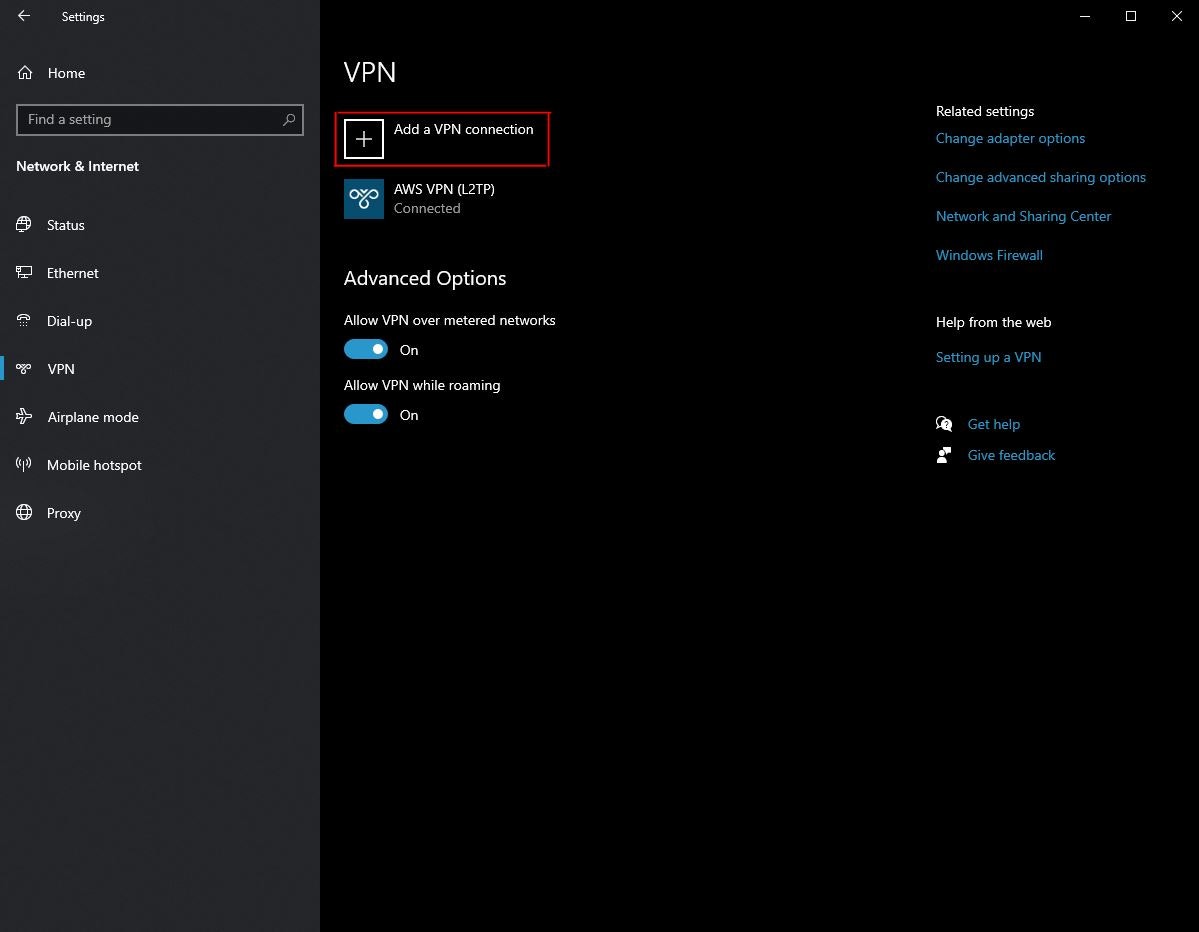
スタートメニューを開き VPN と入力して VPN の設定画面を開き、[VPN 接続を追加する] をクリック。
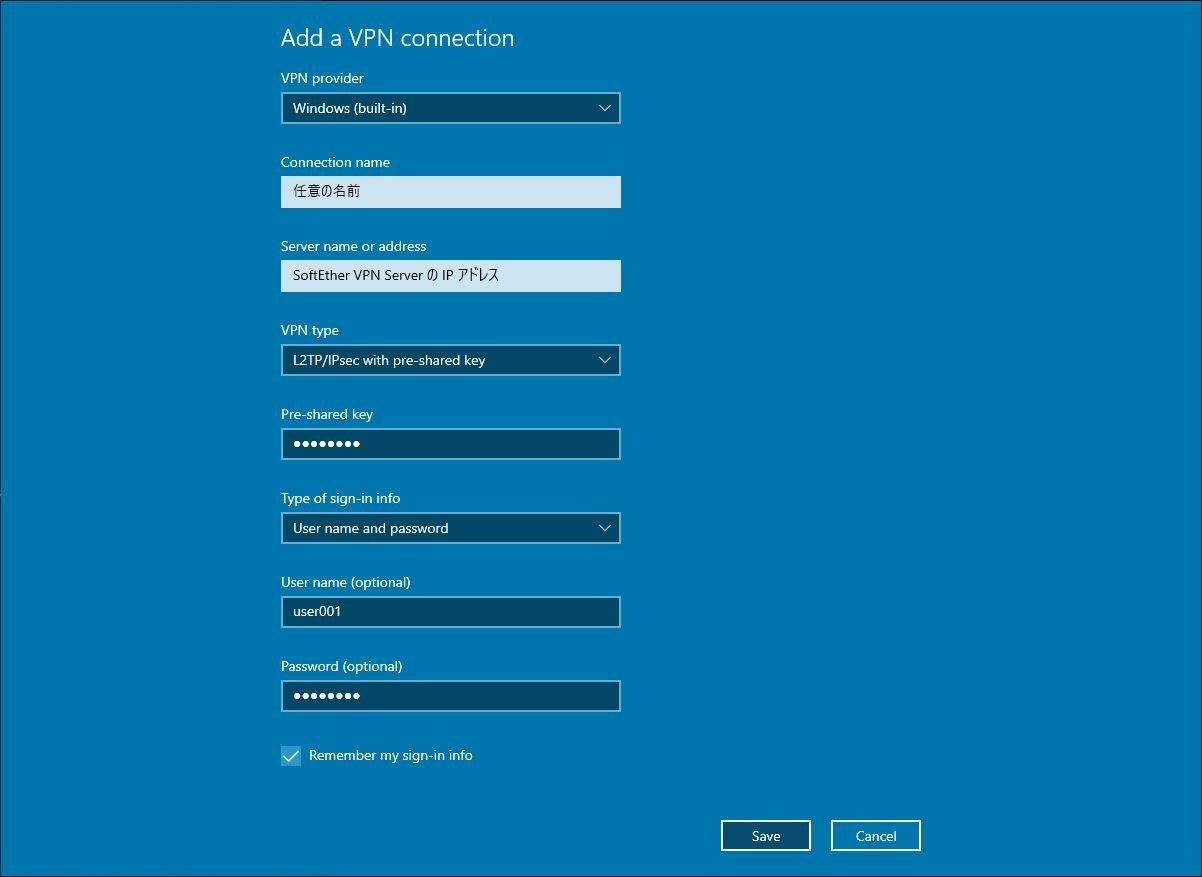
下図のように各項目を設定する。なお、表示言語が英語なのは筆者の好みなのでお気になさらぬよう...
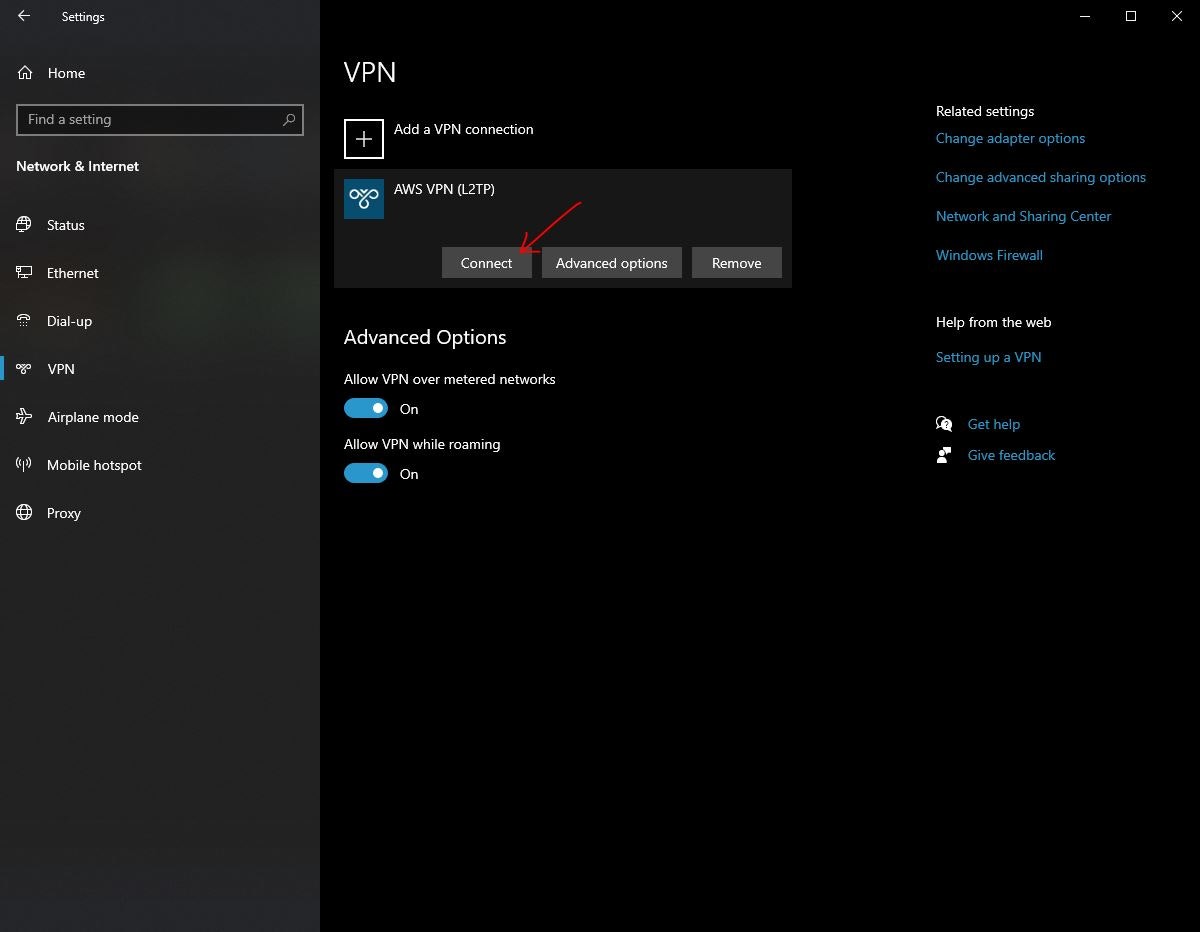
作成した VPN 接続をクリックし [接続] ボタンをクリック。
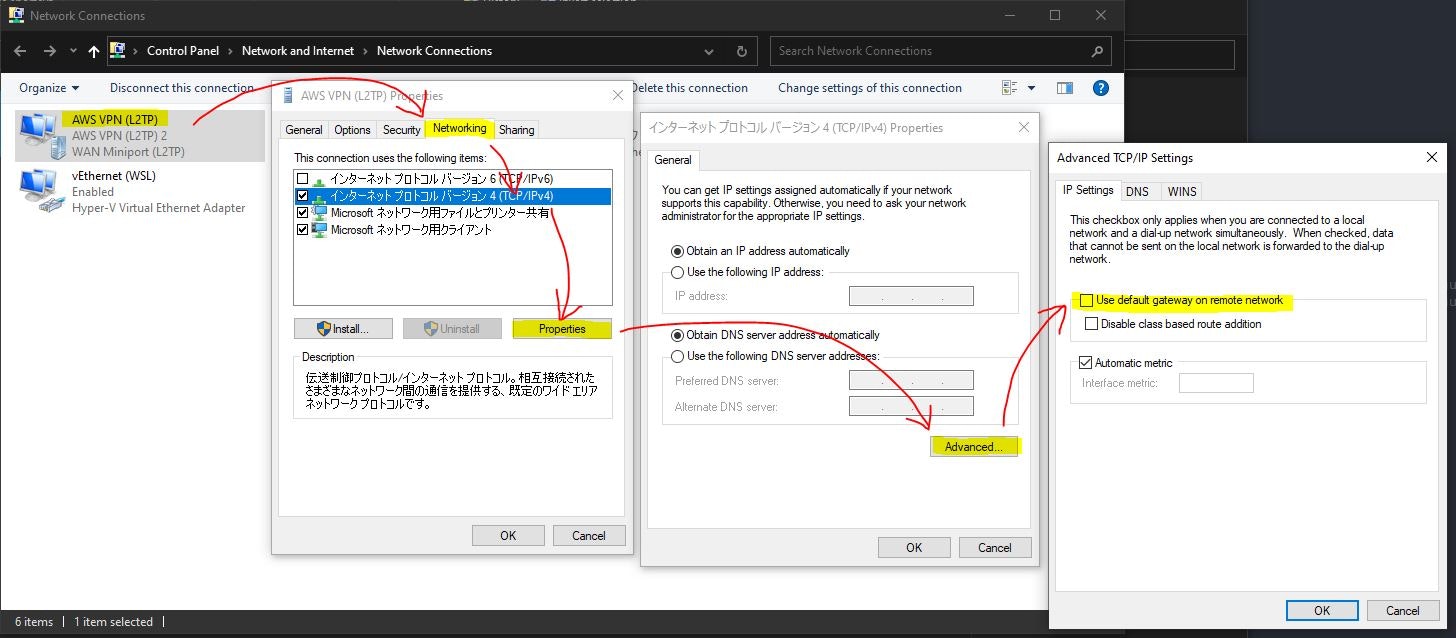
この時点では、クライアントからのすべての通信が SoftEther VPN Server 経由となる。VPN 接続が必要な宛先以外への通信は直接行うよう(スプリットトンネリング方式)にするため、以下の手順に従い設定を行う。
- [コントロールパネル] > [ネットワークとインターネット] > [ネットワーク接続] 画面を開く。
- 先ほど作成した VPN 接続を右クリックして [プロパティ] をクリック。
- [ネットワーク] タブで [インターネットプロトコルバージョン 4 (TCP/IPv4)] を選択し [プロパティ] ボタンをクリック。
- [全般] タブで [詳細設定] ボタンをクリック。
- [リモートネットワークでデフォルトゲートウェイを使う] のチェックを外す。
以上でクライアント側の設定は完了となる。
関連記事