rails プロジェクトの作成, 静的ページの作成
rails new bootstrap_exaple -d mysql
cd bootstrap_exaple
rails generate controller StaticPages home help
ルーティング修正
Rails.application.routes.draw do
  root 'static_pages#home'
  get  'static_pages/home'
  get  'static_pages/help'
  get  'static_pages/about'
  get  'static_pages/contact'
end
http://[address]:3000/static_pages/home にアクセスすると以下のようなページが閲覧できる。
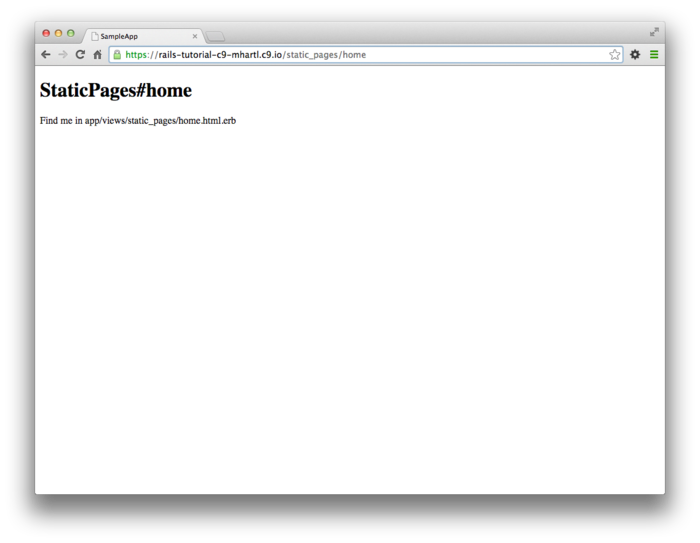
以下はStaticPagesコントローラ
class StaticPagesController < ApplicationController
  def home
  end

  def help
  end
end
Bootstrap gem のインストール
source 'https://rubygems.org'

gem 'rails',          '5.1.2'
gem 'bootstrap-sass', '3.3.7'
bundle install
railsを再起動する。
home ページの修正
curl -o app/assets/images/rails.png -OL railstutorial.jp/rails.png
<div class="center jumbotron">
  <h1>Welcome to the Sample App</h1>

  <h2>
    This is the home page for the
    <a href="https://railstutorial.jp/">Ruby on Rails Tutorial</a>
    sample application.
  </h2>

  <%= link_to "Sign up now!", '#', class: "btn btn-lg btn-primary" %>
</div>

<%= link_to image_tag("rails.png", alt: "Rails logo"),
            'http://rubyonrails.org/' %>
<!DOCTYPE html>
<html>
  <head>
    <title><%= full_title(yield(:title)) %></title>
    <%= csrf_meta_tags %>
    <%= stylesheet_link_tag    'application', media: 'all',
                               'data-turbolinks-track': 'reload' %>
    <%= javascript_include_tag 'application',
                               'data-turbolinks-track': 'reload' %>
    <!--[if lt IE 9]>
      <script src="//cdnjs.cloudflare.com/ajax/libs/html5shiv/r29/html5.min.js">
      </script>
    <![endif]-->
  </head>
  <body>
    <header class="navbar navbar-fixed-top navbar-inverse">
      <div class="container">
        <%= link_to "sample app", '#', id: "logo" %>
        <nav>
          <ul class="nav navbar-nav navbar-right">
            <li><%= link_to "Home",   '#' %></li>
            <li><%= link_to "Help",   '#' %></li>
            <li><%= link_to "Log in", '#' %></li>
          </ul>
        </nav>
      </div>
    </header>
    <div class="container">
      <%= yield %>
    </div>
  </body>
</html>
full_titleヘルパーを定義する。
module ApplicationHelper

  # ページごとの完全なタイトルを返す
  def full_title(page_title = '')
    base_title = "Ruby on Rails Tutorial Sample App"
    if page_title.empty?
      base_title
    else
      page_title + " | " + base_title
    end
  end
end
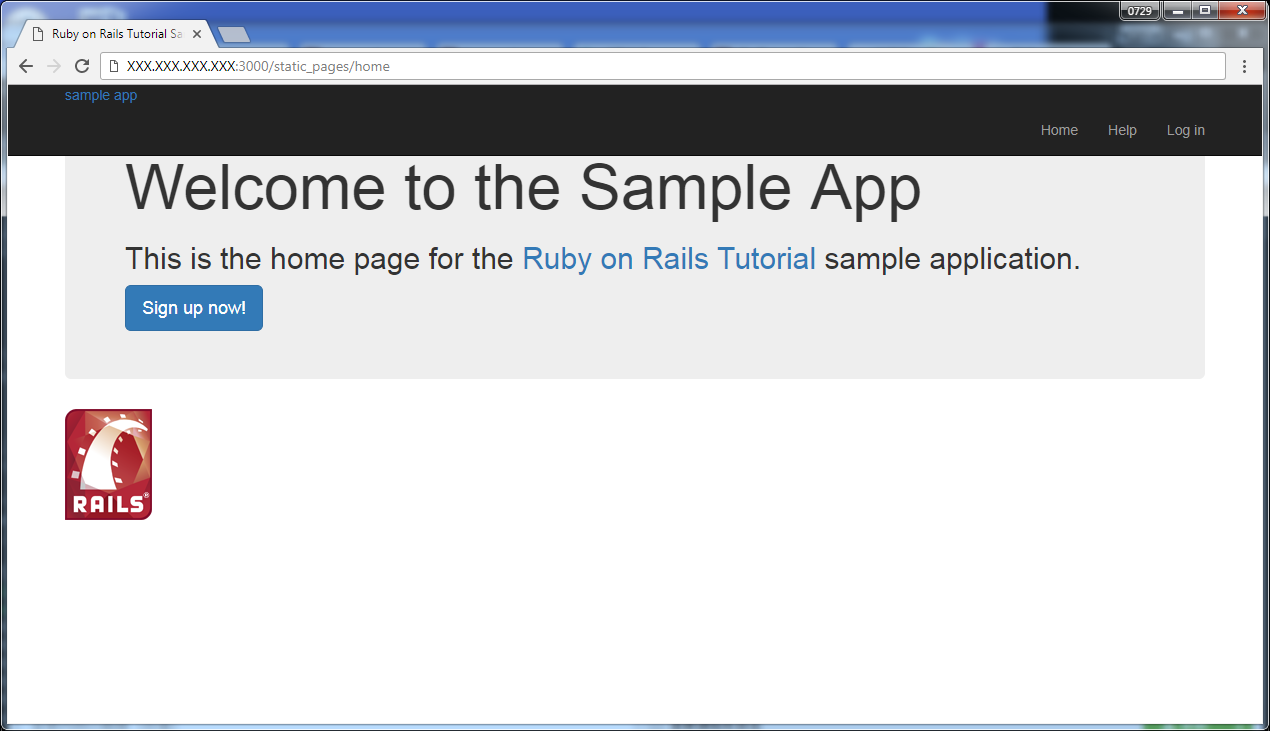
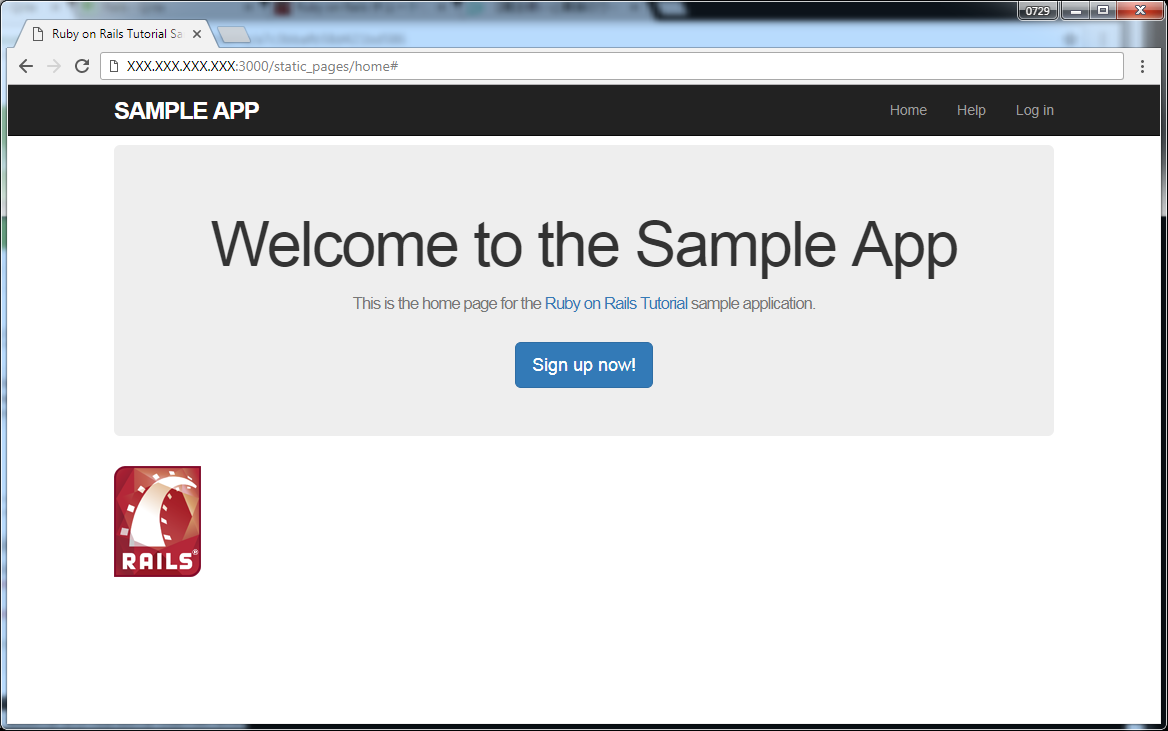
http://[address]:3000/static_pages/home
にアクセスすると以下のようなページが出力される。
カスタムCSSの追加
すべてのページに適用される共通のスタイルをCSSに追加する。
@import "bootstrap-sprockets";
@import "bootstrap";

/* universal */

body {
  padding-top: 60px;
}

section {
  overflow: auto;
}

textarea {
  resize: vertical;
}

.center {
  text-align: center;
}

.center h1 {
  margin-bottom: 10px;
}
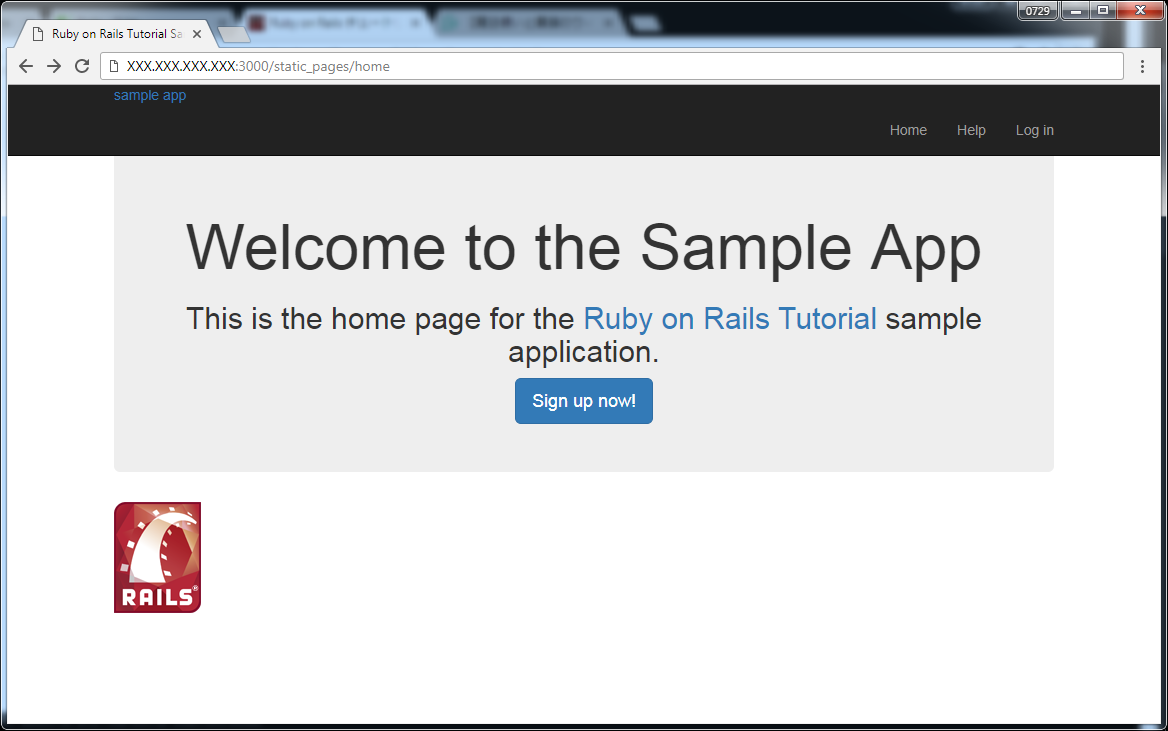
http://[address]:3000/static_pages/home
が以下のようなページに更新される。
さらに以下を追加してテキストの表示も加工する
@import "bootstrap-sprockets";
@import "bootstrap";

...

/* typography */

h1, h2, h3, h4, h5, h6 {
  line-height: 1;
}

h1 {
  font-size: 3em;
  letter-spacing: -2px;
  margin-bottom: 30px;
  text-align: center;
}

h2 {
  font-size: 1.2em;
  letter-spacing: -1px;
  margin-bottom: 30px;
  text-align: center;
  font-weight: normal;
  color: #777;
}

p {
  font-size: 1.1em;
  line-height: 1.7em;
}
"SAMPLE APP"ボタンの加工表示
@import "bootstrap-sprockets";
@import "bootstrap";
.
.
.
/* header */

# logo {
  float: left;
  margin-right: 10px;
  font-size: 1.7em;
  color: #fff;
  text-transform: uppercase;
  letter-spacing: -1px;
  padding-top: 9px;
  font-weight: bold;
}

# logo:hover {
  color: #fff;
  text-decoration: none;
}
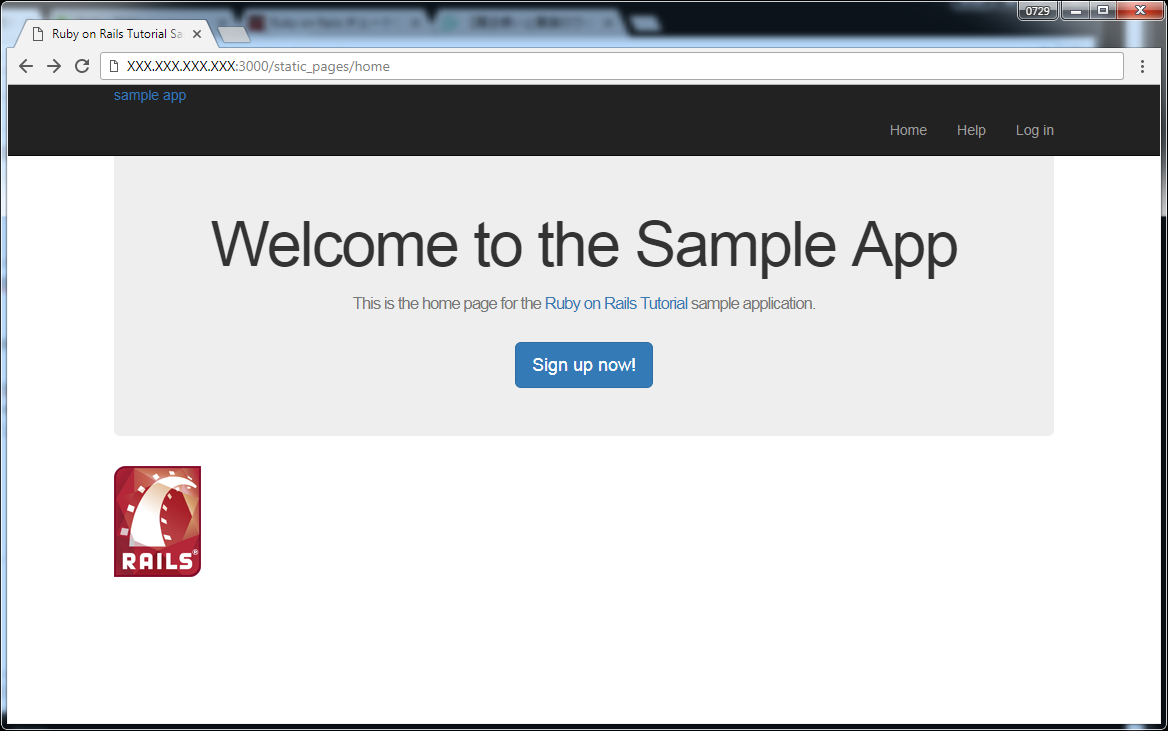
以下のように加工されて表示される。
Partialの利用
shim, header, footerを追加するため、application.html.erbを以下のように修正
<!DOCTYPE html>
<html>
  <head>
    <title><%= full_title(yield(:title)) %></title>
    <%= csrf_meta_tags %>
    <%= stylesheet_link_tag    'application', media: 'all',
                               'data-turbolinks-track': 'reload' %>
    <%= javascript_include_tag 'application',
                               'data-turbolinks-track': 'reload' %>
    <%= render 'layouts/shim' %>
  </head>
  <body>
    <%= render 'layouts/header' %>
    <div class="container">
      <%= yield %>
      <%= render 'layouts/footer' %>
    </div>
  </body>
</html>
shim用partial
<!--[if lt IE 9]>
  <script src="//cdnjs.cloudflare.com/ajax/libs/html5shiv/r29/html5.min.js">
  </script>
<![endif]-->
header用partial
<header class="navbar navbar-fixed-top navbar-inverse">
  <div class="container">
    <%= link_to "sample app", '#', id: "logo" %>
    <nav>
      <ul class="nav navbar-nav navbar-right">
        <li><%= link_to "Home",   '#' %></li>
        <li><%= link_to "Help",   '#' %></li>
        <li><%= link_to "Log in", '#' %></li>
      </ul>
    </nav>
  </div>
</header>
footer用partial
<footer class="footer">
  <small>
    The <a href="https://railstutorial.jp/">Ruby on Rails Tutorial</a>
    by <a href="http://www.michaelhartl.com/">Michael Hartl</a>
  </small>
  <nav>
    <ul>
      <li><%= link_to "About",   '#' %></li>
      <li><%= link_to "Contact", '#' %></li>
      <li><a href="http://news.railstutorial.org/">News</a></li>
    </ul>
  </nav>
</footer>
サイトにfooter用CSSを追加する。
.
.
.
/* footer */

footer {
  margin-top: 45px;
  padding-top: 5px;
  border-top: 1px solid #eaeaea;
  color: #777;
}

footer a {
  color: #555;
}

footer a:hover {
  color: #222;
}

footer small {
  float: left;
}

footer ul {
  float: right;
  list-style: none;
}

footer ul li {
  float: left;
  margin-left: 15px;
}
以下のようにfooterが表示される。
※Headerはすでに埋め込まれていたので画面変化無し

アセットパイプライン (Asset Pipeline)の利用
LESSで定義された変数と同じものが使えるようにするgem bootstrap-sass
がすでにインストールされていることを確認する。
gem list | grep bootstrap-sass
ネストを利用するため以下となるように編集する。
@import "bootstrap-sprockets";
@import "bootstrap";

/* mixins, variables, etc. */

$gray-medium-light: #eaeaea;

/* universal */

body {
  padding-top: 60px;
}

section {
  overflow: auto;
}

textarea {
  resize: vertical;
}

.center {
  text-align: center;
  h1 {
    margin-bottom: 10px;
  }
}

/* typography */

h1, h2, h3, h4, h5, h6 {
  line-height: 1;
}

h1 {
  font-size: 3em;
  letter-spacing: -2px;
  margin-bottom: 30px;
  text-align: center;
}

h2 {
  font-size: 1.2em;
  letter-spacing: -1px;
  margin-bottom: 30px;
  text-align: center;
  font-weight: normal;
  color: $gray-light;
}

p {
  font-size: 1.1em;
  line-height: 1.7em;
}


/* header */

# logo {
  float: left;
  margin-right: 10px;
  font-size: 1.7em;
  color: white;
  text-transform: uppercase;
  letter-spacing: -1px;
  padding-top: 9px;
  font-weight: bold;
  &:hover {
    color: white;
    text-decoration: none;
  }
}

/* footer */

footer {
  margin-top: 45px;
  padding-top: 5px;
  border-top: 1px solid $gray-medium-light;
  color: $gray-light;
  a {
    color: $gray;
    &:hover {
      color: $gray-darker;
    }
  }
  small {
    float: left;
  }
  ul {
    float: right;
    list-style: none;
    li {
      float: left;
      margin-left: 15px;
    }
  }
}
レイアウトリンク
以下のようにroutingを変更する。
Rails.application.routes.draw do
  root 'static_pages#home'
  match '/home', to: 'static_pages#home', via: 'get'
  match '/help', to: 'static_pages#help', via: 'get'
  match '/about', to: 'static_pages#about', via: 'get'
  match '/contact', to: 'static_pages#contact', via: 'get'
end
header, footerの各種リンクページを以下のように編集する。
<header class="navbar navbar-fixed-top navbar-inverse">
  <div class="container">
    <%= link_to "sample app", '#', id: "logo" %>
    <nav>
      <ul class="nav navbar-nav navbar-right">
        <li><%= link_to "Home", home_path %></li>
        <li><%= link_to "Help", help_path %></li>
        <li><%= link_to "Log in", '#' %></li>
      </ul>
    </nav>
  </div>
</header>
<footer class="footer">
  <small>
    The <a href="https://railstutorial.jp/">Ruby on Rails Tutorial</a>
    by <a href="http://www.michaelhartl.com/">Michael Hartl</a>
  </small>
  <nav>
    <ul>
      <li><%= link_to "About", about_path %></li>
      <li><%= link_to "Contact", contact_path %></li>
      <li><a href="http://news.railstutorial.org/">News</a></li>
    </ul>
  </nav>
</footer>
Contact pageが未作成なら以下の手順で作成しておく。
class StaticPagesController < ApplicationController

  def home
  end

  def help
  end

  def about
  end

  def contact
  end
end
<% provide(:title, 'Contact') %>
<h1>Contact</h1>
<p>
  Contact the Ruby on Rails Tutorial about the sample app at the
  <a href="https://railstutorial.jp/contact">contact page</a>.
</p>
各種リンクにアクセスできるようになる。
参考資料
「Ruby on Rails チュートリアル ~第5章 レイアウトを作成する~ 」
https://railstutorial.jp/chapters/filling_in_the_layout?version=5.1#cha-filling_in_the_layout
「Railsにおけるリンクの記述方法とそのテスト」
https://qiita.com/kidach1/items/d704e7eb63513c3831ae
「CSSの擬似クラス:link, :visited, :hover, :active, :focusの使い方」
http://www.phenomena.co.jp/blog/2017/03/29/css%E3%81%AE%E6%93%AC%E4%BC%BC%E3%82%AF%E3%83%A9%E3%82%B9link-visited-hover-active-focus%E3%81%AE%E4%BD%BF%E3%81%84%E6%96%B9/
「Ruby on Rails入門」
https://www.rubylife.jp/rails/