はじめに
Googleアカウントでの認証を試した手順メモ。
環境は「Cordova+AngularJS+OnsenUI+jQuery」
Googleアカウント認証用のクライアントID作成
- Google Developers Consoleで新規プロジェクトを作成。
- 作成したプロジェクトを選択し、Google APIを利用するを選択。
- Google+ APIを有効にする。
- 左のメニューの認証情報を押下し、OAuth同意画面でメールアドレスとサービス名を登録。
- 認証情報の認証情報を追加からOAuth 2.0 クライアントIDを選択し、アプリケーションの種類はウェブアプリケーションにし、必要情報を入力して作成。
プロジェクト作成
プロジェクトを作成し、プラットフォームを追加。
アプリ内ブラウザプラグインを追加しておく。
$ cordova create GoogleOAuth
$ cd GoogleOAuth
$ cordova platform add ios
$ cordova plugin add cordova-plugin-inappbrowser
config.xmlの編集
config.xmlのアプリ名とかの修正。
config.xml
<?xml version='1.0' encoding='utf-8'?>
<widget id="io.cordova.googleOAuth" version="0.0.1" xmlns="http://www.w3.org/ns/widgets" xmlns:cdv="http://cordova.apache.org/ns/1.0">
    <name>GoogleOAuth</name>
    <description>
        This is a google oauth sample application.
    </description>
    <author email="sample@example.com" href="http://example.com">
        Sample Team
    </author>
<!-- 以下略 -->
htmlの編集
AngularJS、Onsen UI、jQueryが動くように編集。
index.html
<!DOCTYPE html>
<html ng-app="google_oauth">
<head>
  <meta http-equiv="Content-Security-Policy" content="default-src 'self' data: gap: https://ssl.gstatic.com 'unsafe-eval'; style-src 'self' 'unsafe-inline'; media-src *">
  <meta name="format-detection" content="telephone=no">
  <meta name="msapplication-tap-highlight" content="no">
  <meta name="viewport" content="user-scalable=no, initial-scale=1, maximum-scale=1, minimum-scale=1, width=device-width">
  <!-- Onsen UI CSS 読み込み -->
  <link rel="stylesheet" href="bower_components/OnsenUI/css/onsenui.css">
  <link rel="stylesheet" href="bower_components/OnsenUI/css/onsen-css-components.css">
  <link rel="stylesheet" type="text/css" href="css/index.css">
  <meta charset="utf-8" />
  <title>Google OAuth</title>
  <!-- AngularJS, Onsen UI, jQuery 読み込み -->
  <script src="bower_components/angular/angular.min.js"></script>
  <script src="bower_components/OnsenUI/js/onsenui.min.js"></script>
  <script src="bower_components/jquery/dist/jquery.min.js"></script>
  <script type="text/javascript" src="cordova.js"></script>
</head>

<body>
  <ons-navigator var="myNavigator" page="page1.html">
  </ons-navigator>

  <script type="text/javascript" src="js/index.js"></script>
</body>
</html>
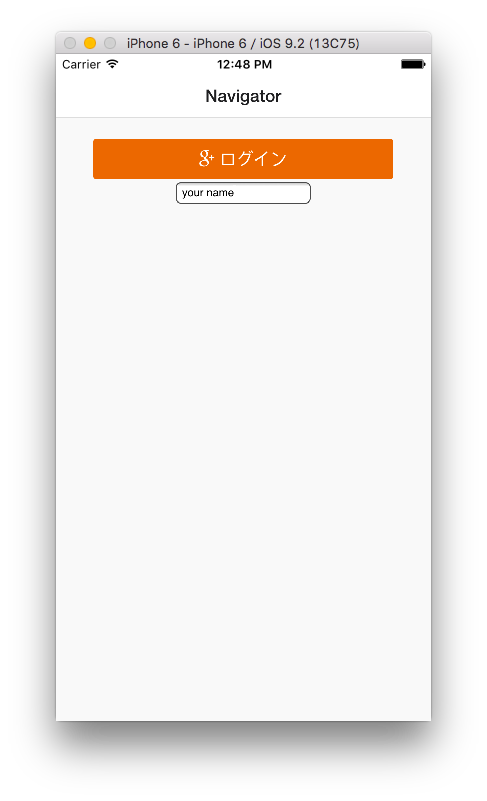
トップページに表示されるログインボタンと、Google認証後に
ユーザー名を取得して表示するインプットテキストを配置。
page1.html
<ons-page ng-controller="GoogleOAuthController">
    <ons-toolbar>
        <div class="center">Navigator</div>
    </ons-toolbar>

    <div style="text-align: center">
        <br>
        <ons-button id="loginButton" ng-click="oauth()" class="login_button">
            <i class="fa fa-google-plus"></i> ログイン
        </ons-button>

        <div>
          <input type="text" id="userName" value=""/>
        </div>
    </div>
</ons-page>
Googleアカウント認証の実装
Using OAuth 2.0 for Client-side Applicationsに書いてあるのでこれを見つつ、調べつつやる。
JSの編集
index.js
var app = angular.module("google_oauth", ['onsen']);

var accessToken = "";
var tokenType = "";
var expiresIn = "";
var state = "";

app.controller("GoogleOAuthController", function($scope) {
  $scope.oauth = function() {
    // リダイレクトURLは適切なものに変更
    var redirect_url = "http://example.com/GoogleOAuth/OAuth";

    var authorize_url = "https://accounts.google.com/o/oauth2/auth?";
    authorize_url += "scope=" + "email";
    authorize_url += "&state=" + "google_oauth"; // これも適宜変更
    authorize_url += "&redirect_uri=" + redirect_url;
    authorize_url += "&response_type=token";
    authorize_url += "&client_id=" + "最初に作成したClient IDをここに";
    var win = cordova.InAppBrowser.open(authorize_url, '_blank', 'location=yes');
    win.addEventListener('loadstart', function(event) {
      var url = event.url;
      if (url.indexOf(redirect_url + "#") >= 0) {
        accessToken = getParameterValue(url, 'access_token');
        tokenType = getParameterValue(url, 'token_type');
        expiresIn = getParameterValue(url, 'expires_in');
        state = getParameterValue(url, 'state');
        win.close();

        validateToken(accessToken);
      }
    });
  }
});

function getParameterValue(url, name) {
  var parameter = name.replace(/[\[]/, "\\\[").replace(/[\]]/, "\\\]");

  var regex_string = "[\\#&]" + parameter + "=([^&#]*)";
  var regex = new RegExp(regex_string);
  var results = regex.exec(url);
  if (results == null) {
    return "";
  } else {
    return results[1];
  }
}

function validateToken(token) {
  $.ajax({
    type: 'GET',
    url: "https://www.googleapis.com/oauth2/v3/tokeninfo?access_token=" + token,
    data: null,
    success: function(responseText) {
      getUserInfo();
    },
    error: function(xhr, status, errThrown) {
      alert(xhr.status + " : " + xhr.statusText);
    },
    dataType: "jsonp"
  });
}

function getUserInfo() {
  $.ajax({
    url: 'https://www.googleapis.com/oauth2/v1/userinfo?access_token=' + accessToken,
    data: null,
    success: function(response) {
      $('#userName').val(response["name"]);
    },
    error: function(xhr, status, errThrown) {
      alert(xhr.status + " : " + xhr.statusText);
    },
    dataType: "jsonp"
  });
}
ただ、このままだとajaxの部分で下記のようなセキュリティポリシー系のエラーで怒られる。
Refused to execute inline event handler
because it violates the following Content Security Policy directive:
"default-src 'self' data: gap: https://ssl.gstatic.com 'unsafe-eval'".
.......以下略
default-srcの'self'の隣にhttps://www.googleapis.com/を追加するとエラーは出なくなる。
index.html
<meta http-equiv="Content-Security-Policy" content="default-src 'self' https://www.googleapis.com/ data: gap: https://ssl.gstatic.com 'unsafe-eval'; style-src 'self' 'unsafe-inline'; media-src *">
scopeについて
今回はemailにしてますが、emailだとこんな値が取れてるみたいです。
| 値 | 説明 |
|---|---|
| id | ID |
| メールアドレス | |
| verified_email | メールアドレスの有効性(true/false) |
| name | 名前+苗字 |
| given_name | 名前 |
| family_name | 苗字 |
| link | Google+へのリンク |
| picture | 画像のURL |
| gender | 性別(male/female) |
試しにprofileに編集してみて、取得できたのが以下。
| 値 | 説明 |
|---|---|
| id | ID |
| name | 名前+苗字 |
| given_name | 名前 |
| family_name | 苗字 |
| link | Google+へのリンク |
| picture | 画像のURL |
| gender | 性別(male/female) |
| locale | ロケール(ja) |
指定できるものはAuthorizing API requestsを参照。
動作確認
シミュレータで動作確認。
$ cordova emulate ios
ログインボタンを押すとアプリ内ブラウザが立ち上がり、認証が終わると閉じて、トップページのインプットテキストに取得した名前が表示される。