経緯
業務でpythonのリクエストをC++に変換してwebApiでリクエストを送る必要があり、
swaggerというものを用いれば簡単にサーバー・クライアントのRESTAPIコードを作成できると知り、調査を開始した。
まずは簡単にサーバーを立てることができるnode.jsでモックサーバーを作成することにした。
備忘録として記事にまとめる。
swaggerについて
Swagger は RESTful APIを構築するためのオープンソースのフレームワーク
以下の記事で詳しくまとめられている。
↓
Swaggerの概要をまとめてみた。
swagger-codegenを使用する理由
swagger-nodeというパッケージを使用することでもサーバー作成を行うことができる。
しかし、以下の理由で採用を見送った。
- モジュールの更新がここ数年行われていない
- 生成されるプロジェクト内のファイルの設定方法や構成がswagger-codegenと異なっていた
- 情報が少ない
サンプルプロジェクトの作成に限ってはこちらの方が簡単に見えた。
使用してみたい人は以下を参照するとよいだろう。
swagger-node
Swaggerとswagger-node
環境
- Windows 10
- Oracle VM VirtualBox 6.1.4
- vagrant 2.2.7
- Ubuntu 18.04
- Microsoft Visual Studio Code
環境構築
1.vagrant,VirtualBox,vscodeをそれぞれインストールする。
2.PowerShell or cmd で任意のディレクトリに移動し、vagrant initを実行する。
3.Vagrantfileを編集する。(備考欄のvagrant参照)
4.vagrant upでVirtualBox起動
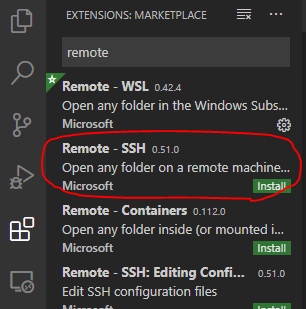
5.vscodeのEXTENSTINSからRemote - SSHをインストール
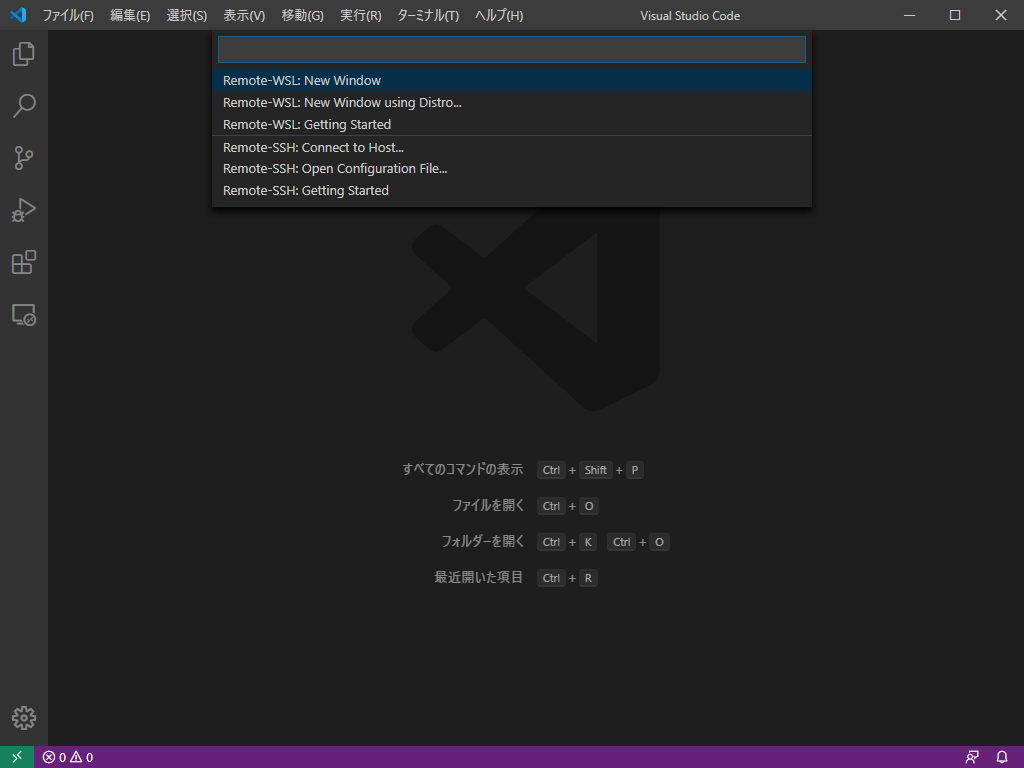
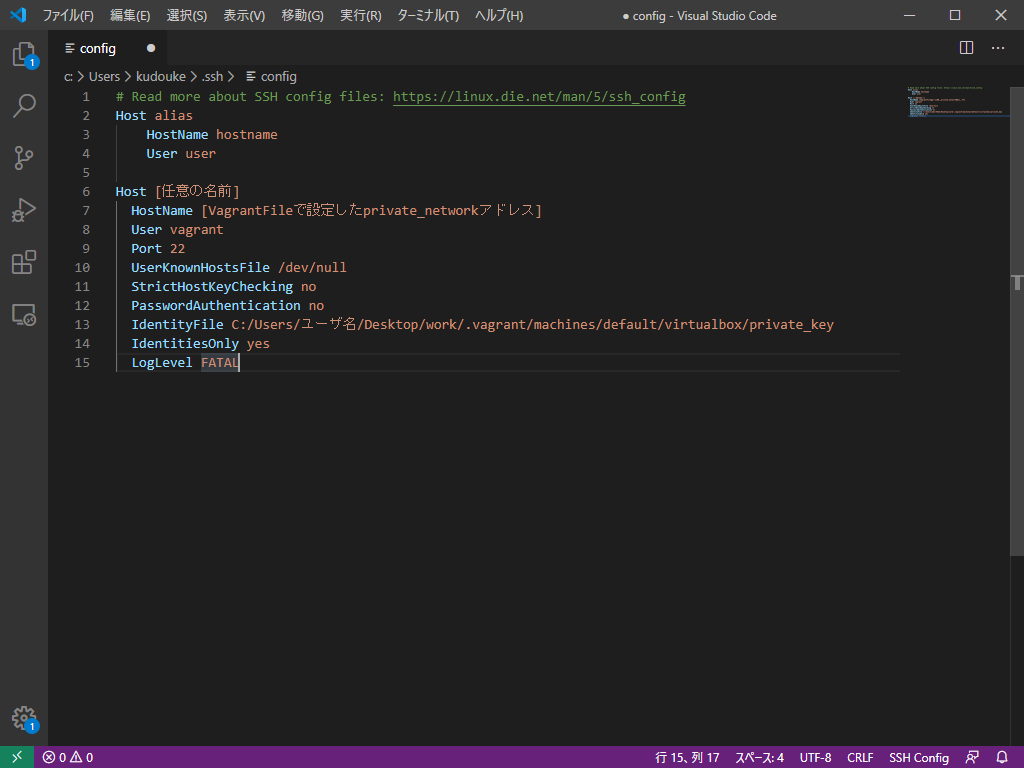
6.インストールすると左下に><マークをクリックすると中央にRemote...が出てくるので、*Remote-SSH: Open Configuration File...*を開き、C:\Users[UserName].ssh\configを開く
7.PowerShell or cmd にてvagrant実行ディレクトリに移動し、vagrant ssh-configを実行する。
表示されたテキストを先ほど開いたconfigに追記する。
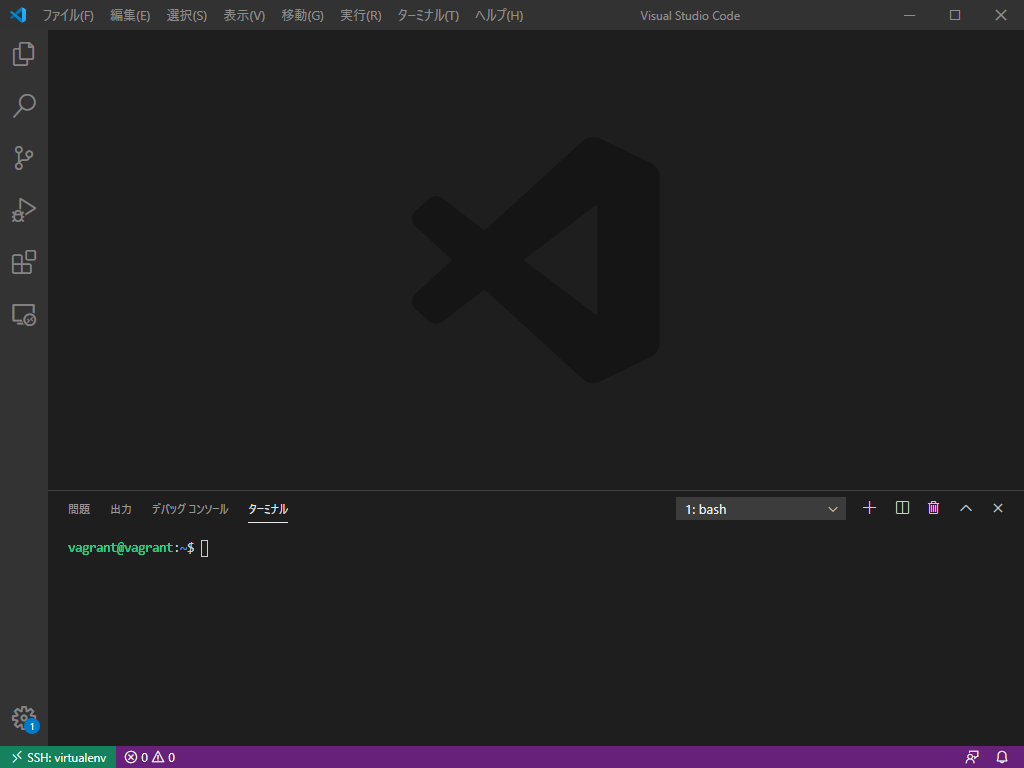
8.><マークをクリックし、*Remote-SSH:Connect to Host...で先ほどconfigファイルに設定したホストを選択してSSH接続する。OSを聞かれた場合はLinuxを選択する。
成功すると左下がSSH:[HOST名]*に変化する。
9.sudo apt update, sudo apt upgradeでパッケージ更新を行う。
10.以下のコマンドでswagger-codegenを取得する。
wget https://repo1.maven.org/maven2/io/swagger/swagger-codegen-cli/2.4.13/swagger-codegen-cli-2.4.13.jar -O swagger-codegen-cli.jar
11.codegenを実行するためにjavaをインストールする。
sudo apt-get install default-jre
12.モックサーバーを構築するための設定ファイルを取得する。
wget http://petstore.swagger.io/v2/swagger.json
13.swagger-codegenでnode.jsのモックサーバーを作成する。
java -jar swagger-codegen-cli.jar generate -i swagger.json -l nodejs-server -o 出力させたい任意のディレクトリ
14.出力させた任意のディレクトリに移動し、npmをインストールする。
sudo apt-get install npm
15.node.jsの起動に必要なパッケージをインストールする。
npm install
※プロキシ環境下の場合はnpmにプロキシ設定をするのを忘れずに
16.サーバーを起動する。
npm start
17.リクエストを送信し、レスポンスが帰ってくれば成功
curl -X GET "http://localhost:8080/v2/pet/1"

※他のHTTPメソッドを試してみたい場合、swagger editorに生成したモックサーバーの
yamlファイルを張り付けてメソッドを確認するとよいだろう
swagger.yamlのロケーション : api/swagger.yaml
Swagger Editor
備考
vagrant
以下の記事を参考に作成。
Vagrant入門③〜Vagrantfile設定編
プロキシを通す場合はここにプロキシ設定を記述する。
デフォルトのVagrantFileファイルとのsdiff結果は以下。
# -*- mode: ruby -*-                                                                  (
# vi: set ft=ruby :                                                                   (
                                                                                      (
# All Vagrant configuration is done below. The "2" in Vagrant.configure               (
# configures the configuration version (we support older styles for                   (
# backwards compatibility). Please don't change it unless you know what               (
# you're doing.                                                                       (
Vagrant.configure("2") do |config|                                                    (
  # The most common configuration options are documented and commented below.         (
  # For a complete reference, please see the online documentation at                  (
  # https://docs.vagrantup.com.                                                       (
                                                                                      (
  # Every Vagrant development environment requires a box. You can search for          (
  # boxes at https://vagrantcloud.com/search.                                         (
  config.vm.box = "bento/ubuntu-18.04"                                                |   config.vm.box = "base"
                                                                                      (
  # Disable automatic box update checking. If you disable this, then                  (
  # boxes will only be checked for updates when the user runs                         (
  # `vagrant box outdated`. This is not recommended.                                  (
  # config.vm.box_check_update = false                                                (
                                                                                      (
  # Create a forwarded port mapping which allows access to a specific port            (
  # within the machine from a port on the host machine. In the example below,         (
  # accessing "localhost:8080" will access port 80 on the guest machine.              (
  # NOTE: This will enable public access to the opened port                           (
  # config.vm.network "forwarded_port", guest: 80, host: 8080                         (
                                                                                      (
  # Create a forwarded port mapping which allows access to a specific port            (
  # within the machine from a port on the host machine and only allow access          (
  # via 127.0.0.1 to disable public access                                            (
  # config.vm.network "forwarded_port", guest: 80, host: 8080, host_ip: "127.0.0      (
                                                                                      (
  # Create a private network, which allows host-only access to the machine            (
  # using a specific IP.                                                              (
  config.vm.network "private_network", ip: "192.168.56.10"                            |   # config.vm.network "private_network", ip: "192.168.33.10"
                                                                                      (
  # Create a public network, which generally matched to bridged network.              (
  # Bridged networks make the machine appear as another physical device on            (
  # your network.                                                                     (
  # config.vm.network "public_network"                                                (
                                                                                      (
  # Share an additional folder to the guest VM. The first argument is                 (
  # the path on the host to the actual folder. The second argument is                 (
  # the path on the guest to mount the folder. And the optional third                 (
  # argument is a set of non-required options.                                        (
  # config.vm.synced_folder "../data", "/vagrant_data"                                (
                                                                                      (
  # Provider-specific configuration so you can fine-tune various                      (
  # backing providers for Vagrant. These expose provider-specific options.            (
  # Example for VirtualBox:                                                           (
  #                                                                                   (
  config.vm.provider "virtualbox" do |vb|                                             |   # config.vm.provider "virtualbox" do |vb|
  #   # Display the VirtualBox GUI when booting the machine                           (
  #   vb.gui = true                                                                   (
  #                                                                                   (
  #   # Customize the amount of memory on the VM:                                     (
      vb.memory = "2048"                                                              |   #   vb.memory = "1024"
  end                                                                                 |   # end
  #                                                                                   (
  # View the documentation for the provider you are using for more                    (
  # information on available options.                                                 (
                                                                                      (
  # Enable provisioning with a shell script. Additional provisioners such as          (
  # Ansible, Chef, Docker, Puppet and Salt are also available. Please see the         (
  # documentation for more information about their specific syntax and use.           (
  # config.vm.provision "shell", inline: <<-SHELL                                     (
  #   apt-get update                                                                  (
  #   apt-get install -y apache2                                                      (
  # SHELL                                                                             (
end
参照
記事内でリンクを張っているものについては割愛する。
github - swagger-codegen
Server stub generator HOWTO