[:contents]
はじめに
ローカルホストで立ち上げたサーバーに対してHTTPSリクエストを行う際、自己署名証明書(オレオレ証明書)を使っているために処理が正常終了しないことがあった。
検証環境:Xcode11.4.1, iOS13.4.1
ATS failed system trust
Connection 3: system TLS Trust evaluation failed(-9802)
Connection 3: TLS Trust encountered error 3:-9802
Connection 3: encountered error(3:-9802)
Task <907D1DCF-61F0-436A-ADFB-8F733B2262F9>.<1> HTTP load failed, 0/0 bytes (error code: -1200 [3:-9802])
Task <907D1DCF-61F0-436A-ADFB-8F733B2262F9>.<1> finished with error [-1200] Error Domain=NSURLErrorDomain Code=-1200 "SSLエラーが起きたため、サーバへのセキュリティ保護された接続を確立できません。" UserInfo={NSURLErrorFailingURLPeerTrustErrorKey=<SecTrustRef: 0x600001607570>, NSLocalizedRecoverySuggestion=それでもサーバに接続しますか?, _kCFStreamErrorDomainKey=3, _kCFStreamErrorCodeKey=-9802, NSErrorPeerCertificateChainKey=(
    "<cert(0x7f816d05da00) s: *.sample.com i: sample.com>"
), NSUnderlyingError=0x600002ae3660 {Error Domain=kCFErrorDomainCFNetwork Code=-1200 "(null)" UserInfo={_kCFStreamPropertySSLClientCertificateState=0, kCFStreamPropertySSLPeerTrust=<SecTrustRef: 0x600001607570>, _kCFNetworkCFStreamSSLErrorOriginalValue=-9802, _kCFStreamErrorDomainKey=3, _kCFStreamErrorCodeKey=-9802, kCFStreamPropertySSLPeerCertificates=(
    "<cert(0x7f816d05da00) s: *.sample.com i: sample.com>"
)}}, NSLocalizedDescription=SSLエラーが起きたため、サーバへのセキュリティ保護された接続を確立できません。, NSErrorFailingURLKey=https://sample.com/graphql, NSErrorFailingURLStringKey=https://sample.com/graphql, NSErrorClientCertificateStateKey=0}
### SSLエラーが起きたため、サーバへのセキュリティ保護された接続を確立できません。
本記事ではこれの対応方法を記録する。
必要な対応
- ATS除外設定の追加
- URLSessionDelegateでの認証チャレンジのハンドリング
1. ATS除外設定の追加
通信対象が自己署名証明書を使っている場合、まずはATSの例外設定をしないとそもそもHTTPS接続ができない。
Info.plistに下記のような設定を加えることで、特定のホスト(sample.com) だけ非セキュアな通信を許可するようにできる。
<key>NSAppTransportSecurity</key>
<dict>
    <key>NSExceptionDomains</key>
    <dict>
        <key>sample.com</key>
        <dict>
            <key>NSExceptionAllowsInsecureHTTPLoads</key>
            <true/>
        </dict>
    </dict>
</dict>
まずはこれである程度制限をつけた上で非セキュアな通信を許可できるようにはなる。
しかしあくまでデバッグ時にだけ必要な設定なので、リリースビルド時にこの設定を残したくはない。
リリースビルド時とデバッグビルド時で設定を変える方法としては、Info.plistを2つ用意して振り分ける方法が一番単純だが、2つのファイルを管理し続けたくない場合はPlistBuddyコマンドとProcessing-Info.plistの組み合わせが使える。
PlistBuddyコマンド
plistを操作することができるmacのビルトインコマンド。
下記のようなコマンドを実行すると、ATSの設定をコマンドラインからInfo.plistに書き込むことができる。
/usr/libexec/PlistBuddy -c "Add NSAppTransportSecurity:NSExceptionDomains:sample.com:NSExceptionAllowsInsecureHTTPLoads bool true" "Info.plist"
Processing-Info.plist
BuildSetting > Packaging > Preprocess Info.plist File を YESに設定すると、ビルド時にInfo.plistファイルをコピーして生成されるようになるファイル。

この設定がONの場合、アプリはビルド時に${TEMP_DIR}に配置されるProcessing-Info.plistの設定値を読むようになる。
そのため、デバッグ時のみ必要な設定など、恒久的に設定したいわけではない設定値はこのファイルに書き込むことで設定することができる。
RunScriptの設定
上記の2つを組み合わせ、RunScriptに以下のような処理を加えることで、Info.plistを汚さずにデバッグ時のみ必要な設定を加えることができるようになる。
- デバッグビルド時のみPlistBuddyコマンドを実行する
- PlistBuddyコマンドでProcessing-Info.plistにATS の設定を書き込む
具体的には以下のようになる。
if [ "${CONFIGURATION}" = "Debug" ]; then
    /usr/libexec/PlistBuddy -c "Add NSAppTransportSecurity:NSExceptionDomains:sample.com:NSExceptionAllowsInsecureHTTPLoads bool true" "${TEMP_DIR}/Preprocessed-Info.plist"
fi
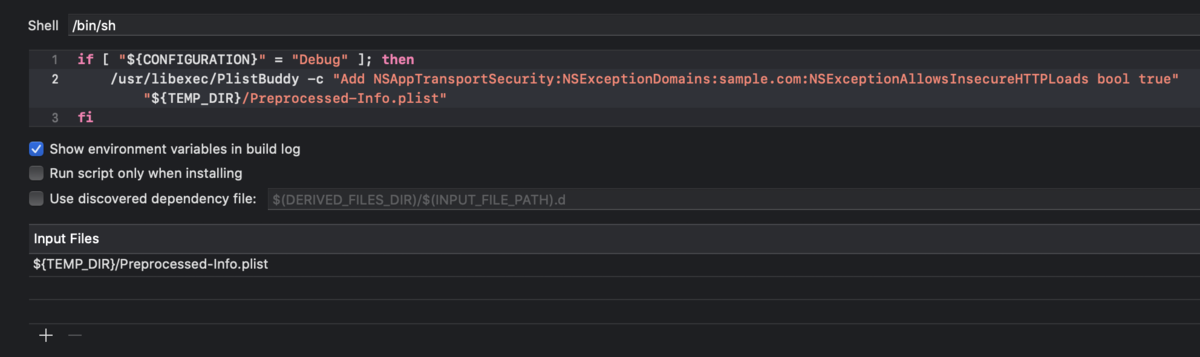
※ ここで、Input Filesには${TEMP_DIR}/Preprocessed-Info.plistを含める必要がある。この設定がないと2回目以降のビルドで期待した動作にならない可能性があるので注意。
ここまででATSの除外設定は完了になる。
2. 認証チャレンジのハンドリング
ATS除外設定を追加したことにより、対象のホストに接続できるようにはなるが、実行するとまだ以下のようなエラーが発生する。
Connection 3: default TLS Trust evaluation failed(-9807)
Connection 3: TLS Trust encountered error 3:-9807
Connection 3: encountered error(3:-9807)
Task <8414FE40-2470-4E9C-86E3-85B9694B8A59>.<1> HTTP load failed, 0/0 bytes (error code: -1202 [3:-9807])
Task <8414FE40-2470-4E9C-86E3-85B9694B8A59>.<1> finished with error [-1202] Error Domain=NSURLErrorDomain Code=-1202 "このサーバの証明書は無効です。“sample.com”に偽装したサーバに接続している可能性があり、機密情報が漏えいするおそれがあります。" UserInfo={NSURLErrorFailingURLPeerTrustErrorKey=<SecTrustRef: 0x600001e606c0>, NSLocalizedRecoverySuggestion=それでもサーバに接続しますか?, _kCFStreamErrorDomainKey=3, _kCFStreamErrorCodeKey=-9807, NSErrorPeerCertificateChainKey=(
    "<cert(0x7f86f5048a00) s: *.sample.com i: sample.com>"
), NSUnderlyingError=0x60000229d290 {Error Domain=kCFErrorDomainCFNetwork Code=-1202 "(null)" UserInfo={_kCFStreamPropertySSLClientCertificateState=0, kCFStreamPropertySSLPeerTrust=<SecTrustRef: 0x600001e606c0>, _kCFNetworkCFStreamSSLErrorOriginalValue=-9807, _kCFStreamErrorDomainKey=3, _kCFStreamErrorCodeKey=-9807, kCFStreamPropertySSLPeerCertificates=(
    "<cert(0x7f86f5048a00) s: *.sample.com i: sample.com>"
)}}, NSLocalizedDescription=このサーバの証明書は無効です。“sample.com”に偽装したサーバに接続している可能性があり、機密情報が漏えいするおそれがあります。, NSErrorFailingURLKey=https://sample.com/graphql, NSErrorFailingURLStringKey=https://sample.com/graphql, NSErrorClientCertificateStateKey=0}
### このサーバの証明書は無効です。“sample.com”に偽装したサーバに接続している可能性があり、機密情報が漏えいするおそれがあります。
これについて、iOS(URLSession)は自己署名証明書を利用しているHTTPSサーバーを叩く場合、信頼されていない証明書を受け入れるべきかどうか、実装者に対して下記のデリゲートメソッドを呼び出して判定させる。
func urlSession(_ session: URLSession, didReceive challenge: URLAuthenticationChallenge, completionHandler: @escaping (URLSession.AuthChallengeDisposition, URLCredential?) -> Void) {}
この時、有効な証明書判定であるという結果を返さなかった場合は通信が中断されるため、上記のようなエラーが出ることになる。
このエラーに対応するには、URLSessionのデリゲート設定をした上で以下のようなチェックし、通信を許可すべきかどうかOSに通知してあげる必要がある。
let session = URLSession(configuration: .default, delegate: AllowsSelfSignedCertificateDelegate(), delegateQueue: nil)
class AllowsSelfSignedCertificateDelegate: NSObject, URLSessionDelegate {
    func urlSession(_ session: URLSession, didReceive challenge: URLAuthenticationChallenge, completionHandler: @escaping (URLSession.AuthChallengeDisposition, URLCredential?) -> Void) {
        let protectionSpace = challenge.protectionSpace

        // 認証チャレンジタイプがサーバ認証かどうか確認
        // 通信対象のホストは想定しているものかどうか確認
        guard protectionSpace.authenticationMethod == NSURLAuthenticationMethodServerTrust,
            protectionSpace.host == "sample.com",
            let serverTrust = protectionSpace.serverTrust else {
                // 特別に検証する対象ではない場合はデフォルトのハンドリングを行う
                completionHandler(.performDefaultHandling, nil)
                return
        }

        // 受け取った証明書は許可すべきかどうか確認
        // (serverTrustオブジェクトを用いて.cerファイルや.derファイルと突き合わせるなど)
        if checkValidity(of: serverTrust) {
            // 通信を継続して問題ない場合は、URLCredentialオブジェクトを作って返す
            completionHandler(.useCredential, URLCredential(trust: serverTrust))
        } else {
            // 通信を中断させたい場合は、cancelを返す
            completionHandler(.cancelAuthenticationChallenge, nil)
        }
    }
}
これにより通信が完了できるようになる。
※ セキュリティリスクは増えるが、バリデーションをしなくても.useCredentialを呼び出せば通信を許可することはできる。ローカル環境での実行時など自己責任でこの対応を選択することも可能。
さいごに
以上の設定により、最小限の適用範囲内で自己署名証明書を使っているHTTPSサーバーと通信ができるようになった。
参考
[https://developer.apple.com/documentation/foundation/url_loading_system/handling_an_authentication_challenge/performing_manual_server_trust_authentication:title]
[https://developer.apple.com/documentation/security/certificate_key_and_trust_services/trust:title]
[https://stackoverflow.com/questions/35592572/swift-ssl-error-with-self-signed-certificate:embed:cite]
[https://threetreeslight.com/posts/2014/04/06/iosobjective-c-ios--7%E3%81%A7%E3%82%AA%E3%83%AC%E3%82%AA%E3%83%ACself-signed%E8%A8%BC%E6%98%8E%E6%9B%B8%E3%82%92%E9%80%9A%E3%81%99/:embed:cite]
[https://gist.github.com/kitasuke/312700aef3f495fe17877aaacf74e796:title]
[https://qiita.com/y_hakutaku/items/3d67582d2f14d50a4ab7:embed:cite]