吹き出しはユーザが投稿したコメントを表示する画面(以下コメント画面)などで良く使うかと思います。簡易な吹き出しなら9patchを用意しなくてもレイアウトファイル(xmlファイル)だけで簡単に作ることができます。
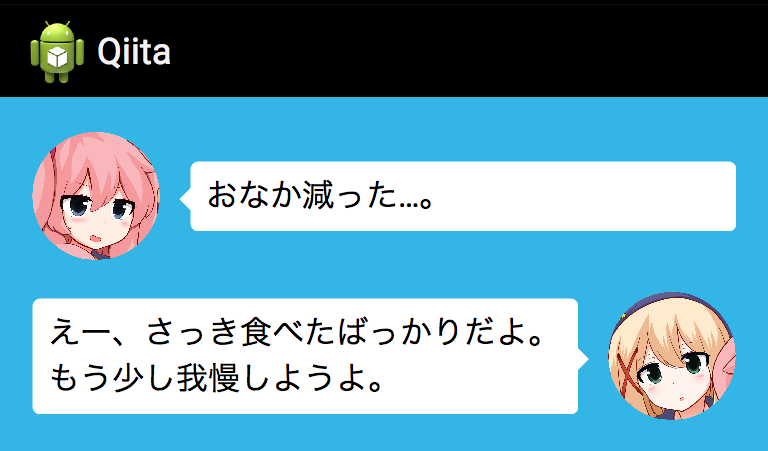
作る吹き出しはこのようなものになります。
※顔の画像は予め丸く切り取ったものを用意しています。ちなみに丸く切り取るにはCircleImageViewなど使うと良いと思います。
吹き出しをレイアウトだけで作ってみる
やり方は色々あるのですが、私は 「正方形のViewをrotationする」 「marginをマイナスして重ねる」 で実現しています。
<LinearLayout xmlns:android="http://schemas.android.com/apk/res/android"
    android:layout_width="match_parent"
    android:layout_height="match_parent"
    android:background="@android:color/holo_blue_light"
    android:orientation="vertical"
    android:padding="16dp">

    <!-- ピンク髪の女の子 -->
    <LinearLayout
        android:id="@+id/container_face1"
        android:layout_width="match_parent"
        android:layout_height="wrap_content"
        android:gravity="center_vertical"
        android:orientation="horizontal">

        <ImageView
            android:layout_width="64dp"
            android:layout_height="64dp"
            android:layout_marginRight="8dp"
            android:src="@drawable/face1" />

        <!-- `■`を45度回転させて`◆`にしている -->
        <!-- rotationするとwidthが変わるので注意。正方形なので8dp * √2になる -->
        <View
            android:layout_width="8dp"
            android:layout_height="8dp"
            android:background="@android:color/white"
            android:rotation="45" />

        <!-- marginLeft="-6dp"することで`◆`に角丸のTextViewを重ねている。 -->
        <TextView
            android:layout_width="wrap_content"
            android:layout_height="wrap_content"
            android:layout_marginLeft="-6dp"
            android:layout_weight="1"
            android:background="@drawable/bg_balloon"
            android:padding="8dp"
            android:text="おなか減った…。"
            android:textColor="@android:color/black"
            android:textSize="14sp" />
    </LinearLayout>

    <!-- 金髪の女の子 -->
    <LinearLayout
        android:layout_width="match_parent"
        android:layout_height="wrap_content"
        android:layout_marginTop="16dp"
        android:gravity="center_vertical"
        android:orientation="horizontal">

        <TextView
            android:layout_width="0dp"
            android:layout_height="wrap_content"
            android:layout_weight="1"
            android:background="@drawable/bg_balloon"
            android:lineSpacingExtra="4sp"
            android:padding="8dp"
            android:text="えー、さっき食べたばっかりだよ。もう少し我慢しようよ。"
            android:textColor="@android:color/black"
            android:textSize="14sp" />

        <!-- marginLeft="-6dp"することで角丸のTextViewに`◆`を重ねている。 -->
        <View
            android:layout_width="8dp"
            android:layout_height="8dp"
            android:layout_marginLeft="-6dp"
            android:background="@android:color/white"
            android:rotation="45" />

        <ImageView
            android:layout_width="64dp"
            android:layout_height="64dp"
            android:layout_marginLeft="8dp"
            android:src="@drawable/face2" />
    </LinearLayout>
</LinearLayout>
<shape xmlns:android="http://schemas.android.com/apk/res/android"
    android:shape="rectangle">

    <corners android:radius="8dp" />

    <solid android:color="@android:color/white" />
</shape>
ListViewで表示する
余談ですが、実際に私だったらこんな感じでやりますというのを説明します。(共通部分とか適当ですみません)
先ほど言ったようにコメント画面で使うときを見てみましょう。
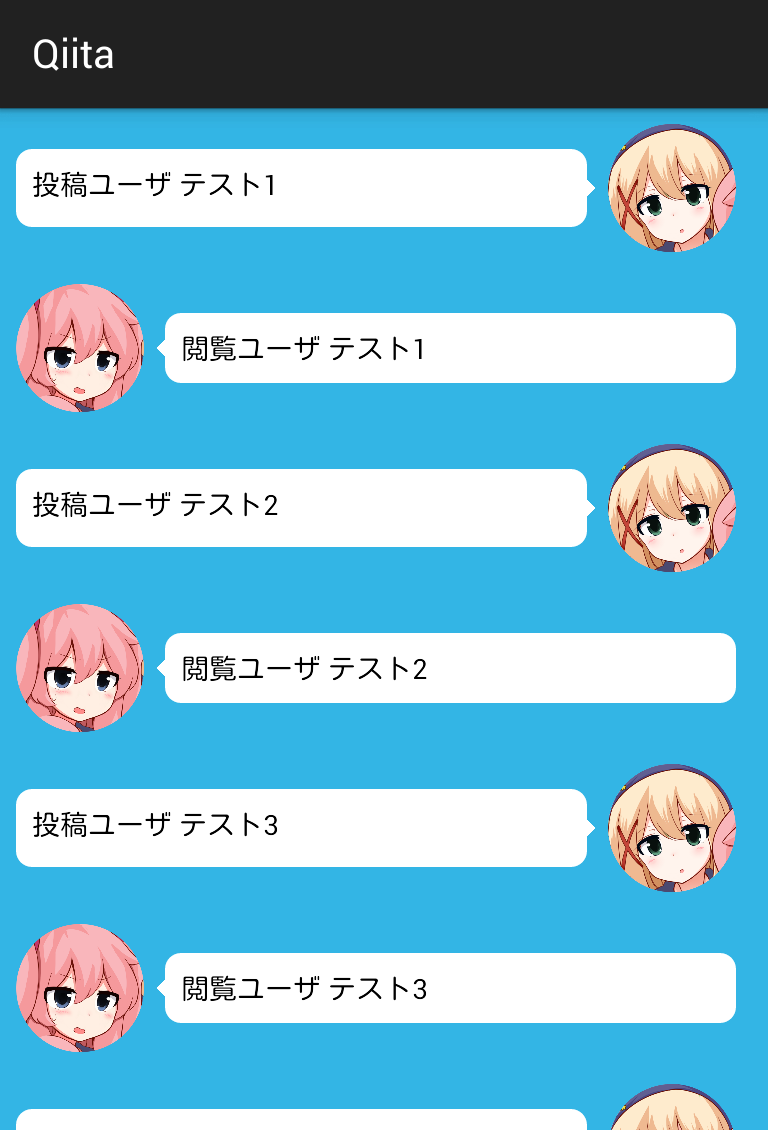
コメントはコンテンツを 投稿するユーザ(author) と 閲覧ユーザ(viewer) がいるとしましょう。authorはアイコンが右、viewerはアイコンが左で表示することにします。
findViewByIdするのがめんどくさいので、ここではみんな大好きButterKnife使います。
最終的にはこのようなViewを作ります。
主要なクラスの構成は以下になります。
- CommentAdapter.java
- Comment.java
- list_item_author.xml
- list_item_viewer.xml
- CommentViewActivity.java
- activity_comment_view.xml
まずはユーザID, ユーザのプロフィール画像, コメント内容をもつCommentクラスから、author/viewerに応じてViewを生成するCommentAdapterを見てみます。
// authorとviewerそれぞれレイアウトを分けていますが、表示する位置が違うだけなのでTextViewやImageViewのidは共通にしてViewHolderを一つにしています。

public class CommentAdapter extends BaseAdapter {

    private final Context mContext;
    private final int mAuthorId;
    private final Comment[] mComments;
    private final LayoutInflater mInflater;

    private static final int NUMBER_OF_VIEW_TYPES = 2;
    private static final int VIEW_TYPE_VIEWER = 0;
    private static final int VIEW_TYPE_AUTHOR = 1;

    public CommentAdapter(Context context, int authorId, Comment[] comments) {
        mContext = context;
        mAuthorId = authorId;
        mComments = comments;
        mInflater = (LayoutInflater) context.getSystemService(Context.LAYOUT_INFLATER_SERVICE);
    }

    @Override
    public int getCount() {
        return mComments.length;
    }

    @Override
    public Object getItem(int position) {
        return mComments[position];
    }

    @Override
    public long getItemId(int position) {
        return 0;
    }

    @Override
    public int getViewTypeCount() {
        return NUMBER_OF_VIEW_TYPES;
    }

    @Override
    public int getItemViewType(int position) {
        boolean isAuthor = mComments[position].userId == mAuthorId;
        return isAuthor ? VIEW_TYPE_AUTHOR : VIEW_TYPE_VIEWER;
    }

    @Override
    public View getView(int position, View view, ViewGroup parent) {
        Comment comment = mComments[position];

        final CommentViewHolder holder;
        if (view == null) {
            int layoutResourceId = getItemViewType(position) == VIEW_TYPE_AUTHOR ?
                    R.layout.list_item_author : R.layout.list_item_viewer;
            view = mInflater.inflate(layoutResourceId, null);
            holder = new CommentViewHolder(view);
            view.setTag(holder);
        } else {
            holder = (CommentViewHolder) view.getTag();
        }

        holder.commentTextView.setText(comment.text);
        holder.iconImageView.setImageDrawable(comment.userIcon);

        return view;
    }

    static class CommentViewHolder {

        @InjectView(R.id.text_user_comment)
        public TextView commentTextView;

        @InjectView(R.id.image_user_icon)
        public ImageView iconImageView;

        public CommentViewHolder(View view) {
            ButterKnife.inject(this, view);
        }
    }
}
public class Comment {

    public int userId; // コメントしたユーザのID
    public Drawable userIcon; // コメントしたユーザの画像
    public String text; // コメントの内容

    public Comment(int userId, Drawable userIcon, String text) {
        this.userId = userId;
        this.userIcon = userIcon;
        this.text = text;
    }
}
<LinearLayout xmlns:android="http://schemas.android.com/apk/res/android"
    android:layout_width="match_parent"
    android:layout_height="wrap_content"
    android:gravity="center_vertical"
    android:orientation="horizontal"
    android:paddingBottom="8dp"
    android:paddingLeft="8dp"
    android:paddingRight="16dp"
    android:paddingTop="8dp">

    <TextView
        android:id="@+id/text_user_comment"
        android:layout_width="0dp"
        android:layout_height="wrap_content"
        android:layout_weight="1"
        android:background="@drawable/bg_balloon"
        android:gravity="center_vertical"
        android:lineSpacingExtra="4sp"
        android:padding="8dp"
        android:textColor="@android:color/black"
        android:textSize="14sp" />

    <!-- marginLeft="-6dp"することで角丸のTextViewに`◆`を重ねている。 -->
    <View
        android:layout_width="8dp"
        android:layout_height="8dp"
        android:layout_marginLeft="-6dp"
        android:background="@android:color/white"
        android:rotation="45" />

    <ImageView
        android:id="@+id/image_user_icon"
        android:layout_width="64dp"
        android:layout_height="64dp"
        android:layout_marginLeft="8dp" />
</LinearLayout>
<LinearLayout xmlns:android="http://schemas.android.com/apk/res/android"
    android:layout_width="match_parent"
    android:layout_height="wrap_content"
    android:gravity="center_vertical"
    android:orientation="horizontal"
    android:paddingBottom="8dp"
    android:paddingLeft="8dp"
    android:paddingRight="16dp"
    android:paddingTop="8dp">

    <ImageView
        android:id="@+id/image_user_icon"
        android:layout_width="64dp"
        android:layout_height="64dp"
        android:layout_marginRight="8dp" />

    <View
        android:layout_width="8dp"
        android:layout_height="8dp"
        android:background="@android:color/white"
        android:rotation="45" />

    <!-- marginLeft="-6dp"することで`◆`に角丸のTextViewを重ねている。 -->
    <TextView
        android:id="@+id/text_user_comment"
        android:layout_width="wrap_content"
        android:layout_height="wrap_content"
        android:layout_marginLeft="-6dp"
        android:layout_weight="1"
        android:background="@drawable/bg_balloon"
        android:gravity="center_vertical"
        android:padding="8dp"
        android:textColor="@android:color/black"
        android:textSize="14sp" />
</LinearLayout>
あとはこれをListViewをもつActivityで表示させます。
public class CommentViewActivity extends ActionBarActivity {

    @InjectView(R.id.list_comment)
    ListView mCommentListView;

    @Override
    protected void onCreate(Bundle savedInstanceState) {
        super.onCreate(savedInstanceState);
        setContentView(R.layout.activity_main);
        ButterKnife.inject(this);

        int authorId = 1; // 投稿者のユーザIDs

        Drawable authorDrawable = getResources().getDrawable(R.drawable.face2);
        Drawable viewerDrawable = getResources().getDrawable(R.drawable.face1);

        Comment[] comments = {
                new Comment(1, authorDrawable, "投稿ユーザ テスト1"),
                new Comment(2, viewerDrawable, "閲覧ユーザ テスト1"),
                new Comment(1, authorDrawable, "投稿ユーザ テスト2"),
                new Comment(2, viewerDrawable, "閲覧ユーザ テスト2"),
                new Comment(1, authorDrawable, "投稿ユーザ テスト3"),
                new Comment(2, viewerDrawable, "閲覧ユーザ テスト3"),
                new Comment(1, authorDrawable, "投稿ユーザ テスト4"),
                new Comment(2, viewerDrawable, "閲覧ユーザ テスト4"),
                new Comment(1, authorDrawable, "投稿ユーザ テスト5"),
                new Comment(2, viewerDrawable, "閲覧ユーザ テスト5"),
        };

        mCommentListView.setAdapter(new CommentAdapter(this, authorId, comments));
    }
}
<ListView xmlns:android="http://schemas.android.com/apk/res/android"
    android:id="@+id/list_comment"
    android:layout_width="match_parent"
    android:layout_height="match_parent"
    android:background="@android:color/holo_blue_light"
    android:divider="@null" />

