この記事は何?
SwiftUI Tutorials Creating and Combining Viewsをハンズオンしたので、忘備録として要所と思われる部分を残しておきます。
ここでは、「UIKitビューをSwiftUI上で扱う方法」を取り上げます。
実行環境
macOS 10.15 Catalina beta7
Xcode11 beta7
Use UIKit and SwiftUI Views Together
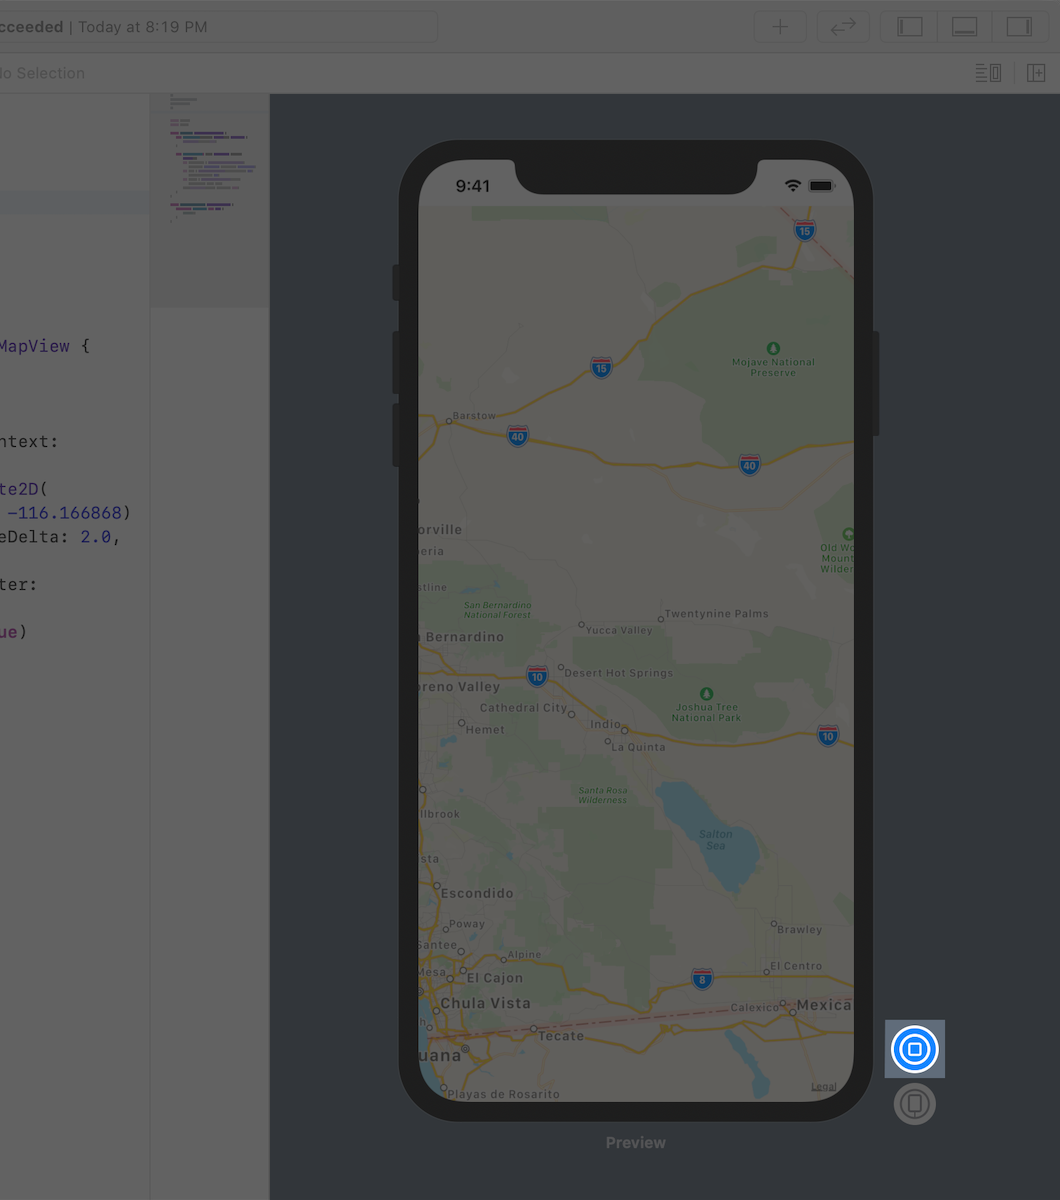
チュートリアルのセクション5の部分です。
このセクションを完了すると、以下のような画面ができます。
これを、単体の__カスタムSwiftUIビュー__として扱うことができます。
説明文によると...
MapKitのMKMapViewクラスを使用して、地図を描画します。
SwiftUI内でUIViewのサブクラスを使用するには、UIViewRepresentableプロトコルに準拠するSwiftUIビューで他のビューをラップします。
...とあります。
UIViewRepresentable プロトコルに準拠させることが要点のようです。準拠したビューは「UIViewっぽく表示できる」ことが保証される感じでしょうか。
また、「SwiftUIビューで他のビューをラップする」とありますが、具体的にはどんな記述か調べます。
ソースコード全体
完成したソースコードは、以下の通りです。
なお、MapView_Previews は単なるプレビュー画面を描画するための構造体なので、以降は無視します。
import SwiftUI
import MapKit

struct MapView: UIViewRepresentable {
    func makeUIView(context: Context) -> MKMapView {
        return MKMapView(frame: .zero)
    }

    func updateUIView(_ uiView: MKMapView, context: Context) {
        let latitude = 34.011286, longitude = -116.166868
        let coordinate = CLLocationCoordinate2DMake(latitude, longitude)
        let span = MKCoordinateSpan(latitudeDelta: 2.0, longitudeDelta: 2.0)
        let region = MKCoordinateRegion(center: coordinate, span: span)
        uiView.setRegion(region, animated: true)
    }

}

struct MapView_Previews: PreviewProvider {
    static var previews: some View {
        MapView()
    }
}
フレームワークのインポート
当たり前な話ですが、地図を扱うので MapKit フレームワークを SwiftUI と合わせてインポートしています。
UIKitビュー 自体を扱わなければ、UIKit をインポートする必要はないようです。
import SwiftUI
import MapKit
MapView構造体
以下の MapView 構造体が、画面に表示されている地図そのものです。
型の名称が MapView となっていますが、カスタムSwiftUIビューなので実際には自由に命名できます。(例えば、SwMapView とか)
struct MapView: UIViewRepresentable {
    func makeUIView(context: Context) -> MKMapView {
        return MKMapView(frame: .zero)
    }

    func updateUIView(_ uiView: MKMapView, context: Context) {
        let latitude = 34.011286, longitude = -116.166868
        let coordinate = CLLocationCoordinate2DMake(latitude, longitude)
        let span = MKCoordinateSpan(latitudeDelta: 2.0, longitudeDelta: 2.0)
        let region = MKCoordinateRegion(center: coordinate, span: span)
        uiView.setRegion(region, animated: true)
    }

}
コード量が削減できることは、SwiftUI で開発する利点の1つですが本当に少ないです!
実装は、2つのメソッドが定義されているだけです。
- makeUIView(context:) メソッド
- updateUIView(_:context:) メソッド
これらはいずれも、UIViewRepresentable プロトコルの準拠に必要なデリゲートメソッドです。
次のように、宣言されています。
/// Creates a `UIView` instance to be presented.
func makeUIView(context: Self.Context) -> Self.UIViewType

/// Updates the presented `UIView` (and coordinator) to the latest configuration.
func updateUIView(_ uiView: Self.UIViewType, context: Self.Context)
それぞれのメソッドを見ていきます。
makeUIView(context:) メソッド
宣言によると Self.Context 型のパラメータを受け取り、Self.UIViewType 型オブジェクトを返します。
func makeUIView(context: Self.Context) -> Self.UIViewType
また、クイックヘルプのサマリーによると...
表示する UIView インスタンスを生成する
と記載されています。
func makeUIView(context: Context) -> MKMapView {
    return MKMapView(frame: .zero)
}
ここでは、MKMapView(frame: .zero) を返しているので、画面いっぱいに地図を表示できます。
実際には MKMapView() でも同じく画面全体に地図が表示されます。
updateUIView(_:context:) メソッド
宣言によると、パラメータは2つあります。
-
Self.UIViewType型(実際にはMKMapView) -
Self.Context型(実際にはContext)
なお、返り値はありません。
func updateUIView(_ uiView: Self.UIViewType, context: Self.Context)
クイックヘルプのサマリーによると...
表示された UIView(およびコーディネーター)を最新の構成にアップデートする
と記載されています。
ここから読み取れる機能は「パラメータとしてビューの方を渡すと、コンテキストに合わせて描画を更新してくれる」と理解できます。
呼び出しコードを見ると、MKMapView 型と Context という型を渡しています。
func updateUIView(_ uiView: MKMapView, context: Context) {
    let latitude = 34.011286, longitude = -116.166868
    let coordinate = CLLocationCoordinate2DMake(latitude, longitude)
    let span = MKCoordinateSpan(latitudeDelta: 2.0, longitudeDelta: 2.0)
    let region = MKCoordinateRegion(center: coordinate, span: span)
    uiView.setRegion(region, animated: true)
}
Context
2つのメソッドにパラメータとして指定されている Context が気になります。
一般的には「文脈」とか「前後関係」という意味ですが、「いまの状況」と考えるといいかもしれません。
次のように宣言されていました。
public protocol UIViewRepresentable : View where Self.Body == Never {
    ...
    typealias Context = UIViewRepresentableContext<Self>
}
UIViewRepresentableContext<Self> の別名です。
これ以上深入りするとハマりそうな予感がするので、「UIViewRepresentableに準拠すると使える値」と理解しておきます。
UIViewRepresentableプロトコル
UIViewRepresentableプロトコル自体の宣言を見てみます。
public protocol UIViewRepresentable : View where Self.Body == Never {
    ...
}
: View where Self.Body == Never とある通り、前出のカスタムSwiftUIビュー MapView には、body がありません。
一般的なSwiftUIビューは以下のように、必ず body プロパティがあります。
body は計算プロパティになっており、ブロック内では宣言的にコードが記述されます。
struct CustomSwiftUIView: View {
    var body: some View {
        Text("Hello World!")
            .font(.title)
            .foregroundColor(.blue)
    }
}
比較してみると、実行文としてコードを記述する update(_:context) メソッドの実装は、SwiftUI 以前のスタイルで懐かしく見えます。
func updateUIView(_ uiView: MKMapView, context: Context) {
    let latitude = 34.011286, longitude = -116.166868
    let coordinate = CLLocationCoordinate2DMake(latitude, longitude)
    let span = MKCoordinateSpan(latitudeDelta: 2.0, longitudeDelta: 2.0)
    let region = MKCoordinateRegion(center: coordinate, span: span)
    uiView.setRegion(region, animated: true)
}
この辺りのことを「SwiftUIビューで、UIビューをラップする」と表現していると思われます。