はじめに
モノレポのプロジェクトにて、VSCodeにおけるJestの拡張機能を利用しようとした際に、
最初はテストが上手くいかなかったので、備忘録として残しておく。
vscode-jest について
If the extension can find the jest command, by default it will automatically run and monitor all tests in watch mode upon launch, and you should see tests, status, errors, coverage (if enabled) in TestExplorer and editors.
拡張機能がjestコマンドを見つけることができれば、デフォルトではVSCode起動時にすべてのテストを自動的に実行し、ウォッチモードで監視するようになる。VSCode上でテストやステータス、エラー、カバレッジを確認可能。
・you can use jest.jestCommandLine to tell the extension to use yarn test instead of the default jest command.
・you can use jest.autoRun to optimize performance and control when the extension should run your tests.
・you can use the extension with monorepo projects, see monorepo project support for details.
-
jest.jestCommandLine: デフォルトのjestコマンドの代わりにyarn testを使うように設定可能。 -
jest.autoRun: 拡張機能がテストを実行するタイミングを制御可能。 - モノレポプロジェクトに対応可能(これがやりたかった)
- Setup jest in your project if you haven't.
- install "Jest" extension in vscode.
- reload or restart vscode
上記ドキュメントによると導入は簡単で、Jestを使っているプロジェクトにおいて、拡張機能をインストールし、VSCodeを再起動すればよい。
モノレポに対応させる
ここからが本題。
The easiest way to setup the monorepo projects is to use the Setup Tool and choose Setup monorepo project.
まず以下のドキュメントに従い、セットアップツールを使ってモノレポ用の設定ができるとのこと。
The extension supports monorepo projects in the following configurations:
- Single-root workspace: If all tests from monorepo packages can be run from a centralized location, such as project root, then a single-root workspace with proper "jest.jestCommandLine" and "jest.rootPath" setting should work.
- Multi-root workspace: If each monorepo package has its own local jest root and configuration, a multi-root workspaces is required. Users can use "jest.disabledWorkspaceFolders" to exclude the packages from jest run.
ルートからすべてのテストを実行できる構成(Single-root workspace)と、各パッケージがJestの設定ファイルを持っている構成(Multi-root workspace)では、設定項目が異なる。
マルチのほうでは、以下の設定が必要(自分のプロジェクトがこのパターンだった)。
どちらの構成でも上記のセットアップツールを使えば、簡単に設定できる。
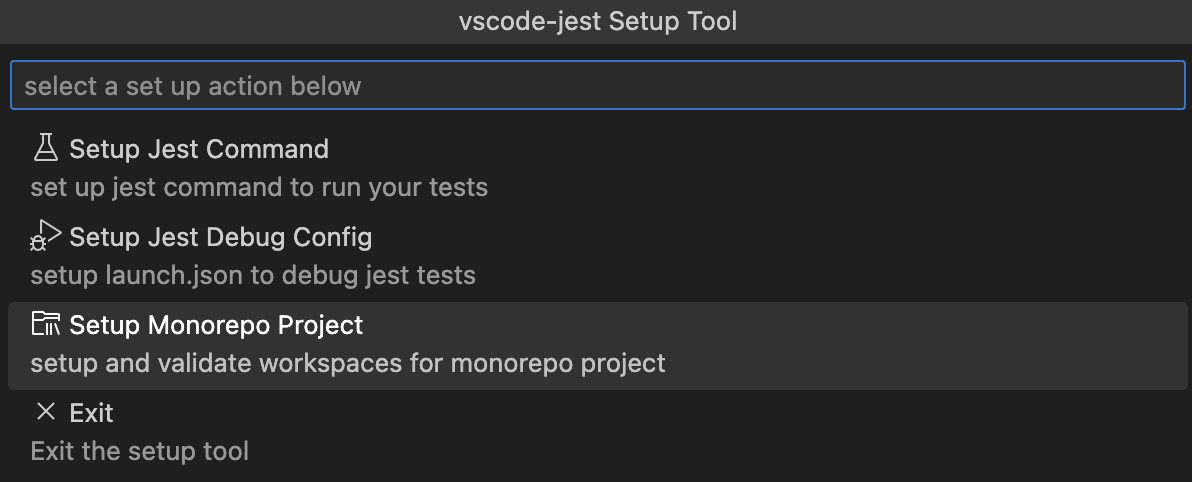
まずは、Cmd + Shift + P でコマンドパレットを開き、jestで検索して、「Jest: Setup Extension」を選択する。
次に、「Setup Monorepo Project」を選択。
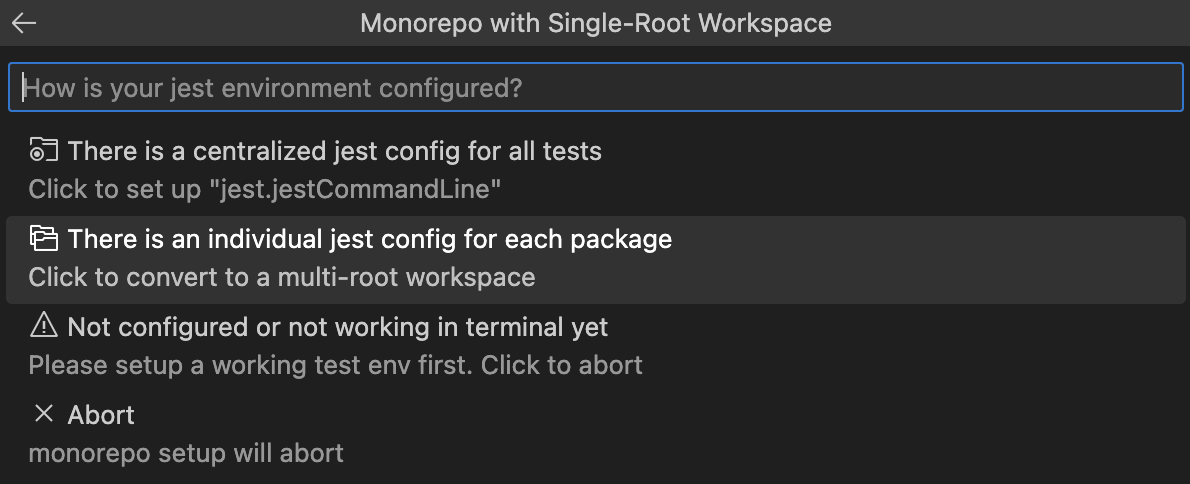
そして、マルチルートのワークスペースに変えるため、「There is an individual jest config for each package」を選択。
すると、ディレクトリ構成を解析して、以下のような<ディレクトリ名>.code-workspaceというファイルを作ってくれる。
{
  "folders": [
    {
      "name": "Product",
      "path": "vscode"
    },
    {
      "name": "Documentation",
      "path": "vscode-docs"
    },
    {
      "name": "Extension generator",
      "path": "vscode-generator-code"
    }
  ]
}
あとはお好みでJest関連の設定を加えればOK。
{
  "folders": [
    {
      "name": "root",
      "path": "."
    },
    {
      "name": "Product",
      "path": "vscode"
    },
    {
      "name": "Documentation",
      "path": "vscode-docs"
    },
    {
      "name": "Extension generator",
      "path": "vscode-generator-code"
    }
  ]
  "settings": {
    "jest.autoRun": {
      "watch": false,
      "onSave": "test-file"
    },
    "jest.jestCommandLine": "npm run test --",
    "jest.showCoverageOnLoad": true,
    "jest.disabledWorkspaceFolders": [
      "root",
    ]
  }
}
ファイルができたら、このファイルの右下らへんにいる、
このボタンをクリックしてワークスペースを開き、あとはいつも通りJestの拡張機能を使ってテストを実行できる。
以上、モノレポのプロジェクトにて、VSCodeにおけるJestの拡張機能にハマった際の備忘録でした。


