0.背景
- 車載カメラの画像に対する先行車両検出に関して以下の2つの公開されている手法を使ってみたのでメモとして残しておく。
- いずれもとりあえず動かすことを主眼にしている。
- 元々はSIGNATEのSUBARU 画像認識チャレンジのために使用した。
- Google Colab + Google drive の環境での動作を前提としている。
1. 共通事項
- 車載カメラ映像では BDD100Kという大規模なデータセットが公開されている。
- この頁で紹介する2つのモデルはいずれも、BDD100Kで学習されている。
- いずれもSUBARU 画像認識チャレンジのデータに対して大部分のシーンではうまく検知できており、検出力は十分に良いように感じた。車載カメラで物体検知が必要な場合は、まずはこれらのモデルを使ってみて、不足があれば自前でモデルを組んだり学習させたりするのが良いように思う。
- BDD100kのWebサイトには、Model zooもあり、物体検出タスクのモデルは、Faster R-CNN, RetinaNet, Cascade R-CNN などかなり多数が掲載されている。Model zooには、この頁で紹介する2つのモデルは掲載されていない。
- この頁で紹介する2つのモデルはいずれも、BDD100Kで学習されている。
Google Colab で Google driveをマウント
以下の通り、まずはGoogle ColabからGoogle driveをマウントする。
#Google driveをマウントする
from google.colab import drive
drive.mount('./gdrive')
my_dir = "/content/gdrive/MyDrive/Colab Notebooks/cardetect/" # Google drive内に適当なフォルダを作って指定してください。
- フォルダパスの注意事項
- Google driveでは通常は"Colab Notebooks"というフォルダが作られてそこにColabのファイルが置かれる。このフォルダ内に関連するファイルも置きたいが、フォルダ名に空白が入っているため、やや注意が必要。
-
%cd /content/gdrive/MyDrive/Colab Notebooks/とすると、空白で区切られていることでエラーがでる。%cd "/content/gdrive/MyDrive/Colab Notebooks/"とする必要がある。 - これは変数を使って
%cd $my_dirとしたときも同じであり、%cd "$my_dir"とする必要がある。
画像を640x640に変換する関数
この関数は、YOLOPとYOLO v5sで共通して使っている。
def resize_unscale(img, new_shape=(640, 640), color=114):
  shape = img.shape[:2]  # current shape [height, width]
  if isinstance(new_shape, int):
    new_shape = (new_shape, new_shape)

  canvas = np.zeros((new_shape[0], new_shape[1], 3))
  canvas.fill(color)
  # Scale ratio (new / old) new_shape(h,w)
  r = min(new_shape[0] / shape[0], new_shape[1] / shape[1])

  # Compute padding
  new_unpad = int(round(shape[1] * r)), int(round(shape[0] * r))  # w,h
  new_unpad_w = new_unpad[0]
  new_unpad_h = new_unpad[1]
  pad_w, pad_h = new_shape[1] - new_unpad_w, new_shape[0] - new_unpad_h  # wh padding

  dw = pad_w // 2  # divide padding into 2 sides
  dh = pad_h // 2

  if shape[::-1] != new_unpad:  # resize
      img = cv2.resize(img, new_unpad, interpolation=cv2.INTER_AREA)

  canvas[dh:dh + new_unpad_h, dw:dw + new_unpad_w, :] = img

  return canvas, r, dw, dh, new_unpad_w, new_unpad_h  # (dw,dh)
2. YOLOP
特徴
- YOLOP
- 物体検知、セグメンテーション、レーン検知の3つのタスクを同時に行える。
- 3つのタスクを1つのバックボーンで行っている。
- 物体検知だけが必要な場合でも、YOLO v5に比べて速い気がする。
- デメリット:バイク・自転車の検出が出来なかった。
- BDD100Kにはバイク・自転車などのデータも含まれているが、YOLOPでは学習していない模様
使い方
- Pytorchでモデル実装されているのだが、Pytorchでの使い方は結局わからなかった(私の理解不足)。
- ONNXに変換されたモデルの使い方が分かったため、そちらを使った。
Githubからレポジトリをコピーする
%cd $my_dir # ディレクトリを移動
%pwd
!git clone https://github.com/hustvl/YOLOP.git
必要なモジュールをインストールする
#YOLOPを使うための必要モジュールをインストール
yolop_req_path = my_dir + "YOLOP/requirements.txt"
!pip install -qr "$yolop_req_path"
#ONNXをインストールする。CPUを使うかGPUを使うかでインストール内容が異なる
import torch
if torch.cuda.is_available():
  !pip install onnxruntime-gpu #GPU用
else:
  !pip install onnx onnxruntime # None(GPU)用
YOLOPの読み込み
import os
import sys
import cv2
import torch
import numpy as np
import onnxruntime as ort

sys.path.append(my_dir + "YOLOP") #1行下の lib.core.general が使えるように Pathを通す
from lib.core.general import non_max_suppression, bbox_iou

ort.set_default_logger_severity(4)
onnx_path = my_dir+"YOLOP/weights/yolop-640-640.onnx"
ort_session = ort.InferenceSession(onnx_path, providers=['TensorrtExecutionProvider', 'CUDAExecutionProvider', 'CPUExecutionProvider'])

def infer_yolop(img_bgr):

    height, width, _ = img_bgr.shape

    # convert to RGB
    img_rgb = img_bgr[:, :, ::-1].copy()

    # resize & normalize
    canvas, r, dw, dh, new_unpad_w, new_unpad_h = resize_unscale(img_rgb, (640, 640))

    img = canvas.copy().astype(np.float32)  # (3,640,640) RGB
    img /= 255.0
    img[:, :, 0] -= 0.485
    img[:, :, 1] -= 0.456
    img[:, :, 2] -= 0.406
    img[:, :, 0] /= 0.229
    img[:, :, 1] /= 0.224
    img[:, :, 2] /= 0.225

    img = img.transpose(2, 0, 1)

    img = np.expand_dims(img, 0)  # (1, 3,640,640)

    # inference: (1,n,6) (1,2,640,640) (1,2,640,640)
    det_out, da_seg_out, ll_seg_out = ort_session.run(
        ['det_out', 'drive_area_seg', 'lane_line_seg'],
        input_feed={"images": img}
    )

    det_out = torch.from_numpy(det_out).float()
    boxes = non_max_suppression(det_out, conf_thres=0.5)[0]  # [n,6] [x1,y1,x2,y2,conf,cls]
    boxes = boxes.cpu().numpy().astype(np.float32)

    if boxes.shape[0] == 0:
        return

    # scale coords to original size.
    boxes[:, 0] -= dw
    boxes[:, 1] -= dh
    boxes[:, 2] -= dw
    boxes[:, 3] -= dh
    boxes[:, :4] /= r

    return boxes
-
non_max_suppressionの引数として指定しているconf_thres=0.5はオプション引数なので無くても動作する。conf_thresを調整することで物体検出の感度を調整できる。
ビデオの特定フレームを読み込んでYOLOPで推定した結果を表示
from google.colab.patches import cv2_imshow

def infer_yolop_and_show(img_bgr):

    boxes = infer_yolop(img_bgr)

    if boxes.shape[0] == 0:
        print("no bounding boxes detected.")
    else:
        print(f"detect {boxes.shape[0]} bounding boxes.")

    img_det = img_bgr.copy()
    for i in range(boxes.shape[0]):
        x1, y1, x2, y2, conf, label = boxes[i]
        x1, y1, x2, y2, label = int(x1), int(y1), int(x2), int(y2), int(label)
        img_det = cv2.rectangle(img_det, (x1, y1), (x2, y2), (0, 255, 0), 2, 2)

    cv2_imshow(img_det) #表示
    print("detect done.")

    return boxes


# 動画フレームの読み込み
video_path = my_dir+"YOLOP/inference/videos/1.mp4" # 試したい動画
cap = cv2.VideoCapture(video_path)
frame_nb=0 # 試したいフレームを指定
cap.set(cv2.CAP_PROP_POS_FRAMES, frame_nb)
ret, frame = cap.read() #1フレーム読み込み

cap.release()
cv2.destroyAllWindows()

infer_yolop_and_show(frame)
- 私はSUBARU 画像認識チャレンジのデータ(車載カメラのビデオデータ)を使って試していたが、SUBARU 画像認識チャレンジのデータは公開禁止&コンペ終了後消去する必要があるため、ここでは結果画像が載せられない。
- この例では代わりに、YOLOPのレポジトリ内に入っているビデオに適用している。
上手くいけば以下のように表示される。
3. YOLO v5
特徴
- YOLO v5s BDD100k
- YOLO v5の一番小さいモデルをBDD100kで学習した学習済みモデル。
使い方
Githubからレポジトリをコピーする
%cd $my_dir # ディレクトリを移動
%pwd
!git clone https://github.com/williamhyin/yolov5s_bdd100k.git
必要なモジュールをインストールする
yolov5_req_path = my_dir + "yolov5s_bdd100k/requirements.txt"
!pip install -r "$yolov5_req_path"
- 以下のような警告が出る場合もありますが、無視して大丈夫なようです。
WARNING: The following packages were previously imported in this runtime:
  [numpy]
You must restart the runtime in order to use newly installed versions.
YOLO v5s の読み込み
import torch.backends.cudnn as cudnn

import sys
sys.path.append(my_dir + "yolov5s_bdd100k/") #下の models.experimental, utils.datasets, utils.utils が使えるように Pathを通す

from models.experimental import *
from utils.datasets import *
from utils.utils import *

#YOLO v5のモデルと学習済みパラメータの読み込み

#GPUかCPUかの選択
if torch.cuda.is_available():
  yolov5_device = '0'
else:
  yolov5_device = 'cpu'

device = torch_utils.select_device(yolov5_device)

weights = my_dir + "yolov5s_bdd100k/runs/exp0_yolov5s_bdd_prew/weights/best_yolov5s_bdd_prew.pt"
model = attempt_load(weights, map_location=device)  # load FP32 model

half = device.type != 'cpu'  # half precision only supported on CUDA(半精度浮動小数点で計算することでパフォーマンスがよくなる)
if half:
    model.half()  # to FP16


def infer_yolov5(img_bgr):

  height, width, _ = img_bgr.shape
  # convert to RGB
  img_rgb = img_bgr[:, :, ::-1].copy()
  # resize & normalize
  canvas, r, dw, dh, new_unpad_w, new_unpad_h = resize_unscale(img_rgb, (640, 640))
  img = canvas.copy().astype(np.float32)  # (3,640,640) RGB
  img = img.transpose(2, 0, 1)
  img = np.expand_dims(img, 0)  # (1, 3,640,640)

  img = torch.from_numpy(img).to(device)
  img = img.half() if half else img.float()  # uint8 to fp16/32
  img /= 255.0  # 0 - 255 to 0.0 - 1.0
  if img.ndimension() == 3:
      img = img.unsqueeze(0)

  # Inference
  with torch.no_grad(): # これをしないとメモリが枯渇する
    det_out = model(img)[0]
    boxes = non_max_suppression(det_out, conf_thres=0.5)[0]  # [n,6] [x1,y1,x2,y2,conf,cls]

  if boxes is None:
    return

  if boxes.shape[0] == 0:
    return

  if yolov5_device == '0': #GPU使用時
    boxes = boxes.cpu().numpy().astype(np.float32)
  else:
    boxes = boxes.detach().numpy().astype(np.float32)

  # scale coords to original size.
  boxes[:, 0] -= dw
  boxes[:, 1] -= dh
  boxes[:, 2] -= dw
  boxes[:, 3] -= dh
  boxes[:, :4] /= r

  return boxes
-
non_max_suppressionの引数として指定しているconf_thres=0.5はオプション引数なので無くても動作する。conf_thresを調整することで物体検出の感度を調整できる。
ビデオの特定フレームを読み込んでYOLOPで推定した結果を表示
#ビデオのの特定フレームを読み込んでYOLO v5で推定した結果を表示する

def infer_yolov5_and_show(img_bgr):

    boxes = infer_yolov5(img_bgr)

    if boxes.shape[0] == 0:
        print("no bounding boxes detected.")
    else:
        print(f"detect {boxes.shape[0]} bounding boxes.")

    img_det = img_bgr.copy()
    for i in range(boxes.shape[0]):
        x1, y1, x2, y2, conf, label = boxes[i]
        x1, y1, x2, y2, label = int(x1), int(y1), int(x2), int(y2), int(label)
        img_det = cv2.rectangle(img_det, (x1, y1), (x2, y2), (0, 255, 0), 2, 2)

    cv2_imshow(img_det) #表示
    print("detect done.")

    return boxes

# 動画フレームの読み込み
video_path = my_dir+"YOLOP/inference/videos/1.mp4" # 試したい動画(ここではYOLOPの動画を借用)
cap = cv2.VideoCapture(video_path)
frame_nb=0 # 試したいフレームを指定
cap.set(cv2.CAP_PROP_POS_FRAMES, frame_nb)
ret, frame = cap.read() #1フレーム読み込み

cap.release()
cv2.destroyAllWindows()

infer_yolov5_and_show(frame)
- YOLOPのビデオを適用している。
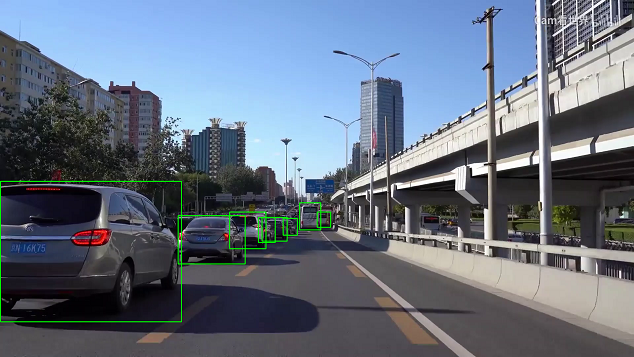
上手くいけば以下のように表示される。

- YOLOPでは自動車のみを検知していたが、YOLO v5sでは標識なども検知している。
- 検知した物体の種類は
labelでわかる。以下のように分類されている。
- 検知した物体の種類は
| label | 内容 |
|---|---|
| 0 | person |
| 1 | rider |
| 2 | car |
| 3 | bus |
| 4 | truck |
| 5 | bike |
| 6 | motor |
| 7 | tl_green |
| 8 | tl_red |
| 9 | tl_yellow |
| 10 | tl_none |
| 11 | t_sign |
| 12 | train |