KINTO Technologies Advent Calendar 2021 - Qiitaの14日目の記事です。
この記事を書いた理由
最初は「バックエンド開発者にSpockデータ駆動テストの素晴らしさを知ってもらいたい」というのが目的でした。
が、その記事を書くための環境を構築するうちに、前段であるアプリ開発環境構築の過程も需要があるのでは?というかむしろそちらのほうがナレッジとしては多くの人に必要とされているのでは?という思いが強くなってきました。
弊社システムのプラットフォームはすべてクラウドベースのコンテナサービスが基本であるため、ローカルでの開発であっても、MacにMySQLをインストールしましょうとかではなく、最初からコンテナベースで構築したほうがDevOps的にも移行が容易になります。
以上の理由で、最終的にタイトルのようなテーマの記事とすることにしました。
読んでほしい人
- うっかりクラウドベースの会社に転職しちゃったオンプレ系エンジニア
- 開発はコンテナベースでできてるけどテストまでコンテナベースで動かしたい
- テストコードを書けと言われるけどJUnit書きづらいし読みづらいしなんかイヤ
環境
MacBook Pro
Docker Desktop for Mac 4.9.1(有償化されてしまいましたね...)
Java 17
Gradle 7.3.1
Spring Boot 2.6.1
Groovy 3.0
Spock 2.0
Testcontainers 1.16.2
サンプルソース
動作の概要
Rest API
http://localhost:8080/v1/cars/{price}
KINTOの人気ランキング入り車種(2021年12月現在)のうち、指定した価格、またはそれよりお安い月額で乗れるクルマのデータが取得できます![]()
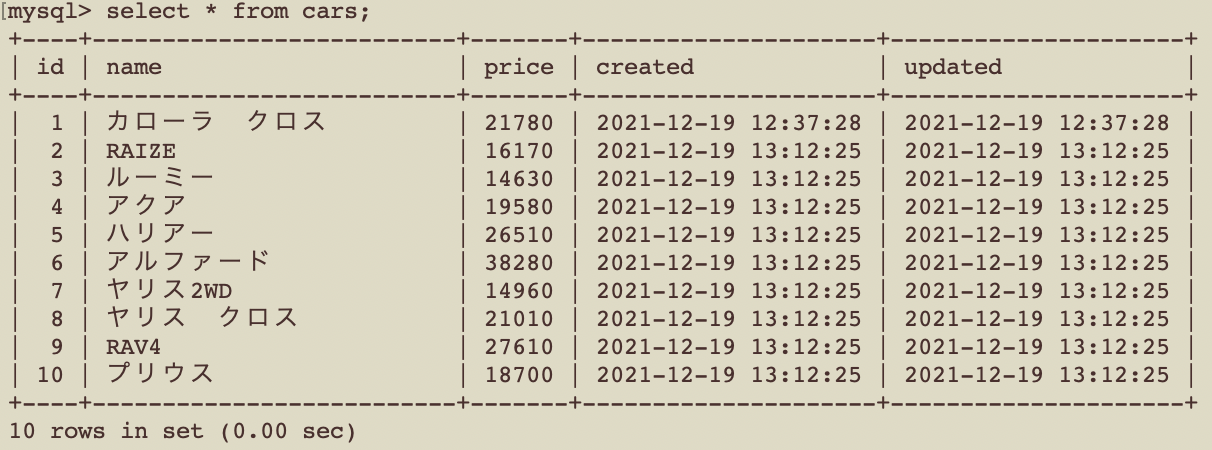
MySQLコンテナのテーブルには以下のクルマデータを入れています。
テスト内容
- HTTPステータス200でレスポンスが返るか
- 価格パターンによるデータ駆動テスト
構築手順
Rest APIの開発
Spring Bootのクラス構成はこんな感じです。
.
├── java
│   └── com
│       └── example
│           └── restapitestbyspock
│               ├── RestApiTestBySpockApplication.java
│               ├── application
│               │   └── CarController.java
│               ├── domain
│               │   ├── model
│               │   │   └── Car.java
│               │   ├── repository
│               │   │   └── CarRepository.java
│               │   └── service
│               │       └── CarService.java
│               └── infrastructure
│                   ├── entity
│                   │   └── CarEntity.java
│                   └── repository
│                       ├── CarJpaRepository.java
│                       └── CarRepositoryImpl.java
└── resources
    ├── application.yml
    ├── static
    └── templates
Spring Data JPAのクエリ生成機能を活用して、「findByPriceLessThanEqualOrderByPriceAsc」つまり「指定した価格、またはそれよりお安い月額で乗れるクルマのデータをお安い順に」取得しています![]()
その他特にトリッキーなこともしていないのでサクッとコードだけ載せていきます。
domain層
@Data
@Builder
public class Car {
    @Id
    private Integer id;
    private String name;
    private Integer price;
}
public interface CarRepository {

    List<Car> findByPriceLessThanEqualOrderByPriceAsc(Integer price);

}
@Service
@RequiredArgsConstructor
public class CarService {

    @NonNull
    private final CarRepository carRepository;

    public List<Car> findByPriceLessThanEqualOrderByPriceAsc(Integer price) {
        return this.carRepository.findByPriceLessThanEqualOrderByPriceAsc(price);
    }

}
infrastructure層
@Data
@Builder
@NoArgsConstructor
@AllArgsConstructor
@Entity
@Table(name = "cars")
public class CarEntity {
    @Id
    private Integer id;
    private String name;
    private Integer price;

    public Car toDomainCar() {
        return Car.builder()
                .id(this.id)
                .name(this.name)
                .price(this.price)
                .build();
    }
}
public interface CarJpaRepository extends JpaRepository<CarEntity, Integer> {
    List<CarEntity> findByPriceLessThanEqualOrderByPriceAsc(Integer price);
}
@Repository
@RequiredArgsConstructor
public class CarRepositoryImpl implements CarRepository {

    @NonNull
    private final CarJpaRepository carJpaRepository;

    @Override
    public List<Car> findByPriceLessThanEqualOrderByPriceAsc(Integer price) {
        return this.carJpaRepository.findByPriceLessThanEqualOrderByPriceAsc(price)
                .stream().map(CarEntity::toDomainCar)
                .collect(Collectors.toList());
    }
}
application層
@RestController
@RequiredArgsConstructor
@RequestMapping(path = "/v1/cars")
public class CarController {

    @NonNull
    private final CarService carService;

    @GetMapping("/{price}")
    @ResponseStatus(HttpStatus.OK)
    public List<Car> findByPriceLessThanEqualOrderByPriceAsc(@PathVariable("price") Integer price) {
        return this.carService.findByPriceLessThanEqualOrderByPriceAsc(price);
    }
}
Docker Desktopのインストール
それではいよいよコンテナ化の準備をしていきましょう。
Docker Desktop for Mac and Windows
上記からお使いの端末にあわせてダウンロード、インストールしてください。
Dockerコンテナの設定
設定ファイル構成はこんな感じ。
.
├── docker
│   ├── flyway
│   │   ├── conf
│   │   │   └── flyway.conf
│   │   └── sql
│   │       ├── V1.0.0__schema.sql
│   │       └── V1.1.0__data.sql
│   ├── log
│   │   └── mysql
│   │       └── mysqld.log
│   ├── mysql
│   │   ├── Dockerfile
│   │   └── conf.d
│   │       └── my.cnf
│   └── spring
│       └── Dockerfile
├── docker-compose.yml
Docker Composeベースで設定ファイルの実装を進めていきます。
「Spring BootからMySQLに接続、かつFlywayでマイグレーション管理する」という構成にしたいため、必要なコンテナイメージは下記の3つになります。
- MySQL
- Flyway
- Spring Boot
version: "3.7"
services:
  dbserver:
    container_name: mysql-db
    build:
      context: ./docker/mysql
      dockerfile: Dockerfile
    image: chig1215/mysql:latest
    environment:
      MYSQL_ROOT_PASSWORD: root
      MYSQL_USER: chig1215
      MYSQL_PASSWORD: chig1215
      MYSQL_DATABASE: kinto
    restart: always
    command: --default-authentication-plugin=mysql_native_password
    ports:
      - "3306:3306"
    volumes:
      - ./docker/mysql/conf.d:/etc/mysql/conf.d
      - ./docker/log/mysql:/var/log/mysql
      - mysql_db:/var/lib/mysql
  flyway-repair:
    container_name: flyway-repair
    image: flyway/flyway
    command: repair
    volumes:
      - ./docker/flyway/conf:/flyway/conf
    depends_on:
      - dbserver
  flyway-migration:
    container_name: flyway-migration
    image: flyway/flyway
    command: -url=jdbc:mysql://dbserver -schemas=kinto -user=chig1215 -password=chig1215 -connectRetries=60 migrate
    volumes:
      - ./docker/flyway/conf:/flyway/conf
      - ./docker/flyway/sql:/flyway/sql
    depends_on:
      - flyway-repair
  spring:
    container_name: spring-app
    build: ./docker/spring
    depends_on:
      - flyway-migration
    ports:
      - "8080:8080"
    volumes:
      - .:/app
    environment:
      spring.datasource.driverClassName: "com.mysql.cj.jdbc.Driver"
      spring.datasource.url: "jdbc:mysql://dbserver/kinto"
      spring.datasource.username: "chig1215"
      spring.datasource.password: "chig1215"
    working_dir: /app
    command: sh -c "java -jar ./build/libs/rest-api-test-by-spock-0.0.1-SNAPSHOT.jar"
volumes:
  mysql_db:
    driver: local
各コンテナ毎の設定をコメントで解説していきます。
MySQL
  dbserver:
    container_name: mysql-db  # コンテナ名(Docker Desktop上はこの名前で表示される)
    build:
      context: ./docker/mysql # Dockerfileを含むディレクトリへのパス
      dockerfile: Dockerfile  # Dockerfile名
    image: chig1215/mysql:latest # イメージ名
    environment:
      MYSQL_ROOT_PASSWORD: root # 環境変数(rootユーザのパスワード)
      MYSQL_USER: chig1215      # 環境変数(ユーザ)
      MYSQL_PASSWORD: chig1215  # 環境変数(パスワード)
      MYSQL_DATABASE: kinto     # 環境変数(データベース名)
    restart: always # 再起動ポリシー
    command: --default-authentication-plugin=mysql_native_password  # mysql_native_password を使用したネイティブ認証
    ports:
      - "3306:3306" # ポートマッピング
    volumes:
      - ./docker/mysql/conf.d:/etc/mysql/conf.d # mysql.confディレクトリのマッピング
      - ./docker/log/mysql:/var/log/mysql       # mysqld.logディレクトリのマッピング
      - mysql_db:/var/lib/mysql                 # データ永続化ボリュームのマッピング
# DBの永続化先
volumes:
  mysql_db:
    driver: local
Flyway
  flyway-repair:
    container_name: flyway-repair # コンテナ名(Docker Desktop上はこの名前で表示される)
    image: flyway/flyway          # イメージ名
    command: repair               # 前回のSQLエラー解消(サンプルコンテンツのため。本番稼働アプリでは不要)
    volumes:
      - ./docker/flyway/conf:/flyway/conf # flyway.confディレクトリのマッピング
    depends_on:
      - dbserver  # MySQLコンテナが起動した後に起動させる
  flyway-migration:
    container_name: flyway-migration  # コンテナ名(Docker Desktop上はこの名前で表示される)
    image: flyway/flyway              # イメージ名
    # MySQLの接続先を指定してマイグレーションを実行する(host:port部分はコンテナ名を指定する)
    command: -url=jdbc:mysql://dbserver -schemas=kinto -user=chig1215 -password=chig1215 -connectRetries=60 migrate
    volumes:
      - ./docker/flyway/conf:/flyway/conf # flyway.confディレクトリのマッピング
      - ./docker/flyway/sql:/flyway/sql   # マイグレーションSQLファイルディレクトリのマッピング
    depends_on:
      - flyway-repair # repairが完了した後に起動させる
Spring Boot
  spring:
    container_name: spring-app  # コンテナ名(Docker Desktop上はこの名前で表示される)
    build: ./docker/spring      # Dockerfileを含むディレクトリへのパス
    depends_on:
      - flyway-migration        # マイグレーションが完了した後に起動させる
    ports:
      - "8080:8080"             # ポートマッピング
    volumes:
      - .:/app                  # ボリュームマッピング
    environment:
      # MySQLの接続設定
      spring.datasource.driverClassName: "com.mysql.cj.jdbc.Driver"
      spring.datasource.url: "jdbc:mysql://dbserver/kinto"  # host:port部分はコンテナ名を指定する
      spring.datasource.username: "chig1215"
      spring.datasource.password: "chig1215"
    working_dir: /app # 作業ディレクトリ
    # jarから起動
    command: sh -c "java -jar ./build/libs/rest-api-test-by-spock-0.0.1-SNAPSHOT.jar"
各コンテナのDockerfileやconfの内容はサンプルソースをご参照ください。
動作確認
アプリケーションのビルド
$ ./gradlew clean build
buildディレクトリにjarができていることを確認しましょう。
.
├── build
│   ├── libs
│   │   ├── rest-api-test-by-spock-0.0.1-SNAPSHOT-plain.jar
│   │   └── rest-api-test-by-spock-0.0.1-SNAPSHOT.jar
コンテナの起動
$ docker-compose up --build
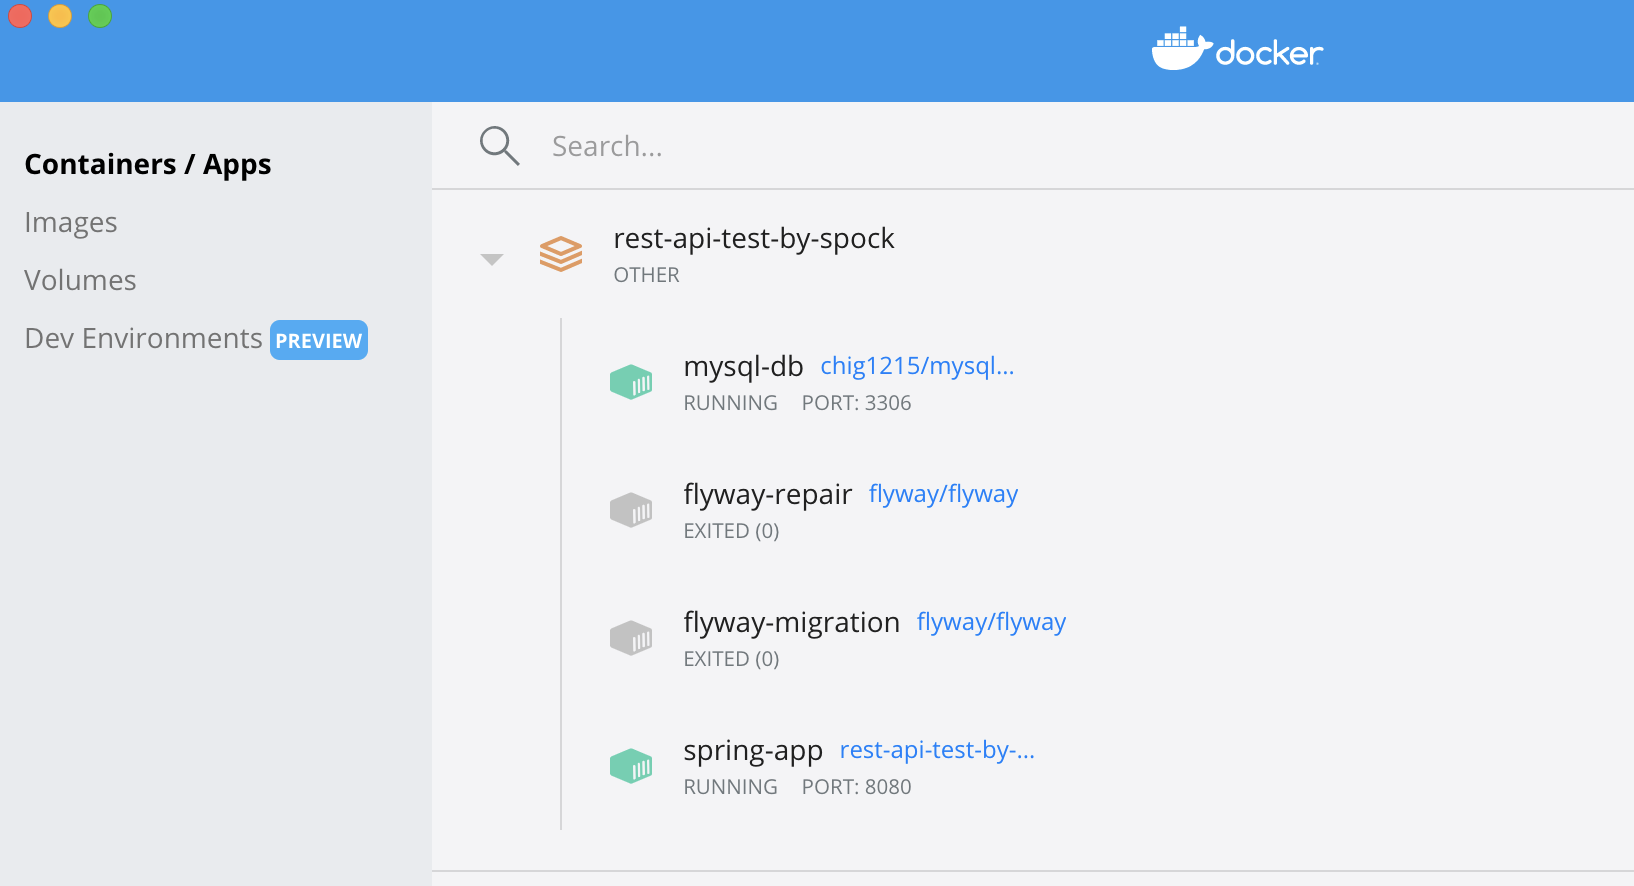
起動に成功すれば、Docker DesktopのContainers/Appsに以下のように表示されるはずです。
Rest APIをGETして、このように結果が返却されれば正常に起動しています。
http://localhost:8080/v1/cars/20000
[{
	"id": 3,
	"name": "ルーミー",
	"price": 14630
}, {
	"id": 7,
	"name": "ヤリス2WD",
	"price": 14960
}, {
	"id": 2,
	"name": "RAIZE",
	"price": 16170
}, {
	"id": 10,
	"name": "プリウス",
	"price": 18700
}, {
	"id": 4,
	"name": "アクア",
	"price": 19580
}]
コンテナの停止
$ docker-compose down
ちょっと休憩
コーヒーブレイク![]()
テスト開発
さて、いよいよ当初のメインテーマになるはずだったSpockの登場です。
今回はテストもコンテナベースで実施したいので、Testcontainersも併用していきます。
クラス構成はこんな感じです。
.
└── src
    └── test
        ├── groovy
        │   └── com
        │       └── example
        │           └── restapitestbyspock
        │               └── application
        │                   └── CarControllerTest.groovy
        ├── java
        │   └── com
        │       └── example
        │           └── restapitestbyspock
        │               └── helper
        │                   └── test
        │                       └── MySQLContainerContextInitializer.java
        └── resources
テストビルドに必要なライブラリの追加
build.gradleに下記の通り追記します。
plugins {
    id 'org.springframework.boot' version '2.6.1'
    id 'io.spring.dependency-management' version '1.0.11.RELEASE'
    id 'java'
    id 'groovy' // 追記(SpockはGroovyで記述するため)
}

group = 'com.example'
version = '0.0.1-SNAPSHOT'
sourceCompatibility = '17'

configurations {
    compileOnly {
        extendsFrom annotationProcessor
    }
}

repositories {
    maven { url 'https://repo.spring.io/release' }
    mavenCentral()
}

dependencies {
    implementation 'org.springframework.boot:spring-boot-starter-data-rest'
    implementation 'org.springframework.boot:spring-boot-starter-web'
    implementation 'org.springframework.boot:spring-boot-starter-jdbc'
    implementation 'org.springframework.boot:spring-boot-starter-data-jpa'
    implementation 'javax.persistence:javax.persistence-api'
    compileOnly 'org.projectlombok:lombok'
    runtimeOnly 'mysql:mysql-connector-java'
    annotationProcessor 'org.springframework.boot:spring-boot-configuration-processor'
    annotationProcessor 'org.projectlombok:lombok'
    // ここから追記
    testImplementation 'org.springframework.boot:spring-boot-test:2.6.2'
    testImplementation 'org.springframework.boot:spring-boot-starter-test:2.6.2'
    testImplementation 'org.spockframework:spock-core:2.0-groovy-3.0'
    testImplementation 'org.spockframework:spock-spring:2.0-groovy-3.0'
    testImplementation 'org.testcontainers:testcontainers:1.16.2'
    testImplementation 'org.testcontainers:mysql:1.16.2'
    testImplementation 'com.jayway.jsonpath:json-path:2.6.0'
}

test {
    useJUnitPlatform()
}

bootBuildImage {
    builder = 'paketobuildpacks/builder:tiny'
    environment = ['BP_NATIVE_IMAGE': 'true']
}

// 追記(FlywayのマイグレーションSQLをテストリソースとして使いたいため)
sourceSets.test {
    resources.srcDirs = ["src/test/resources", "docker"]
}
テスト用データベースコンテナ設定用ヘルパークラス
@SuppressWarnings({"rawtypes", "unchecked"})
public class MySQLContainerContextInitializer
        implements ApplicationContextInitializer<ConfigurableApplicationContext> {

    private static final Logger LOGGER = LoggerFactory.getLogger(MySQLContainerContextInitializer.class);

    private static final MySQLContainer MYSQL =
            new MySQLContainer("mysql:latest") {
                {
                    withDatabaseName("kinto");
                    withUsername("chig1215");
                    withPassword("chig1215");
                    withExposedPorts(3306);
                    withLogConsumer(new Slf4jLogConsumer(LOGGER));
                    withClasspathResourceMapping(
                            "mysql/conf.d",
                            "/etc/mysql/conf.d", BindMode.READ_ONLY);
                    withClasspathResourceMapping(
                            "flyway/sql",
                            "/docker-entrypoint-initdb.d", BindMode.READ_ONLY);
                }
            };

    static {
        MYSQL.start();
    }

    @Override
    public void initialize(ConfigurableApplicationContext applicationContext) {
        TestPropertyValues.of("spring.datasource.url=" + MYSQL.getJdbcUrl())
                .applyTo(applicationContext.getEnvironment());
    }
}
Springの起動時に動作させたいので、ApplicationContextInitializerを実装するクラスとして作成します。
接続情報はdocker-compose.ymlに設定した内容と同じ。
mysql.confディレクトリとマイグレーションSQLディレクトリは、階層的には
.
├── docker
│   ├── flyway
│   │   ├── conf
│   │   │   └── flyway.conf
│   │   └── sql
│   │       ├── V1.0.0__schema.sql
│   │       └── V1.1.0__data.sql
│   ├── mysql
│   │   ├── Dockerfile
│   │   └── conf.d
│   │       └── my.cnf
こんなところにいたので、src/test/resourcesに同じものをコピーするしかないか?と思ってたのですが、しばらくしてから
// 追記(FlywayのマイグレーションSQLをテストリソースとして使いたいため)
sourceSets.test {
    resources.srcDirs = ["src/test/resources", "docker"]
}
これでいいことに気づき、めでたくアプリとテストでファイルを一元化できました。
テストを書く
@SpringBootTest
@AutoConfigureMockMvc
@ContextConfiguration(initializers = [MySQLContainerContextInitializer.class])
class CarControllerTest extends Specification {
    @Autowired
    MockMvc mockMvc

    @Unroll
    def "FindByPriceLessThanEqualOrderByPriceAsc HttpStatus"() {

        when:
        def result =
                mockMvc.perform(MockMvcRequestBuilders.get("/v1/cars/30000"))
                        .andReturn().getResponse()

        then:
        result.getStatus() == HttpStatus.OK.value
    }

    @Unroll
    def "FindByPriceLessThanEqualOrderByPriceAsc Data Pattern"() {

        expect:
        mockMvc.perform(MockMvcRequestBuilders.get("/v1/cars/" + price))
                .andExpect(MockMvcResultMatchers.jsonPath("\$.*", Matchers.hasSize(size)))

        where:
        price   || size
        "50000" || 10
        "40000" || 10
        "30000" || 9
        "20000" || 5
        "15000" || 2
        "10000" || 0

    }

}
@ContextConfiguration(initializers = [MySQLContainerContextInitializer.class])
で先ほどのヘルパークラスを指定し、コンテナの起動と接続情報の設定を行っています。
これで、テストコードからテスト用MySQLコンテナにアクセスできるようになります。
テスト内容は下記の2つです。
- HTTPステータス200でレスポンスが返るか(
FindByPriceLessThanEqualOrderByPriceAsc HttpStatus) - 価格パターンによるデータ駆動テスト(
FindByPriceLessThanEqualOrderByPriceAsc Data Pattern)
私がSpockを推す最大の理由はなんといっても「読みやすさ」です。
        expect:
        mockMvc.perform(MockMvcRequestBuilders.get("/v1/cars/" + price))
                .andExpect(MockMvcResultMatchers.jsonPath("\$.*", Matchers.hasSize(size)))

        where:
        price   || size
        "50000" || 10
        "40000" || 10
        "30000" || 9
        "20000" || 5
        "15000" || 2
        "10000" || 0
コメントがなくても何をテストしているかわかりますよね。
Rest APIに渡す価格のデータパターンをprice、データパターン毎に返却されるはずのクルマオブジェクトの数をsizeに定義しています。
テストを通す
$ ./gradlew clean test
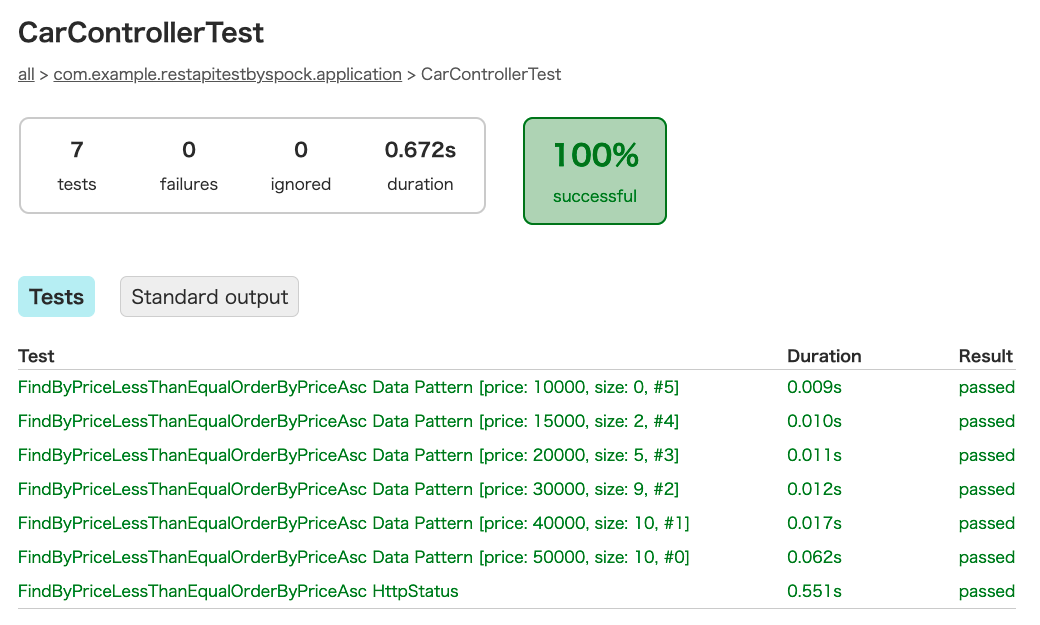
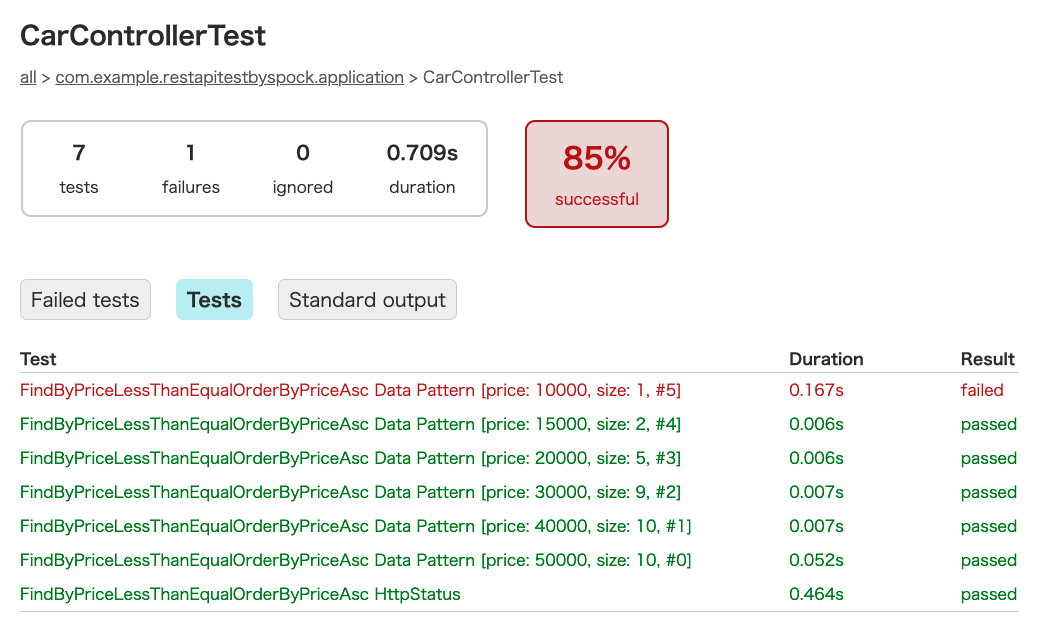
コンソールにテスト結果が表示されますが、レポートも出力されるので、ブラウザで表示してみましょう。
.
├── build
│   ├── reports
│   │   └── tests
│   │       └── test
│   │           ├── classes
│   │           │   └── com.example.restapitestbyspock.application.CarControllerTest.html
│   │           ├── css
│   │           │   ├── base-style.css
│   │           │   └── style.css
│   │           ├── index.html
│   │           ├── js
│   │           │   └── report.js
│   │           └── packages
│   │               └── com.example.restapitestbyspock.application.html
全テスト成功
失敗テストあり
参考資料
https://matsuand.github.io/docs.docker.jp.onthefly/reference/
https://www.testcontainers.org/
おわりに
いかがでしたでしょうか。
少しでも皆様のお役に立てるナレッジとなりましたら幸いです。
当社では、トヨタ車のサブスク「KINTO」等の企画/開発を行っており、エンジニアを募集中です。
KINTO Technologies コーポレートサイト


