Vue/Nuxtでパララックスしようぜ!
※パララックス効果とは:スクロールしたときに、スクロール量に合わせてずれたり動いたりするやつ。
こういうやつ
Vue.jsプラグインもいくつかあるけど、自前で実装した方が自由度高くて楽だった。勉強にもなるし。
実装方法概要
実装方法の大まかな説明
- scrollイベントをlisten
- スクロール量やら色々パラメータを取って移動量を計算
- imgのstyleに
object-position: {移動量X}% {移動量Y}%をぶち込む- ※
object-positionを知らない方は先に 事前知識 : CSS object-position について をどうぞ。 - もちろん、
background-position: {移動量X}% {移動量Y}%プロパティでも可能です。
- ※
<template>
  <img
    ref="backgroundImg"
    class="background-img"
    src="~/assets/img/background.png"
    :style="`object-position: 50% ${objPosY}%;`"
  >
</template>

<script>
export default {
  data() {
    return {
      objPosY: 0
    }
  },
  mounted(){
    window.addEventListener('scroll', this.calculateScrollY) // スクロールイベントのlisten
  },
  methods: {
    calculateScrollY() {
      // this.objPosY に計算した移動量をぶち込む
    }
  }
}
以上の実装方法は、場合によって移動量の計算方法が異なる。
ページのトップにいてスクロールをしていないときに、画面上に画像が見えているか見えていないかで、計算方法を2パターン用意した。
- img要素が完全に隠れている場合。(スクロールしないとimg要素が現れない場合)
- img要素が最初から見えている場合。(スクロールしなくてもimg要素が少しでも見えていて、これからスクロールする場合。)
1. img要素が完全に隠れている場合
imgタグに以下のようにstyle属性を追加する。
:style="`object-position: 50% ${objPosY}%;`"
// または :style="`background-position: 50% ${objPosY}%;`"
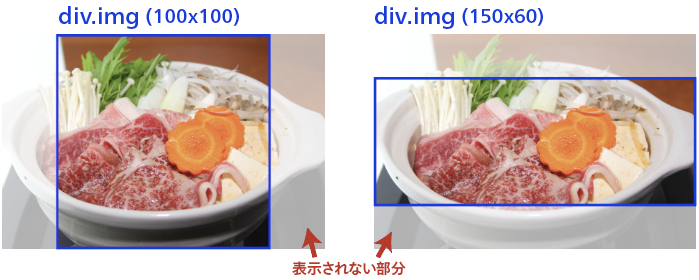
CSSの object-position(またはbackground-position)を使用すると、以下のように画像の位置が変えられる。そのY軸の移動量が objPosY。これを制御したい。
-50%とか、150%とかの状態にならないように、0%から100%までで動かしたい。

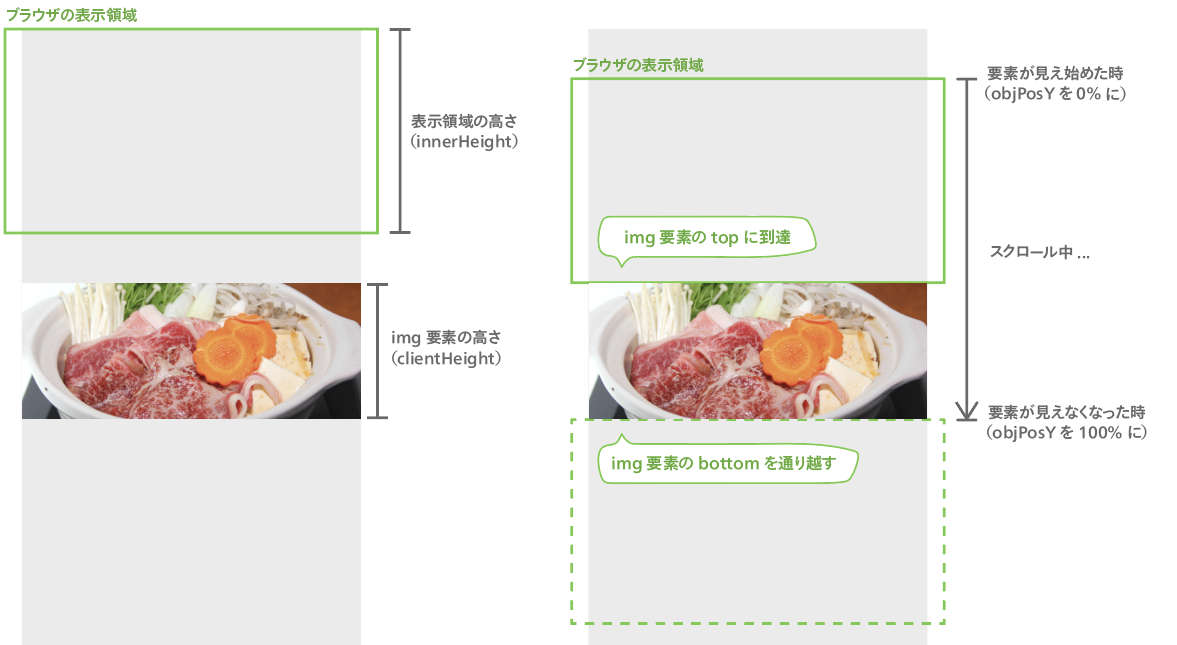
img要素が完全に隠れている場合、実装したい画像の移動量 objPosY の仕様は、以下の通り。
- スクロールして要素が見え始めた時は、移動量が0%である。
= ブラウザの表示領域のbottomが、img要素のtop に到達した時 - スクロールして要素が見えなくなった時は、移動量が100%である。
= ブラウザの表示領域のtopが、img要素のbottom に到達した時
以上のように、スクロール量に合わせてobjPosYの値が、0から100まで動けばよい。
1.1 要素が見え始めた時にスクロール量が0となる基準変数を作る
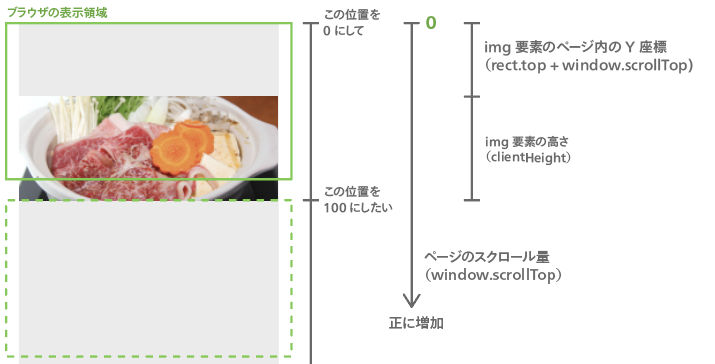
getBoundingClientRect() を使ってスクロール量を取得し、新たに変数 topVisibleScrollY を定義した。
const rect = this.$refs.backgroundImg.getBoundingClientRect();
console.log(rect.top) // ブラウザの表示領域を基準とする、img要素の絶対座標(top) スクロールによって可変

const innerHeight = window.innerHeight // ブラウザの表示領域の高さ。

const topVisibleScrollY = -rect.top + innerHeight // 要素が見え始めた時にスクロール量が0。スクロールによって可変
console.log(topVisibleScrollY)
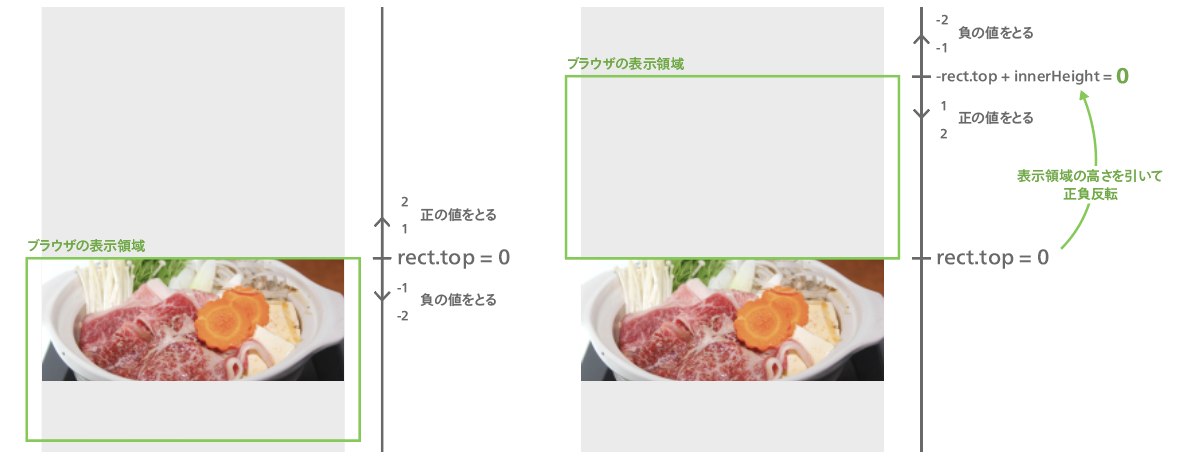
getBoundingClientRect().top は、ブラウザの表示領域を基準とする、img要素の相対座標である。
つまり、ブラウザの表示領域のtopとimg要素のtopが重なった時に0になる。
「img要素のtop」を「img要素のbottom」に変えるために、img要素の高さを引いてやれば良い。
ただ、getBoundingClientRect().top は、下へスクロールするごとに値が小さくなっていくので、マイナスにして正負反転させていることに注意。こうすることで、imgが画面内に現れた後、下へのスクロールによってtopVisibleScrollYの値は正の方へ増えていく。
これで、「スクロールして要素が見え始めた時は、移動量が0%である。」の条件がクリアできたので、今度は**「じゃぁtopVisibleScrollYが何pxのときに100%とみなせばいいのか」**を求めていきます。
1.2 topVisibleScrollYが何pxのときに100%とみなせばいい?
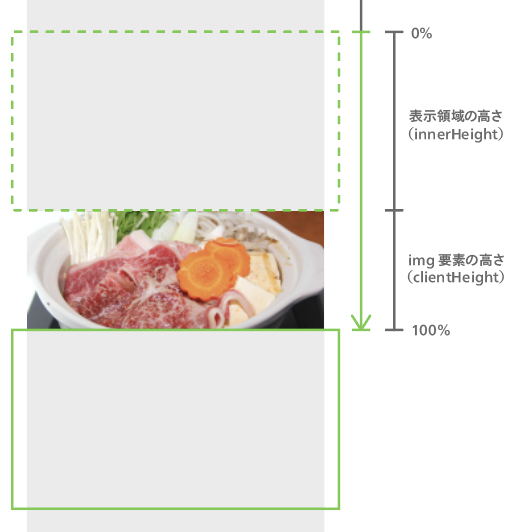
要素が見えなくなった時に topVisibleScrollY が何pxかがわかれば良い。
要素が見え始めた時を0としたスクロール量がtopVisibleScrollYだから、計算は簡単。
答えは、img要素の高さと表示領域の高さを足したやつになる。
// img要素の高さ
const height = this.$refs.backgroundImg.clientHeight

// `topVisibleScrollY`が何pxのときに100%とみなせばいいか
const bottomVisibleEndY = height + innerHeight
1.3 要素が見えなくなった時に、移動量が100%となるやつを作る
topVisibleScrollY が bottomVisibleEndY に達した時に100になるようにすればいい。
this.objPosY = topVisibleScrollY / bottomVisibleEndY * 100 // 見え始めた時は0、見えなくなった時100
topVisibleScrollY も bottomVisibleEndY も単位がピクセル量なのでパーセントに変換。
おしまい!
1.4 全体のコード
<template>
  <img
    ref="backgroundImg"
    class="background-img"
    src="~/assets/img/background.png"
    :style="`object-position: 50% ${objPosY}%;`"
  >
</template>

<script>
export default {
  data() {
    return {
      objPosY: 0
    }
  },
  mounted(){
    window.addEventListener('scroll', this.calculateScrollY) // removeEventListenerは別で書きましょう。
  },
  methods: {
    calculateScrollY() {
      const rect = this.$refs.backgroundImg.getBoundingClientRect();
      const innerHeight = window.innerHeight // 表示領域の高さ
      const topVisibleScrollY = -rect.top + innerHeight // 要素が見え始めた時にスクロール量が0。スクロールによって可変。

      const height = this.$refs.backgroundImg.clientHeight // img要素の高さ
      const bottomVisibleEndY = height + innerHeight // topVisibleScrollYが何pxのときに100%とみなせばいいか

      this.objPosY = topVisibleScrollY / bottomVisibleEndY * 100 // 見え始めた時は0、見えなくなった時100
    }
  }
}
</script>
<style>
.background-img {
  display: block;
  width: 100%;
  height: 100%;
  object-fit: cover;
  object-position: 50% 50%;
  overflow: hidden;
}
</style>
2. img要素が最初から見えている場合
この場合、imgが上側へ隠れることがないので、これまでの実装方法だと移動量が0%になることがない。スクロールしてない状態でも、40%とか30%とかになってしまう。
スクロールしてない状態なら0%にしたい。ということで以下に変えれば解決。
  calculateScrollY() {
    const scrollY = document.body.scrollTop;
    const rect = this.$refs.backgroundImg.getBoundingClientRect();
    const height = this.$refs.backgroundImg.clientHeight
    const bottomVisibleEndY = height + rect.top + scrollY
    this.objPosY = scrollY / bottomVisibleEndY * 100
  }
スクロール量については、途中から0で始める必要がなくなったので、rect.topをやめて window.scrollTop に変更。
bottomVisibleEndY(scrollTopが何pxのときに100%とみなせばいいか) はimg要素の高さとimg要素のY座標を足し合わせればOK。
img要素のY座標は rect.top + scrollY で求められます。
事前知識 : CSS object-position について
今回は CSS の object-position を使って画像をずらしていたのでその説明。
参考:https://developer.mozilla.org/ja/docs/Web/CSS/object-position
画像の width と height を指定した上で、画像自体は cover にしたい時、よく使われるのは以下のようなコード。
backgroundに画像を指定する方法である。
<div class="hoge-img">
.hoge-img {
  /* img要素ではなくdiv要素とかにつける */
  width: 100px;
  height: 100px;
  background: url('image.png') no-repeat;
  background-position: 50% 50%;  /* center; でも可 */
  background-size: cover;
}
ただこの方法は、CSSに画像のパスを配置する必要がある。なので、パスが動的に変わるような場合は、imgタグを使いたいときもある。
その際に登場するのが、object-fit と object-position。
<img src="画像パス" alt="" class="hoge-img">
img.hoge-img {
  /* img要素につける */
  width: 100px;
  height: 100px;
  object-fit: cover;
  object-position: 50% 50%;  /* center; でも可 */
  overflow: hidden;
}
これでimg要素でも自由なサイズにクリッピングできる。ちなみにIEでは使えません。
https://caniuse.com/#feat=object-fit
今回はobject-positionを使ったが、background-positionを使っても同様にパララックスできる。
こうすればいいだけ↓↓↓
<template>
  <div
    ref="backgroundImg"
    class="background-img"
    :style="`background-position: 50% ${objPosY}%;`"
  >
</template>
...
ついでに:addEventListenerについて
mixins.jsをpluginsフォルダにつくって、nuxt.config.jsにplugins: ['~/plugins/mixins'],とやる。
これでEventListenerを使う時は、this.listen(window, 'scroll', this.calculateScrollY) とするだけでよい。
import Vue from 'vue'

Vue.mixin({
  destroyed() {
    if (this._eventRemovers) {
      this._eventRemovers.forEach(function(eventRemover) {
        eventRemover.remove()
      })
    }
  },
  methods: {
    listen(target, eventType, callback) {
      if (!this._eventRemovers) {
        this._eventRemovers = []
      }
      target.addEventListener(eventType, callback)
      this._eventRemovers.push({
        remove() {
          target.removeEventListener(eventType, callback)
        }
      })
    }
  }
})
remove()をいちいち書かなくて良いの天才すぎる。以下から参考にさせていただきました。(多分)
- Nuxt.jsで異なるコンポーネントから共通で利用できる関数を定義する(mixin編) - Qiita
-
Vue.js 外側をクリックすると閉じるドロップダウンメニュー - Qiita
- ここでイベントリスナーの知見を得た。あざます。
PS : Twitterで「パララックス、SafariとiOSで動かなかったはずでは?」って言われてビビってましたが、実装方法の勘違いだったようです。 Safariでも動作します。