1. はじめに
CloudFormationによるIaC開発を行う時、毎度毎度スタック更新コマンドを打つのはちょっと面倒くさいなーなんて感じてる方。いらっしゃいますよね??
そんな時はCI機能を導入するのがオススメです!
パイプラインを通すことでGitHubへのpushから変更セットの作成までを自動化することができます。
Ciとか聞くと、「CI/CDとかコンテナのやつでしょ?」「なんか難しく感じる..」等と思うかも知れませんが、CIもテンプレート化してしまえば一撃で実装可能ですので、是非この機会にCIに触れてみるのはいかがでしょうか。
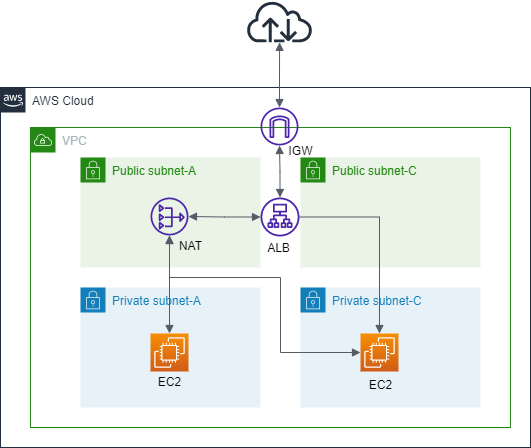
本記事ではCoudFormationを利用して、シンプルなWeb環境にCIパイプラインを通してみます。
2. 概要
本記事の概要を以下に記載します。
2.1 構成図
2.2 リポジトリ階層図
.
├── cicd/                            ・・・CI機能に関する資材を格納
│   ├── buildspec.yml                ・・・BuildSpec
│   ├── ci-change-set.yml            ・・・CIスタック
│   ├── requirements.txt             ・・・パッケージインストール用の設定ファイル
│   └── script/                      ・・・CIスタックデプロイ用shを格納
│  	  ├── create-ci-change-set.sh*
│  	  └── update-ci-change-set.sh*
├── params/
│   └── param.json                   ・・・共通パラメータ設定ファイル
├── README.md
└── template/                        ・・・CFnテンプレートを格納(ネストスタック)
	 ├── lb.yml
	 ├── main.yml
	 ├── network.yml
	 ├── server.yml
	 └── sg.yml
● GitHub
https://github.com/chibiharu/CloudFormation-Template/tree/master/CI-Create-ChangeSet-demo
2.3 要件
-
環境構築
- 「2.1 構成図」の通りの環境を構築する
- 開発にはCloudFormationを利用する
-
バージョン管理
- ソース管理にGitHubを利用する
- GitHubをCodeCommitへミラーリングする
-
CIパイプライン
- 以下の流れを自動化する
- GitHubのリポジトリに登録されているCloudFormationのyamlファイルを修正して、push
- pushをトリガーにして、CodePipelineを自動的に実行し、CloudFormationの変更セットを自動的に生成
- 以下の流れを自動化する
3. 事前準備
3.1 アカウントの準備
事前に以下のアカウントを作成しておくこと
- GitHub
- AWS
3.2 GitHubとCodeCommitの連携
本記事ではCIパイプラインに「CodePipeline」というAWSサービスを利用します。
CodePipelineでCI/CDを組む場合は、GitHubではなくCodeCommitというバージョン管理サービスを利用する必要があります。
CodeCommit自体は便利なバージョン管理サービスなのですが、やはりGitHubと比べると分が悪いものです。
そんな時はミラーリング機能を使いましょう。
GitHubをCodeCommitへミラーリングすることでGitHubを使用しつつもCodePiplineからはCodeCommitを使用しているかのように見えるようになります。
ミラーリング手順については以下の記事にて公開しています。
4. デプロイ
4.1 プロジェクトの作成
GitHub上にプロジェクトを配置します。
リポジトリ構成については、前項(2.2 リポジトリ階層図)にて記載しています。
4.2 CIスタックの作成
GitHubとCodeCommitの連携、GitHub上にリポジトリ作成、ここまで完了したら後はCIスタックを上げるだけです。
今回は以下のCIスタックと資材を準備しました。
CIスタック
CloudFormationをCI/CDするCodePipelineのCloudFormationのyamlファイルです。なかでは、シンプルに、CodeCommitを起点として、変更セットを作成するようになっています。
---
AWSTemplateFormatVersion: 2010-09-09
Description: "Launch a CI-Create-ChangeSet-demo"


# ------------------------------------------------------------
#  Metadate
# ------------------------------------------------------------
Metadata:
  AWS::CloudFormation::Interface:
    ParameterGroups:
      - Parameters:
          - PJPrefix
          - RepositoryName
          - StackConfig
          - TemplateFilePath
          - BuildSpec


# ------------------------------------------------------------
# Input Parameters
# ------------------------------------------------------------
Parameters:
  PJPrefix:
    Type: String
  RepositoryName:
    Type: String
    Default: "CI-Create-ChangeSet-demo"
  ArtifactBucketName:
    Type: String
    Default: "ci-create-changeset-artifactstore-bucket"
  CodeBuildName:
    Type: String
    Default: "ci-create-changeset-codebuild-bucket"
  StackConfig:
    Type: String
    Default: "param.json"
  TemplateFilePath:
    Type: String
    Default: "packaged.yml"
  BuildSpec:
    Type: String
    Default: "codecomponent/buildspec.yml"


### Resources ###
Resources:
# ------------------------------------------------------------
# S3 Bucket
# ------------------------------------------------------------
### アーティファクト格納用バケット ###
  ArtifactStoreBucket:
    Type: AWS::S3::Bucket
    Properties:
      BucketName: !Ref ArtifactBucketName
      VersioningConfiguration:
        Status: Enabled

### CodeBuild用のバケット(環境変数を一時的に格納する為に使用) ###
  CodeBuildBucket:
    Type: AWS::S3::Bucket
    Properties:
      BucketName: !Ref CodeBuildName
      VersioningConfiguration:
        Status: Enabled


# ------------------------------------------------------------
# IAM
# ------------------------------------------------------------
### CodeBuild用IAMロール ###
  CodeBuildRole:
    Type: AWS::IAM::Role
    Properties:
      AssumeRolePolicyDocument:
        Version: 2012-10-17
        Statement:
          - Action: sts:AssumeRole
            Effect: Allow
            Principal:
              Service: codebuild.amazonaws.com
      Path: /
      Policies:
        - PolicyName: CodeBuildAccess
          PolicyDocument:
            Version: 2012-10-17
            Statement:
              ## CloudWatch Logsへのアクセスポリシー ##
              - Sid: CloudWatchLogsAccess
                Effect: Allow
                Action:
                  - logs:CreateLogGroup
                  - logs:CreateLogStream
                  - logs:PutLogEvents
                Resource:
                  - !Sub arn:aws:logs:${AWS::Region}:${AWS::AccountId}:log-group:/aws/codebuild/*
              ## S3へのアクセスポリシー ##
              - Sid: S3Access
                Effect: Allow
                Action:
                  - s3:PutObject
                  - s3:GetObject
                  - s3:GetObjectVersion
                Resource:
                  - !Sub arn:aws:s3:::${ArtifactStoreBucket}
                  - !Sub arn:aws:s3:::${ArtifactStoreBucket}/*
                  - !Sub arn:aws:s3:::${CodeBuildBucket}
                  - !Sub arn:aws:s3:::${CodeBuildBucket}/*
              ## CloudFormationへのアクセスポリシー ##
              - Sid: CloudFormationAccess
                Effect: Allow
                Action: cloudformation:ValidateTemplate
                Resource: "*"

### CloudFormation用IAMロール ###
## ポリシー権限→[Admin]
  CFnRole:
    Type: AWS::IAM::Role
    Properties:
      AssumeRolePolicyDocument:
        Version: 2012-10-17
        Statement:
          - Effect: Allow
            Action: sts:AssumeRole
            Principal:
              Service: cloudformation.amazonaws.com
      Path: /
      ManagedPolicyArns:
        - arn:aws:iam::aws:policy/AdministratorAccess

### CodePiplien用IAMロール ###
## ポリシー権限→[S3][CodeCommit][CodeBuild]
  PipelineRole:
    Type: AWS::IAM::Role
    Properties:
      AssumeRolePolicyDocument:
        Version: 2012-10-17
        Statement:
          - Action: sts:AssumeRole
            Effect: Allow
            Principal:
              Service: codepipeline.amazonaws.com
      Path: /
      Policies:
        - PolicyName: CodePipelineAccess
          PolicyDocument:
            Version: 2012-10-17
            Statement:
              ## S3へのアクセスポリシー ##
              - Sid: S3FullAccess
                Effect: Allow
                Action: s3:*
                Resource:
                  - !Sub arn:aws:s3:::${ArtifactStoreBucket}
                  - !Sub arn:aws:s3:::${ArtifactStoreBucket}/*
              ## CodeCommitへのアクセスポリシー ##
              - Sid: FullAccess
                Effect: Allow
                Action:
                  - cloudformation:*
                  - iam:PassRole
                  - codecommit:GetRepository
                  - codecommit:ListBranches
                  - codecommit:GetUploadArchiveStatus
                  - codecommit:UploadArchive
                  - codecommit:CancelUploadArchive
                  - codecommit:GetBranch
                  - codecommit:GetCommit
                Resource: "*"
              ## CodeBuildへのアクセスポリシー ##
              - Sid: CodeBuildAccess
                Effect: Allow
                Action:
                  - codebuild:BatchGetBuilds
                  - codebuild:StartBuild
                Resource: !GetAtt CodeBuildProject.Arn


# ------------------------------------------------------------
# CodeBuild:Project
# ------------------------------------------------------------
### CodeBuildProject ###
# BuidSpec→CFnテンプレートの構文チェック等Makefileのような役割
  CodeBuildProject:
    Type: AWS::CodeBuild::Project
    Properties:
      Name: !Sub "${PJPrefix}-BuildProject"
      ServiceRole: !GetAtt CodeBuildRole.Arn
      Artifacts:
        Type: CODEPIPELINE
      Environment:
        Type: LINUX_CONTAINER
        ComputeType: BUILD_GENERAL1_SMALL
        Image: aws/codebuild/ubuntu-base:14.04
        EnvironmentVariables:
          - Name: AWS_REGION
            Value: !Ref AWS::Region
          - Name: S3_BUCKET
            Value: !Ref CodeBuildBucket
      Source:
        Type: CODEPIPELINE
        BuildSpec: !Ref BuildSpec


# ------------------------------------------------------------
# CodePipline
# ------------------------------------------------------------
### CodePipline(Branch→master)(Use→CI) ###
# CIまで、具体的にはChangeSetの作成までのパイプラインを通してる
  Pipeline:
    Type: AWS::CodePipeline::Pipeline
    Properties:
      Name: !Sub "${PJPrefix}-CodePiplne"
      RoleArn: !GetAtt PipelineRole.Arn
      ArtifactStore:
        Type: S3
        Location: !Ref ArtifactStoreBucket
      Stages:
        ## ステージ→ソース ##
        # このステージでCodeCommitのソースコードをフェッチする
        - Name: Source
          Actions:
            - Name: download-source
              ActionTypeId:
                Category: Source
                Owner: AWS
                Version: 1
                Provider: CodeCommit
              Configuration:
                RepositoryName: !Ref RepositoryName
                BranchName: master
              OutputArtifacts:
                - Name: SourceOutput
        ## ステージ→テスト ##
        # BuildSpecからテンプレートのチェックを行う
        - Name: Test
          Actions:
            - InputArtifacts:
                - Name: SourceOutput
              Name: Test-BuildSpec
              ActionTypeId:
                Category: Test
                Owner: AWS
                Version: 1
                Provider: CodeBuild
              OutputArtifacts:
                - Name: TestOutput
              Configuration:
                ProjectName: !Ref CodeBuildProject
        ## ステージ→ビルド ##
        # CodeBuildからCFnのChangeSetを作成する
        - Name: Build
          Actions:
            - InputArtifacts:
                - Name: TestOutput
              Name: create-changeset
              ActionTypeId:
                Category: Deploy
                Owner: AWS
                Version: 1
                Provider: CloudFormation
              OutputArtifacts:
                - Name: BuildOutput
              Configuration:
                ActionMode: CHANGE_SET_REPLACE
                ChangeSetName: changeset
                RoleArn: !GetAtt CFnRole.Arn
                Capabilities: CAPABILITY_IAM
                StackName: !Sub ${PJPrefix}-Stack
                TemplatePath: !Sub TestOutput::${TemplateFilePath}
                TemplateConfiguration: !Sub TestOutput::${StackConfig}
buidspec.yml
CodeBuildで起動させるbuildspecになります。
このbuidspecでは以下の処理を行います。
- requirements.txtに記載のパッケージをインストール
- template配下のCFnテンプレートの構文チェックを実施
- 親スタックであるmain.ymlをパッケージ化してS3に配置する
version: 0.1

phases:
  install:
    commands:
      - |
        pip install -U pip
        pip install -r codecomponent/requirements.txt
  pre_build:
    commands:
      - |
        [ -d .cfn ] || mkdir .cfn
        aws configure set default.region $AWS_REGION
        for template in template/*; do
          echo "$template" | xargs -I% -t aws cloudformation validate-template --template-body file://%
        done
  build:
    commands:
      - |
        aws cloudformation package \
          --template-file template/main.yml \
          --s3-bucket $S3_BUCKET \
          --output-template-file .cfn/packaged.yml

artifacts:
  files:
    - .cfn/*
    - params/*
  discard-paths: yes
param.json
{
 "Parameters": {
  "PJPrefix": "CI-Create-ChangeSet-Demo",
  "CIDRVpc": "192.168.0.0/16",
  "CIDRPublicSubnetA": "192.168.1.0/24",
  "CIDRPublicSubnetC": "192.168.2.0/24",
  "CIDRPrivateSubnetA": "192.168.3.0/24",
  "CIDRPrivateSubnetC": "192.168.4.0/24",
  "AMIId01": "AMI-ID",
  "InstanceType": "t2.micro",
  "KeyName": "SSH-KeyName"
 }
}
requirements.txt
awscli>=1.11.61
4.3 CIスタックのデプロイ
CIスタックをデプロイすると以下の流れで変更セットが作成されます。
- CIスタックのデプロイ
- CodePipelineがリポジトリの変更を検知し、CIが起動する
- BuildSpec(CodeBuild)によって、「CFnテンプレートに構文エラーが無いか」、「CFnテンプレート(main.yml)をパッケージ化してS3へ飛ばす」処理を実行します
- CodeBuildからmain.ymlの変更セットを作成する
変更セットが作成されたことを確認し、内容に問題が無ければ変更セットの実行を行います。
すると、まずは親スタックであるmain.ymlがデプロイされ、次に子スタックの変更セットが作成されます。
後は順に子スタックの変更セットを実行していきます。
4.4 テンプレートの更新
テンプレートに変更を加えて、GitHubへ変更内容をpushするとCodePiplineが更新を検知してCIが起動します。
後はデプロイ時と同じく以下の流れで変更セットが作成されます。
- CodePipelineがリポジトリの変更を検知し、CIが起動する
- BuildSpec(CodeBuild)によって、「CFnテンプレートに構文エラーが無いか」、「CFnテンプレート(main.yml)をパッケージ化してS3へ飛ばす」処理を実行します
- CodeBuildから更新を加えたテンプレートの変更セットを作成する
- 更新を加えたテンプレートの変更セットのみを実行します
5. まとめ
CI/CDを・・・みたいな記事は沢山あるのですが、CIのみといった記事は見かけなかったのが理由で本記事の執筆にあたりました。
CI/CDという概念は難しく、初学者が学ぼうとすると難しくて挫折してしまいがちなので、まずはCIから学んでみるのがオススメです。
(CIが理解できて初めてCDの便利さに気づけると思うので・・)
また、本記事のCFnテンプレートや構成は下記参考文献のサイトを非常に参考にさせて頂きました。(ほぼパクリです)
今後はテンプレートをもうちょっと弄って、
