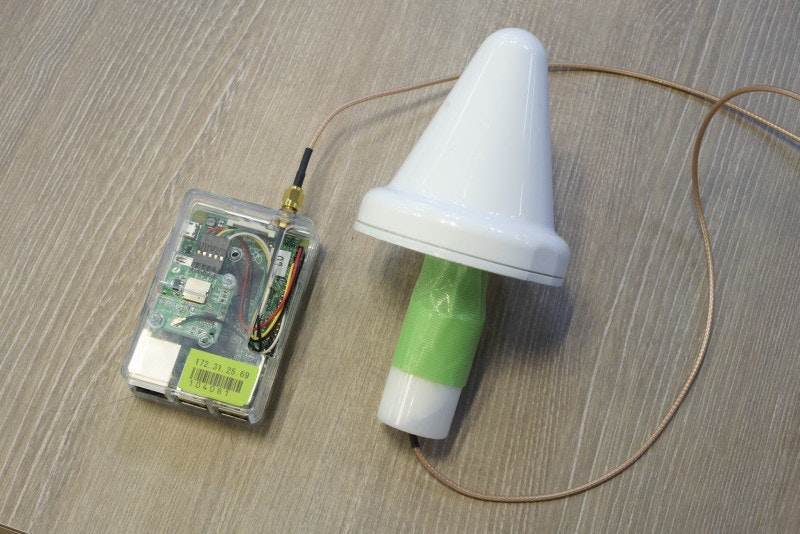
先日の技術書展6で 「GPSと仲良くなってNTPサーバを作ろう」 というタイトルの本を頒布していました。
この中ではRaspberry PiやSTM32、FPGAでGNSSのNMEAと1PPS信号を受信し、NTPサーバを作るための情報が記載されています。
BOOTHでダウンロード版を販売していますので、ぜひ読んでください。
GPSロガーが欲しくなった
台湾に旅行に行くことになり、そういえばGPSロガー欲しいな、と思ったのが出発2日前のこと。
この本に掲載されているNTPサーバの筐体をそのまま流用し、Raspberry PiでGPSロガーを作れば最速で手に入ると思い作成しました。
Raspberry Piを選択した理由はすでに筐体があったことと、fluentdとfluent-plugin-serialportプラグインをインストールすればあっという間に作成できることに気づいたからです。
長期の安定性はあまり期待できませんが、すぐに欲しい時に手軽にGPSロガーが作成できます。
作ってみてわかったのは、いくつかポイントを抑えると意外と消費電力を落とした状態で稼働させることができるということです。
構成
- GNSS(GPS・GLONASS・QZSS)受信機キット 1PPS出力 みちびき3機対応 アンテナ外付タイプ
- Symmetricom 58532A GPS L1 Reference Antenna
- Raspberry Pi B+
- microSDカード
- モバイルバッテリー
- 各種ケーブル
パーツや構成については組み立てた本人の記事をご参照ください。

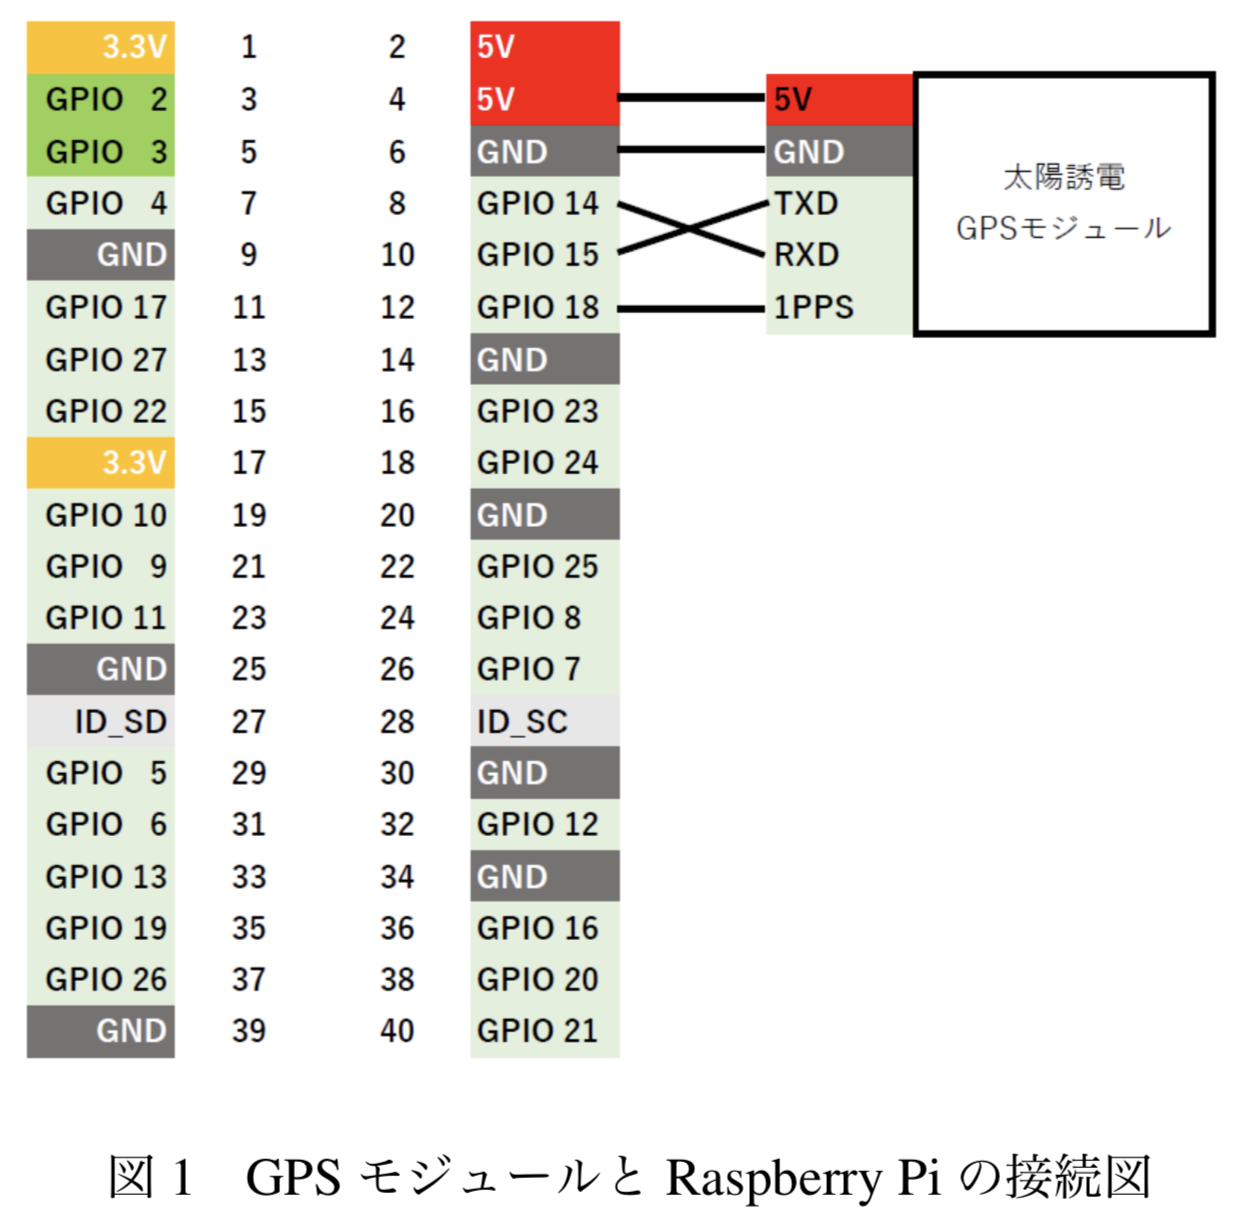
GNSS受信機をRaspberry Piに接続する
先ほどの本に詳しく説明が載っていますが、買ってきたGNSSモジュールに電源とシリアル信号を接続するだけです。
Raspbianのセットアップ
SDカードにRaspbian Stretch Liteのイメージを書き込みます。
そして、bootパーティションにあるconfig.txtを編集します。
enable_uart=1
dtoverlay=pi3-disable-bt
また、cmdline.txtからシリアルコンソールの設定を削除します。
dwc_otg.lpm_enable=0 console=serial0,115200 console=tty1 root=PARTUUID=c1dc39e5-02 rootfstype=ext4 elevator=deadline fsck.repair=yes rootwait quiet init=/usr/lib/raspi-config/init_resize.sh
dwc_otg.lpm_enable=0 console=tty1 root=PARTUUID=c1dc39e5-02 rootfstype=ext4 elevator=deadline fsck.repair=yes rootwait quiet init=/usr/lib/raspi-config/init_resize.sh
SSHを有効にするために /boot/ssh ファイルを空ファイルでいいので作成しておきます。
DHCPやstaticなどでIPアドレスなど設定し、SSHでログインできる状態にしてください。
td-agentのインストール
パッケージのインストール
sudo apt-get update && sudo apt-get upgrade -y
sudo apt-get install -y ruby-dev libssl-dev
sudo gem install fluentd --no-ri --no-rdoc -V
sudo fluent-gem install fluent-plugin-serialport --no-rdoc --no-ri
設定ファイルの作成
cd /home/pi
fluentd --setup ./fluent
mkdir -p gps
作成されたfluent.confを編集します。
<source>
  @type serialport
  com_port /dev/serial0
  tag serial
  baud_rate 9600
</source>


<match serial>
  @type copy
  <store>
    @type null
  </store>
  <store>
    @type file
    path /home/pi/gps/nmea
    format single_value
    message_key serial0
    add_newline false
    <buffer>
      @type memory
      flush_mode interval
      flush_interval 60s
    </buffer>
    time_slice_format %Y%m%d
    append true
  </store>
</match>
systemdのサービス作成
/etc/systemd/system/fluentd.service ファイルを以下のように作成します。
[Unit]
Description=Fluentd daemon
After=network.service

[Service]
LimitNOFILE=65536
ExecStart=/usr/local/bin/fluentd --user pi --group pi -c /home/pi/fluent/fluent.conf
ExecStop=/bin/kill -INT ${MAINPID}
ExecReload=/bin/kill -HUP ${MAINPID}
Restart=always

[Install]
WantedBy=multi-user.target
サービスの起動
sudo systemctl enable fluentd
sudo service fluentd start
作成されるファイルの確認
/home/pi/gps 以下に nmea.20190420.log のようなファイルが作成され、NMEAフォーマットで保存されていれば成功です。
pi@raspberrypi:~ $ ls gps
nmea.20190506.log
pi@raspberrypi:~ $ head gps/nmea.20190506.log
37,240,13,30,33,282,17,22,29,157,33*7C
$GPGSV,4,3,14,27,29,072,41,28,18,315,23,16,17,131,40,10,15,046,*71
$GPGSV,4,4,14,03,12,172,12,193,,,*70
$GLGSV,1,1,00*65
$GNRMC,064038.000,A,3541.6574,N,13941.7547,E,0.72,92.87,060519,,,A*4F
$GPVTG,92.87,T,,M,0.72,N,1.34,K,A*0A
$GPZDA,064038.000,06,05,2019,,*56
$GPGGA,064039.000,3541.6574,N,13941.7547,E,1,4,2.63,101.0,M,39.3,M,,*52
$GNGLL,3541.6574,N,13941.7547,E,064039.000,A,A*43
$GNGSA,A,3,27,16,22,08,,,,,,,,,2.81,2.63,1.00*1B
不要なデーモンの停止
現状で以下のサービスが有効になっていました。
pi@raspberrypi:~ $ sudo systemctl list-unit-files --type=service | grep enabled
autovt@.service                        enabled
avahi-daemon.service                   enabled
bluetooth.service                      enabled
console-setup.service                  enabled
cron.service                           enabled
dbus-fi.w1.wpa_supplicant1.service     enabled
dbus-org.bluez.service                 enabled
dbus-org.freedesktop.Avahi.service     enabled
dhcpcd.service                         enabled
dhcpcd5.service                        enabled
fake-hwclock.service                   enabled
fluentd.service                        enabled
getty@.service                         enabled
hciuart.service                        enabled
keyboard-setup.service                 enabled
networking.service                     enabled
raspberrypi-net-mods.service           enabled
rpi-display-backlight.service          enabled
rsync.service                          enabled
rsyslog.service                        enabled
ssh.service                            enabled
sshswitch.service                      enabled
syslog.service                         enabled
systemd-timesyncd.service              enabled
triggerhappy.service                   enabled
wifi-country.service                   enabled
wpa_supplicant.service                 enabled
ここから不要そうなサービスを全て停止して行きます。見境なく停止してるので、必要そうなものがあればスキップしてください。
sudo service avahi-daemon stop
sudo systemctl disable avahi-daemon

sudo service bluetooth stop
sudo systemctl disable bluetooth

sudo service fake-hwclock stop
sudo systemctl disable fake-hwclock

sudo service rpi-display-backlight stop
sudo systemctl disable rpi-display-backlight

sudo service rsync stop
sudo systemctl disable rsync

sudo service syslog stop
sudo systemctl disable syslog

sudo service systemd-timesyncd stop
sudo systemctl disable systemd-timesyncd

sudo service triggerhappy stop
sudo systemctl disable triggerhappy

sudo service wifi-country stop
sudo systemctl disable wifi-country

sudo service wpa_supplicant stop
sudo systemctl disable wpa_supplicant
swapを無効にする
できるだけSDへのアクセスをしたくないのでswapも削除します。
sudo swapoff --all
sudo apt-get purge -y --auto-remove dphys-swapfile
sudo rm -fr /var/swap
さらなる消費電力削減
HDMIを停止し、USBも停止、パワーセーブモードなどを設定します。
USBを停止するとEthernet等も利用できなくなるため、電源投入後120秒経ったら発動するようにしました。
/etc/rc.localを以下のように編集します。
# !/bin/sh -e
#
# rc.local
#
# This script is executed at the end of each multiuser runlevel.
# Make sure that the script will "exit 0" on success or any other
# value on error.
#
# In order to enable or disable this script just change the execution
# bits.
#
# By default this script does nothing.

# Print the IP address
_IP=$(hostname -I) || true
if [ "$_IP" ]; then
  printf "My IP address is %s\n" "$_IP"
fi

/opt/vc/bin/tvservice --off
echo "powersave" > /sys/devices/system/cpu/cpu0/cpufreq/scaling_governor
/bin/bash -c "sleep 120; echo 0 > /sys/devices/platform/soc/3f980000.usb/buspower" &

exit 0
これらを有効にすると、だいたい170mAぐらいで稼働させることができました。
実際に使ってみた
20000mAhの巨大モバイルバッテリーに接続することで、計算上80時間ぐらい持つGPSロガーが出来上がりました。
安いパッチアンテナではなく、Symmetricomの58532A (通称:きのこアンテナ) を利用したため、カバンの中や電車の中でもタクシーの中でも、途切れることなく記録することができました。
今後の課題
- 時刻を正しく設定していないためファイル名の日付がどんどんずれて行く
- NMEAをパースして時刻設定するようにしたい
- OSのファイルシステムをReadOnlyにする


