Beginning
Hey guys, this is JT, the infrastructure engineer, nice to meet you.
When we talk about the duties for infrastructure engineer, it would be managing and monitoring Windows and Linux servers. Back to the day when I was working closely with Web developers, for solving and identifying issues, sometimes I read codes. I think knowledge of programming would be very useful even you are an Infrastructure engineer.
I will use this blog to write topics about configuring servers, together with the record of my studies on AWS certificate developer exam. I will firstly write the topic in Japanese, and English version will be posted a bit later.
I appreciate your helps on letting me know about mistakes I make on the topic. That will be very useful for me and other readers.
What is Ubuntu AutoInstall?
Here is the Japanese version.
Starting from Ubuntu 20.04, AutoInstall enables user to automate OS installation. The first time I learned about this concept was my study on Solaris 10 Jumpstart.
After that I didn't have any chances to automate OS installation at work, instead now we have Virtual Machines (VM). What we have to do is: creating a "golden image" that contains all the packages we need, and we can clone as much VMs as needed. This also applies to EC2 on AWS.
So when we use AutoInstall in era of VM or EC2? Here is the case when I was working on a web project in my previous company. Our role was helping client to install the OS and deploy our web application into their servers. They sent us few identical servers which we couldnt make use of VM/EC2 , so tools like AutoInstall enables us to finish the installation quickly.
Originally, I wanted to write topics based on CentOS, due to EOL of centOS, my upcoming Linux topics will be mainly written on Ubuntu.
Testing Environment
Our test is conducted on Apple MacBookPro 2015 13 inch model with VirtualBox.
And the setting of VirtualBox guest is:
Virtual CPU: 1
Disk: 15GB
Ram: 1GB
Here is the official documentation from Ubuntu。Dusktin has created us a workable template, but the configuration of disk layout is the default one.
From Ubuntu official documentation, we've got this:
    storage:
      layout:
        name: lvm
This configuration forms the disk as LVM and here is an illustration of final disk layout using the setting above:

By using above settings, it allocates 1MB to Grub,
formats /boot as ext4 file system with 1GB size,
the root partition will be a LVM and allocates all the remains spaces.
But, what if we don't want to use the default disk layout like this?
Here is the trick, we complete the Ubuntu installation using the installer first.
Once it's completed, we reboot it and go to below folder and execute vi command to this file:
cd /var/log/installer
sudo vi autoinstall-user-data
Here is the content:
# cloud-config
autoinstall:
  apt:
    geoip: true
    preserve_sources_list: false
    primary:
    - arches: [amd64, i386]
      uri: http://us.archive.ubuntu.com/ubuntu
    - arches: [default]
      uri: http://ports.ubuntu.com/ubuntu-ports
  identity: {hostname: ithost, password: $6$NPLmJFVMoi8QGjQr$7MWX45ajTNTpE3Ar33mquKzFUd62AZwkMjOxaNPwSuId41JSoeRGiN9/HKryS/RbR.UBDc.KBCYHDawWETJ320,
    username: ub20}
  kernel:
    kernel: {package: linux-generic}
  keyboard: {layout: us, toggle: null, variant: ''}
  locale: en_US.UTF-8
  network:
    ethernets:
      enp0s3: {dhcp4: true}
    version: 2
  ssh:
    allow-pw: true
    authorized-keys: []
    install-server: true
  storage:
    config:
    - {ptable: gpt, serial: VBOX_HARDDISK_VB8f97059d-a7457df4, path: /dev/sda, wipe: superblock,
      preserve: false, name: '', grub_device: true, type: disk, id: disk-sda}
    - {device: disk-sda, size: 1048576, flag: bios_grub, number: 1, preserve: false,
      grub_device: false, type: partition, id: partition-0}
    - {device: disk-sda, size: 1073741824, wipe: superblock, flag: '', number: 2,
      preserve: false, grub_device: false, type: partition, id: partition-1}
    - {fstype: ext4, volume: partition-1, preserve: false, type: format, id: format-0}
    - {device: disk-sda, size: 15029239808, wipe: superblock, flag: '', number: 3,
      preserve: false, grub_device: false, type: partition, id: partition-2}
    - name: ubuntu-vg
      devices: [partition-2]
      preserve: false
      type: lvm_volgroup
      id: lvm_volgroup-0
    - {name: ubuntu-lv, volgroup: lvm_volgroup-0, size: 15028191232B, wipe: superblock,
      preserve: false, type: lvm_partition, id: lvm_partition-0}
    - {fstype: ext4, volume: lvm_partition-0, preserve: false, type: format, id: format-1}
    - {path: /, device: format-1, type: mount, id: mount-1}
    - {path: /boot, device: format-0, type: mount, id: mount-0}
  updates: security
  version: 1
This is the user-data that can be used for Ubuntu AutoInstall. If we make some changes on it, we can use it on another servers.
First we delete lines from apt: to uri: http://ports.ubuntu.com/ubuntu-ports.
Next we delete lines starting at kernel:.
And now let's look at the second line from storage: section:
- {ptable: gpt, serial: VBOX_HARDDISK_VB8f97059d-a7457df4, path: /dev/sda, wipe: superblock,
      preserve: false, name: '', grub_device: true, type: disk, id: disk-sda}
We don't need the item: serial: VBOX_HARDDISK_VB8f97059d-a7457df4,, so we remove it first.
The storage: section could be understood in this way:
1: Ubuntu has recognized the 15GB hard drive attached to VirtualBox guest as /dev/sda. Refer to path: /dev/sda.
2: Three partitions are created from the hard drive. Refer to id: partition-[0-2]
3: Partition-0 is used as Grub with 1MB size. Refer to item: grub_device: true
4: Partition-1 is format as ext4 file system with 1GB size. Refer to item: id: format-0
5: The remaining space is allocated to Partition-2.
Next, let's look at line with name: ubuntu-vg.
A volume group "ubuntu-vg" is defined here and the target is Partition-2.
Refer to devices: [partition-2].
A logical volume is defined at the line starting with name: ubuntu-lv. It has the size of 15028191232B (B means bytes, which about 13.9GB), and it is slightly less than 14GB of Partition-2. Seems error occurs when it set to exact size of Partition-2.
The next line tells us this logical volume is formatted as ext4 file system. Refer to id: format-1.
Finally from the lines starting at path: / and path: /boot, we know the mount points with the corresponding volumes (format-0, format-1).
Now we've learned about user-data template and I am going to make some modifications into it with a new mount point: /JT.
We firstly shrink the size of ubuntu-lv to 10GB
- {name: ubuntu-lv, volgroup: lvm_volgroup-0, size: 10737418240B, wipe: superblock,
      preserve: false, type: lvm_partition, id: lvm_partition-0}
Next we define a new logical volume with following lines:
- {name: u-lv2, volgroup: lvm_volgroup-0, size: 4187593216B, wipe: superblock,
      preserve: false, type: lvm_partition, id: lvm_partition-1}
    - {fstype: ext4, volume: lvm_partition-1, preserve: false, type: format, id: format-2}
- {path: /JT, device: format-2, type: mount, id: mount-2}
The updated user-data is:
# cloud-config
autoinstall:
  apt:
    geoip: true
    preserve_sources_list: false
    primary:
    - arches: [amd64, i386]
      uri: http://us.archive.ubuntu.com/ubuntu
    - arches: [default]
      uri: http://ports.ubuntu.com/ubuntu-ports
  identity: {hostname: ithost, password: $6$NPLmJFVMoi8QGjQr$7MWX45ajTNTpE3Ar33mquKzFUd62AZwkMjOxaNPwSuId41JSoeRGiN9/HKryS/RbR.UBDc.KBCYHDawWETJ320,
    realname: ub, username: ub20}
  kernel:
    kernel: {package: linux-generic}
  keyboard: {layout: us, toggle: null, variant: ''}
  locale: en_US.UTF-8
  network:
    ethernets:
      enp0s3: {dhcp4: true}
    version: 2
  ssh:
    allow-pw: true
    authorized-keys: []
    install-server: true
  storage:
    config:
    - {ptable: gpt, serial: VBOX_HARDDISK_VB8f97059d-a7457df4, path: /dev/sda, wipe: superblock,
      preserve: false, name: '', grub_device: true, type: disk, id: disk-sda}
    - {device: disk-sda, size: 1048576, flag: bios_grub, number: 1, preserve: false,
      grub_device: false, type: partition, id: partition-0}
    - {device: disk-sda, size: 1073741824, wipe: superblock, flag: '', number: 2,
      preserve: false, grub_device: false, type: partition, id: partition-1}
    - {fstype: ext4, volume: partition-1, preserve: false, type: format, id: format-0}
    - {device: disk-sda, size: 15029239808, wipe: superblock, flag: '', number: 3,
      preserve: false, grub_device: false, type: partition, id: partition-2}
    - name: ubuntu-vg
      devices: [partition-2]
      preserve: false
      type: lvm_volgroup
      id: lvm_volgroup-0
    - {name: ubuntu-lv, volgroup: lvm_volgroup-0, size: 10737418240B, wipe: superblock,
      preserve: false, type: lvm_partition, id: lvm_partition-0}
    - {fstype: ext4, volume: lvm_partition-0, preserve: false, type: format, id: format-1}
    - {name: u-lv2, volgroup: lvm_volgroup-0, size: 4187593216B, wipe: superblock,
      preserve: false, type: lvm_partition, id: lvm_partition-1}
    - {fstype: ext4, volume: lvm_partition-1, preserve: false, type: format, id: format-2}
    - {path: /, device: format-1, type: mount, id: mount-1}
    - {path: /boot, device: format-0, type: mount, id: mount-0}
    - {path: /JT, device: format-2, type: mount, id: mount-2}
  updates: security
  version: 1
Here are some remarks for you:
- The password in
identity: { }block is generated by openssl command:
openssl passwd -6 -salt xX9 12345678
Above command generated an encoded string of 12345678.
- It is recommended to set the volume size which can be evenly divided by 512 for the new volume. Otherwise, the AutoInstall may quit and prompts an error about the size.
Now we prepare the seed.iso for AutoInstall.
sudo apt-get install -y cloud-image-utils
mkdir ~/seed
sudo cp /var/log/installer/autoinstall-user-data ~/seed/user-data
mkdir ~/seed/meta-data
sudo cloud-locales ~/seed.iso ~/seed/user-data ~/seed/meta-data
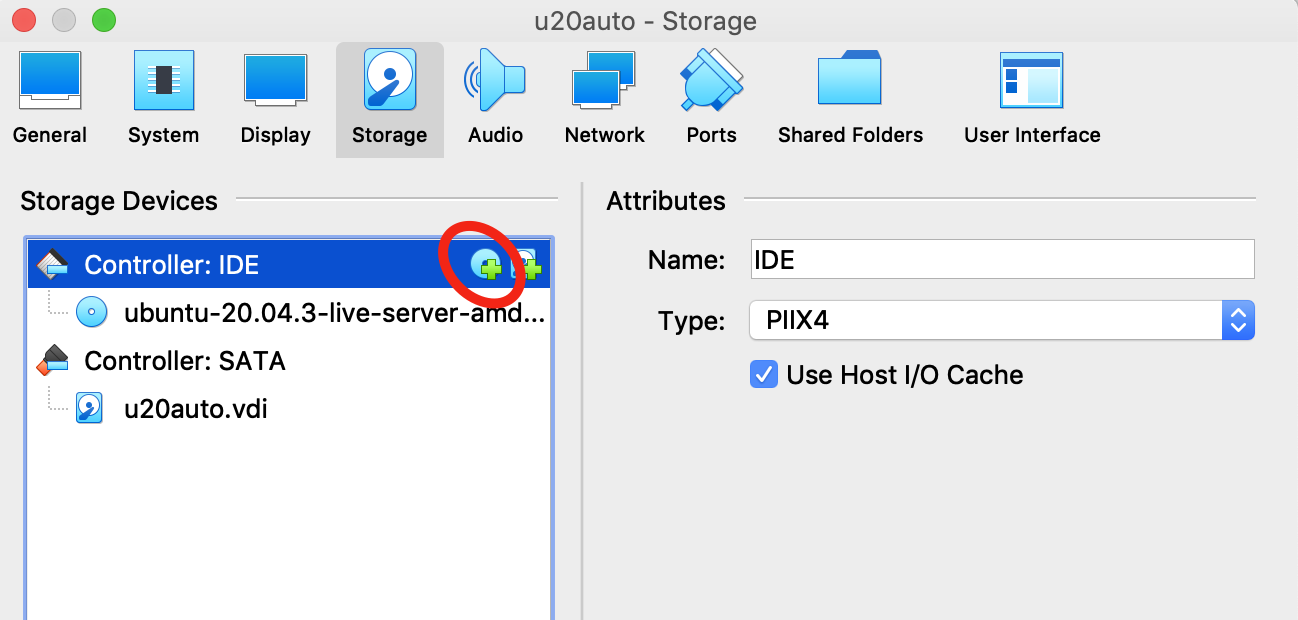
After we download the seed.iso to the local directory, we create a new VirtualBox guest VM, and mount seed.iso as secondary CD rom.

The following message will be shown after the guest is started.
Continue with autoinstall (yes|no)?
Once the installation successfully completed, we reboot it and using log into the console.
Now we issue df command to verify partitions, and we've got the expected layout.
df -lh  | egrep -v "tmpfs|loop[0-9]|udev"

/dev/mapper/ubuntu--vg-ubuntu--lv  9.8G  4.1G  5.3G  44% /
/dev/mapper/ubuntu--vg-u--lv2      3.8G   16M  3.6G   1% /JT
/dev/sda2                          976M  107M  803M  12% /boot
Summary
In this topic, we learned how to use AutoInstall to install Ubuntu 20.04 automatically by using VirtualBox.
During the setup of production servers, we often customize the disk layout, and it may takes time to write the user-data from scratch.
Even a typo could stop the AutoInstall, that requires you extra efforts and time to fix it. So I would suggest that we get the "workable" template in first place, and the remaining work is just adding some modifications based on your application environment.
If you want to use the template in topic directly, please modify device name such as /dev/sda and enp0s3 to match your hardware's configurations.
Just a little bit more
Ubuntu was the first Linux I learned back to the day I was still a college student. After that I rarely used Ubuntu in my work, instead I almost used CentOS in my every jobs. But I think Ubuntu will be getting much more popular, so it's time for me back to Ubuntu.
Regarding to user-data template, please let me in case there is a testing method to test the content without running it with Ubuntu installer.
Finally, thank you for reading this topic and see you next time!