今回紹介するもの
Microsoft Azure(以下 Azure)で docker コンテナを使う方法です.
仮想マシンの作成~ Ubuntu イメージの立ち上げまで.
docker 自体の説明などは他に譲ります.
また今回は仮想マシンの OS として CoreOS を用います.
デフォルトで docker の実行環境が入っていますので,「docker を触ってみたいぜ」な方にオススメ.
ただ,CentOS や Debian GNU/Linux などに慣れている方にはとてもしんどい OS.
何をするにも少し遠回りしないとほとんど何も出来ません.裏を返せば,その分少しは安心できると言えます.
準備
Azure のアカウント
まだ持っていない人は Azure のサイトで作りましょう.
2015 年 12 月時点では,アカウント登録時にクレジットカードなどの支払い手段の申告は必須ではありませんし,1 ヶ月分のクレジットが付いてきます.
今回紹介する仮想マシン環境以外の機能も使えるので,この機会に是非.(営業じゃないです)
SSH で外に出られる環境
今回は Azure 上に作成した仮想マシンに SSH で接続して環境を操作します.
企業や機関によっては SSH で外に出られない場合もありますので,要確認です.
作業開始
仮想マシンの作成
できるだけ新しいものを,ということで,新しいポータルからリソースマネージャによって管理する仮想マシンを作成します.
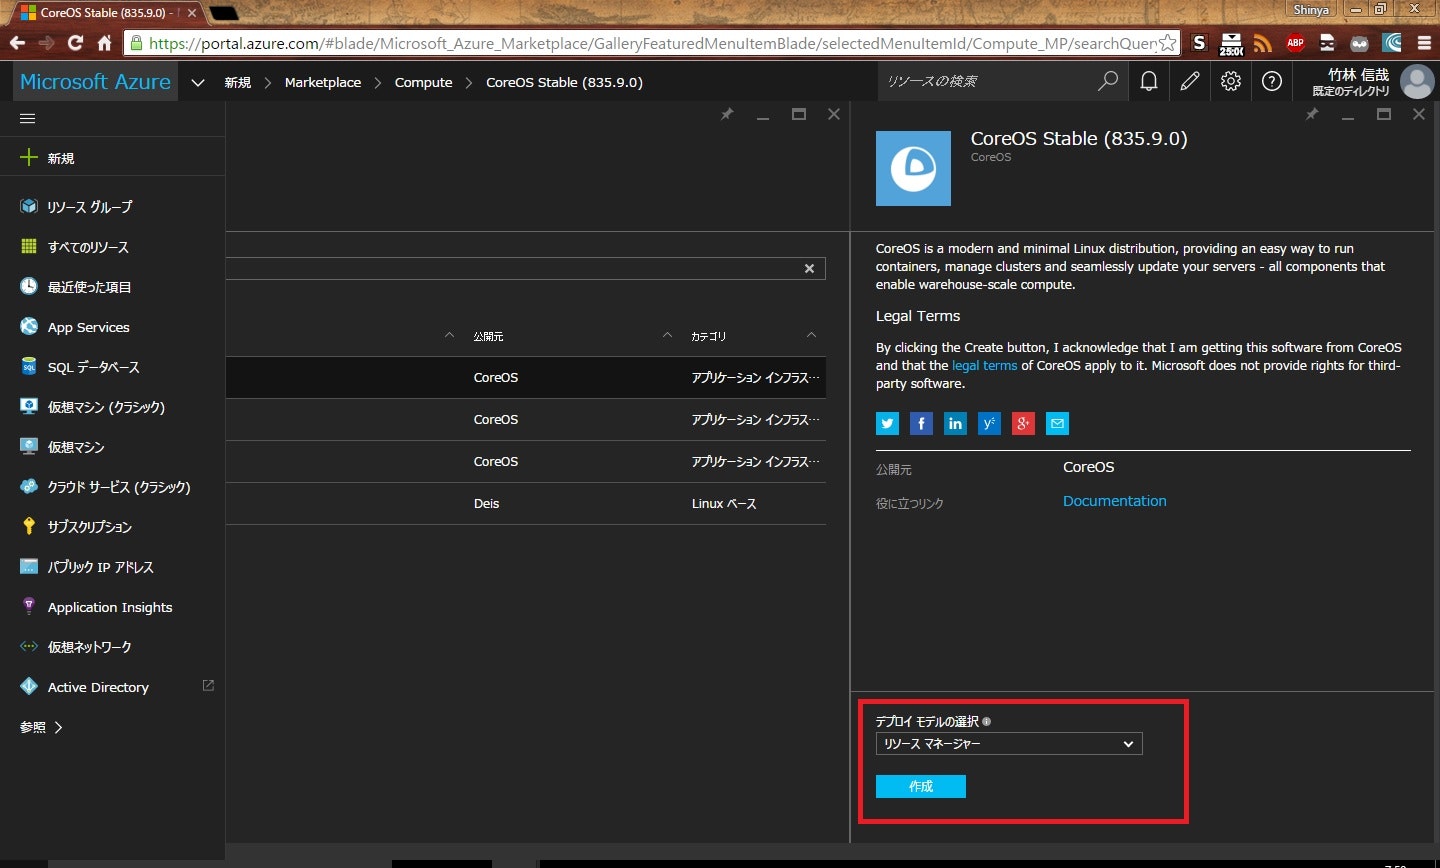
- メニューの「新規 +」
- Markerplace
- Compute
の順にたどり,CoreOS を選択します.(図のように検索ボックスを使うと便利)
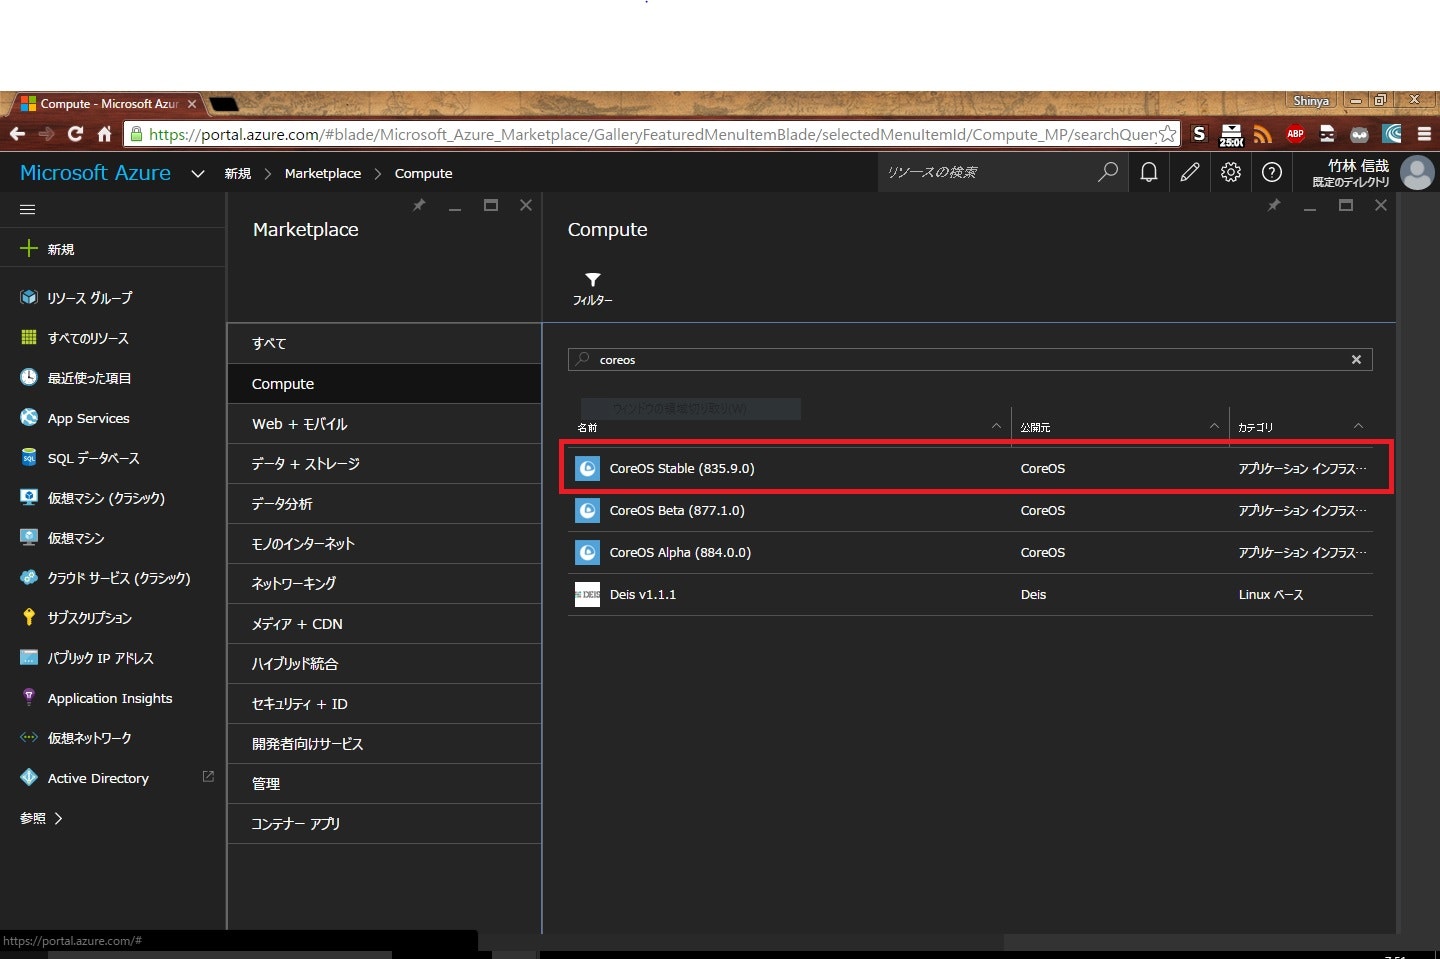
続いてデプロイモデルは「リソースマネージャー」を選択し,「作成」ボタンを押します.
Azure の場合(AWS などもそうですが)仮想マシン単体で全てが完結するものではなく,ネットワークインタフェイスやストレージなどを個々のリソースとして管理し,それらをつなぎ合わせて環境を作っていきます.
これらの関連するリソースをまとめて管理しやすくするのがリソースグループであり,それに属するリソースはリソースマネージャによって管理されることになります.
(一言で言えば,今回の環境を丸ごと綺麗に消したい,という時の操作が楽になる,ということです)
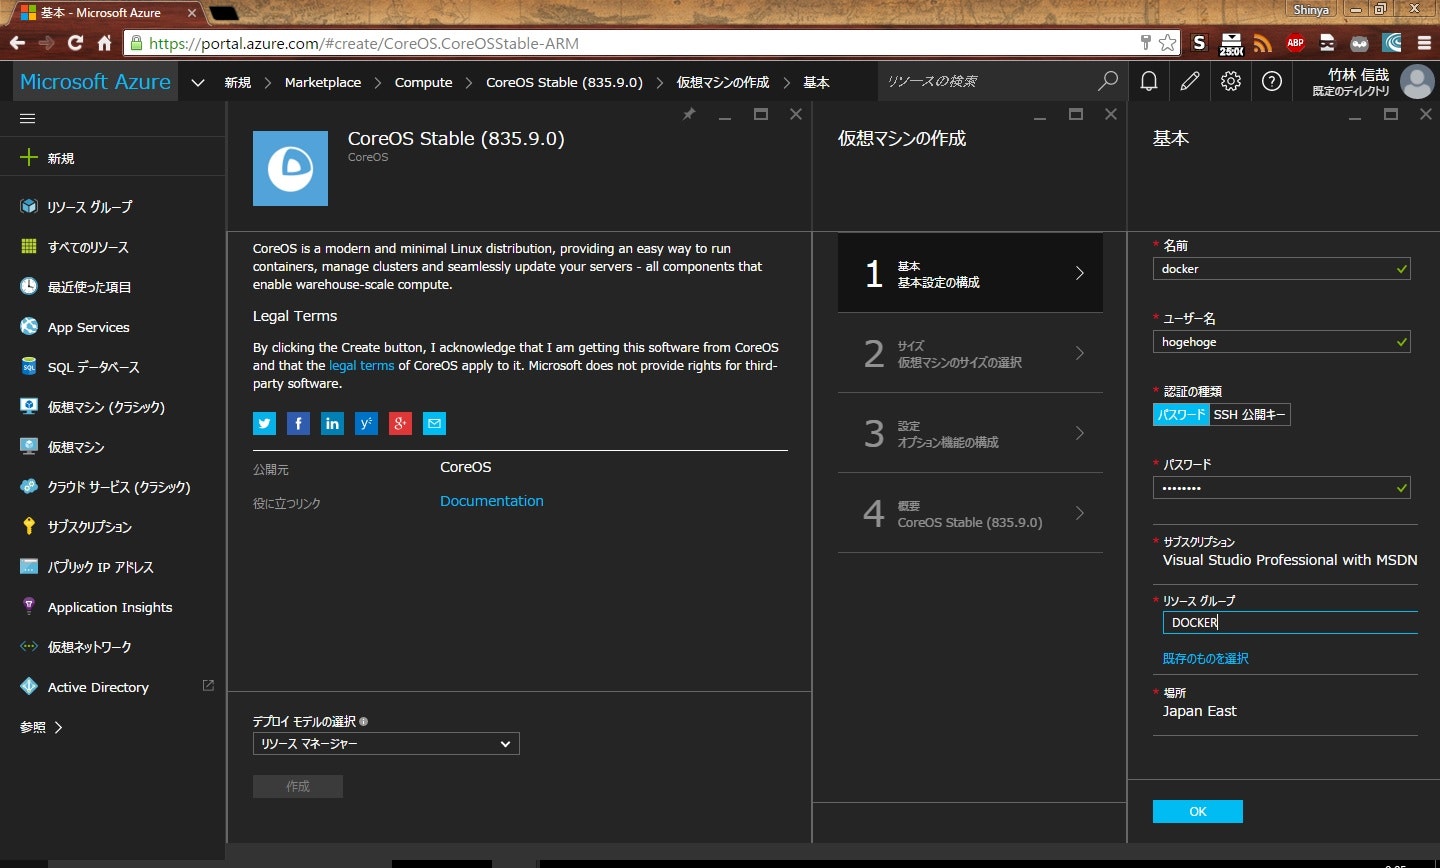
作成ボタンを押すと色々聞かれます.ほんと色々.サンプルを参考に,お好きなように設定してください.
1. 基本
- 仮想マシンの名前
- 今回は「docker」にしました
- 初期登録するユーザ名とパスワード,認証方法(プレインパスワードか,鍵か)
- 何でも良いです
- リソースグループ名(新規に作成する場合は入力.既存から選択することも可能)
- 今回は「DOCKER」にしました
- 場所
- お好きなところにどうぞ.今回は東日本を選択.
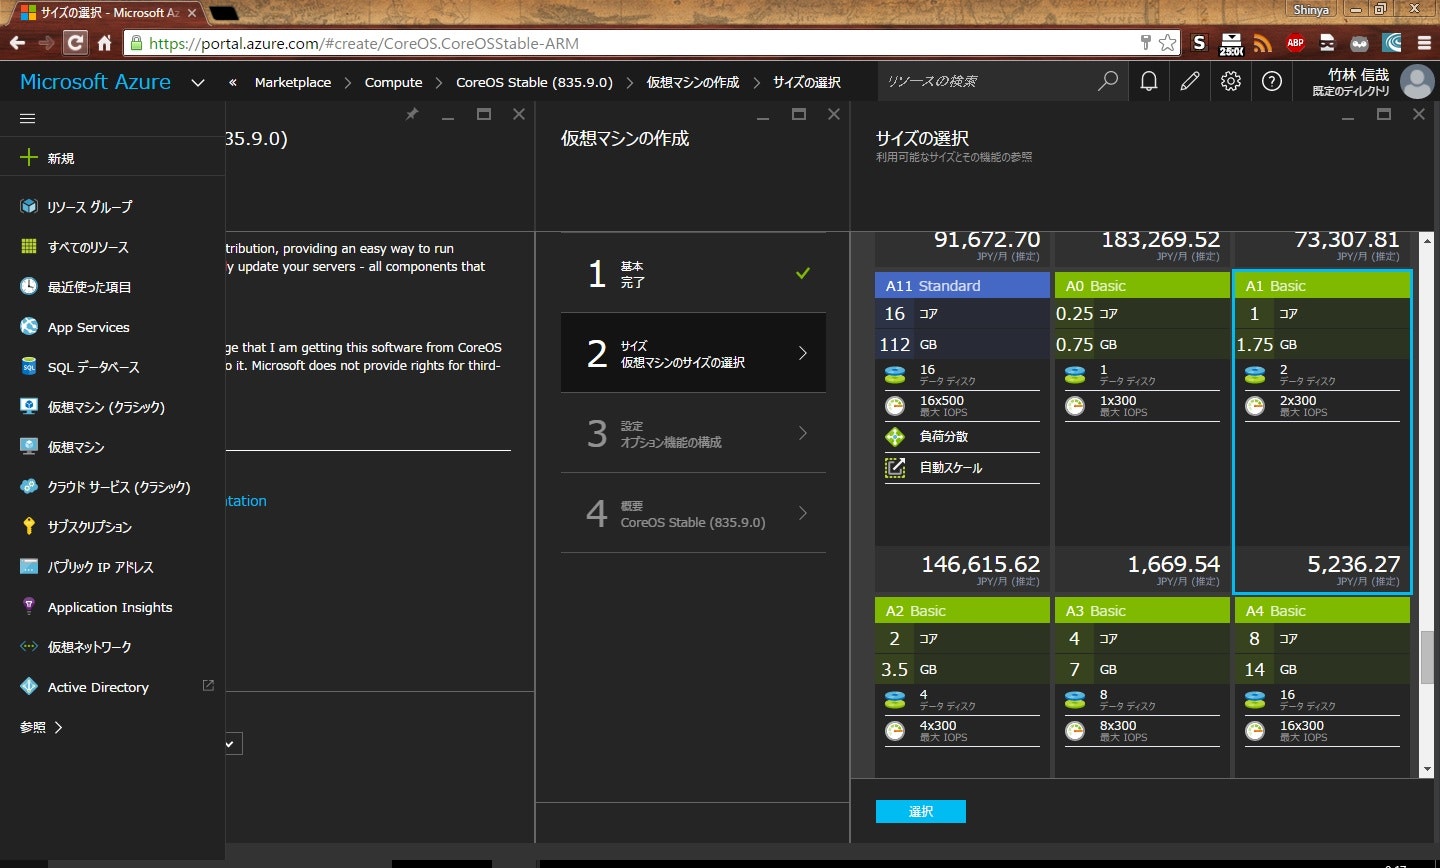
2. サイズ
お勧めしてくるのはとても良いインスタンスです.高いです.関東のちょっと売れ始めたラーメン屋のように,全部盛りが一番上にあります.
どのインスタンスを使ってもコンテナを立ち上げることはできるので,好みに応じて選ぶと良いです.
今回は本番環境ではなく触ってみるだけなので,「すべて表示」を選択して「A1 Basic」くらいで良いでしょう.
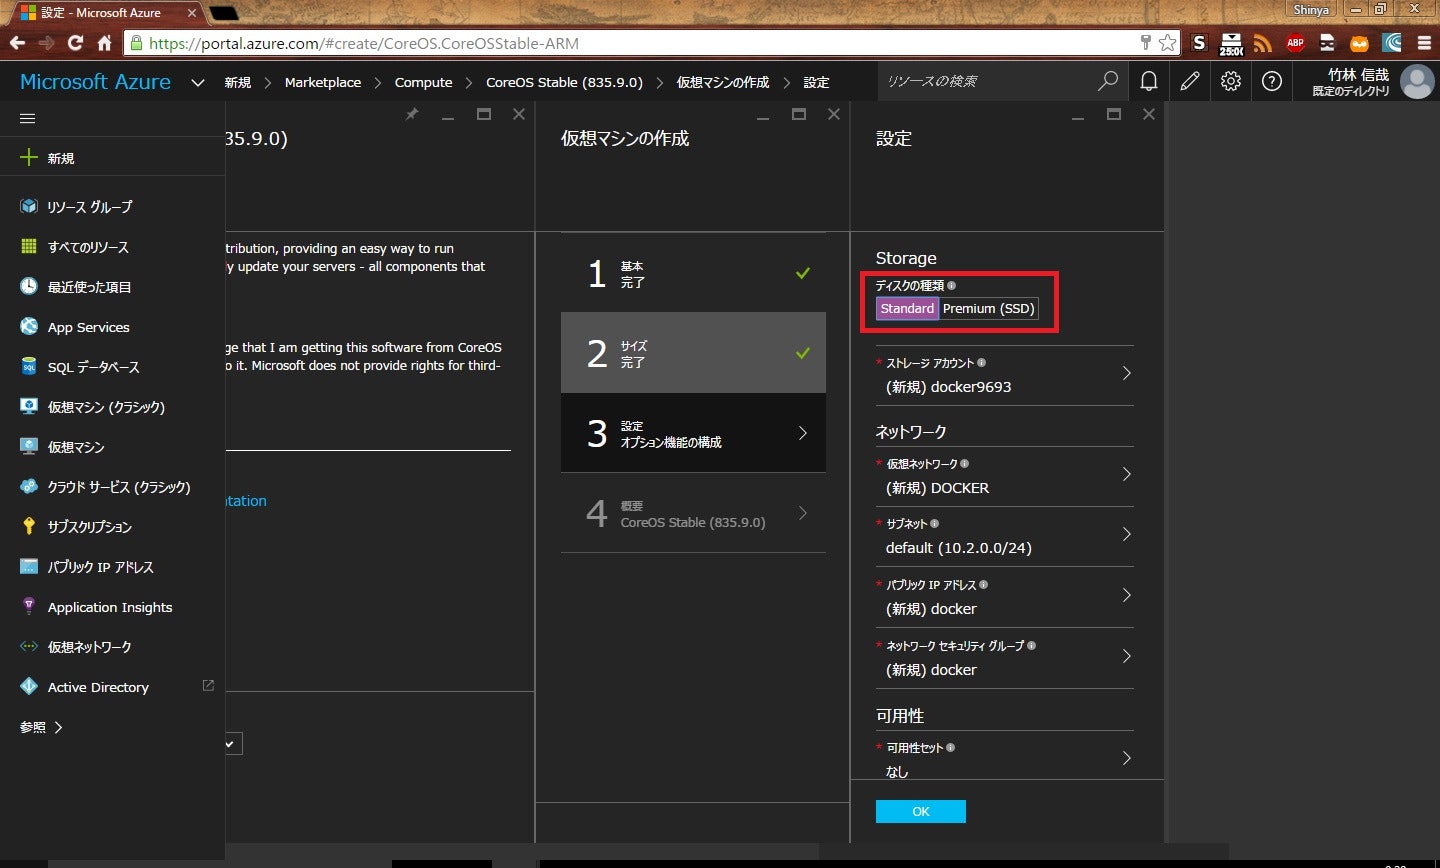
3. 設定
A1 インスタンスなどの「醤油ラーメン普通で」のようなものを選ぶと「ヤサイマシできないぜ」と言わんばかりに「この仮想マシンのサイズ 'Basic A1' では、Premium ディスクがサポートされていません。」と言いながら「Premium(SSD)」が選ばれているので,ここは Standard を選び直しておきます.(図の赤枠部)
他は今回はデフォルトで大丈夫です.
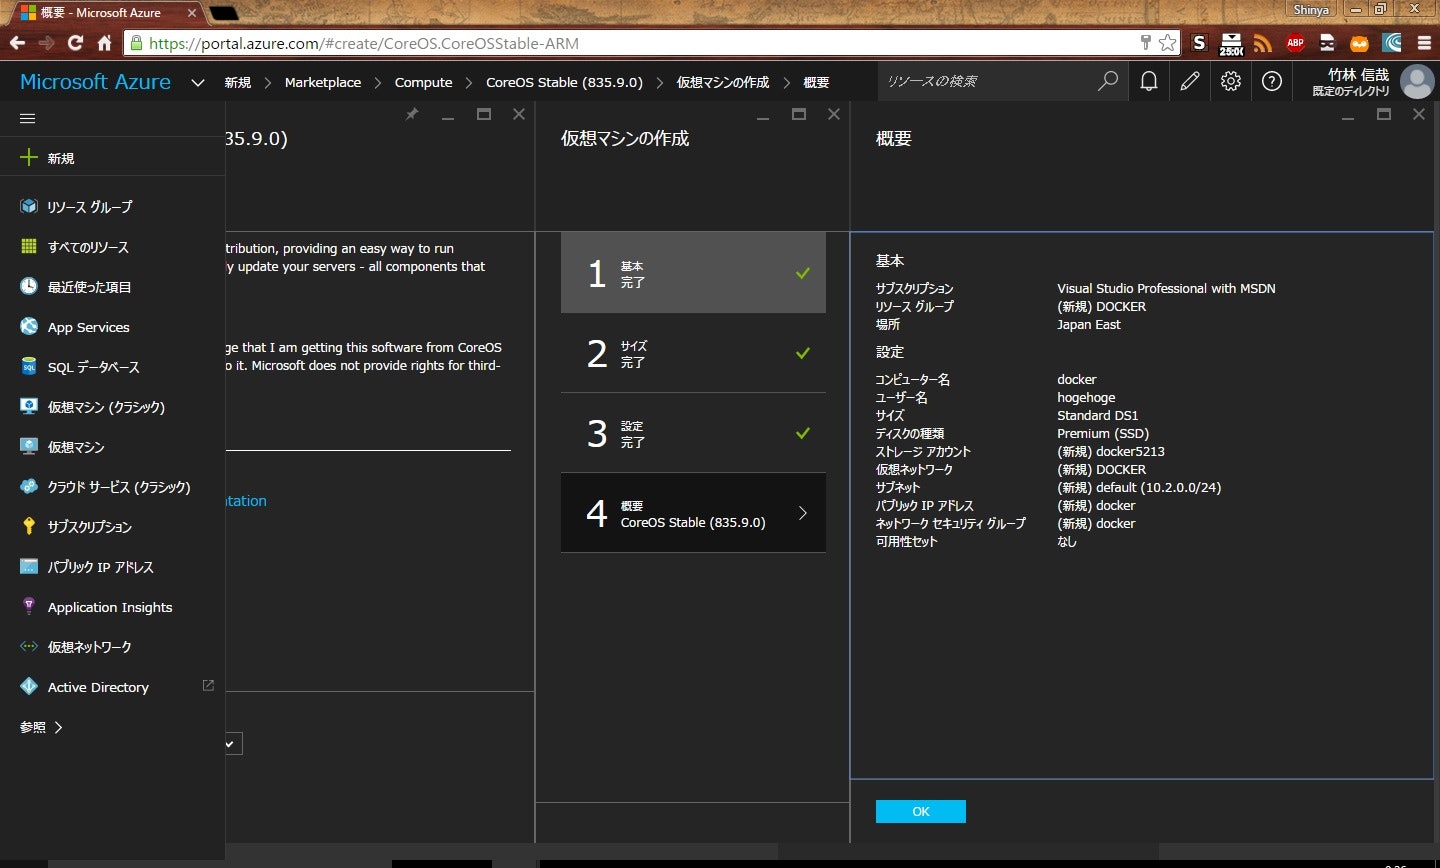
4. 概要
設定した項目の確認画面です.問題が無ければ OK を押しましょう.
デプロイが始まりますのでしばらく待ちます.
仮想マシンに接続する
IP アドレスの確認
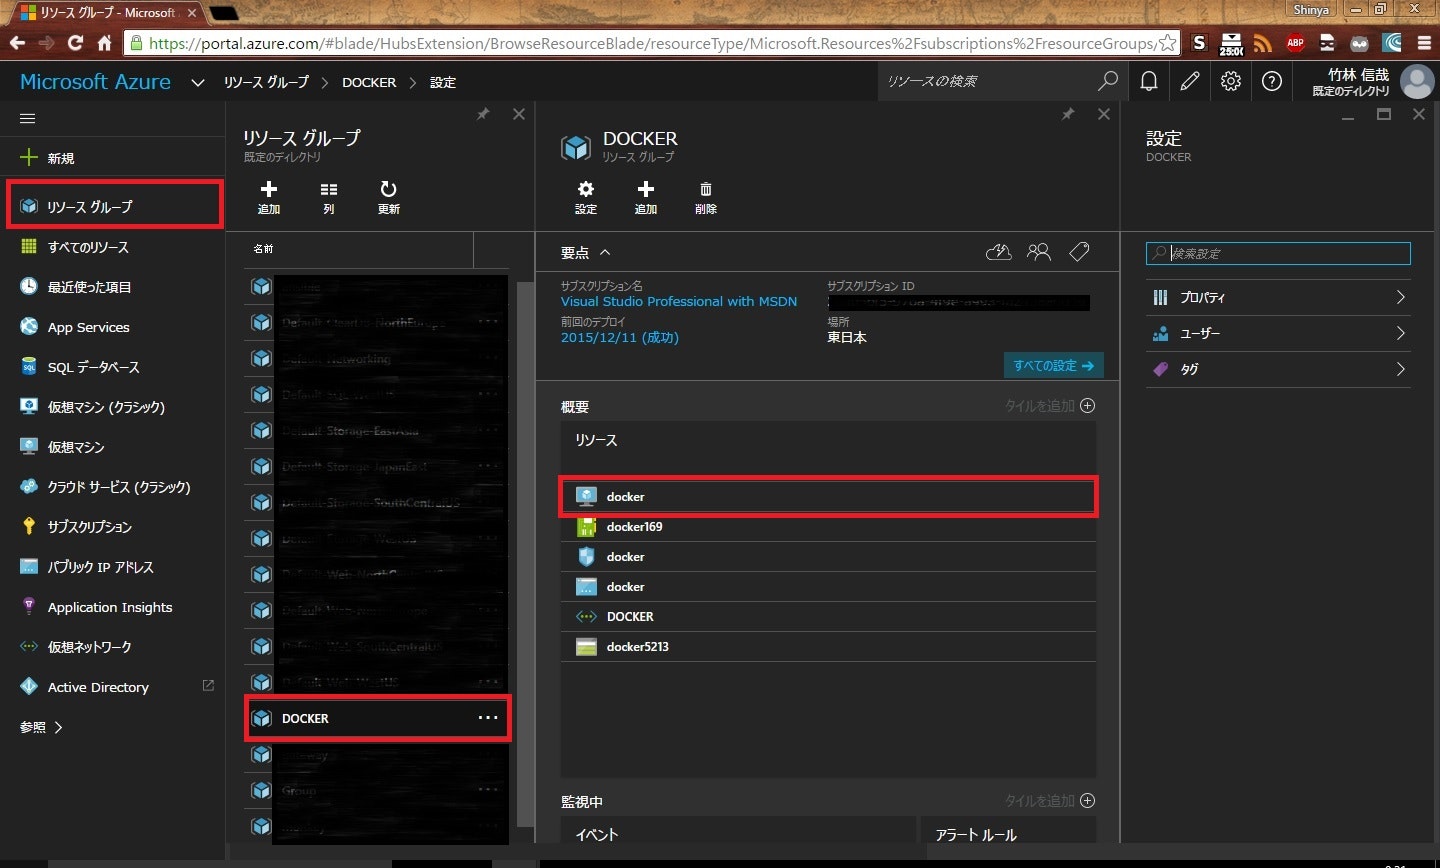
左側メニューの
- リソースグループ
- DOCKER(作成したリソースグループ名)
- docker(作成した仮想マシン名)
の順に選択していきます.
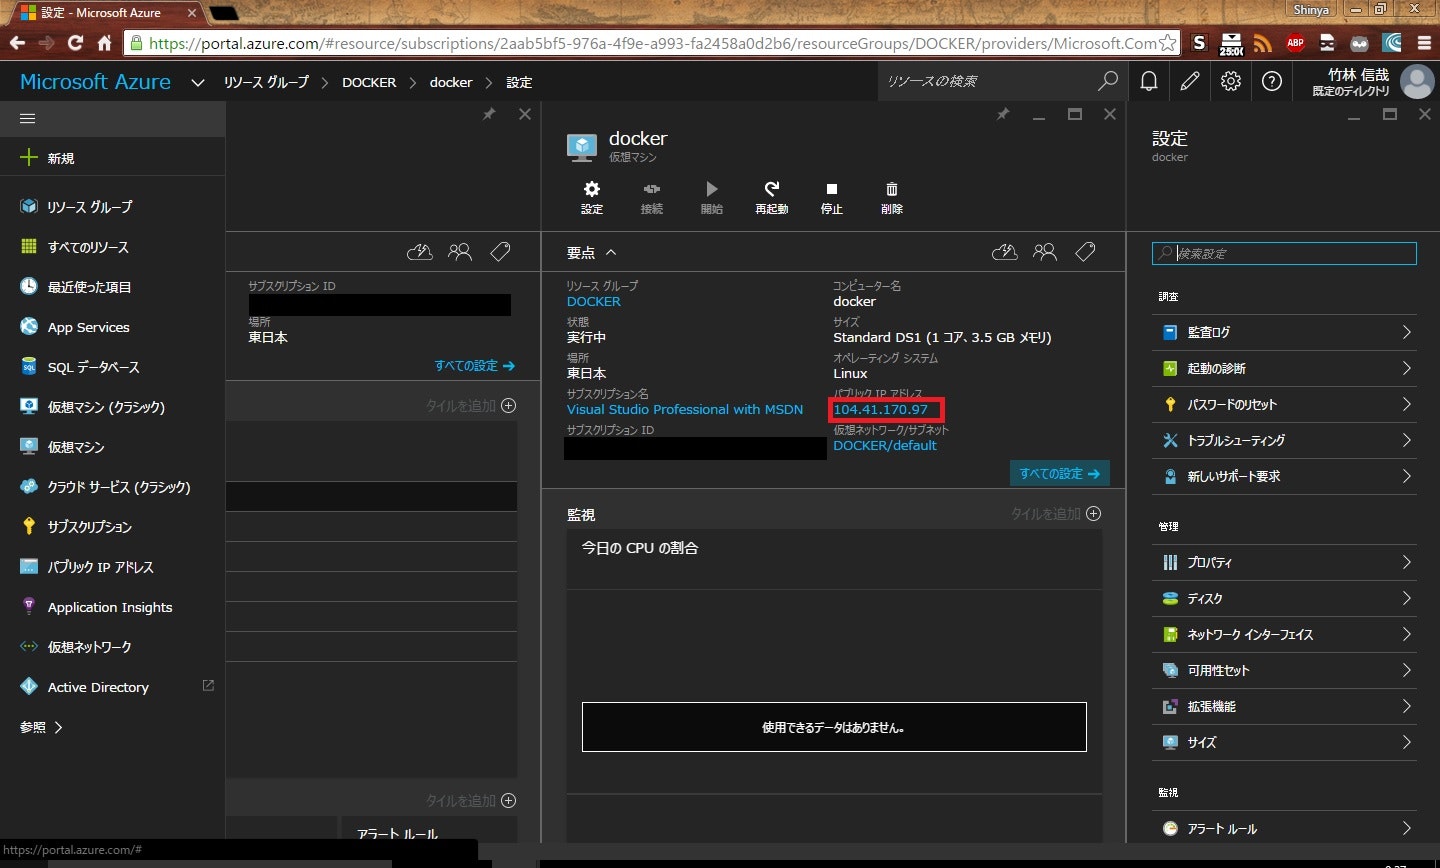
すると仮想マシンに設定されている各種情報が表示されます.ここに向かって SSH でつなぎます.
SSH でつなぐ
上記で調査したパブリック IP アドレスに SSH で接続します.
ユーザ名やパスワード(または鍵)は仮想マシン作成時に指定したものを指定してください.
ssh xxx.xxx.xxx.xxx -l <ユーザ名>
CoreOS についてちょっと
冒頭で「CoreOS はほとんど何も出来ない」と申し上げたとおり,実際に触ってみれば分かりますがシステム管理系のコマンドについてもほとんど使えません.
カスタマイズは可能ですが,少し手の込んだ手段が必要です.(今回は紹介しません)
とはいえ,やはり色々できるんですけどね.
一番危険な root でシェルを叩くとかも出来ますし.
ただ直接 su - できるユーザを作ったり sudo できるユーザを増やすには結構な手間が要ります.
hogehoge@docker ~ $ sudo passwd
Changing password for root
Enter the new password (minimum of 5 characters)
Please use a combination of upper and lower case letters and numbers.
New password:
Re-enter new password:
passwd: password changed.

hogehoge@docker ~ $ su -
You are not authorized to su root

hogehoge@docker ~ $ sudo bash

docker hogehoge # id
uid=0(root) gid=0(root) groups=0(root),1(bin),2(daemon),3(sys),4(adm),6(disk),10(wheel),11(floppy),26(tape),27(video)

docker hogehoge # visudo
visudo: /usr/share/baselayout/sudoers: Read-only file system

docker hogehoge # cd /etc

docker etc # cat sudo.conf
# CoreOS /etc/sudo.conf
# Use an alternative path for the default sudoers file.
Plugin sudoers_policy sudoers.so sudoers_file=/usr/share/baselayout/sudoers
Plugin sudoers_io sudoers.so

docker etc # rm sudo.conf

docker etc # cp /usr/share/baselayout/sudo.conf .

docker etc # vi sudo.conf

docker etc # cat sudo.conf
# CoreOS /etc/sudo.conf
# Use an alternative path for the default sudoers file.
Plugin sudoers_policy sudoers.so sudoers_file=/etc/sudoers
Plugin sudoers_io sudoers.so

docker etc # rm sudoers

docker etc # cp /usr/share/baselayout/sudoers .

docker etc # visudo
visudo: no editor found (editor path = /usr/libexec/editor)

docker etc # vi sudoers
ファイルシステムのマウント状態
hogehoge@docker ~ $ mount | grep sd
/dev/sda9 on / type ext4 (rw,relatime,seclabel,data=ordered)
/dev/sda3 on /usr type ext4 (ro,relatime,seclabel)
/dev/sda6 on /usr/share/oem type ext4 (rw,nodev,relatime,seclabel,commit=600,data=ordered)
/dev/sda1 on /boot type vfat (rw,relatime,fmask=0022,dmask=0022,codepage=437,iocharset=ascii,shortname=mixed,errors=remount-ro)
/dev/sdb1 on /mnt/resource type ext4 (rw,relatime,seclabel,data=ordered)
/usr が Read-Only なので,野良ビルドしてホームディレクトリに放り込むなどしない限り,基本的には新しいソフトウェアのインストールは難しいです.
いよいよ docker を触る
現時点でインストールされている docker は 1.8.3 です.
hogehoge@docker ~ $ sudo docker version
Client:
 Version:      1.8.3
 API version:  1.20
 Go version:   go1.4.2
 Git commit:   cedd534-dirty
 Built:        Sat Dec  5 05:57:26 UTC 2015
 OS/Arch:      linux/amd64

Server:
 Version:      1.8.3
 API version:  1.20
 Go version:   go1.4.2
 Git commit:   cedd534-dirty
 Built:        Sat Dec  5 05:57:26 UTC 2015
 OS/Arch:      linux/amd64
Ubuntu のイメージを立ち上げてみる
一番新しい Ubuntu のイメージを取得します.
hogehoge@docker ~ $ sudo docker pull ubuntu
Password:
Using default tag: latest
latest: Pulling from library/ubuntu
0bf056161913: Pull complete
1796d1c62d0c: Pull complete
e24428725dd6: Pull complete
89d5d8e8bafb: Pull complete
Digest: sha256:a2b67b6107aa640044c25a03b9e06e2a2d48c95be6ac17fb1a387e75eebafd7c
Status: Downloaded newer image for ubuntu:latest
つづいて実行.確かに Ubuntu のイメージが立ち上がっています.
hogehoge@docker ~ $ sudo docker run -t -i ubuntu
root@0ff599c29c59:/# cat /etc/issue
Ubuntu 14.04.3 LTS \n \l
終わりに
今回は docker を実行するための CoreOS の仮想マシンを作成するところから始めて Ubuntu のイメージを立ち上げるところまで紹介しました.
CoreOS の上では docker のサブコマンド全てを実行することが可能です.
Azure は Web ブラウザを用いた操作以外にも,Azure Powershell を用いて Powershell 上から操作することも可能です.
Infrastructure as a Code なことも簡単ですね.
使い終わった必要の無い仮想マシンは停止しておきましょう.せっかくなので Powershell で.
PS C:\> Add-AzureRmAccount


Environment           : AzureCloud
Account               : xxxxxxxxxxxxx
TenantId              : xxxxxxxx-xxxx-xxxx-xxxx-xxxxxxxxxxxx
SubscriptionId        : xxxxxxxx-xxxx-xxxx-xxxx-xxxxxxxxxxxx
CurrentStorageAccount :


PS C:\> Stop-AzureRmVM Docker docker

Virtual machine stopping operation
This cmdlet will stop the specified virtual machine. Do you want to continue?
[Y] はい(Y)  [N] いいえ(N)  [S] 中断(S)  [?] ヘルプ (既定値は "Y"):


Status              : Succeeded
StatusCode          : OK
RequestId           : xxxxxxxx-xxxx-xxxx-xxxx-xxxxxxxxxxxx
Output              :
Error               :
StartTime           : 2015/12/11 9:25:19 +09:00
EndTime             : 2015/12/11 9:27:35 +09:00
TrackingOperationId : xxxxxxxx-xxxx-xxxx-xxxx-xxxxxxxxxxxx
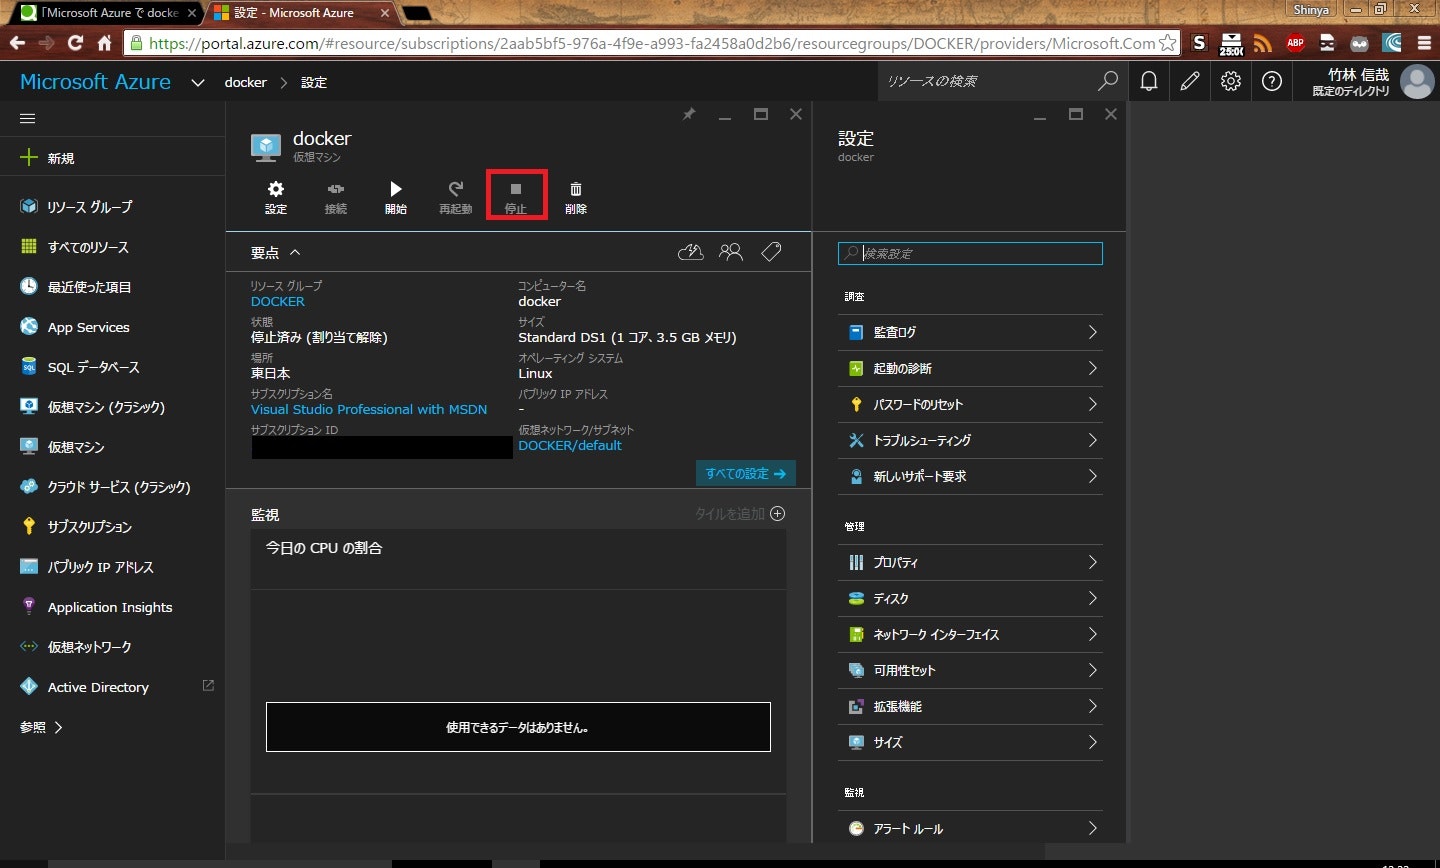
もちろんポータル上からでも停止できます.(図は停止済みの状態ですが...)
