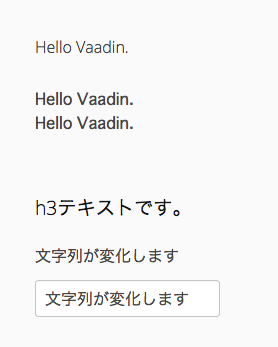
Vaadin を使いこなせるようになるため講習会を開く。
まずはプロジェクト作成、HelloVaadinあたりから。
Mavenプロジェクト作成
Mavenプロジェクト作成の仕方は
こちらを参照
Labelコンポーネントを使った例
LabelPractice
package com.example;

import javax.servlet.annotation.WebServlet;

import com.vaadin.annotations.Theme;
import com.vaadin.annotations.VaadinServletConfiguration;
import com.vaadin.annotations.Widgetset;
import com.vaadin.server.VaadinRequest;
import com.vaadin.server.VaadinServlet;
import com.vaadin.shared.ui.label.ContentMode;
import com.vaadin.ui.Label;
import com.vaadin.ui.TextField;
import com.vaadin.ui.UI;
import com.vaadin.ui.VerticalLayout;

/**
 *
 */
@Theme("mytheme")
@Widgetset("com.example.MyAppWidgetset")
public class LabelPractice extends UI {
	@Override
	protected void init(VaadinRequest vaadinRequest) {
		//縦にコンポーネントを配置するlayuout生成・セット
		final VerticalLayout layout = new VerticalLayout();
		setContent(layout);

		//デフォルトの配置だと左上に寄せられるので、少し見やすくなるようにマージンをとる
		layout.setMargin(true);

		//これも縦の配置がギュウギュウ詰めならないようにスペースをとる
		layout.setSpacing(true);

		//文字列コンポーネントを用意 ContentMode.TEXTは省略可能
		Label label1 = new Label("Hello Vaadin.",ContentMode.TEXT);
		layout.addComponent(label1);

		//改行コード等を含めたい場合 第二引数にContentMode.PREFORMATTEDを指定
		Label label2 = new Label("Hello Vaadin.\nHello Vaadin.",ContentMode.PREFORMATTED);
		layout.addComponent(label2);

		//文字列コンポーネントhtmlで記載する。第二引数にContentMode.HTMLを指定
		Label label3 = new Label("<h3>h3テキストです。</h3>",ContentMode.HTML);
		layout.addComponent(label3);

		//文字列をテキストフィールドに入れた値で変化させる
		Label label4 = new Label("文字列が変化します");
		layout.addComponent(label4);
		TextField editor = new TextField(null,label4.getValue());
		editor.addValueChangeListener(event -> label3.setValue(editor.getValue()));
		editor.setImmediate(true);
		layout.addComponent(editor);
	}
	@WebServlet(urlPatterns = "/LabelPractice/*", name = "LabelPractice", asyncSupported = true)
	@VaadinServletConfiguration(ui = LabelPractice.class, productionMode = false)
	public static class MyUIServlet extends VaadinServlet {
	}
}
