はじめに
JupyterHubはJupyter NotebookというPythonなどをWEBブラウザ上で操作するための仕組みを複数ユーザーで利用できるようにする仕組みですが、GitHubの認証を利用してのログインやDjangoのShell環境とうまく接続する情報が断片的にはありつつもまとまった情報がなかったので、まとめたものです。
AWSのELB/EC2/RDSを利用して、Webサーバーにはnginxを利用しています。
ユースケースとしては、テストデータに接続するためのDjango環境をすでに構築してるんだけどそれをWEB上からさくっと触れる環境が欲しい・ユーザー毎に環境を切り分けて使いたいけど複雑な認証の仕組みを作り込んだりはしたくないって場合に便利だと思います。
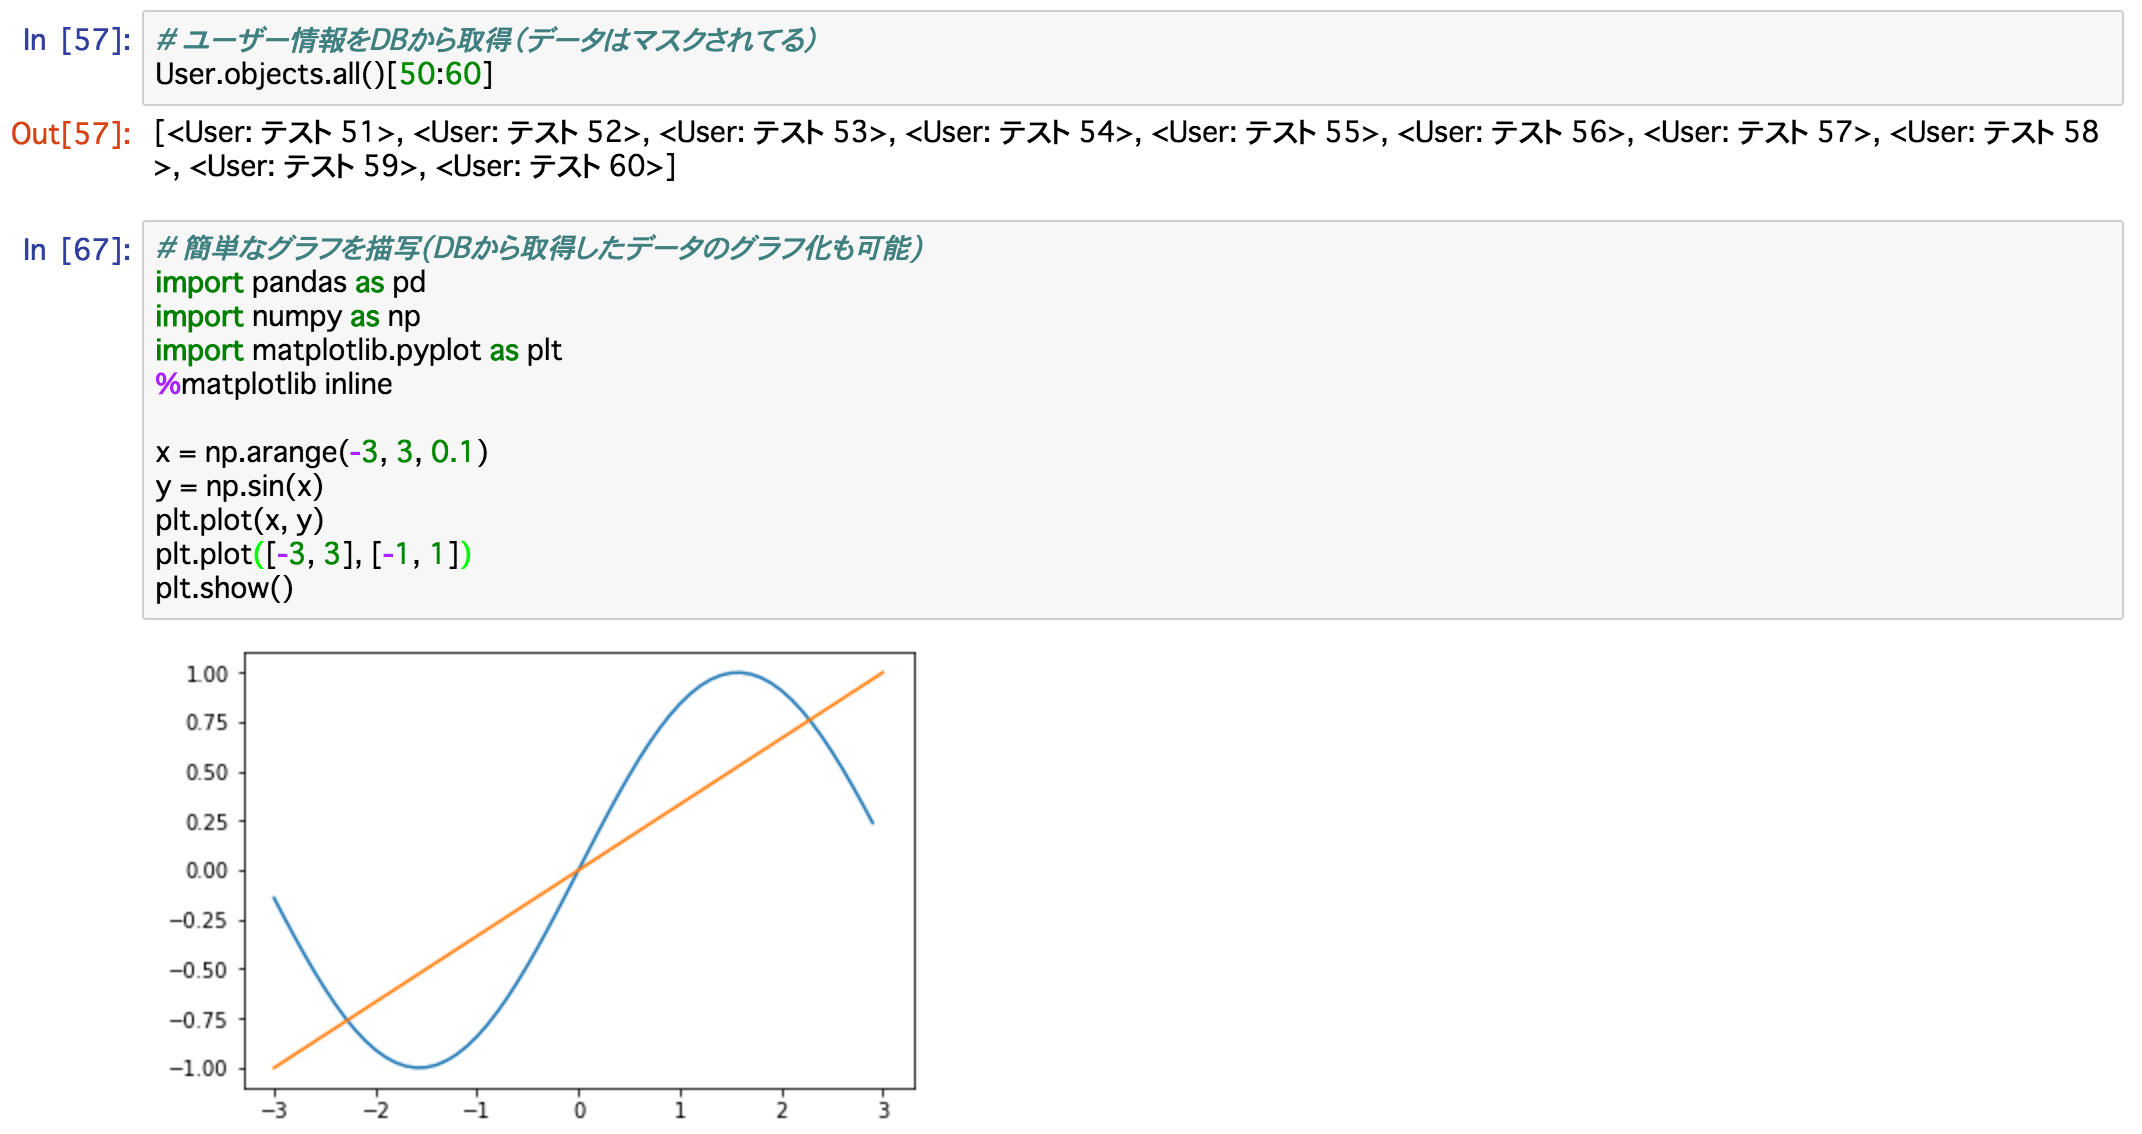
完成すると以下のようなことがWEBブラウザ上でさくっとできるようになります。
※環境構築時のログを元に手順をまとめたものになっていますが、権限の設定など一部漏れがあるかもしれません。再現してみてうまく動作しないなどありましたらコメントなどで教えていただければ幸いです。また、もっとエレガントな環境構築手順もあるかと思いますのでそちらもありましたら、、、
動作の流れ
すごくざっくりと言うと以下な感じです。
- http://jupyter.example.jp/ にアクセス(BASIC認証など付けておいた方がいいです)
- nginxが処理を受けて127.0.0.1:8000で動作しているJupyterHubにproxyする
- GitHubで認証を行うとJupyter Notebookを操作できる
- Jupyter NotebookはKernelとしてDjangoのプロセスとつないで動作するためすぐにDBにアクセス可能
残課題:SSL環境が構築できていない
やり方はあるんだと思いますが、https接続にすると、ELBでSSL→nginx→Virtualenv上のTornadeでJupyterHubという構成にした時に、notebookでDjangoのKernelに指定した際のAttachに失敗するという問題にあたりました。
httpアクセスだとだいじょうぶなんですがJupyterHubに内部ではhttpである旨教えてあげる必要があるのか、なにか他に設定が必要そうです。
GitHubとの連携など外部とのアクセスがあるのでhttpsにすべきなのですがそこまで行き着かずちょっと残念ですが。
環境構築手順
全体構成
私が利用している環境では、本番サーバーのDBをDailyでマスクして別RDSに格納しています。
テスト/ステージング環境ではそのマスクDBをDjangoから操作できるようにしています。
本資料ではそのRDSに対してDjangoで操作する環境をJupyterHubを通して実行できるようにすることをGoalとしています。

環境に関する前提
/var/www/jupyter.example.jp/ 以下にDjango環境を構築している前提です。
関係ありそうなディレクトリ構成を一部以下に示します。
/var/www/jupyter.example.jp/
├── README.md
├── jupyter  # アプリケーションのコードを配置(この下にmanage.pyがある)
├── requirements.txt
├── virtualenv
virtualenv環境にDjangoがすでに入っており、shell_plusを利用してModelを読み込むためにdjango-extensionsが入っている前提で進めております。
virtualenv環境は以下な感じで入れています。
cd /var/www/jupyter.example.jp/
virtualenv --prompt "(jupyter)" virtualenv
また、JupyterHubの設定ファイルは /etc/jupyterhub 以下に配置します。
JupyterHub用のユーザー作成
JupyterHubはjupyterhubユーザーで操作します。
sudo useradd jupyterhub
sudo usermod -a -G shadow jupyterhub
sudo mkdir /etc/jupyterhub
sudo chown jupyterhub /etc/jupyterhub
JupyterHubのインストール
jupyterhub/jupyterhub: Multi-user server for Jupyter notebooksのまま進めます。
sudo apt-get install npm nodejs-legacy
sudo npm install -g configurable-http-proxy
(virtualenv環境以下にpipでインストール)
pip install ipython jupyterhub
(npmやnodeのインストールの仕方、、古いような気もしつつ)
JupyterHubの設定ファイルの作成
jupyterhub --generate-config
/etc/jupyterhub/jupyterhub_config.py に移動して以下の箇所を修正

L.137付近
c.JupyterHub.ip = '127.0.0.1'

L. 106付近
c.JupyterHub.cookie_secret_file = '/etc/jupyterhub/jupyterhub_cookie_secret'
c.JupyterHub.db_url = '/etc/jupyterhub/jupyterhub.sqlite'
参考:http://jupyterhub.readthedocs.io/en/latest/config-examples.html
GitHubアカウントでのログイン
JupyterHubからOauthでGitHubにログインするための設定を構築します。
pip install oauthenticator
jupyterhub_config.pyのL.58くらいに以下追加
c.JupyterHub.authenticator_class = 'oauthenticator.GitHubOAuthenticator'
c.GitHubOAuthenticator.oauth_callback_url = os.environ['OAUTH_CALLBACK_URL']
c.GitHubOAuthenticator.client_id = os.environ['GITHUB_CLIENT_ID']
c.GitHubOAuthenticator.client_secret = os.environ['GITHUB_CLIENT_SECRET']
参考: https://github.com/jupyterhub/oauthenticator
Spawner
Spawnerがどういった概念か深く理解できているわけでないのですが、プロセスの管理のためにJupyterHubで利用するSpawnerを定義する必要があるようです。
※今回SudoSpawnerを利用していますが、より適切なものもあるかもしれません。
参考: http://jupyterhub.readthedocs.io/en/latest/spawners.html
pip install git+https://github.com/jupyter/sudospawner
jupyterhub_config.pyのL.220付近に以下を記述
c.JupyterHub.confirm_no_ssl = True
c.JupyterHub.spawner_class = 'sudospawner.SudoSpawner'
c.Spawner.notebook_dir = '~/notebooks'

c.SudoSpawner.sudospawner_path = '/var/www/jupyter.example.jp/virtualenv/bin/sudospawner'
sudo visudoで末尾に以下を追加する。
## Jupyterhub
# comma-separated whitelist of users that can spawn single-user servers
Runas_Alias JUPYTER_USERS = 利用するGitHubユーザー名(カンマ区切り)

# the command(s) the Hub can run on behalf of the above users without needing a password# the exact pa$
Cmnd_Alias JUPYTER_CMD = /var/www/jupyter.example.jp/virtualenv/bin/sudospawner

# actually give the Hub user permission to run the above command on behalf# of the above users without$
jupyterhub ALL=(JUPYTER_USERS) NOPASSWD:JUPYTER_CMD
参考:http://qiita.com/mt08/items/301f9fb93d01e78bda47
※Linuxユーザー名=GitHubユーザー名とする必要があるので、なんらかマッピングロジックが作れると幸せですがそこまで対応していません
JupyterHub起動
ここまでの設定で、JupyterHubのサーバーを起動させることはできるようになっています。
起動スクリプトを作成して起動してみます。
sudo -u jupyterhub vi /etc/jupyterhub/launch_notebook.sh
# !/bin/bash

export OAUTH_CALLBACK_URL=http://jupyter.example.jp/hub/oauth_callback
export GITHUB_CLIENT_ID=xxx
export GITHUB_CLIENT_SECRET=xxx

source /var/www/jupyter.example.jp/virtualenv/bin/activate
jupyterhub -f /etc/jupyterhub/jupyterhub_config.py
GitHub連携のために必要なCLIENT_IDとCLIENT_SECRETは以下から取得可能です。
https://github.com/settings/applications/new
※環境変数は外だしすべきだとは思いますが、、
これで
sudo -u jupyterhub /etc/jupyterhub/launch_notebook.sh
と実行すれば http://127.0.0.1:8000/ でJupyterHubが起動するはずです。
nginxの設定
JupyterHubが起動するようになれば次はELBからのアクセスを流してあげます。
nginxは80番ポートへのアクセスを受けて、JupyterHubで処理すべきものであれば8000番ポートに流すproxyとして利用しています。
sudo vi vi /etc/nginx/nginx.conf
http {
    map $http_upgrade $connection_upgrade {
        default upgrade;
        ''      close;
    }
    ...
/etc/nginx/sites-enabled/ 以下にjupyter.example.jp用の設定を記述するconfファイルを作成します。(例:jupyter.example.jp.conf)
server {
    listen 80;
    server_name jupyter.example.jp;

    # HTTPS接続環境ができたら以下の設定を有効化したい
    # add_header Strict-Transport-Security max-age=15768000;

    # Managing literal requests to the JupyterHub front end
    location / {
        proxy_pass http://127.0.0.1:8000;
        proxy_set_header X-Real-IP $remote_addr;
        proxy_set_header Host $host;
        proxy_set_header X-Forwarded-For $proxy_add_x_forwarded_for;
    }

    # Managing WebHook/Socket requests between hub user servers and external proxy
    location ~* /(api/kernels/[^/]+/(channels|iopub|shell|stdin)|terminals/websocket)/? {
        proxy_pass http://127.0.0.1:8000;

        proxy_set_header X-Real-IP $remote_addr;
        proxy_set_header Host $host;
        proxy_set_header X-Forwarded-For $proxy_add_x_forwarded_for;
        # WebSocket support
        proxy_http_version 1.1;
        proxy_set_header Upgrade $http_upgrade;
        proxy_set_header Connection $connection_upgrade;
    }
}
GitHub経由でログインできるようにする
Linuxユーザーで利用するGitHubのユーザー名と同じものがすでにできていれば問題ないが、無い場合は作成しておく必要があります。
※GitHubはg_hogeで、Linuxはl_hogeってユーザーがあるときにg_hoge→l_hogeのマッピングができれば理想的ですが、そこまではしていません。
USER=利用するGitHubユーザー名
useradd -d /home/${USER} -m ${USER}
mkdir /home/${USER}/notebooks
chown ${USER}/home/${USER}/notebooks
Kernelの設定
Jupyter notebookにはKernelという概念があり、実行時にどのPython環境を利用するかを指定することが可能となっています。
標準では起動時のPython環境ですが、これにDjangoのshell_plusを利用した環境を設定することでDBに接続済でModelのimportも完了した状態で利用可能になり大変便利です。
Virtualenv環境にJupyterHubを入れている場合、以下で設定ファイルを作成できます。WARNING出てますが、、
% jupyter kernelspec install-self --user
[InstallNativeKernelSpec] WARNING | `jupyter kernelspec install-self` is DEPRECATED as of 4.0. You probably want `ipython kernel install` to install the IPython kernelspec.
[InstallNativeKernelSpec] Installed kernelspec python3 in /home/your_user/.local/share/jupyter/kernels/python3
Virtualenv環境に入れずにグローバル領域に入れてる場合は以下でできるかもです。
% python -m ipykernel install
Installed kernelspec python3 in /usr/local/share/jupyter/kernels/python3
※root環境にipythonを入れていないのでVirtualenv環境で作成したものを必要な場所に保存しました。
で、できた設定ファイル群を移動させます。
% cd /usr/local/share
% sudo mv /home/your_user/.local/share/jupyter ./
% sudo chmod 775 jupyter
% sudo chown -R root:root jupyter
% cd /usr/local/share/jupyter/kernels

% ls /usr/local/share/jupyter/kernels
python3

% sudo mv python3 django

% ls /usr/local/share/jupyter/kernels/django
kernel.json  logo-32x32.png  logo-64x64.png
sudo vi django/kernel.json
で以下のようになっていると思うので、後述のように修正します。
{
 "language": "python",
 "argv": [
  "/var/www/jupyter.example.jp/virtualenv/bin/python3.4",
  "-m",
  "ipykernel",
  "-f",
  "{connection_file}"
 ],
 "display_name": "Python 3"
}
↓
{
  "display_name": "Django",
  "language": "python",
  "codemirror_mode": {
    "version": 3,
    "name": "ipython"
  },
  "argv": [
    "/var/www/jupyter.example.jp/virtualenv/bin/python",
    "/var/www/jupyter.example.jp/jupyter/manage.py",
    "shell_plus",
    "--settings=jupyter.settings",
    "--kernel",
    "--connection-file",
    "{connection_file}"
  ]
}

※--settings=jupyter.settings は、manage.pyで利用するDjangoの設定ファイルのパスを指定する
※shell_plusを利用するためにDjangoにはdjango-extensionsを入れてINSTALLED_APPSにdjango_extensionsを指定しておく必要があります
参考1: https://ipython.org/ipython-doc/3/development/kernels.html
参考2: http://stackoverflow.com/questions/31088080/django-extensions-shell-plus-kernel-specify-connection-file (コメントにもあるように"--connection-file"とする必要があります)
参考3: http://stackoverflow.com/questions/39007571/running-jupyter-with-multiple-python-and-ipython-paths
また、
https://github.com/Cadair/jupyter_environment_kernels
こちらを入れることでKernelの切り替えはもっと簡単にできるかもですがやってないです。
supervisordでJupyterHubを管理
これで launch_notebook.sh を実行すれば起動できますが、サーバーの再起動毎に立ち上げるのは面倒なのでsupervisordで自動的に立ち上がるようにします。
sudo vi /etc/supervisor/conf.d/
[program:notebook]
command=/etc/jupyterhub/launch_notebook.sh
directory=/etc/jupyterhub/
autostart=true
autorestart=true
stopgroup=true
startretries=3
exitcodes=0,2
stopsignal=TERM
user=jupyterhub
group=jupyterhub
設定ファイルを読み込んで起動します。
supervisord reread
supervisord reload
supervisord start notebook
これで自動的に起動するようになりログは /etc/log/supervisor/notebook-xxx.log に記述されます。
Appendix
環境構築時にはまった内容や、参考にしたリンクをまとめます。
connection_upgradeの問題
何も考えずに80番アクセスをJupyterHubに流した場合、
2017/02/03 17:20:44 [emerg] 16297#16297: unknown "connection_upgrade" variable
というエラーが出てしまいます。
http://mogile.web.fc2.com/nginx/http/websocket.html を参考にして解決済みですが、 /etc/nginx/nginx.confに以下を記述する必要があるようでした。
http {
    map $http_upgrade $connection_upgrade {
        default upgrade;
        ''      close;
    }
https接続にした際のエラー
ELBでhttpsからアクセスさせた場合、JupyterHubへのアクセスはできますが、Kernelを設定した際にsupervisordに以下のようなエラーが出てしまいます。
[I 2017-02-05 21:43:24.410 JupyterHub log:100] 200 GET /hub/api/authorizations/cookie/jupyter-hub-token-xxx/[secret] (xxx@127.0.0.1) 14.89ms
21:44:26.703 - error: [ConfigProxy] Proxy error:  Error: socket hang up
    at createHangUpError (http.js:1472:15)
    at Socket.socketCloseListener (http.js:1522:23)
    at Socket.EventEmitter.emit (events.js:95:17)
    at TCP.close (net.js:466:12)
cookieとか言ってるし設定値をどこか修正することできれいに治りそうだがそこまでできずいったん断念。いつか再トライします。
データ分析用のライブラリを色々インストール
このあたりは他に掲載されているので割愛でいいかもですが、matplotlibなどを利用するために、以下などでデータ分析に必要なライブラリを入れております。
sudo apt-get install -y libpng12-dev libjpeg8-dev libfreetype6-dev libxft-dev
pip install numpy pandas matplotlib seaborn scikit-learn
※virtualenv環境に入れてsupervisord restart notebookとすることで利用可能になります
その他参考資料
- Jupyter notebookがいかにイケてるか語られてます
- いい感じに恣意的ですが、Jupyter notebookへの愛が感じられます