Let's Encryptを使ってWordPressのサイトをSSL化しました。
SSL化したサイトの構成
-CentOS 6.9
-Nginx 1.12.0
-php-fpm 5.4.36
-WordPress 4.7.5
元のサイトのNginxの設定
元のサイトはVirtualHostで公開しているのでNginxの設定はこんな感じ。
※blog.sample.localは実際のサイトのURLに読み替えてください。
blog.sample.local.conf
server {
  listen       80;
  server_name  blog.sample.local;
  root         /virtual/public/blog.sample.local;
  index        index.php index.html index.htm;
  access_log   /var/log/nginx/blog.sample.local/access.log main;
  error_log    /var/log/nginx/blog.sample.local/error.log warn;
  include      wordpress.conf;
}
wordpress.conf
    try_files $uri $uri/ /index.php?q=$uri&$args;

    location ~* \.(gif|jpg|png|ico|css|js)$ {
        access_log        off;
    }
    location ~ /wp-admin {
        access_log     off;
        include        php_exec;
    }
    location ~ /wp-content {
        access_log     off;
        include        php_exec;
    }
    location ~ /wp-includes {
        access_log     off;
        include        php_exec;
    }
    location ~ /wp-cron.php {
        access_log     off;
        include        php_exec;
    }
    location ~ /wp-login.php {
        access_log     off;
        include        php_exec;
    }
    location ~ /wp-comments {
        access_log     off;
        include        php_exec;
    }

    include        php_exec;
php_exec.
location ~ \.php$ {
   fastcgi_pass   127.0.0.1:9000;
   fastcgi_index  index.php;
   fastcgi_param  SCRIPT_FILENAME  $document_root$fastcgi_script_name;
   include        fastcgi_params;
}
fastcgi_params.
fastcgi_param  QUERY_STRING       $query_string;
fastcgi_param  REQUEST_METHOD     $request_method;
fastcgi_param  CONTENT_TYPE       $content_type;
fastcgi_param  CONTENT_LENGTH     $content_length;

fastcgi_param  SCRIPT_NAME        $fastcgi_script_name;
fastcgi_param  REQUEST_URI        $request_uri;
fastcgi_param  DOCUMENT_URI       $document_uri;
fastcgi_param  DOCUMENT_ROOT      $document_root;
fastcgi_param  SERVER_PROTOCOL    $server_protocol;
fastcgi_param  REQUEST_SCHEME     $scheme;
fastcgi_param  HTTPS              $https if_not_empty;

fastcgi_param  GATEWAY_INTERFACE  CGI/1.1;
fastcgi_param  SERVER_SOFTWARE    nginx/$nginx_version;

fastcgi_param  REMOTE_ADDR        $remote_addr;
fastcgi_param  REMOTE_PORT        $remote_port;
fastcgi_param  SERVER_ADDR        $server_addr;
fastcgi_param  SERVER_PORT        $server_port;
fastcgi_param  SERVER_NAME        $server_name;

fastcgi_param  REDIRECT_STATUS    200;
SSL化する変更方針
次のような方針でSSL化します。
- http(ポート80)でアクセスがきたときはhttps(ポート443)に転送する。
- SSLはリバースプロキシで解く。
- WordPressはhttp(ポート8080)で運用する。
- Let's Encryptの証明書はwebrootモードで取得・更新する。
Let's Encryptの証明書取得時の認証用ディレクトリの作成
mkdir -p /var/www/ssl-proof/rancher/.well-known/
Nginxの設定変更
blog.sample.local.conf
upstream wordpress_sample {
    server 127.0.0.1:8080 fail_timeout=0;
}

server {
  listen       8080;

  root         /virtual/public/blog.sample.local;

  index        index.php index.html index.htm;

  access_log   /var/log/nginx/blog.sample.local/access.log main;
  error_log    /var/log/nginx/blog.sample.local/error.log warn;

  set_real_ip_from    127.0.0.1;
  real_ip_header      X-Forwarded-For;

  include      wordpress.conf;
}

server {
    listen 80;
    listen [::]:80;

    server_name blog.sample.local;
    return 301 https://$server_name$request_uri;
}

server {
        add_header Strict-Transport-Security "max-age=31536000; includeSubDomains";
        listen 443 ssl;
        listen [::]:443 ssl;

        server_name blog.sample.local;

        root /var/www/rancher-certbot-webroot;

        ssl on;
        ssl_certificate /etc/letsencrypt/live/blog.sample.local/fullchain.pem;
        ssl_certificate_key /etc/letsencrypt/live/blog.sample.local/privkey.pem;
        ssl_protocols        TLSv1 TLSv1.1 TLSv1.2;
        ssl_prefer_server_ciphers on;
        ssl_ciphers 'kEECDH+ECDSA+AES128 kEECDH+ECDSA+AES256 kEECDH+AES128 kEECDH+AES256 kEDH+AES128 kEDH+AES256 DES-CBC3-SHA +SHA !aNULL !eNULL !LOW !kECDH !DSS !MD5 !EXP !PSK !SRP !CAMELLIA !SEED';
        ssl_dhparam /etc/nginx/ssl/dhparam.pem;
        ssl_session_cache    builtin:1000 shared:SSL:10m;
        ssl_session_timeout  10m;
        ssl_stapling on;
        ssl_stapling_verify on;

        location /.well-known {
           root /var/www/ssl-proof/rancher/;
        }

        location / {
                proxy_redirect off;
                proxy_set_header X-Forwarded-Proto https;
                proxy_set_header Host $host;
                proxy_set_header X-Forwarded-For $proxy_add_x_forwarded_for;
                proxy_set_header X-Forwarded-Host $host;
                proxy_set_header X-Forwarded-Server $host;
                proxy_set_header X-Real-IP $remote_addr;
                proxy_intercept_errors on;
                proxy_pass http://wordpress_sample;
                proxy_redirect http:// https://;
        }
}
WordPressのserver設定に
  set_real_ip_from    127.0.0.1;
  real_ip_header      X-Forwarded-For;
を追加しないとaccess.log,error.logに記録されるIPアドレスが127.0.0.1になってしまいますので忘れずに追加しましょう。
wp-config.phpの修正
上記の設定だけだとリダイレクトループが発生してしまいますのでwp-config.phpに下記の内容を追記します。
if (isset($_SERVER['HTTP_X_FORWARDED_PROTO'])
  && $_SERVER['HTTP_X_FORWARDED_PROTO'] === "https") {
    $_SERVER['HTTPS'] = 'on';
}
define('FORCE_SSL_LOGIN', true);
define('FORCE_SSL_ADMIN', true);
Let's Encryptの証明書の取得
certbot-autoの入手
cd /tmp
wget https://dl.eff.org/certbot-auto
mv certbot-auto /usr/bin
chmod a+x /usr/bin/certbot-auto
証明書の入手
certbot-auto certonly --webroot -w /var/www/ssl-proof/rancher/ -d blog.sample.local
証明書の定期更新
Let's Encrypt の証明書の有効期限は90日間のため定期的に更新する必要があります。
毎月12日の朝5時に更新するようにcronを設定します。
更新日時はお好みで。
00 05 12 * * certbot-auto certonly --force-renewal --webroot -w /var/www/ssl-proof/rancher/ -d blog.sample.local && service nginx restart
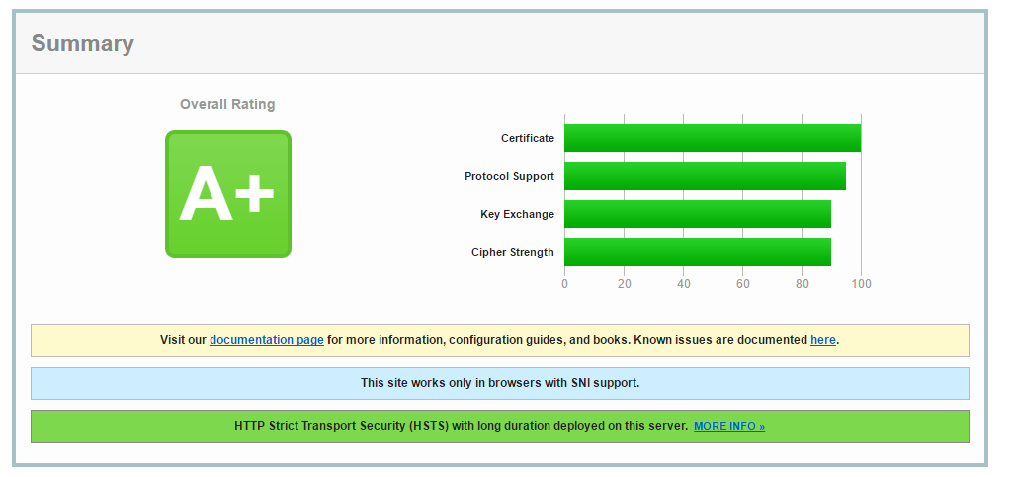
SSL化した後の「Qualys SSL Labs」での評価
SSLが有効なサーバを解析し、適切な設定がされているかを評価する「Qualys SSL Labs SSL Server Test」で設定内容をチェックしてみました。
「A+」の評価をゲットすることができました。
参考にさせていただいたサイト
- Qitta
- https://certbot.eff.org/
- hello-world.jp.net
- [あぱーブログ](https://blog.apar.jp/linux/3619/,"Let's Encrypt サーバー証明書の取得と自動更新設定メモ")
- [Lancork](https://www.lancork.net/2016/05/nginx-php-fastcgi-wordpress-ssl/,"nginx + PHP + fastCGI環境のWordPressを常時SSL化した方法")
- 空想ブログ