This is a continuation of "Test Each Type of Input Element". Please read the previous chapter for environment preparation. This time, we will test the part that displays values in various input tags on the web page. We will also test how to loop and display the contents of drop-down lists and tables.
Jsp Creation
Copy the source below and save it as htlloworld/OutputTest.jsp. The character code is UTF8.
<%@ page language="java" contentType="text/html; charset=UTF-8" pageEncoding="UTF-8"%>
<%@ taglib prefix="efw" uri="efw" %>
<!DOCTYPE HTML>
<HTML>
<HEAD>
	<META HTTP-EQUIV="CONTENT-TYPE"CONTENT="TEXT/HTML;CHARSET=UTF-8">
	<TITLE>efw Output Test</TITLE>
	<!-- Efwクライアントの取り込み-->
	<efw:Client lang="jp"/>
	<style>
		button{
			font-size:30px;
			font-weight:bold;
		}
	</style>
</HEAD>
<BODY>
<h1>各種類の入力枠を<button type="button" onclick="Efw('OutputTest_display')">一括表示</button></h1>
<table><tr><td style="vertical-align:top">
<h3>html5 input type</h3>
<fieldset style="width:220px">
1	<input id="item1"><br>
2	I am hidden<input id="item2" type="hidden"><br>
3	<input id="item3" type="text"><br>
4	<input id="item4" type="search"><br>
5	<input id="item5" type="tel"><br>
6	<input id="item6" type="url"><br>
7	<input id="item7" type="email"><br>
8	<input id="item8" type="password"><br>
9	<input id="item9" type="datetime"><br>
10	<input id="item10" type="date"><br>
11	<input id="item11" type="month"><br>
12	<input id="item12" type="week"><br>
13	<input id="item13" type="time"><br>
14	<input id="item14" type="datetime-local"><br>
15	<input id="item15" type="number"><br>
16	<input id="item16" type="range"><br>
17	<input id="item17" type="color"><br>
18	<input id="item18" type="checkbox" value="1"><br>
19	<input id="item19_1" name="item19" type="radio" value="1"><input id="item19_2" name="item19" type="radio" value="2"><br>
</fieldset>
</td><td style="vertical-align:top">
<h3>その他の入力用タグ</h3>
<fieldset style="width:200px">
20	<select id="item20">
	</select><br>
21	<select id="item21" size=3 multiple>
	</select><br>
22	<textarea id="item22"></textarea><br>
</fieldset>
</td><td style="vertical-align:top">
<h3>table</h3>
<fieldset style="width:200px">
	<table id="item23" border=1>
		<tr><th>head1</th><th>head2</th><th>head3</th></tr>
	</table>
</fieldset>
</td><td style="vertical-align:top">
<h3>表示値</h3>
<textarea id="txtOptions" style="width:400px;height:50px;font-size:15px;">
[{"value":"","text":""},
{"value":"I am option 1","text":"option 1"},
{"value":"I am option 2","text":"option 2"}]</textarea>
<textarea id="txtTables" style="width:400px;height:50px;font-size:15px;">
[{"fd1":"data1-1","fd2":"data1-2","fd3":"data1-3"},
{"fd1":"data2-1","fd2":"data2-2","fd3":"data2-3"},
{"fd1":"data3-1","fd2":"data3-2","fd3":"data3-3"}]</textarea>
</textarea>
<textarea id="txtValues" style="width:400px;height:350px;font-size:15px;">
{"#item1":"I am input",
"#item2":"I am hidden",
"#item3":"I am text",
"#item4":"I am search",
"#item5":"03-000-0000",
"#item6":"htttps://I.am.url.jp",
"#item7":"i@am.url.jp",
"#item8":"I am password",
"#item9":"2023/06/21 10:23:00",
"#item10":"2023-06-21",
"#item11":"2023-06",
"#item12":"2023-W25",
"#item13":"12:00",
"#item14":"2023-06-21T12:00",
"#item15":"1234567890",
"#item16":"100",
"#item17":"#ff0000",
"#item18":"1",
"[name=item19]":"1",
"#item20":"I am option 1",
"#item21":"I am option 1,I am option 2",
"#item22":"I am text area"
}</textarea>
</td></tr></table>
</BODY>
</HTML>
Js Event Creation
Copy the source below and save it as /helloworld/WEB-INF/efw/event/OutputTest_display.js. The character code is UTF8.
var OutputTest_display={};
OutputTest_display.paramsFormat={
	"#txtOptions":null,
	"#txtTables":null,
	"#txtValues":null,
}
OutputTest_display.fire=function(params){
	var aryOptions=JSON.parse(params["#txtOptions"]);
	var aryTables=JSON.parse(params["#txtTables"]);
	var objValues=JSON.parse(params["#txtValues"]);
	return new Result()
	.runat("#item20,#item21")
	.remove("option")
	.append("<option value='{value}'>{text}</option>")
	.withdata(aryOptions)
	.runat("#item23")
	.remove("tr:gt(0)")
	.append("<tr><td>{fd1}</td><td>{fd2}</td><td>{fd3}</td></tr>")
	.withdata(aryTables)
	.runat("body")
	.withdata(objValues);
}
Test
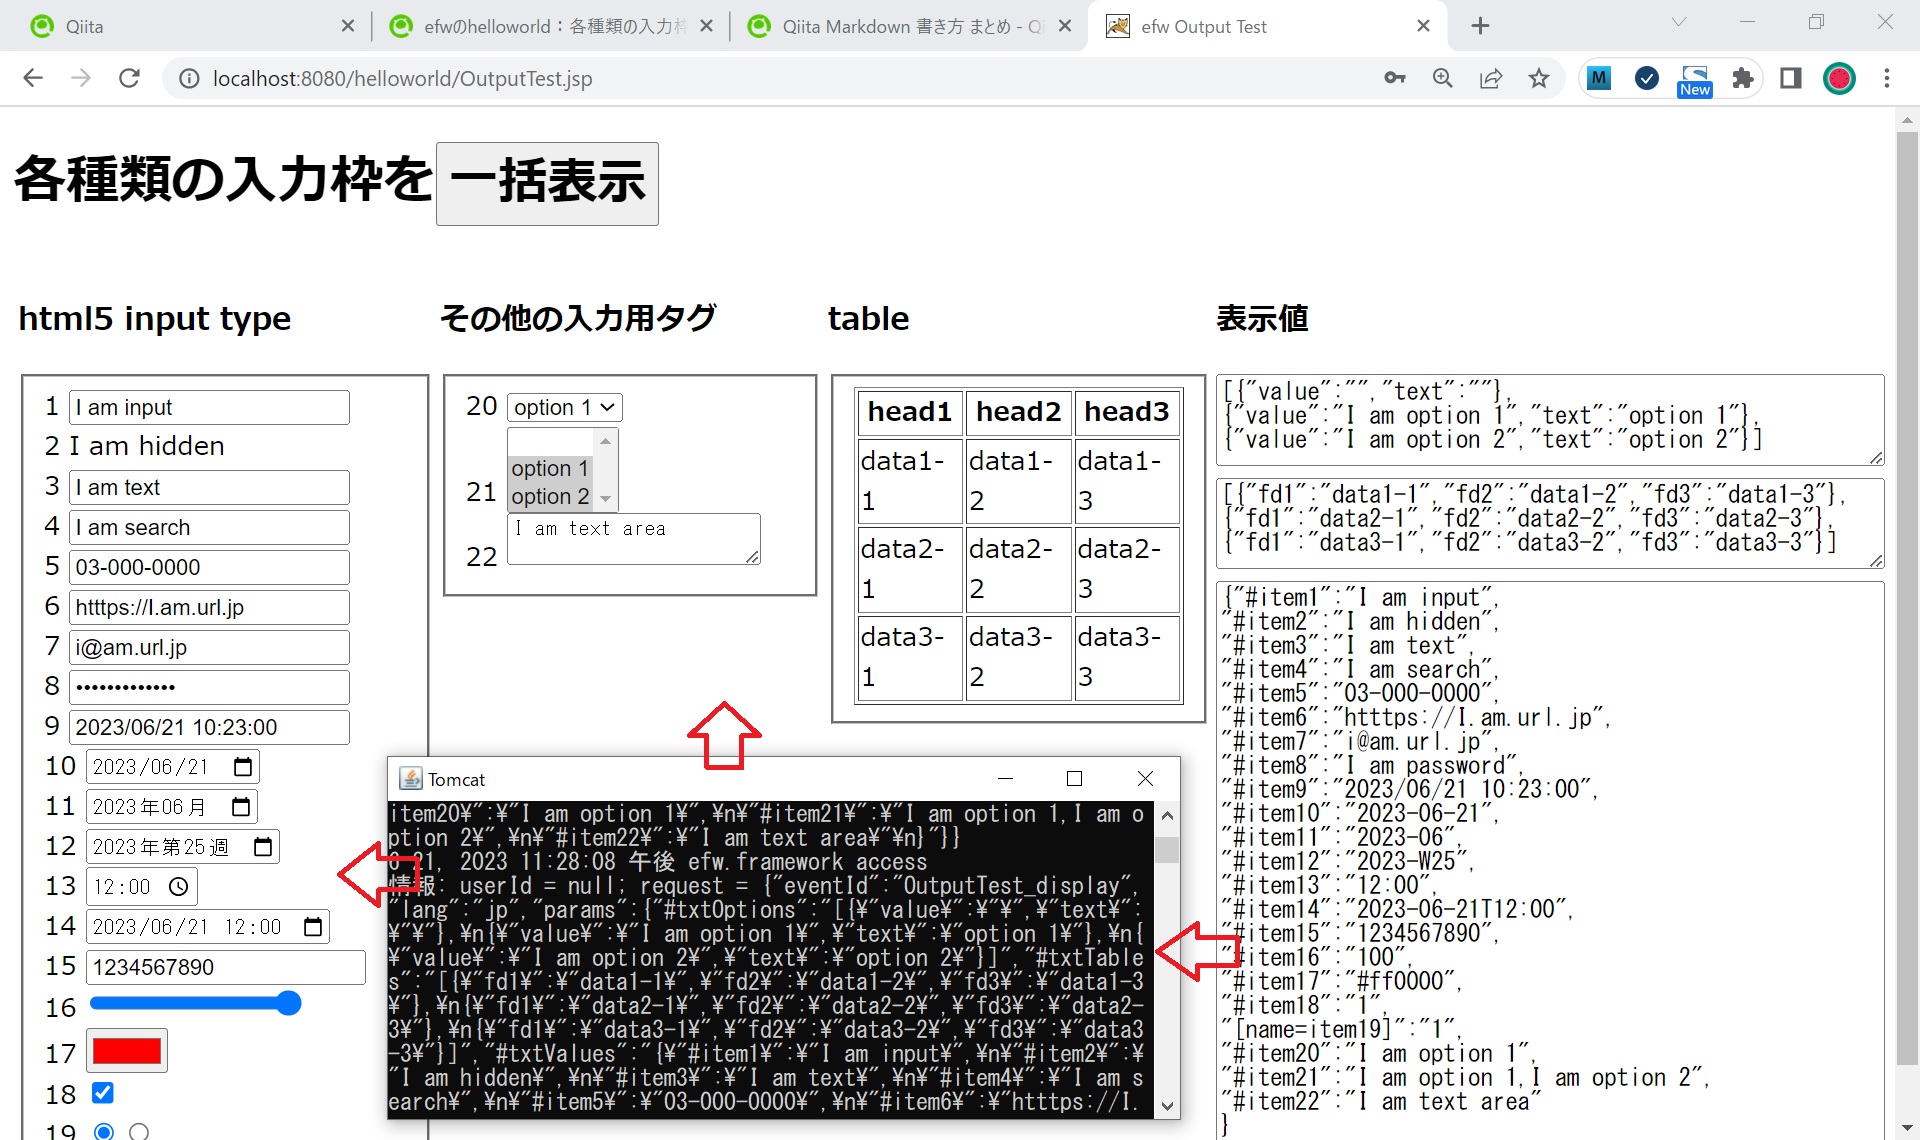
Start tomcat and press the batch display button.

After execution, the JSON data of the "display value" on the right will be sent to the server and displayed on the left and center of the page. If you modify the contents of the text area on the right and press the "Display All" button again, the values in the related areas will be updated.
Explanation of Single Value Display
There are two ways to display server values in the browser in js events. One is to display a single value. runat specifies "where". withdata answers "what". The meaning of the source below is to find the item1 tag in the body tag and assign the value "I am input". The attribute to be assigned is value or innerhtml, but there are exceptions.
return new Result()
.runat("body")
.withdata({
    "#item1":"I am input",
    ...
})
The following explanation is a bit like framework content, but even if you don't understand it, there is no problem in using efw.
Checkbox ※Item18
In the case of checkbox, it has nothing to do with whether or not the value attribute is checked. Whether or not it is checked is the checked attribute. Then, if the tag specified in withdata is checkbox and the assigned value matches the value of checkbox, the checked attribute is added to the checkbox tag. If they do not match, remove the checked attribute of the checkbox.
Radio ※Item19
In the case of radio, multiple items are always used together. The assigned value is compared to the values of its multiple radios and gives the matching radio tags the checked attribute.
Select ※Item20
When writing a drop-down list in HTML, the selected row is determined by the selected attribute of the option tag, but in JavaScript, the same effect can be obtained by manipulating the value attribute of the select tag. Then, assigning the value is done using the value attribute of the select tag without touching the option tag.
Multi Selection List ※Item21
If the select tag allows multiple selections, the values assigned from the server side should be comma-separated strings.
Explanation of Array Display
There are two types of patterns that are looped to the web screen and displayed on the screen. One is the table display. The other is displaying the contents of the drop-down list.
The runat part specifies the select tag or table tag, not the body. remove specifies the location to be removed. In the table, "tr:gt(0)" means tr greater than 0 rows. In other words, I want to leave the header line. The append part sets the template. Enclose the part that corresponds to data in "{}". What is set to withdata is an array. The contents of that array are one JSON object. The JSON attribute is mapped to the key set to "{}" and assigned a value. This is how it works.
return new Result()
//ドロップダウンリストとリストボックスを一緒にリスト内容を追加する。
.runat("#item20,#item21")
    .remove("option")
    .append("<option value='{value}'>{text}</option>")
    .withdata(aryOptions)
//テーブルの行を追加する。
.runat("#item23")
    .remove("tr:gt(0)")
    .append("<tr><td>{fd1}</td><td>{fd2}</td><td>{fd3}</td></tr>")
    .withdata(aryTables)
Above, I tested and explained how to display values on the page. Next are the various actions on the page. please wait.
This sample can be downloaded from the link below.