What is efw?
efw (Escco-Framework) is a server-side JavaScript Ajax framework designed and developed by Escco Japan Co., Ltd. using a goal-oriented approach. A free and open source Java framework. The github site is efw4.X.
In this article, I would like to create a helloworld step by step and introduce its convenience.
Environmental Preparation
Any of tomcat789, any of jdk8 to 24. For Tomcat 10 or later, please use 4.XX.XXXjakarta.
Create a helloworld folder in the tomcat/webapps folder and create a WEB-INF folder inside it. Create classes, efw, and lib in WEB-INF as shown in the diagram.

Obtaining Materials
efw4.X.jar from github https://github.com/efwGrp/efw4.X/tree/master/bin
Download efw.properties. Store the downloaded file locally in the same folder.
If your JDK is 15 or higher, additional jars are required.
https://github.com/efwGrp/qittaSamples/tree/main/ext_lib_jar_for_jdk15_or_later
The above jar can also be obtained from maven.
<dependency>
    <groupId>io.github.efwgrp</groupId>
    <artifactId>efw</artifactId>
    <version>4.07.029</version>
</dependency>
<dependency>
    <groupId>org.openjdk.nashorn</groupId>
    <artifactId>nashorn-core</artifactId>
    <version>15.6</version>
</dependency>
Set the Debug mode and log output level in the efw.properites file. This way, source modifications will be recognized by the framework in real time, and various logs of the framework will be displayed in the tomcat console. This will be very convenient for development.
efw.isdebug = true
efw.logging.level = ALL

Jsp Creation
Copy the source below and save it as htlloworld/InputTest.jsp. The character code is UTF8.
<%@ page language="java" contentType="text/html; charset=UTF-8" pageEncoding="UTF-8"%>
<%@ taglib prefix="efw" uri="efw" %>
<!DOCTYPE HTML>
<HTML>
<HEAD>
<META HTTP-EQUIV="CONTENT-TYPE"CONTENT="TEXT/HTML;CHARSET=UTF-8">
<TITLE>efw Input Test</TITLE>
<!-- Efwクライアントの取り込み-->
<efw:Client lang="jp"/>
<style>
button{
font-size:30px;
font-weight:bold;
}
span{
margin-left:200px;
}
#divParams{
position:absolute;
top:250px;
right:50px;
width:500px;
height:700px;
border:1px solid black;
background-color:white;
font-size:20px;
}
</style>
</HEAD>
<BODY>
<textarea id="divParams" style=""></textarea>
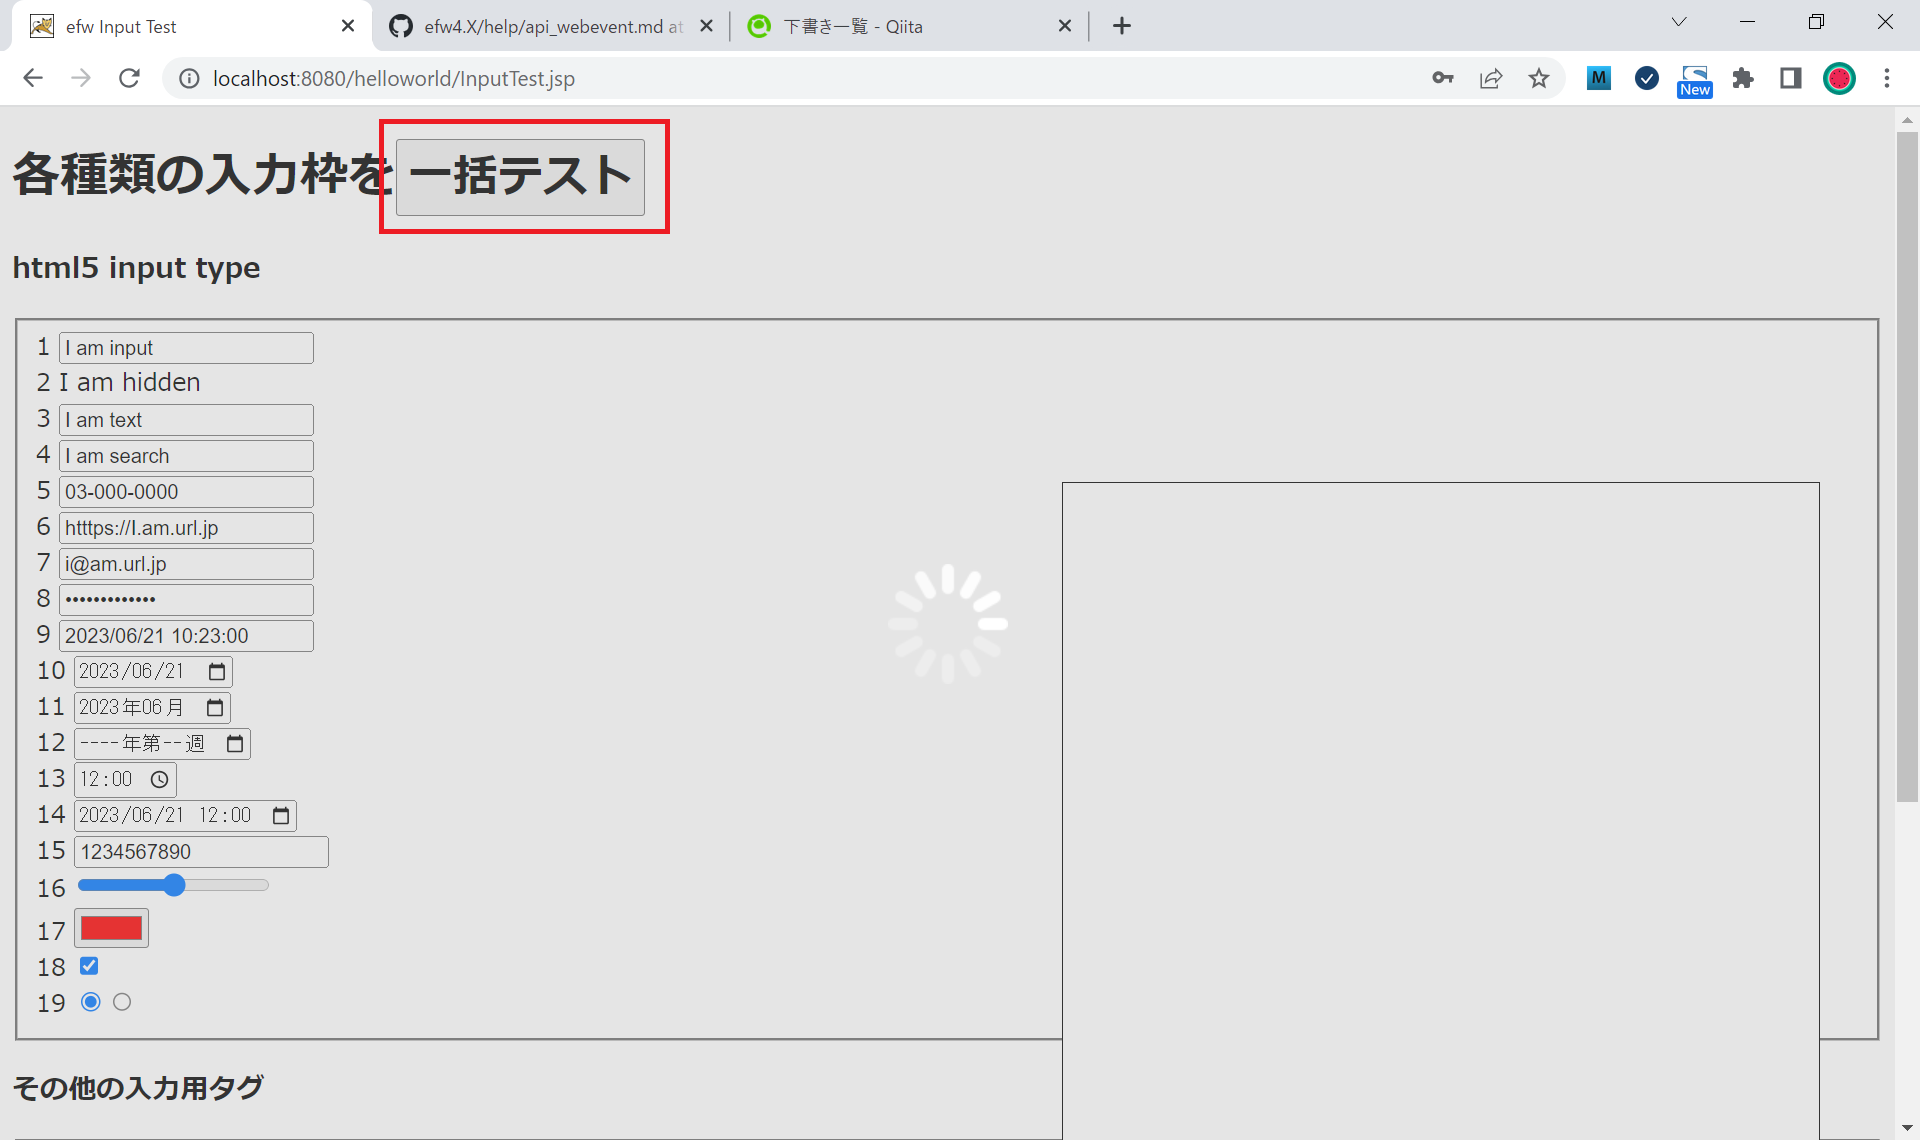
<h1>各種類の入力枠を<button type="button" onclick="Efw('InputTest_submit')">一括テスト</button></h1>
<h3>html5 input type</h3>
<fieldset>
1 <input id="item1" value="I am input"> <span id="spnItem1"></span><br>
2 I am hidden<input id="item2" type="hidden" value="I am hiden"> <span id="spnItem2"></span><br>
3 <input id="item3" type="text" value="I am text"> <span id="spnItem3"></span><br>
4 <input id="item4" type="search" value="I am search"> <span id="spnItem4"></span><br>
5 <input id="item5" type="tel" value="03-000-0000"> <span id="spnItem5"></span><br>
6 <input id="item6" type="url" value="htttps://I.am.url.jp"> <span id="spnItem6"></span><br>
7 <input id="item7" type="email" value="i@am.url.jp"> <span id="spnItem7"></span><br>
8 <input id="item8" type="password" value="I am password"> <span id="spnItem8"></span><br>
9 <input id="item9" type="datetime" value="2023/06/21 10:23:00"> <span id="spnItem9"></span><br>
10 <input id="item10" type="date" value="2023-06-21"> <span id="spnItem10"></span><br>
11 <input id="item11" type="month" value="2023-06"> <span id="spnItem11"></span><br>
12 <input id="item12" type="week" value=""> <span id="spnItem12"></span><br>
13 <input id="item13" type="time" value="12:00"> <span id="spnItem13"></span><br>
14 <input id="item14" type="datetime-local" value="2023-06-21 12:00:00"> <span id="spnItem14"></span><br>
15 <input id="item15" type="number" value="1234567890"> <span id="spnItem15"></span><br>
16 <input id="item16" type="range" value="50"> <span id="spnItem16"></span><br>
17 <input id="item17" type="color" value="#FF0000"> <span id="spnItem17"></span><br>
18 <input id="item18" type="checkbox" value="1" checked> <span id="spnItem18"></span><br>
19 <input id="item19_1" name="item19" type="radio" value="1" checked><input id="item19_2" name="item19" type="radio" value="2"> <span id="spnItem19"></span><br>
</fieldset>
<h3>その他の入力用タグ</h3>
<fieldset>
20 <select id="item20">
<option value=""></option>
<option value="I am option 1" selected>option 1</option>
<option value="I am option 2">option 2</option>
</select> <span id="spnItem20"></span><br>
21 <select id="item21" size=3 multiple>
<option value="I am option 1" selected>option 1</option>
<option value="I am option 2" selected>option 2</option>
</select> <span id="spnItem21"></span><br>
22 <textarea id="item22">I am text area</textarea> <span id="spnItem22"></span><br>
</fieldset>
<h3>efw data-format</h3>
<fieldset>
23 <input id="item23" data-format="#,##0.00" style="text-align:right" value="1,234.56"> <span id="spnItem23"></span><br>
24 <input id="item24" data-format="yyyy/MM/dd HH:mm:ss" value="2023/12/12 12:00:00"> <span id="spnItem24"></span><br>
25 <input id="item25" data-format="yyyy/MM/dd" value="2023/12/12"> <span id="spnItem25"></span><br>
26 <input id="item26" data-format="yyyy/MM" value="2023/12"> <span id="spnItem26"></span><br>
</fieldset>
</BODY>
</HTML>
Js Event Creation
Copy the source below and save it as /helloworld/WEB-INF/efw/event/InputTest_submit.js. The character code is UTF8.
var InputTest_submit={};
InputTest_submit.paramsFormat={
	"#item1":null,
	"#item2":null,
	"#item3":null,
	"#item4":null,
	"#item5":null,
	"#item6":null,
	"#item7":null,
	"#item8":null,
	"#item9":null,
	"#item10":null,
	"#item11":null,
	"#item12":null,
	"#item13":null,
	"#item14":null,
	"#item15":null,
	"#item16":null,
	"#item17":null,
	"#item18":null,
	"[name=item19]:checked":null,
	"#item20":null,
	"#item21":null,
	"#item22":null,
	"#item23":"format:#,##0.00",
	"#item24":"format:yyyy/MM/dd HH:mm:ss",
	"#item25":"format:yyyy/MM/dd",
	"#item26":"format:yyyy/MM",
};
InputTest_submit.fire=function(params){
	return new Result()
	.runat("body")
	.withdata({
		"#spnItem1":params["#item1"],
		"#spnItem2":params["#item2"],
		"#spnItem3":params["#item3"],
		"#spnItem4":params["#item4"],
		"#spnItem5":params["#item5"],
		"#spnItem6":params["#item6"],
		"#spnItem7":params["#item7"],
		"#spnItem8":params["#item8"],
		"#spnItem9":params["#item9"],
		"#spnItem10":params["#item10"],
		"#spnItem11":params["#item11"],
		"#spnItem12":params["#item12"],
		"#spnItem13":params["#item13"],
		"#spnItem14":params["#item14"],
		"#spnItem15":params["#item15"],
		"#spnItem16":params["#item16"],
		"#spnItem17":params["#item17"],
		"#spnItem18":params["#item18"],
		"#spnItem19":params["[name=item19]:checked"],
		"#spnItem20":params["#item20"],
		"#spnItem21":JSON.stringify(params["#item21"]),
		"#spnItem22":params["#item22"],
		"#spnItem23":params["#item23"],
		"#spnItem24":params["#item24"],
		"#spnItem25":params["#item25"],
		"#spnItem26":params["#item26"],
	})
	.runat("body")
	.withdata({
		"#divParams":JSON.stringify(params).replace(/,\"/g,",\n\""),
	});
}
Test
Start tomcat and press the bulk test button. A typical Ajax-style busy icon will be displayed. *To take this image, I added the java.lang.Thread.sleep(3000); code to the js event fire function.
After execution, the following screen will appear.
The input content on the left side of the web page will be displayed as a log on the tomcat console in JSON format. It is also displayed in the display area in the middle of the web page and in the text area frame on the right. Now you can see at a glance what values the server receives for each input box.


You can view the cloud and server logs on the browser console screen by pressing the F12 button. You can definitely view the server logs as well.

With just this, you can create a fairly impressive ajax program. how is it? Isn't it easy?
Explanation
Define which item on the page to retrieve using the jquery identifier in the js event. Most of the input values are sent to the server as they are, but only the special ones will need to be explained.
Checkbox ※Item18
When checked, the checkbox value is sent to the server. If not checked, send null. Other input frames will be sent blank when no input is made.
Radio ※Item19
radio is used with multiple tags. It won't work if you identify it by ID like other tags. Therefore, use the following identifier in paramsFormat of the js event. It means "What is checked in the name item 19". Actually, it doesn't matter how you write the identifier, as long as jQuery can recognize it.
"[name=item19]:checked":null,
Multi-selection List ※Item21
If you add the multiple attribute to the select tag, multiple selections will be possible. In this case, what you receive on the server side will be an array.
data-format ※Item23-26
When using the data-format attribute, efw automatically attaches onfocus and onblur events to those tags in the specified format to provide a little input assistance.
23	<input id="item23" data-format="#,##0.00" style="text-align:right" value="1,234.56">
24	<input id="item24" data-format="yyyy/MM/dd HH:mm:ss" value="2023/12/12 12:00:00">
25	<input id="item25" data-format="yyyy/MM/dd" value="2023/12/12">
26	<input id="item26" data-format="yyyy/MM" value="2023/12">
When receiving it on the server side, if you specify the format, what you receive will be automatically converted to a number type or date type instead of a string.
InputTest_submit.paramsFormat={
    "#item23":"format:#,##0.00",
    "#item24":"format:yyyy/MM/dd HH:mm:ss",
    "#item25":"format:yyyy/MM/dd",
    "#item26":"format:yyyy/MM",
}
When converting the numbers and date items of the received parameters into JSON representation, it will be as follows.
{"#item23":1234.56,
"#item24":"2023-12-12T03:00:00.000Z",
"#item25":"2023-12-11T15:00:00.000Z",
"#item26":"2023-11-30T15:00:00.000Z"}
This sample can be downloaded from the link below. I plan to make test samples for each aspect one by one. thank you.