分析環境をコンテナベースで構築したいと思い調べていたらマネージドのKubernetes上にJupyterHubをデプロイするチュートリアルを見つけました。
かなり手軽にできたので、チュートリアルのスクリプトの中身をじっくりみて勉強していこうと思います。
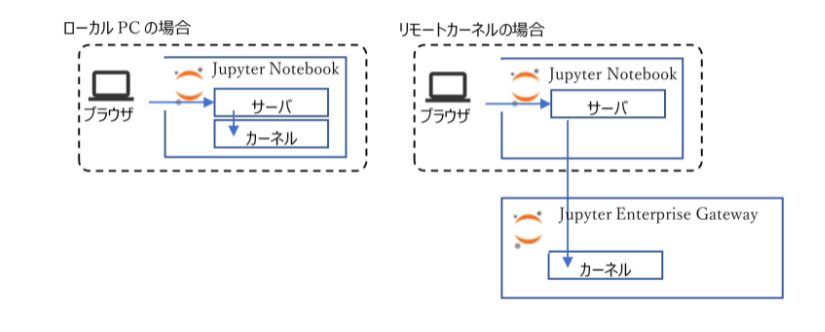
+アルファでJupyter Enterprise GatewayというJupyterのカーネルをリモートのKubernetesクラスタ上できる仕組みを使って実行カーネルを別podで分離して実行することに挑戦してみます。
Jupyter Enterprise Gateway とは?
ドキュメントから引用します(翻訳)
Jupyter Enterprise Gatewayは、マルチクラスター環境で複数のユーザーをサポートするための便利な機能を提供するプラグイン式フレームワークです。Jupyter Enterprise Gatewayは、計算機資源の最適化、マルチユーザーサポートの強化、Jupyterノートブック環境のより詳細なセキュリティなどの機能を提供しており、企業、科学、学術分野での導入に適しています。
Jupyter Enterprise Gatewayは、遠隔地にあるノートブックに代わってカーネルを起動することができるWebサーバーです。これにより、Webサーバがカーネルの動作に関わる唯一の場所ではなくなるため、リソース管理が向上します。
要するに、ローカルなどでコンピュートが小さいNotebookで計算している場合に、リモートのKubernetesクラスタをコンピュート資源として扱う事でローカルのNotebookでありながらスケーラブルなコンピュートを利用した計算が可能になるといった感じでしょうか。

(Jupyter Enterprise Gatewayを使った計算資源の共有から引用)
チュートリアル開始
今回まとめるチュートリアルは下記のものになります。
Google公式のJupyterHub on GKE チュートリアルです。
Google Kubernetes Engine でノートブック サーバーを生成する
環境設定
1. プロジェクトIDの環境変数設定, gcloudコマンドの適用先のプロジェクト設定
export PROJECT_ID=qiita_test

gcloud config set project ${PROJECT_ID}

gcloud services enable \
    compute.googleapis.com \
    container.googleapis.com \
    cloudbuild.googleapis.com \
    containerregistry.googleapis.com
2. リポジトリクローン, ツールのインストール
git clone https://github.com/GoogleCloudPlatform/ai-notebooks-extended.git

cd ai-notebooks-extended/gke-hub-example/deploy/manually

bash 00-install-tools.sh
00-install-tools.sh
OSによって各ツールのインストール方法を変えているみたいです。
MacOSのOS名は「Darwin」ってでるの初めて知りました。
# !/bin/bash

PROJECT_ID=$(gcloud config list --format 'value(core.project)')
echo "--------------------------------"
echo "Using project ${PROJECT_ID}"
echo "--------------------------------"

echo "--------------------------------"
echo "Installs kubectl"
echo "--------------------------------"
case $(uname -s) in
  Linux*)
    echo "Installing for Linux."
    curl -LO "https://storage.googleapis.com/kubernetes-release/release/$(curl -s https://storage.googleapis.com/kubernetes-release/release/stable.txt)/bin/linux/amd64/kubectl"
  ;;
  Darwin*)
    echo "Installing for MacOs."
    curl -LO "https://storage.googleapis.com/kubernetes-release/release/$(curl -s https://storage.googleapis.com/kubernetes-release/release/stable.txt)/bin/darwin/amd64/kubectl"
  ;;
esac
chmod +x ./kubectl
sudo mv ./kubectl /usr/local/bin/kubectl

echo "--------------------------------"
echo "Installs minikube tools."
echo "--------------------------------"
case $(uname -s) in
  Linux*)
    curl -Lo minikube https://storage.googleapis.com/minikube/releases/latest/minikube-linux-amd64
  ;;
  Darwin*)
    curl -Lo minikube https://storage.googleapis.com/minikube/releases/latest/minikube-darwin-amd64
  ;;
esac
chmod +x minikube

sudo mkdir -p /usr/local/bin/
sudo install minikube /usr/local/bin/

echo "--------------------------------"
echo "Installs kustomize."
echo "--------------------------------"
curl -s "https://raw.githubusercontent.com/\
kubernetes-sigs/kustomize/master/hack/install_kustomize.sh"  | bash
chmod +x ./kustomize
sudo mv ./kustomize /usr/local/bin/kustomize
ついでにそれぞれのツールについて簡単に調べてみました。
◆ kubectl
- みなさんご存知のKubernetesクラスターを制御するためのコマンラインツール
-
kubectlは$HOME/.kube/configというファイルから制御するクラスタ情報を取得 -
こちらの記事が頻出の
kubectlコマンドについてまとめらている
◆ minikube
- 小規模なKubernetes環境を作成するために作られたパッケージ
- シングルノードのKubernetesクラスタを実行可能
- デプロイ前にKubernetes環境をのテストとデバッグを行える
◆ kustomize
- 環境共通のマニフェストや環境ごとに異なるマニフェストといった環境差分の管理が簡単に行える
- Kubernetes宣言ファイルをカスタマイズが可能
インフラストラクチャの準備
3. GKEクラスタを作成およびkubectl構成ファイルの更新
bash 20-create-infrastructure.sh
20-create-infrastructure.sh
# !/bin/bash

# 環境変数がまとまっているファイルの読み込み
source 10-set-variables.sh

# コンテナ関連のAPIを利用可能に
gcloud services enable container.googleapis.com

# GKEクラスタで使用するサービスアカウントの作成
# 既存のサービスアカウントがあればコメントアウトしてOK
gcloud iam service-accounts create ${SA_GKE_HUB} --display-name ${SA_GKE_HUB} --project ${PROJECT_ID}

# 作成したサービスアカウントに対してオーナー権限を付与
# オーナー権限なので何でもできることに注意(既存ロールをアタッチするならroles/ownerを変更
# 既存のサービスアカウントを利用する場合はここもコメントアウトしてOK
gcloud projects add-iam-policy-binding ${PROJECT_ID} \
   --member serviceAccount:${SA_GKE_HUB}@${PROJECT_ID}.iam.gserviceaccount.com \
   --role roles/owner

# こちらも同様にサービスアカウントの作成
gcloud iam service-accounts create ${SA_GKE_SU} --display-name ${SA_GKE_SU} --project ${PROJECT_ID}

echo "---------------------------------------------"
echo "Creating a Workload Identity enabled cluster."
echo "---------------------------------------------"

# GKEクラスタの作成
# デフォルトからの変更点はネットワーク周りの設定
# プライベートネットワークで検証したかったため予め作成した環境を設定
# ノード数は1となっているがzoneでリージョンを指定しているため、各ゾーンに1ノードずつ作成されたクラスタとなる
# zone=asia-northeast1としているため各ゾーンに1ノードずつ作成され合計3ノードでクラスタが作成される
gcloud beta container clusters create ${CLUSTER_NAME} \
  --project ${PROJECT_ID} \
  --zone ${ZONE} \
  --network=***** \
  --subnetwork=**** \
  --release-channel regular \
  --enable-ip-alias \
  --num-nodes 1 \
  --scopes cloud-platform,userinfo-email \
  --service-account ${SA_GKE_HUB}@${PROJECT_ID}.iam.gserviceaccount.com \
  --machine-type n1-standard-4 \
  --addons ConfigConnector \
  --workload-pool=${PROJECT_ID}.svc.id.goog \
  --enable-stackdriver-kubernetes \
  --workload-metadata=GCE_METADATA  # VM authentication of inverting proxy needs GCE_METADATA; this disables WID on default pool.

# GKEクラスタのクレデンシャルを取得
# ここで取得した情報をkubectlが参照してkubectlで操作が可能になる
gcloud container clusters get-credentials ${CLUSTER_NAME} \
  --project ${PROJECT_ID} \
  --zone ${ZONE}

# スケールするときに必要となる追加のノードプールの作成
# ノード数は0で作成され、必要に応じて最大3ノードまでスケールする
# --clusterでプールをアタッチするクラスタを指定する
gcloud beta container node-pools create user-pool \
  --machine-type n1-standard-2 \
  --num-nodes 0 \
  --enable-autoscaling \
  --min-nodes 0 \
  --max-nodes 3 \
  --zone ${ZONE} \
  --node-taints hub.jupyter.org_dedicated=user:NoSchedule \
  --node-labels hub.jupyter.org/node-purpose=user \
  --cluster ${CLUSTER_NAME} \
  --workload-metadata=GKE_METADATA  # Enable WID on the user pool.

# ユーザー用JupyterNotebookポッドのサービスアカウント権限付与
gcloud iam service-accounts add-iam-policy-binding \
--role roles/iam.workloadIdentityUser \
--member "serviceAccount:${PROJECT_ID}.svc.id.goog[default/singleuser-runner]" \
${SA_GKE_SU}@${PROJECT_ID}.iam.gserviceaccount.com

# Agentポッドのサービスアカウント権限付与
gcloud iam service-accounts add-iam-policy-binding \
--role roles/iam.workloadIdentityUser \
--member "serviceAccount:${PROJECT_ID}.svc.id.goog[default/agent-runner]" \
${SA_GKE_HUB}@${PROJECT_ID}.iam.gserviceaccount.com

# JupyterHubポッドのサービスアカウント権限付与
gcloud iam service-accounts add-iam-policy-binding \
--role roles/iam.workloadIdentityUser \
--member "serviceAccount:${PROJECT_ID}.svc.id.goog[default/hub-runner]" \
${SA_GKE_HUB}@${PROJECT_ID}.iam.gserviceaccount.com
10-set-variables.sh
20-create-infrastructure.shの中で読み込まれている環境変数設定スクリプト
# !/bin/bash

alias k=kubectl

WORKING_DIR=$(pwd)

export PROJECT_ID=$(gcloud config list --format 'value(core.project)')

# 作成されるクラスタの名前
export CLUSTER_NAME="****"
echo "--------------------------------"
echo "Using project ${PROJECT_ID}"
echo "Using cluster ${CLUSTER_NAME}"
echo "--------------------------------"

export ZONE="asia-northeast1"

# クラスタで作成されるサービスアカウント名
export SA_GKE_HUB="*****"
export SA_GKE_SU="*****"

# kustomization.yamlが格納されている階層
# いじらないでよい
export FOLDER_MANIFESTS="../manifests/overlays"
export FOLDER_MANIFESTS_GKE="${FOLDER_MANIFESTS}/gke"
export FOLDER_MANIFESTS_LOCAL="${FOLDER_MANIFESTS}/local"

# Dockerfileなどが格納されている階層
# いじらないでよい
export DOCKER_FOLDER="../../docker"
export DOCKER_FOLDER_HUB="${DOCKER_FOLDER}/hub"
export DOCKER_FOLDER_AGENT="${DOCKER_FOLDER}/agent"
export DOCKER_FOLDER_JUPYTER="${DOCKER_FOLDER}/jupyter"

# JupyterHubとそのAgentのDockerイメージ名
export IMAGE_HUB_NAME="gkehub-hub"
export IMAGE_HUB_TAG="latest"
export IMAGE_AGENT_NAME="gkehub-agent"
export IMAGE_AGENT_TAG="latest"

# ContinerRegistryからコンテナを引っ張るときのパス
export DOCKER_HUB_GKE="gcr.io/${PROJECT_ID}/${IMAGE_HUB_NAME}:${IMAGE_HUB_TAG}"
export DOCKER_AGENT_GKE="gcr.io/${PROJECT_ID}/${IMAGE_AGENT_NAME}:${IMAGE_AGENT_TAG}"

# JupyterNotebookのDockerイメージ名
export IMAGES_JUPYTER=(jupyter-mine-basic)
export DOCKERS_JUPYTER_LOCAL=$(printf %s, "${IMAGES_JUPYTER[@]}" | sed s/.$//)
export DOCKERS_JUPYTER_GKE=$(printf "gcr.io/${PROJECT_ID}/%s", "${IMAGES_JUPYTER[@]}" | sed s/.$//)

if [ ! -z "$IMAGES_THIRD_PARTY" ]; then
  DOCKERS_JUPYTER_LOCAL=${DOCKERS_JUPYTER_LOCAL}",${IMAGES_THIRD_PARTY}"
  DOCKERS_JUPYTER_GKE=${DOCKERS_JUPYTER_GKE}",${IMAGES_THIRD_PARTY}"
fi
4. JupyterNotebookのDockerイメージ作成
bash 15-create-jupyter-image.sh TARGET DOCKER_FOLDER IMAGE_JUPYTER_TAG という順で引数を渡しています
bash 15-create-jupyter-image.sh \
    gke \
    jupyter-mine-basic \
    gcr.io/${PROJECT_ID}/jupyter-mine-basic
15-create-jupyter-image.sh
gkeを引数に渡した場合はCloud Buildを使ってDockerfileをビルドしてContainerRegistryに格納して
localを引数に渡した場合はdocker buildでDockerfileをビルドしてローカルに格納します
# !/bin/bash

source 10-set-variables.sh

TARGET=$1
DOCKER_FOLDER=${DOCKER_FOLDER_JUPYTER}/$2
IMAGE_JUPYTER_TAG=$3

if [ "$TARGET" == "gke" ]; then
  gcloud builds submit -t ${IMAGE_JUPYTER_TAG} ${DOCKER_FOLDER}
elif [ "$TARGET" == "local" ]; then
  docker build -t ${IMAGE_JUPYTER_TAG} ${DOCKER_FOLDER}
else
  echo "echo Target ${TARGET} not supported."
fi
GKE Hubのデプロイ
5. 各種イメージのビルド/GKEにデプロイ
bash 30-deploy-gke-workloads.sh gke true
# !/bin/bash

# 環境変数読み込み
source 10-set-variables.sh

# GKE or Local でデプロイ先を指定
TARGET=$1
MUST_BUILD=$2

echo "Deploying for TARGET:${TARGET}"
echo "Working with cluster: ${CLUSTER_NAME}"
echo "Image to build MUST_BUILD: ${MUST_BUILD}"
echo "--------------------------------"

###################################
# Deploys on GKE
###################################
if [ "$TARGET" == "gke" ]; then
  # Resets GKE environment if used Minikube
  if [[ "$(minikube status | grep host)" == "host: Running" ]]; then
    minikube stop
    # GKEクラスタのクレデンシャルを取得
    gcloud container clusters get-credentials ${CLUSTER_NAME} \
      --project ${PROJECT_ID} \
      --zone ${ZONE}
  fi
  # ビルドが必要な対象によって分岐
  # Dockerイメージ名とDockerfileを指定
  # Cloud Buildでビルド
  if [ "$MUST_BUILD" == "hub" ]; then
    gcloud builds submit -t ${DOCKER_HUB_GKE} ${DOCKER_FOLDER_HUB}
  fi

  if [ "$MUST_BUILD" == "agent" ]; then
    gcloud builds submit -t ${DOCKER_AGENT_GKE} ${DOCKER_FOLDER_AGENT}
  fi

  if [ "$MUST_BUILD" == "true" ]; then
    gcloud builds submit -t ${DOCKER_HUB_GKE} ${DOCKER_FOLDER_HUB}
    gcloud builds submit -t ${DOCKER_AGENT_GKE} ${DOCKER_FOLDER_AGENT}
  fi
  # ワークロードのデプロイ
  # GKEマニフェストファイルの作成
  source 35-use-wid.sh

###################################
# Deploys locally
###################################
elif [ "$TARGET" == "local" ]; then

  # Sets Minikube environment
  USER=$(id -un)
  if [ "$(minikube status | grep host)" != "host: Running" ]; then
    minikube start --disk-size=100g
  fi

  eval $(minikube docker-env)

  # ビルドが必要な対象によって分岐
  # Dockerイメージ名とDockerfileを指定
  # DockerBuidでビルド実行
  if [ "$MUST_BUILD" == "hub" ]; then
    docker build -t ${IMAGE_HUB_NAME:IMAGE_HUB_TAG} ${DOCKER_FOLDER_HUB}
  fi

  if [ "$MUST_BUILD" == "true" ]; then
    docker build -t ${IMAGE_HUB_NAME:IMAGE_HUB_TAG} ${DOCKER_FOLDER_HUB}

    for image_jupyter in "${IMAGES_JUPYTER[@]}"; do
      echo "Building Jupyter profile ${image_jupyter}"
      bash 15-create-jupyter-image.sh local ../../docker/jupyter/${image_jupyter} ${image_jupyter}
    done
  fi
  # ワークロードのデプロイ
  # GKEマニフェストファイルの作成
  source 35-use-minikube.sh

###################################
# Catch all target.
###################################
else
  echo "echo Target ${TARGET} not supported."
fi
35-use-wid.sh
GKEのマニフェストファイル作成スクリプト
# !/bin/bash

# Creates Kustmomize `GKE` patches for the Hub
cat <<EOT > ${FOLDER_MANIFESTS_GKE}/patch_gke.yaml
apiVersion: apps/v1
kind: Deployment
metadata:
  name: jupyterlab-hub
spec:
  template:
    spec:
      containers:
      - name: jupyterlab-hub
        image: ${DOCKER_HUB_GKE}
        imagePullPolicy: Always
        env:
        - name: spawnable_profiles
          value: ${DOCKERS_JUPYTER_GKE}
---
apiVersion: apps/v1
kind: Deployment
metadata:
  name: proxy-agent-hub
spec:
  template:
    spec:
      containers:
      - name: proxy-agent-hub
        image: ${DOCKER_AGENT_GKE}
        imagePullPolicy: Always
---
apiVersion: v1
kind: ServiceAccount
metadata:
  annotations:
    iam.gke.io/gcp-service-account: ${SA_GKE_HUB}@${PROJECT_ID}.iam.gserviceaccount.com
  name: agent-runner
  namespace: default
---
apiVersion: v1
kind: ServiceAccount
metadata:
  annotations:
    iam.gke.io/gcp-service-account: ${SA_GKE_HUB}@${PROJECT_ID}.iam.gserviceaccount.com
  name: hub-runner
  namespace: default
---
apiVersion: v1
kind: ServiceAccount
metadata:
  annotations:
    iam.gke.io/gcp-service-account: ${SA_GKE_SU}@${PROJECT_ID}.iam.gserviceaccount.com
  name: singleuser-runner
  namespace: default
EOT

# Deploys.
kustomize build ${FOLDER_MANIFESTS_GKE} | kubectl apply -f -
InvertingProxyURLの取得
bash 40-get-hub-url.sh
40-get-hub-url.sh
# !/bin/bash

source 10-set-variables.sh
# GKEクラスタのクレデンシャルを取得
gcloud container clusters get-credentials ${CLUSTER_NAME} \
--project ${PROJECT_ID} \
--zone ${ZONE}
# プロキシされたURLを取得
# アクセスすることでJupyterHubを起動可能
echo https://$(kubectl describe configmap inverse-proxy-config-hub | grep googleusercontent.com)
表示されたURLにアクセスすると
が表示され、My Serverをクリックすると
JupyterLabが立ち上がります
GKE上にはさまざまなポッドがたちあがっており、その中にJupyterlab-Hubやproxy-agentポッドが常駐しています
$ kubectl get pods --all-namespaces -o wide
認証はGCPアカウントでされており、My Serverを実行するとJupyter-[認証アカウント]という名前でpodがたちあがっています
ここまでがGKE上にJupyterHubを構築するGKE Hubのチュートリアルとなります
次にこれを利用してJupyter EnterpriseGatewayを試してみます
Jupyter EGWのデプロイ
6. Jupyter EGWのマニフェストファイル取得
Jupyter EGWにはエンドポイントが必要のため、Kubernetes上でServiceを作成する必要があります
下記のGithubにあるEnterpriseGateway用のマニフェストファイルを取得します
https://github.com/jupyter/enterprise_gateway/blob/master/etc/kubernetes/enterprise-gateway.yaml
# This file defines the Kubernetes objects necessary for Enterprise Gateway to run within Kubernetes.
#
apiVersion: v1
kind: Namespace
metadata:
  name: enterprise-gateway
  labels:
    app: enterprise-gateway
---
apiVersion: v1
kind: ServiceAccount
metadata:
  name: enterprise-gateway-sa
  namespace: enterprise-gateway
  labels:
    app: enterprise-gateway
    component: enterprise-gateway
---
apiVersion: rbac.authorization.k8s.io/v1
kind: ClusterRole
metadata:
  name: enterprise-gateway-controller
  labels:
    app: enterprise-gateway
    component: enterprise-gateway
rules:
  - apiGroups: [""]
    resources: ["pods", "namespaces", "services", "configmaps", "secrets", "persistentvolumes", "persistentvolumeclaims"]
    verbs: ["get", "watch", "list", "create", "delete"]
  - apiGroups: ["rbac.authorization.k8s.io"]
    resources: ["rolebindings"]
    verbs: ["get", "list", "create", "delete"]
---
apiVersion: rbac.authorization.k8s.io/v1
kind: ClusterRole
metadata:
  # Referenced by EG_KERNEL_CLUSTER_ROLE below
  name: kernel-controller
  labels:
    app: enterprise-gateway
    component: kernel
rules:
  - apiGroups: [""]
    resources: ["pods"]
    verbs: ["get", "watch", "list", "create", "delete"]
---
apiVersion: rbac.authorization.k8s.io/v1
kind: ClusterRoleBinding
metadata:
  name: enterprise-gateway-controller
  labels:
    app: enterprise-gateway
    component: enterprise-gateway
subjects:
  - kind: ServiceAccount
    name: enterprise-gateway-sa
    namespace: enterprise-gateway
roleRef:
  kind: ClusterRole
  name: enterprise-gateway-controller
  apiGroup: rbac.authorization.k8s.io
---
apiVersion: v1
kind: Service
metadata:
  labels:
    app: enterprise-gateway
    component: enterprise-gateway
  name: enterprise-gateway
  namespace: enterprise-gateway
spec:
  ports:
  - name: http
    port: 8888
    targetPort: 8888
  - name: response
    port: 8877
    targetPort: 8877
  selector:
    gateway-selector: enterprise-gateway
  sessionAffinity: ClientIP
  type: NodePort
# Uncomment in order to use <k8s-master>:8888
#  externalIPs:
#  - k8s-master-public-ip
---
apiVersion: apps/v1
kind: Deployment
metadata:
  name: enterprise-gateway
  namespace: enterprise-gateway
  labels:
    gateway-selector: enterprise-gateway
    app: enterprise-gateway
    component: enterprise-gateway
spec:
# Uncomment/Update to deploy multiple replicas of EG
#  replicas: 1
  selector:
    matchLabels:
      gateway-selector: enterprise-gateway
  template:
    metadata:
      labels:
        gateway-selector: enterprise-gateway
        app: enterprise-gateway
        component: enterprise-gateway
    spec:
      # Created above.
      serviceAccountName: enterprise-gateway-sa
      containers:
      - env:
        - name: EG_PORT
          value: "8888"

        - name: EG_RESPONSE_PORT
          value: "8877"

          # Created above.
        - name: EG_NAMESPACE
          value: "enterprise-gateway"

          # Created above.  Used if no KERNEL_NAMESPACE is provided by client.
        - name: EG_KERNEL_CLUSTER_ROLE
          value: "kernel-controller"

          # All kernels reside in the EG namespace if True, otherwise KERNEL_NAMESPACE
          # must be provided or one will be created for each kernel.
        - name: EG_SHARED_NAMESPACE
          value: "False"

          # NOTE: This requires appropriate volume mounts to make notebook dir accessible
        - name: EG_MIRROR_WORKING_DIRS
          value: "False"

          # Current idle timeout is 1 hour.
        - name: EG_CULL_IDLE_TIMEOUT
          value: "3600"

        - name: EG_LOG_LEVEL
          value: "DEBUG"

        - name: EG_KERNEL_LAUNCH_TIMEOUT
          value: "60"

        - name: EG_KERNEL_WHITELIST
          value: "'r_kubernetes','python_kubernetes','python_tf_kubernetes','python_tf_gpu_kubernetes','scala_kubernetes','spark_r_kubernetes','spark_python_kubernetes','spark_scala_kubernetes'"

        - name: EG_DEFAULT_KERNEL_NAME
          value: "python_kubernetes"

        # Optional authorization token passed in all requests
        #- name: EG_AUTH_TOKEN
        #  value: <configured-auth-token>

        # Ensure the following VERSION tag is updated to the version of Enterprise Gateway you wish to run
        image: elyra/enterprise-gateway:dev
        # Use IfNotPresent policy so that dev-based systems don't automatically
        # update. This provides more control.  Since formal tags will be release-specific
        # this policy should be sufficient for them as well.
        imagePullPolicy: IfNotPresent
        name: enterprise-gateway
        ports:
        - containerPort: 8888
        - containerPort: 8877
## Uncomment to enable NFS-mounted kernelspecs
#        volumeMounts:
#        - name: kernelspecs
#          mountPath: "/usr/local/share/jupyter/kernels"
#      volumes:
#      - name: kernelspecs
#        nfs:
#          server: <internal-ip-of-nfs-server>
#          path: "/usr/local/share/jupyter/kernels"
---
apiVersion: apps/v1
kind: DaemonSet
metadata:
  name: kernel-image-puller
  namespace: enterprise-gateway
spec:
  selector:
    matchLabels:
      name: kernel-image-puller
  template:
    metadata:
      labels:
        name: kernel-image-puller
        app: enterprise-gateway
        component: kernel-image-puller
    spec:
      containers:
      - name: kernel-image-puller
        image: elyra/kernel-image-puller:dev
        env:
          - name: KIP_GATEWAY_HOST
            value: "http://enterprise-gateway.enterprise-gateway:8888"
          - name: KIP_INTERVAL
            value: "300"
          - name: KIP_PULL_POLICY
            value: "IfNotPresent"
        volumeMounts:
          - name: dockersock
            mountPath: "/var/run/docker.sock"
      volumes:
      - name: dockersock
        hostPath:
          path: /var/run/docker.sock
7. デプロイ
これはkubectlでいつも通りデプロイします
kubectl apply -f enterprise-gateway.yaml
すると下記のようpodが立ち上がります。
また、Serviceも同時に作成され、ここが実行カーネルが投げられるエンドポイントになります。

GKE上でJupyterカーネルを分離して実行
8. Dockerfileの編集
上記で作成したエンドポイントに目掛けてカーネルを投げる設定をJupyterNotebookのイメージにする必要があります。
cd ai-notebooks-extended/gke-hub-example/docker/jupyter/jupyter-mine-basic
vim Dockerfile
下記のようにENV JUPYTER_GATEWAY_URL http://~を追加します。
URLは上記のServiceのエンドポイントになります。
FROM jupyter/base-notebook

USER root
RUN apt-get update && apt-get install -y curl apt-transport-https ca-certificates gnupg \
  && curl https://packages.cloud.google.com/apt/doc/apt-key.gpg | apt-key add - \
  && echo "deb https://packages.cloud.google.com/apt cloud-sdk main" | tee -a /etc/apt/sources.list.d/google-cloud-sdk.list \
  && apt-get update && apt-get install -y google-cloud-sdk

COPY jupyter_notebook_config.py /etc/jupyter/
RUN fix-permissions /etc/jupyter/
USER $NB_UID

ENV JUPYTER_GATEWAY_URL http://10.216.4.29:8888

EXPOSE 8080
9. Dockerの再ビルド/GKE上で実行
このようにDockerfileを書き換えて、下記を実行するとJupyterEnterpriseGatewayで実行カーネルが動くNotebookがたちがあるようになります。
bash 15-create-jupyter-image.sh \
    gke \
    jupyter-mine-basic \
    gcr.io/${PROJECT_ID}/jupyter-mine-basic
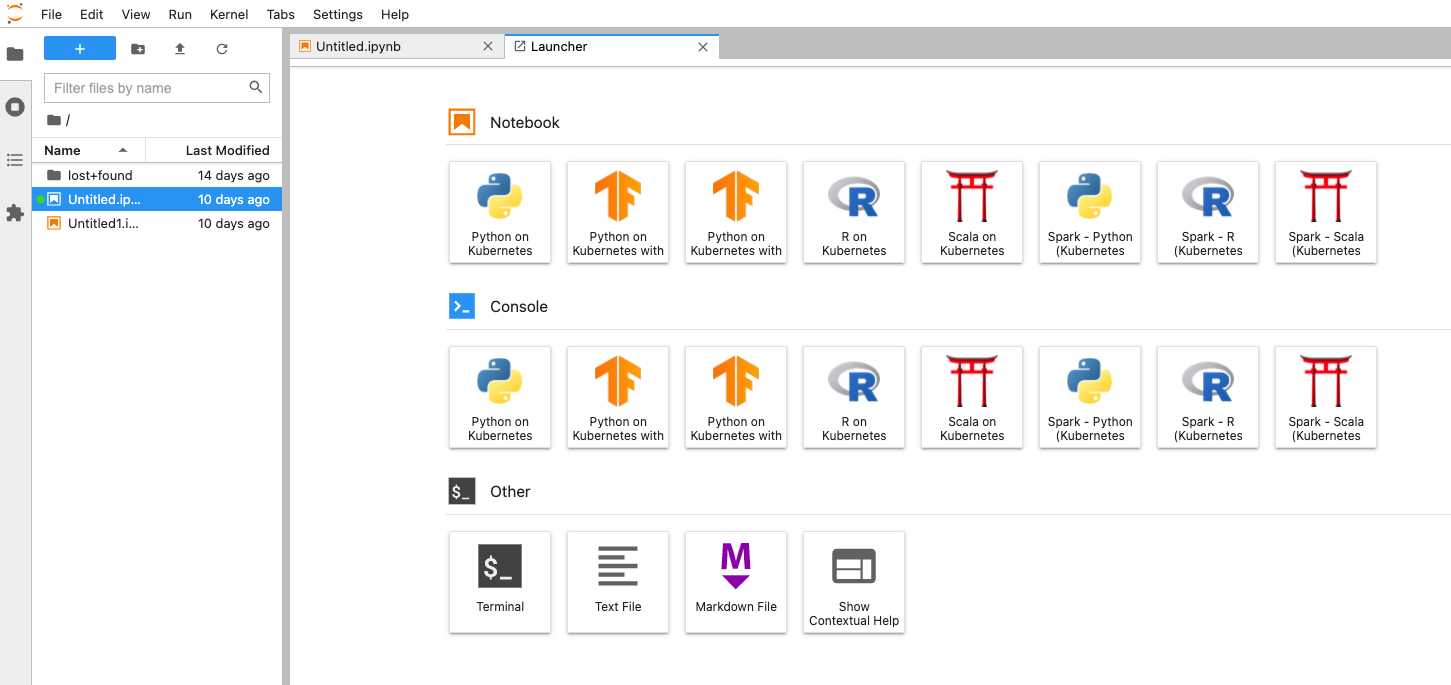
実際にたちあげてみると、NotebookのランチャーにPython on Kubernetesが出現します。
Python on Kubernetes で適当なプログラムを実行してみます。
すると、プログラムを実行するPodがたちあがって実行カーネルが分離している様子がわかります。
これでGKE上でJupyterカーネルを分離して実行することを実現できました。
めでたし!


