結論から言うと勝てはしないと思う。
しかし、私は自作のVSCode拡張機能を開発して実際に今の開発チームに使用してもらって、開発効率をかなり上げた。
今回は開発した拡張機能の紹介と簡単に作り方を紹介します。
見ていただけた方達の開発効率の助けになれば思います。
実務でRailsを使用しているのでRuby寄りの機能もありますが、考え方は他の言語でも同じだと思います。
まずgenerator-codeをグローバルインストールします。これをYoemanで使用するとVS Code拡張のプロジェクトの雛形を生成できます。
npm install -g yo generator-code
yo code


     _-----_     ╭──────────────────────────╮
    |       |    │   Welcome to the Visual  │
    |--(o)--|    │   Studio Code Extension  │
   `---------´   │        generator!        │
    ( _´U`_ )    ╰──────────────────────────╯
    /___A___\   /
     |  ~  |
   __'.___.'__
 ´   `  |° ´ Y `

? What type of extension do you want to create? New Extension (TypeScript)
? What's the name of your extension? chobichobi
? What's the identifier of your extension? chobichobi
? What's the description of your extension?
? Initialize a git repository? Yes
? Bundle the source code with webpack? Yes
? Which package manager to use? npm
聞かれてる事は以下です。
- コマンドをJavaScript/TypeScriptのいずれで開発するかの選択
- 拡張機能の名前指定
- 拡張機能IDの指定(拡張機能名と同じでもOK)
- 拡張機能の説明(必須ではない)
- Git Initするかどうか
- Webpackを使うかどうか(モジュールのバンドリングをするならYes)
- パッケージマネージャーの選択(npm/npmp/yarn)
実行した場所に以下のようなディレクトリ構成のプロジェクトができています。
触るのは「extension.ts」と「package.json」のみ

一旦簡単な拡張機能を作ってみます。
// The module 'vscode' contains the VS Code extensibility API
// Import the module and reference it with the alias vscode in your code below
import * as vscode from 'vscode';

//この「activate」の中に拡張機能を実装していく
export function activate(context: vscode.ExtensionContext) {
// vscode.commands.registerCommandで拡張機能を登録する
	let windowSelectText = vscode.commands.registerCommand("window_select_text", () => {

    let editor = vscode.window.activeTextEditor;
    if (editor === undefined) {
      return;
    }
    // 選択部分の情報を取得できる
    let selection = editor.selection;
    // 選択部分のテキストを取得できる
    let selectedText = editor.document.getText(selection);
    // 選択したメッセージを表示する
	vscode.window.showInformationMessage(selectedText);
  });

 // 定義した拡張機能をここにどんどんpushする。
 context.subscriptions.push(windowSelectText);
}

// This method is called when your extension is deactivated
export function deactivate() {}
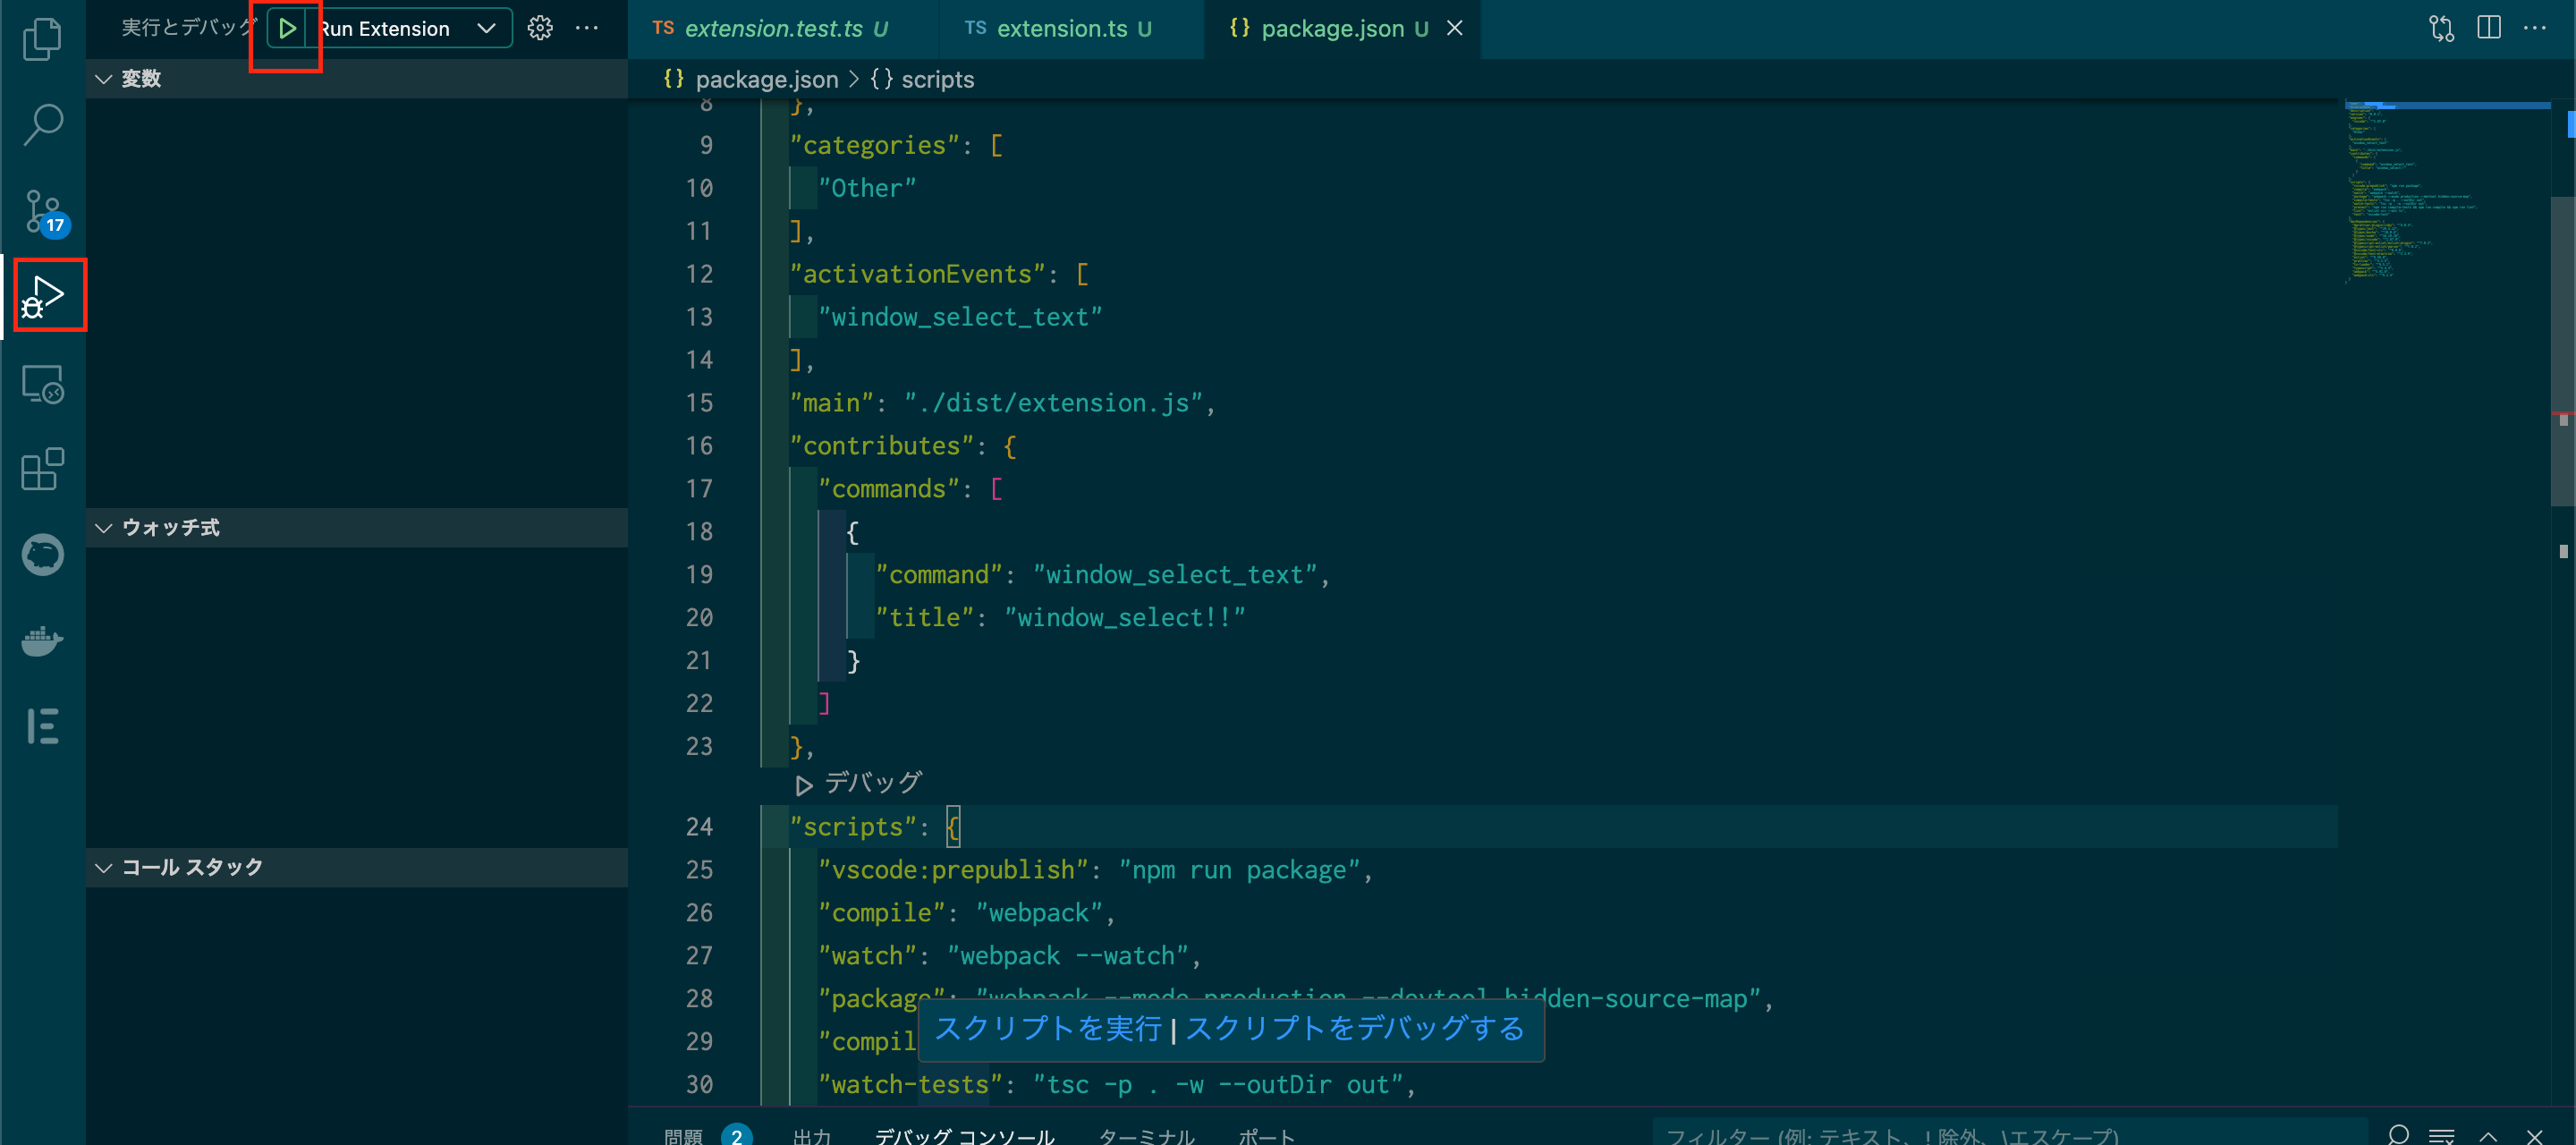
package.jsonに実装した拡張機能を登録する
編集するのは
- activationEventsの中
- contributesの中
{
  "name": "chobichobi",
  "displayName": "chobichobi",
  "description": "",
  "version": "0.0.1",
  "engines": {
    "vscode": "^1.87.0"
  },
  "categories": [
    "Other"
  ],
  "activationEvents": [
    "window_select_text" //tsで指定した拡張機能の名前
  ],
  "main": "./dist/extension.js",
  "contributes": {
    "commands": [
      {
        "command": "window_select_text", //tsで指定した拡張機能の名前
        "title": "window_select!!" // なんでもOK。
      }
    ]
  }
  // ~ 省略
}
VSCodeの左の三角の「実行とデバッグ」ボタンを押して上の三角ボタン「Run Extension」を押すと拡張機能開発用のVSCodeが立ち上がる。

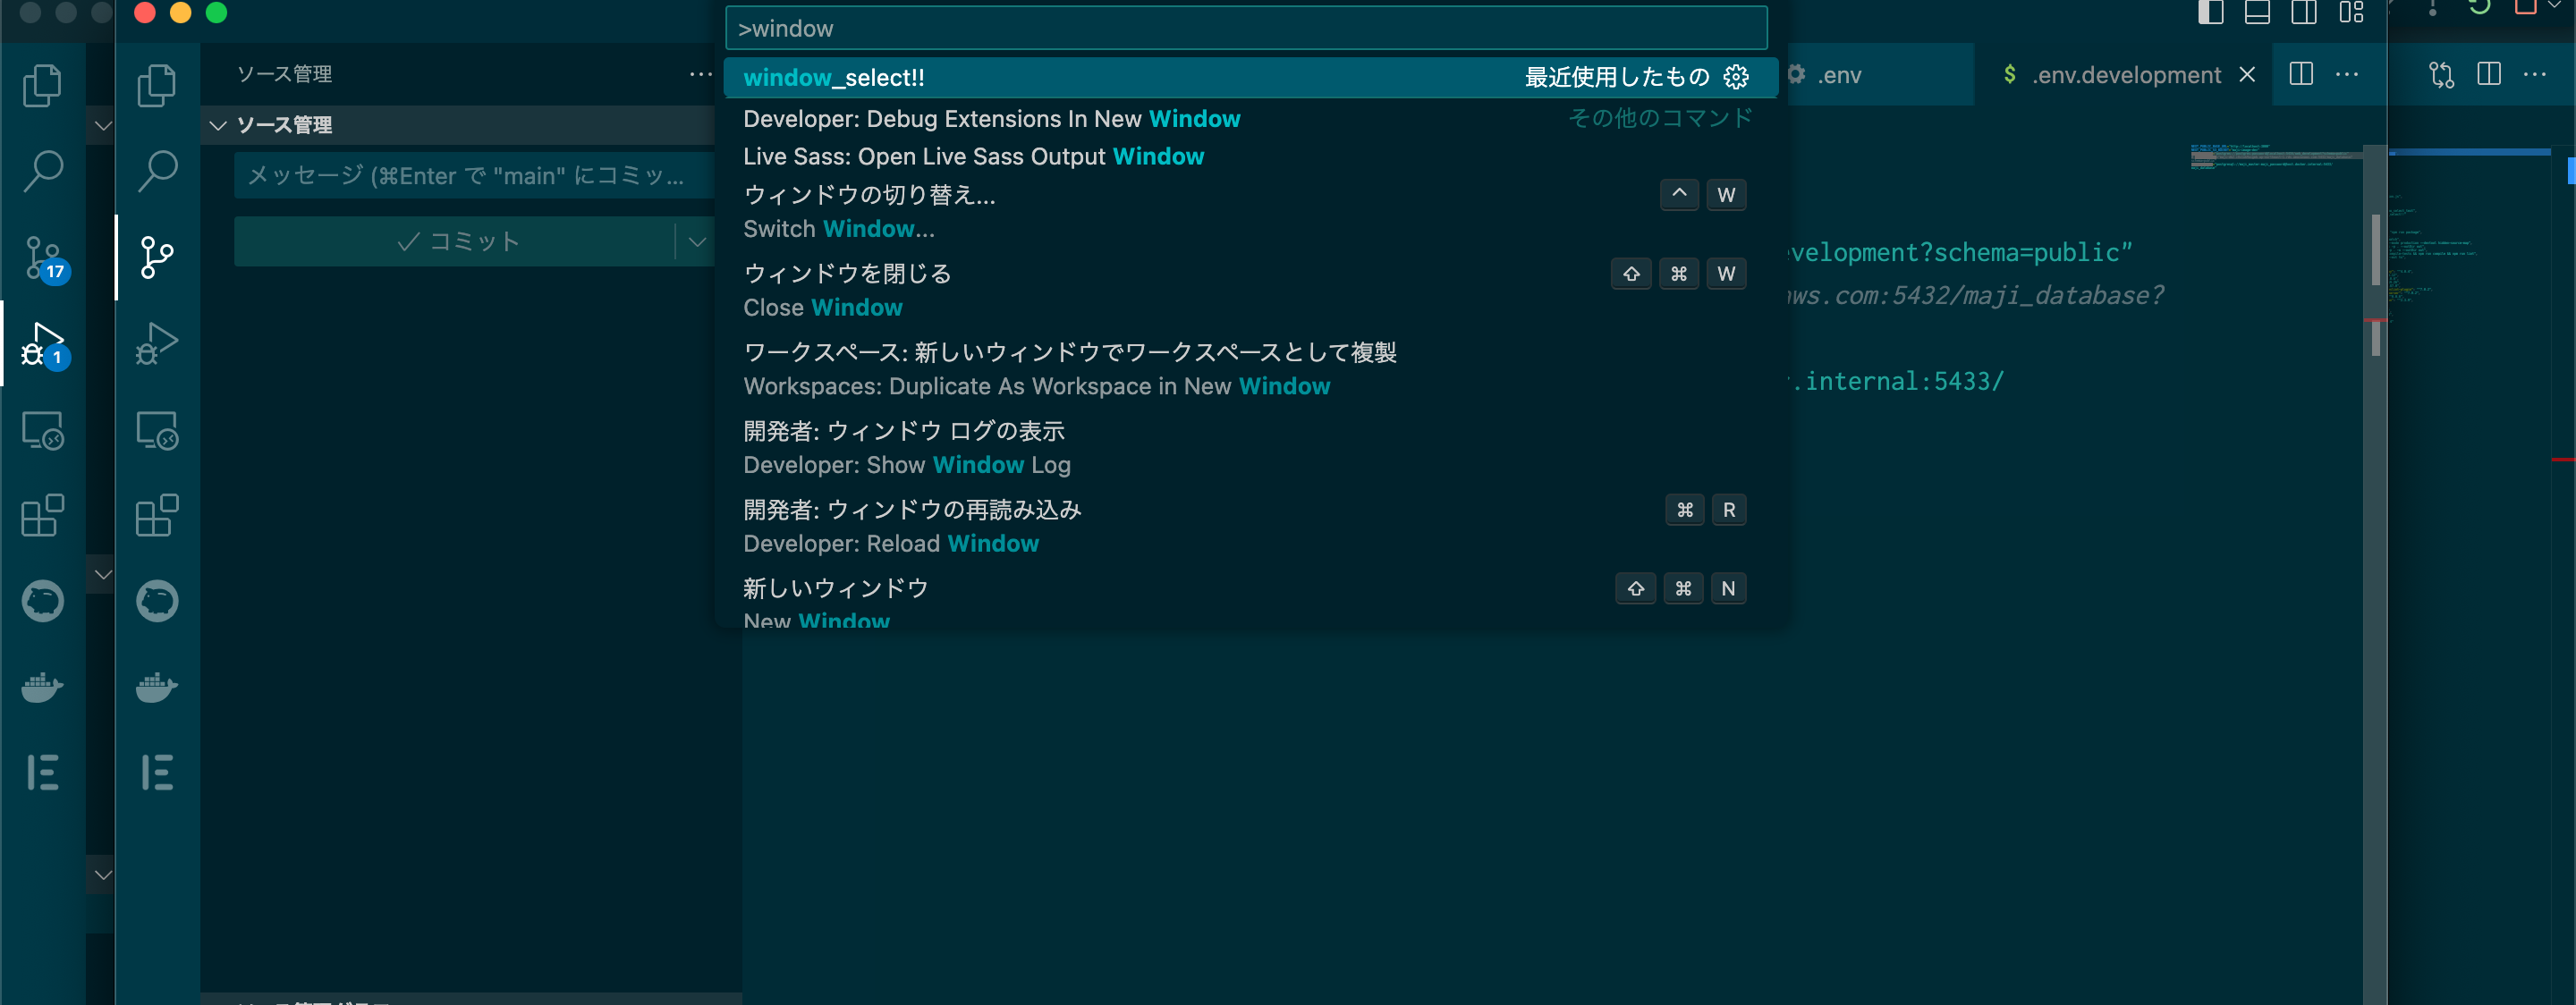
立ち上がったら「Shift」+ 「command」+ 「P」で先ほどpackage.jsonに記載した拡張機能のtitleで検索

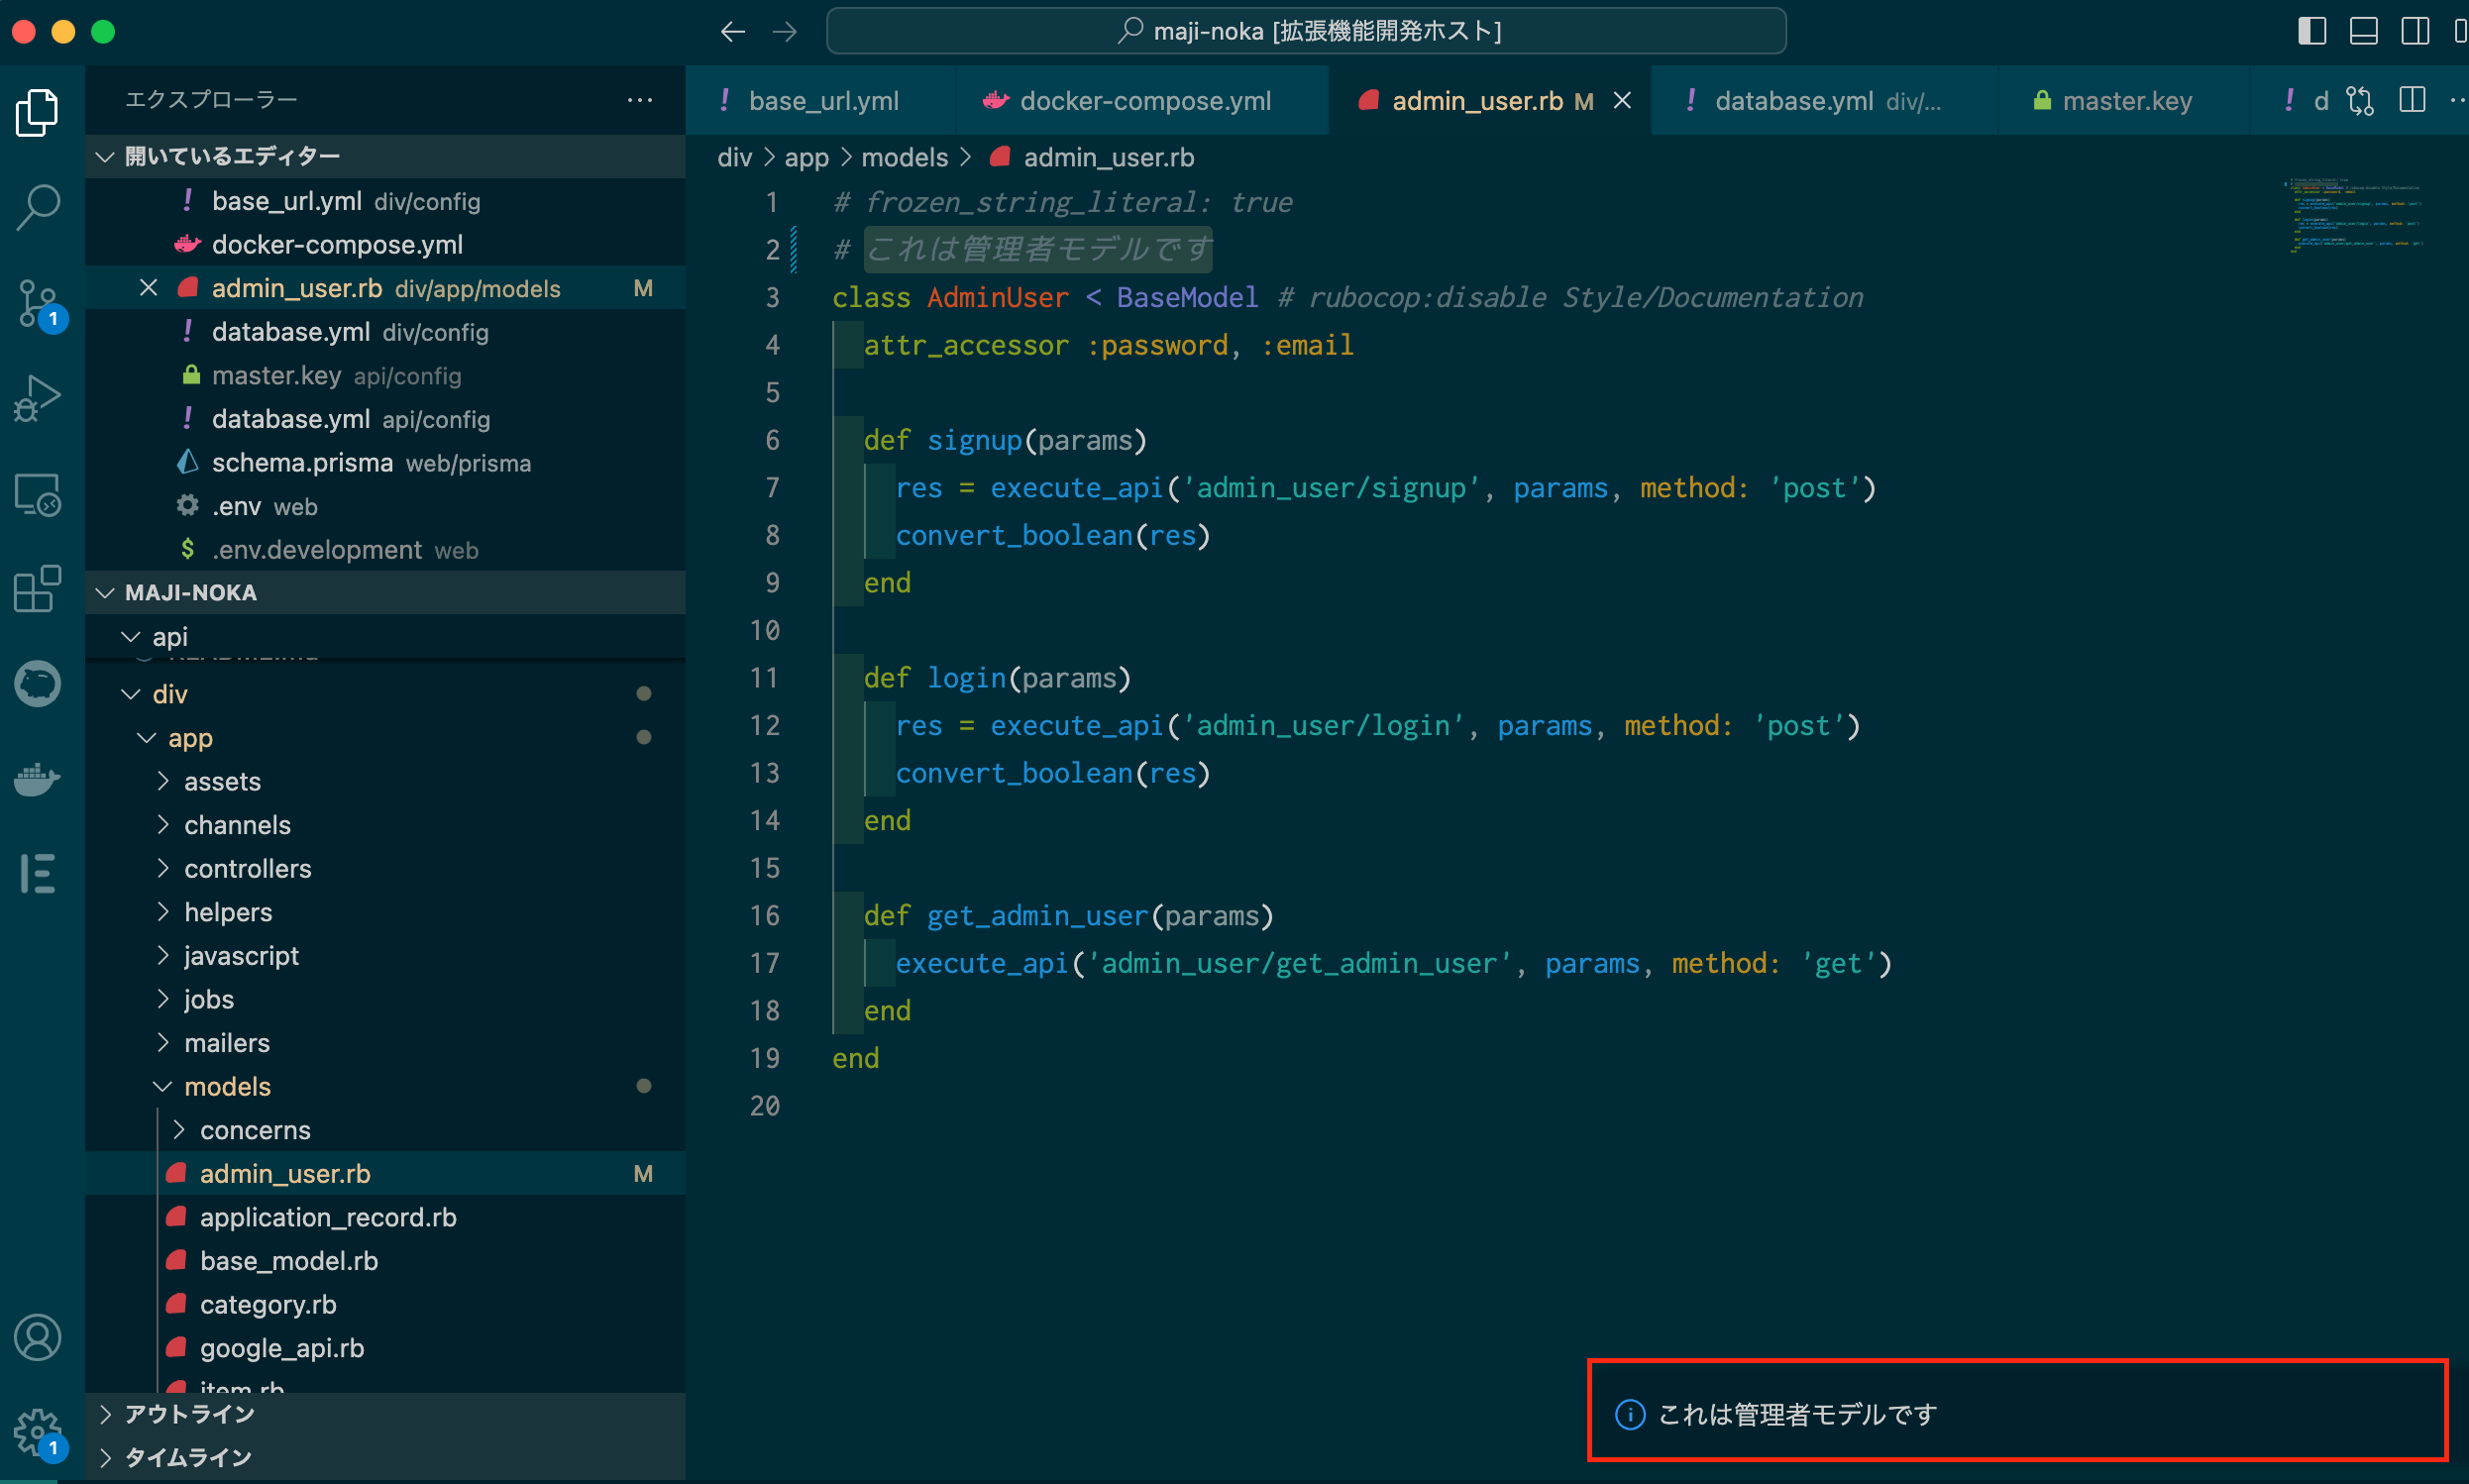
実際に実行してみる。文字列を選択した状態で実行すると以下のように表示される。

ここまで簡単に拡張機能の作り方を説明しました。次から実際に私が開発した機能を紹介します。
extension.tsのコードのみ記載します。
部分フォーマッター
これが意外とない。基本的にフォーマッターはプロジェクト立ち上げ当初に入れます。
私は普段Railsを使用しています。有名なフォーマッターと言えばrubocop。
しかし、途中からフォーマッターを入れると1ファイル丸ごとフォーマットされるので既存コードとの差分がすごいことになる。なので部分的なフォーマッターが欲しかったが全然ないので作った。
やってることは以下。他のもそうだが、普通にLinuxコマンド実行してるだけなので基本なんでもできると思います。
- 選択部分を一時ファイルに書き込む
- そいつに対してフォーマット実行
- フォーマットしたファイル内のコードと選択部分を置き換え
これに関してはprettierをインストールする必要がある
# プロジェクト内で実行
npm install --save-dev prettier @prettier/plugin-ruby
# prettierrc.jsonをルートディレクトリへコピー
cp .prettierrc.json ~/
# ルートディレクトリで実行
cd ~
sudo  gem install bundler prettier_print syntax_tree syntax_tree-haml syntax_tree-rbs
import * as vscode from "vscode";
import { execSync, exec } from "child_process";
import * as path from "path";

export function activate(context: vscode.ExtensionContext) {
  let prettier = vscode.commands.registerCommand("point-format", () => {
    let editor = vscode.window.activeTextEditor;
    if (editor === undefined) {
      return;
    }
    let selection = editor.selection;
    let selectedText = editor.document.getText(selection);
    // 選択した部分のコードをルートディレクトリの一時ファイルに書き込む
    let command =
      'echo "' +
      convertDoubleToSingleQuotes(selectedText) +
      '" > ~/.rbprettier.rb';
    try {
      execSync(command);
    } catch (error: unknown) {
      if (error instanceof Error) {
        vscode.window.showErrorMessage(`Error: ${error.message}`);
      }
      return;
    }
    // 一時的に保存したファイルに対してprettier実行コマンド定義
    command =
      "cd ~ && prettier --plugin=@prettier/plugin-ruby ~/.rbprettier.rb";
    try {
      //コマンド実行
      const commandOutput = execSync(command).toString();
      editor.edit((builder) => {
        // フォーマット書けたものと置き換える。
        builder.replace(selection, convertDoubleToDoubleQuotes(commandOutput));
      });
    } catch (error: unknown) {
      if (error instanceof Error) {
        vscode.window.showErrorMessage(`Error👎: ${error.message}`);
      }
      return;
    }
  });


  context.subscriptions.push(
    prettier
  );
}
function convertDoubleToSingleQuotes(input: string): string {
  // ダブルクオーテーションをシングルクオーテーションに置換する
  return input.replace(/"/g, "'");
}
function convertDoubleToDoubleQuotes(input: string): string {
  // 逆に
  return input.replace(/'/g, '"');
}

export function deactivate() {}
Docker環境で自動テスト実行
Docker環境でRspecをVSCodeから実行します。カーソルのある行のテストを実行できます。
これがないといちいち以下のように実行しないといけない
docker-compose exec api bundle exec "rspec controllers/items_controller_spec.rb:27"
なのでこれも現在のファイルパスやファイル名、行数が取得できれば上記のコマンドを生成して直接コマンド実行すれできそう。という事で以下のようになる。
  let rspec = vscode.commands.registerCommand("exec_spec", () => {
    let editor = vscode.window.activeTextEditor;
    if (editor === undefined) {
      return;
    }
    // 現在いるファイルパス取得
    const currentFilePath = editor.document.fileName;
    // 現在いるファイル名取得
    const currentFileName = path.basename(currentFilePath);
    // 現在いる行数取得
    const currentLineNumber = editor.selection.active.line + 1;
    const apiBasePath = "spec/controllers/";

    try {
      vscode.window.showInformationMessage("Please wating.....");
      // rspecコマンドを実行する
      exec(
        `docker exec api bash -c "rspec ${apiBasePath}${currentFileName}:${currentLineNumber}"`,
        (error, stdout, stderr) => {
          const match = stdout.match(/(\d+) examples?, (\d+) failures?/);
          const examples = parseInt(match![1]);
          const failures = parseInt(match![2]);
          const success = examples - failures;
          if (!error) {
            vscode.window.showInformationMessage(`
            ALL PASSED🤩\n実行したテスト=>「 ${examples} 」|
             成功「 ${success} 」|
             失敗 「 ${failures} 」`);
          } else {
            const panel = vscode.window.createWebviewPanel(
              "testResults", // Identifies the type of the webview. Used internally
              "Test Results", // Title of the panel displayed to the user
              vscode.ViewColumn.One, // Editor column to show the new webview panel in.
              {}, // Webview options. More on these later.
            );
            panel.webview.html = getFailContent(
              stdout,
              examples,
              success,
              failures,
              currentFileName,
            );
          }
        },
      );
    } catch (error: unknown) {
      if (error instanceof Error) {
        vscode.window.showErrorMessage(`MochobiError👎: ${error.stack}`);
      }
    }
  });


// 失敗したら別タブで詳細を表示
function getFailContent(
  message: string,
  examples: number,
  success: number,
  failures: number,
  filename: string,
) {
  return `
      <!DOCTYPE html>
      <html lang="en">
      <head>
          <meta charset="UTF-8">
          <meta name="viewport" content="width=device-width, initial-scale=1.0">
          <title>${filename}</title>
      </head>
      <body>
          <h1>テストNG🥲</h1>
          <p>実行したテスト => 「 ${examples} 」</p>
          <p>成功 => 「 ${success} 」</p>
          <p>失敗 => 「 ${failures} 」</p>
          <p>メッセージ => 「 ${message} 」</p>
          <p>「cmd + w」で閉じる</p>
          <p>「command + shift + [ 」で左のタブに移動</p>
      </body>
      </html>
  `;
}
S3へファイルのアップロード
aws cliを利用してS3へのファイルアップロードもできます。
  let s3Upload = vscode.commands.registerCommand("s3Upload", () => {
    const editor = vscode.window.activeTextEditor;
    if (!editor) {
      return;
    }

    const currentFilePath = editor.document.fileName;
    // 保存場所
    const regex = /\/webapp\/.*/;
    const match = currentFilePath.match(regex);
    if (match) {
      const webappPath = match[0];
      // 「.css」が付いている部分を削除
      const s3CssFolder = webappPath.replace(/\/[^\/]*\.css$/, "/");
      const targetDir = `s3://[バケット名]${s3CssFolder}`
      const command = `aws s3 cp ${currentFilePath} ${targetDir}`
      exec(command, (error, stdout, stderr) => {
        if (error) {
          vscode.window.showErrorMessage(`Error: ${error.message}`);
          return;
        }
        if (stderr) {
          vscode.window.showErrorMessage(`Error: ${stderr}`);
          return;
        }
        vscode.window.showInformationMessage(`S3アップロード完了${targetDir}`);
      });
    } else {
      vscode.window.showErrorMessage("アップロードできませんでした");
    }
  });
テストコード自動生成
ログに出るパラメーターから自動テストコードを自動生成
以下のようなログからパラメーターをコピーしてくる
{"title"=>"タイトル", "fetch_from_ts"=>"2024-10-01", "fetch_to_ts"=>"2024-10-10", "show_flag"=>"false", "delete_flag"=>"false"}
それを貼り付けてコマンド実行すると以下のようにテストコードを自動生成してくれる
it "test_name" do
 params = {
  "title": "タイトル",
  "fetch_from_ts": "2024-10-01",
  "fetch_to_ts": "2024-10-10",
  "show_flag": "false",
  "delete_flag": "false"
}
 post "", params: params
 expect(response.status).to eq 200
end
 let testGenerate = vscode.commands.registerCommand('gene', () => {
    const editor = vscode.window.activeTextEditor;
    if (!editor) {
      return;
    }

    const selection = editor.selection;
    const text = editor.document.getText(selection);

    try {
      const params = parseRubyHash(text);
      const testCode = generateRSpecTestCode(params);
      editor.edit((builder) => {
        builder.replace(selection, testCode);
      });
      vscode.window.showInformationMessage('RSpec test code generated and copied to clipboard!');
    } catch (error) {
      vscode.window.showErrorMessage('Failed to parse the selected text as Ruby hash.');
    }
  });

  function parseRubyHash(hashString: string): object {
      const jsonString = hashString.replace(/=>/g, ":"); // Replace => with :

      return JSON.parse(jsonString);
}


  function generateRSpecTestCode(params: string): string {
    return `it "test_name" do
      params = ${params}
      post "", params: params
      expect(response.status).to eq 200
    end`;
選択範囲を翻訳、または英語に変換(メソッドっぽく変換)
let translation = vscode.commands.registerCommand("translation", async () => {
    let editor = vscode.window.activeTextEditor;
    if (editor === undefined) {
        return;
    }
    let selection = editor.selection;
    let selectedText = editor.document.getText(selection);
    vscode.window.showInformationMessage(`翻訳中🥸...`);
    try {
        const translatedText = await convertTrance(selectedText);
        editor.edit((builder) => {
            builder.replace(selection, translatedText.text.replace(/ /g, '_'));
        });
    } catch (error: unknown) {
        if (error instanceof Error) {
            vscode.window.showErrorMessage(`TraceError👎: ${error.message}`);
        }
        return;
    }
});

// Google翻訳apiに選択範囲を渡す
async function convertTrance(str: string) {
  const url = `https://script.google.com/macros/s/AKfycbw_Y-lKGlhT5YfqZoFcrBzZc0AHjRYKwikbIxvsC/exec`;
  let target
  let source
  if(isJapanese(str)){
    target = "en"
    source = "ja"
  }else{
    target = "ja"
    source = "en"

  }
  const response = await axios.get(url, {
    params: {
      text: str,
      target: target,
      source: source,
    }
  });


   return response.data;
}
最後に
package.jsonに以下のように記述すると拡張機能にショートカットを割り当てられます。
 "keybindings": [
      {
        "command": "s3Upload",
        "key": "ctrl+shift+c",
        "mac": "cmd+shift+c"
      },
      {
        "command": "exec_spec",
        "key": "ctrl+shift+r",
        "mac": "cmd+shift+r"
      }
]
ざっとこんな感じです。結構無限にいろんなことが出来ると思うので普段の開発の中の「面倒くさい」を解決できちゃいます。Vimerに勝ちましょう!