はじめに
C# ソフト開発時に、決まり事として実施していた内容を記載します。
DataGridView については下記記事もあります
- Windows Forms C#定石 - DataGridView - EditMode, DropDown
- Windows Forms C#定石 - DataGridView - 値依存イメージ表示, ちらつき防止
- Windows Forms C#定石 - DataGridView - DataTable
テスト環境
ここに記載した情報/ソースコードは、Visual Studio Community 2022 を利用した下記プロジェクトで生成したモジュールを Windows 11 24H2 で動作確認しています。
- Windows Forms - .NET Framework 4.8
- Windows Forms - .NET 8
記載したソースコードは .NET 8 ベースとしています。
.NET Framework 4.8 の場合は、コメントで記載している null 許容参照型の明示 ? を削除してください。
Visual Studio 2022 - .NET Framework 4.8 は、C# 7.3 が既定です。
このため、サンプルコードは、C# 7.3 機能範囲で記述しています。
ReadOnly
DataGridView でセルを ReadOnly すると入力不可になりますが、見た目で ReadOnly ということは判断できません。
これを改善する手法としては、下記などがあります。
- ReadOnly のセルは BackColor, ForeColor を変更する
- ReadOnly のセルは Tooltip でその旨を表示
これらはケースバイケースでの対応で、必要性が低いと判断して、対応しないことが多かったと思います。
ToolTip を設定する場合、ReadOnly 設定時に ToolTip もあわせて設定していました。
これらの対応は、CellFormatting イベントハンドラで対応することができます。
// デザイナで DataGridView dataGridView1 を配置
dataGridView1.CellFormatting += DataGridView_CellFormatting;
// .NET Framework 時 object? の ? 不要
private void DataGridView_CellFormatting(object? sender,
                                         DataGridViewCellFormattingEventArgs e)
{
  if (e.ColumnIndex < 0 || e.RowIndex < 0)
  {
    return;
  }
  if (sender is DataGridView dgv)
  {
    var cell = dgv.Rows[e.RowIndex].Cells[e.ColumnIndex];

    // ReadOnly の可視化
    if (cell?.ReadOnly == true)
    {
      if (e.CellStyle != null)
      {
        e.CellStyle.BackColor = Color.LightGray; // 編集不可セルの背景色
        e.CellStyle.ForeColor = Color.DarkGray;  // 編集不可セルの文字色
      }
      // 下記コードでも可能
      // cell.Style.BackColor = Color.LightGray;
      // cell.Style.ForeColor = Color.DarkGray;

      // ツールチップ設定(基本的には ReadOnly 設定時に設定)
      // cell.ToolTipText = "このセルは編集できません";
    }
  }
}
Disable相当
DataGridViewCell は、ReadOnly プロパティは存在しますが、Enable/Disable に相当するプロパティは存在しません。
DataGridViewComboBoxCell, DataGridViewButtonCell の場合、それぞれ、セルに ComboBox, Button コントールが乗っているため、ReadOnly でセル背景色を変えたとしても、コントールが上にあるので視認できません。
このようなケースでの対処方法について、記載します。
DataGridViewComboBoxCell
DataGridViewComboBoxCell では、DisplayStyle = DataGridViewComboBoxDisplayStyle.Nothing とすると、DropDown 表示ボタンが非表示となります。
この処理を CellFormatting イベントハンドラに記載します。
// デザイナで DataGridView dataGridView1 を配置
dataGridView1.CellFormatting += DataGridView_CellFormatting;
// .NET Framework 時 object? の ? 不要
private void DataGridView_CellFormatting(object? sender,
                                         DataGridViewCellFormattingEventArgs e)
{
  if (e.ColumnIndex < 0 || e.RowIndex < 0)
  {
    return;
  }
  if (sender is DataGridView dgv)
  {
    var cell = dgv.Rows[e.RowIndex].Cells[e.ColumnIndex];
    if (cell is DataGridViewComboBoxCell combo)
    {
      if (combo.ReadOnly)
      {
        combo.DisplayStyle = DataGridViewComboBoxDisplayStyle.Nothing;
      }
      else
      {
        combo.DisplayStyle = DataGridViewComboBoxDisplayStyle.ComboBox;
      }
    }

    // ReadOnly の可視化 - 必要に応じて併用
    // if (cell?.ReadOnly == true)
    // {
    //  if (e.CellStyle != null)
    //   {
    //     e.CellStyle.BackColor = Color.LightGray; // 編集不可セルの背景色
    //     e.CellStyle.ForeColor = Color.DarkGray;  // 編集不可セルの文字色
    //   }
    // }
  }
}
上記を実施前後の DataGridView 表示を掲載します。
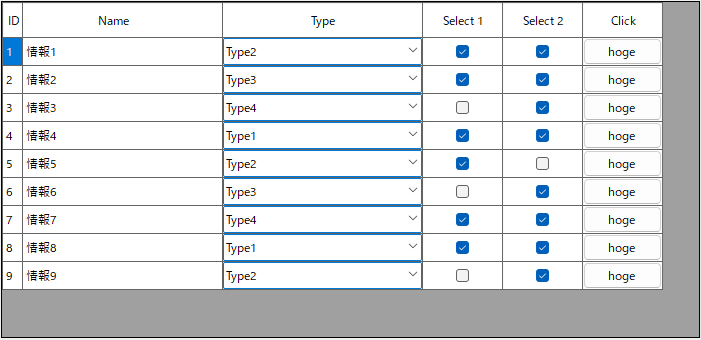
実施前
実施後
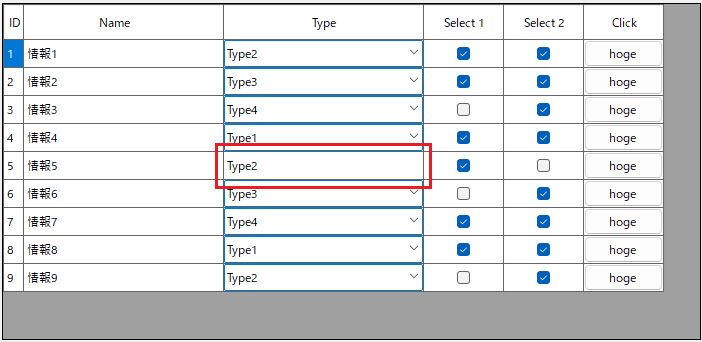
5行目が ReadOnly で、DisplayStyle = DataGridViewComboBoxDisplayStyle.Nothing とすることで、DataGridViewTextBoxCell の ReadOnly と同等の表示となりました。
DataGridViewButtonCell
Microsoft サンプルで、DataGridViewButtonCell クラスをカスタマイズして、ボタンの Enable/Disable を追加した DataGridViewDisableButtonColumn があるので、これを利用するという手があります。
上記以外の手法について記載します。
DataGridViewComboBoxCell と同様に CellFormatting イベントハンドラでの対応を試みます。
// デザイナで DataGridView dataGridView1 を配置
dataGridView1.CellFormatting += DataGridView_CellFormatting;
// .NET Framework 時 object? の ? 不要
private void DataGridView_CellFormatting(object? sender,
                                         DataGridViewCellFormattingEventArgs e)
{
  if (e.ColumnIndex < 0 || e.RowIndex < 0)
  {
    return;
  }
  if (sender is DataGridView dgv)
  {
    var cell = dgv.Rows[e.RowIndex].Cells[e.ColumnIndex];
    if (cell is DataGridViewButtonCell button)
    {
      if (button.ReadOnly)
      {
        button.Style.ForeColor = Color.Transparent;
        button.FlatStyle = FlatStyle.Flat;
      }
    }
  }
}
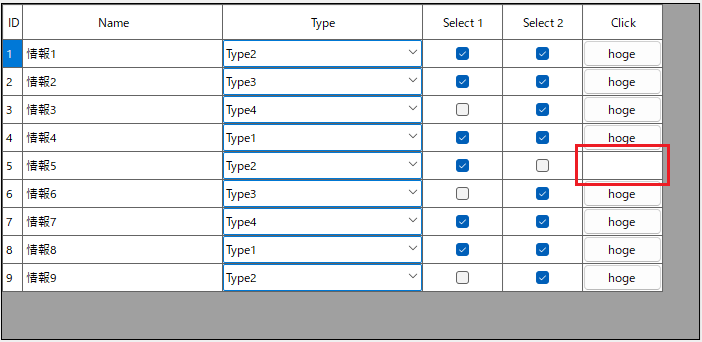
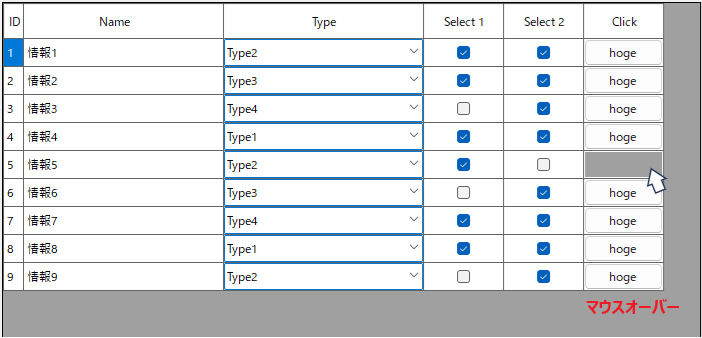
見た目は消えましたが、マウスオーバーで背景色が変化して、ボタンクリックもできます。
CellFormatting イベントハンドラのコードは削除して、CellPainting イベントハンドラでの対応を試みます。
// デザイナで DataGridView dataGridView1 を配置
dataGridView1.CellPainting += DataGridView_CellPainting;
// .NET Framework 時 object? の ? 不要
private void DataGridView_CellPainting(object? sender,
                                       DataGridViewCellPaintingEventArgs e)
{
  if (e.ColumnIndex < 0 || e.RowIndex < 0)
  {
    return;
  }
  if (sender is DataGridView dgv)
  {
    var cell = dgv.Rows[e.RowIndex].Cells[e.ColumnIndex];
    if (cell is DataGridViewButtonCell)
    {
      if (cell.ReadOnly)
      {
        e.PaintBackground(e.CellBounds, true); // 背景のみ描画
        e.Handled = true; // デフォルト描画をスキップ
      }
    }
  }
}

マウスオーバーでも問題はありません。
ボタンクリックについては、末尾「おまけ - DataGridViewButtonCell」に記載した、クリック時の処理を行う際に、ReadOnly を除外すれば良いです。
// .NET Framework 時 object? の ? 不要
private void DataGridView_CellContentClick(object? sender, DataGridViewCellEventArgs e)
{
  if (e.ColumnIndex < 0 || e.RowIndex < 0)
  {
    return;
  }
  if (sender is DataGridView dgv)
  {
    var row = dgv.Rows[e.RowIndex];
    var cell = row.Cells[e.ColumnIndex];
    if (cell is DataGridViewButtonCell)
    {
      // 行追加用の「新しい行」と ReadOnly を除外
      if (!row.IsNewRow && !cell.ReadOnly)
      {
        // TODO - ボタンクリック時の処理
        MessageBox.Show($"col={e.ColumnIndex} row={e.RowIndex} ボタンクリック");
      }
    }
  }
}
おまけ
DataGridViewButtonCell
ユーザー ボタンのクリックに応答するには、 DataGridView.CellContentClick または DataGridView.CellClick イベントを処理します。 イベント ハンドラーでは、 プロパティを DataGridViewCellEventArgs.ColumnIndex 使用して、クリックによってボタン列が発生したかどうかを判断できます。 プロパティを DataGridViewCellEventArgs.RowIndex 使用して、クリックが特定のボタン セルで発生したかどうかを判断できます。
CellContentClick イベントハンドラで、DataGridViewButtonCell クリック時の処理記述サンプルを記載します。
// デザイナで DataGridView dataGridView1 を配置
dataGridView1.CurrentCellDirtyStateChanged += DataGridView_CellContentClick;
// .NET Framework 時 object? の ? 不要
private void DataGridView_CellContentClick(object? sender, DataGridViewCellEventArgs e)
{
  if (e.ColumnIndex < 0 || e.RowIndex < 0)
  {
    return;
  }
  if (sender is DataGridView dgv)
  {
    var row = dgv.Rows[e.RowIndex];
    var cell = row.Cells[e.ColumnIndex];
    if (cell is DataGridViewButtonCell)
    {
      // 行追加用の「新しい行」以外
      if (!row.IsNewRow)
      {
        // TODO - ボタンクリック時の処理
        MessageBox.Show($"col={e.ColumnIndex} row={e.RowIndex} ボタンクリック");
      }
    }
  }
}
新しい行の DataGridViewButtonCell クリックでは、行追加は動作しないので、row.IsNewRow 確認は意味があります。