はじめに
PyQt5にmatplotlibのfigureを埋め込む方法はmatplotlibの公式で紹介されています。
user_interfaces example code: embedding_in_qt5.py
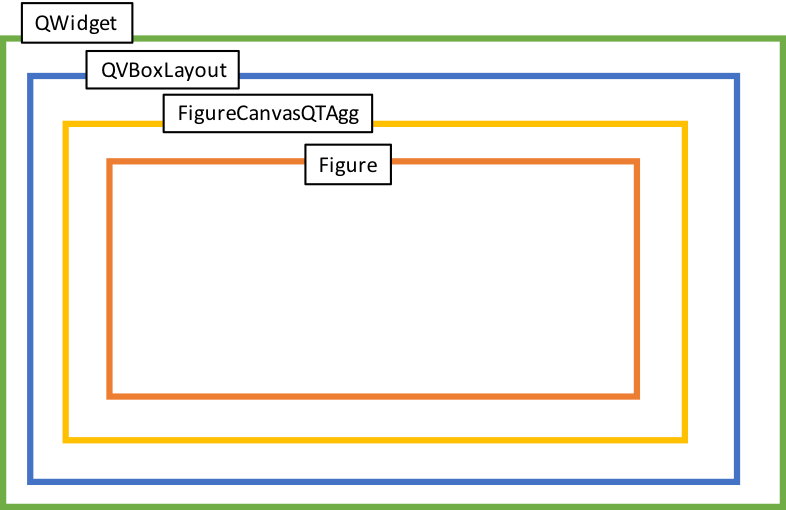
基本的にはFigureクラスをFigureCanvasQTAggクラスを介して、PyQt5のレイアウト(QVBoxLayoutやQHBoxLayout)に入れるというやり方です。
公式のようなFigureCanvasQTAggを継承するやり方は、データのやり取りなどで使いにくかったので、FigureCanvasQTAggクラスのインスタンスを直接PyQt5のレイアウトに追加する方法に変更しています。
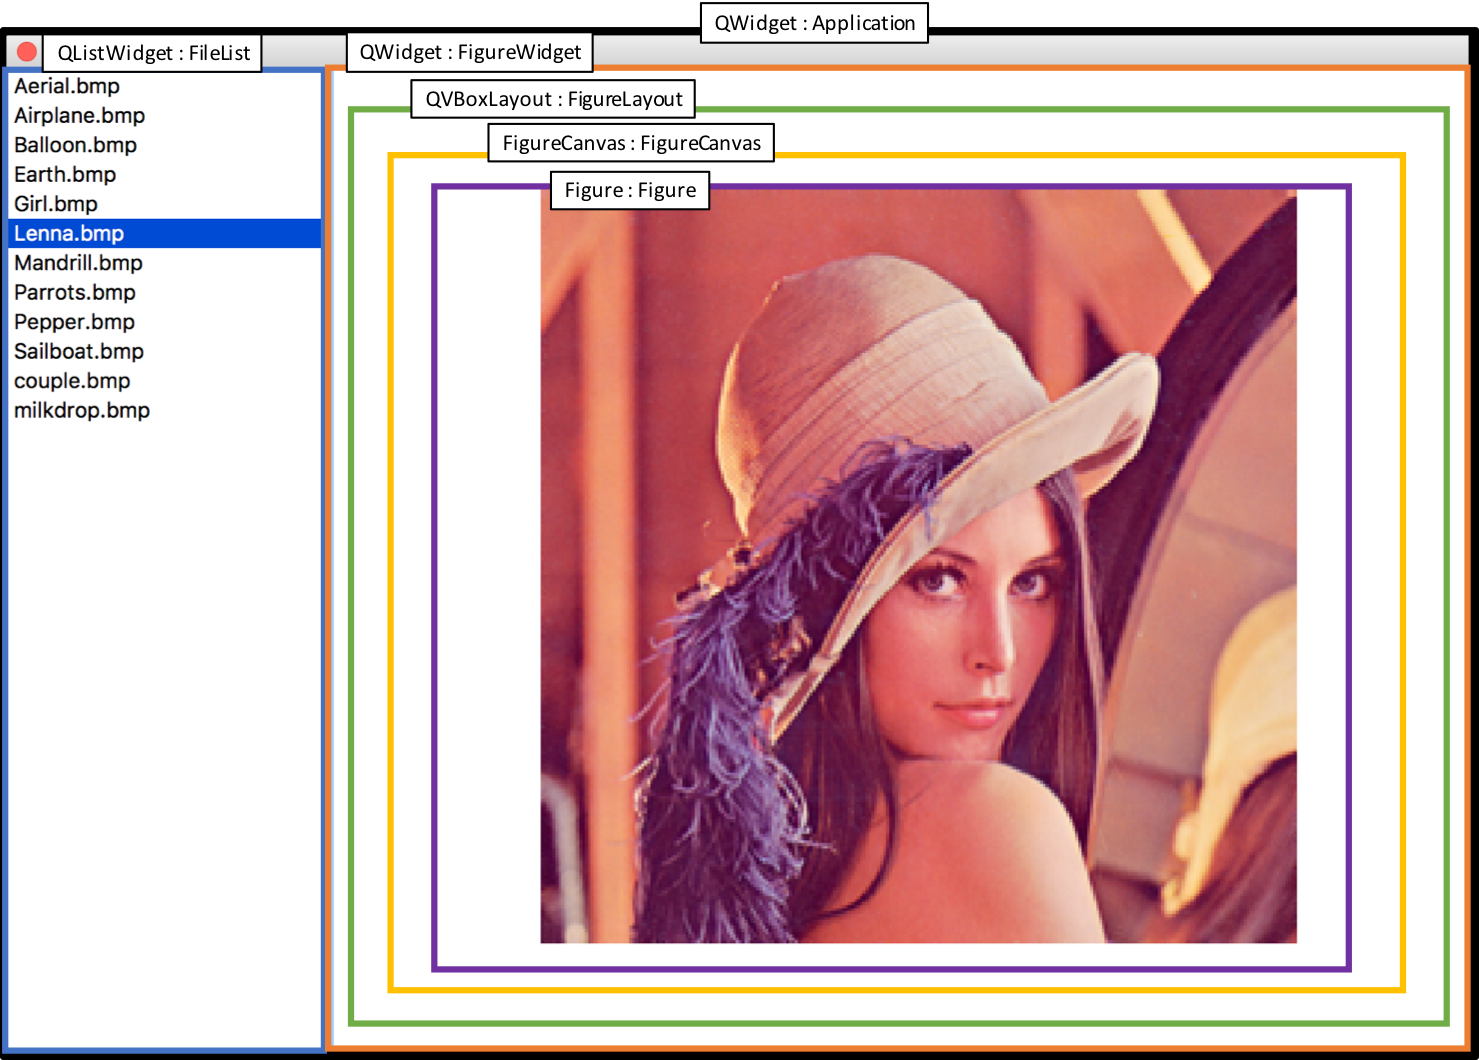
結果
ソースコード
import sys
import os

import numpy as np
import matplotlib.pyplot as plt

from PyQt5 import QtWidgets
from matplotlib.backends.backend_qt5agg import FigureCanvasQTAgg as FigureCanvas

import glob
from PIL import Image

class Application(QtWidgets.QWidget):
    def __init__(self):
        super().__init__()
        # UIの初期化
        self.initUI()

        # rootディレクトリ
        self.root = './Image/'
        # 拡張子
        self.ext = 'bmp'

        # ファイルを配置
        self.set_FileList()

        # 画像
        self.FileName = self.FileList.item(0).text()

        # 画像を読み込む
        self.load_ImageFile()

        # Figureの初期化
        self.initFigure()

        # ファイルを変更した時のイベント
        self.FileList.itemSelectionChanged.connect(self.FileList_Changed)

    # UIの初期化
    def initUI(self):
        # Figure用のWidget
        self.FigureWidget = QtWidgets.QWidget(self)
        # FigureWidgetにLayoutを追加
        self.FigureLayout = QtWidgets.QVBoxLayout(self.FigureWidget)
        # Marginを消す
        self.FigureLayout.setContentsMargins(0,0,0,0)

        # ファイルのリスト
        self.FileList = QtWidgets.QListWidget(self)

        # 配置
        self.setGeometry(0,0,900,600)
        self.FigureWidget.setGeometry(200,0,700,600)
        self.FileList.setGeometry(0,0,200,600)

    # Figureの初期化
    def initFigure(self):
        # Figureを作成
        self.Figure = plt.figure()
        # FigureをFigureCanvasに追加
        self.FigureCanvas = FigureCanvas(self.Figure)
        # LayoutにFigureCanvasを追加
        self.FigureLayout.addWidget(self.FigureCanvas)

        self.axis = self.Figure.add_subplot(1,1,1)
        self.axis_image = self.axis.imshow(self.image, cmap='gray')
        plt.axis('off')

    # ファイルを配置
    def set_FileList(self):
        # ファイルの読み込み
        Files = glob.glob(self.root+'*.'+self.ext)
        # ソート
        self.Files = sorted(Files)

        # ファイルリストに追加
        for file in self.Files:
            self.FileList.addItem(os.path.basename(file))

    # ファイルを変更した時の関数
    def FileList_Changed(self):
        # 選択しているファイルの名前を取得
        self.FileName = self.FileList.selectedItems()[0].text()
        # 画像を読み込み
        self.load_ImageFile()
        # Figureを更新
        self.update_Figure()

    # 画像ファイルを読み込む
    def load_ImageFile(self):
        # 画像を開く
        image = Image.open(self.root + self.FileName)
        # numpy.ndarrayに
        self.image = np.asarray(image)

    # Figureを更新
    def update_Figure(self):
        self.axis_image.set_data(self.image)
        self.FigureCanvas.draw()

QApp = QtWidgets.QApplication(sys.argv)
app = Application()
app.show()
sys.exit(QApp.exec_())
解説
FigureCanvasQTAggクラスをFigureCanvasとしてimportします。
from matplotlib.backends.backend_qt5agg import FigureCanvasQTAgg as FigureCanvas
Figure用のWidget(QWidget : FigureWidget)にレイアウト(QVBoxLayout : FigureLayout)を追加します。
# Figure用のWidget
self.FigureWidget = QtWidgets.QWidget(self)
# FigureWidgetにLayoutを追加
self.FigureLayout = QtWidgets.QVBoxLayout(self.FigureWidget)
Figureを作成し、FigureCanvasに追加します。さらにFigureCanvasをレイアウト(FigureLayout)に追加します。
# Figureを作成
self.Figure = plt.figure()
# FigureをFigureCanvasに追加
self.FigureCanvas = FigureCanvas(self.Figure)
# LayoutにFigureCanvasを追加
self.FigureLayout.addWidget(self.FigureCanvas)
ややこしいですが、全体の構成は以下のようになっています。
色々模索してこのやり方に落ち着きましたが、もっとスマートな方法があればぜひ教えて頂きたいです。
それ以外はファイルを選択する度に画像を読み込んで、更新しているだけなので詳細は割愛します。
また画像は下記サイトのものを使用させて頂きました。
再配布可能か確認していないので、プログラムを試したい方は、ソースコードと同じ階層のImageフォルダに画像を追加し、適当に拡張子を指定している箇所を変更して実行してみて下さい。
動作確認
OS : macOS High Sierra Version 10.13.2
Python : 3.6.2
matplotlib : 2.0.2
PyQt5 : 5.6.0