この記事は MicroAd Advent Calendar 2023 の8日目の記事です。
背景と目的
以前、APIトークンを使用してBasic認証でJira Cloud REST APIを実行し、Jiraの課題を取得する方法を紹介しました。
その後、Googleから公開されているGASのOAuthライブラリを使用してOAuthの処理を行う仕組みに改良しましたので、今回はその内容を紹介しようと思います。
参考ドキュメント
今回の改良を行う上で以下の公式ドキュメントや記事を参考にさせていただきました。
ありがとうございました!
全体の流れ
今回の大まかな流れです。
- 取得した情報を書き出すGoogleスプレッドシートとGASプロジェクトの用意
- Atlassian DeveloperサイトでOAuth 2.0 Integrationアプリの設定
- GASにスクリプト プロパティを設定
- GASにOAuthライブラリを追加
- GASのコード作成
- OAuth処理の実行
- JQLで指定した条件にマッチするJira課題の取得
作業詳細
GoogleスプレッドシートとGASプロジェクトの用意
- 新規でGoogleスプレッドシートを作成し、任意の名前を設定します。
今回は「無題のスプレッドシート」のままにしています。 - rawDataとconfigというシートを作成します。
rawDataシートは取得したJira課題を書き出すのに使用します。
configシートはJQLを指定するために使用します。 - [拡張機能] > [Apps Script]をクリックしてGASプロジェクトを開き、任意の名前を設定します。
今回は「無題のプロジェクト」のままにしています。 - ⚙️([プロジェクトの設定])アイコンをクリックし、
スクリプトIDをコピーします。
スクリプトIDは次項のコールバック関数の設定で使用します。

OAuth 2.0 Integrationアプリの設定
Atlassian Developerサイトのdeveloper consoleでアプリの設定を行います。
-
developer consoleにアクセスします。
-
[Create] > [OAuth 2.0 integration]をクリックします。

-
[Name]に任意の名前を入力し、「I agree to be bound by Atlassian's developer terms.」のチェックボックスにチェックを入れ、[Create]をクリックします。

-
自分以外にもこのアプリを共有する場合、[Distribution] > [Edit]をクリックして必要な設定を行います。

-
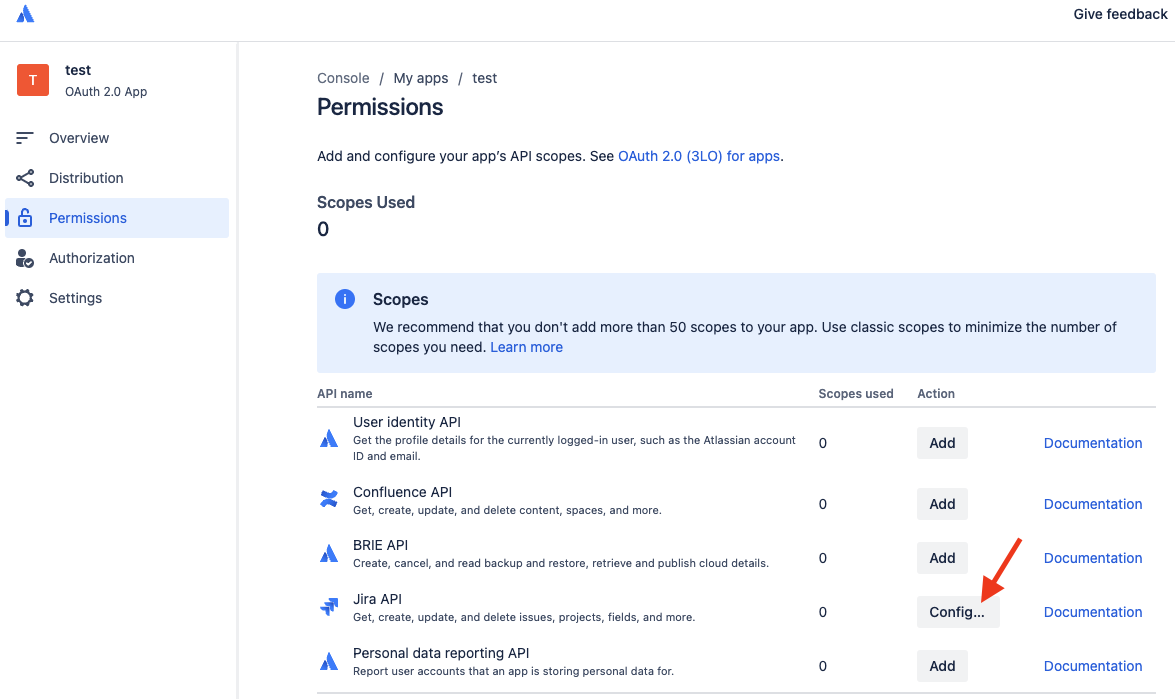
[Permissions]をクリックし、使用したいAPIの[Add]をクリックします。
今回はJira Cloudのapi-rest-api-3-search-postを使用したいので、Jira APIの[Add]をクリックします。

-
表示が[Add]から[Configure]に変わったら[Configure]をクリックします。
-
[Classic scopes]タブまたは[Granular scopes]タブをクリックした後、[Edit Scopes]をクリックします。
今回は[Granular scopes]でスコープを設定するので[Granular scopes]ダブをクリックした後に[Edit Scopes]をクリックします。

-
使用したいAPIで要求されるスコープにチェックを入れ、[Save]をクリックします。
今回は[Granular scopes]でread:issue-details:jiraread:field.default-value:jiraread:field.option:jiraread:field:jiraread:group:jiraをチェックします。

-
[Authorization] > [Add]をクリックします。

-
[Callback URL]に
https://script.google.com/macros/d/{GASのスクリプトID}/usercallbackを入力し、[Save changes]をクリックします。
{GASのスクリプトID}には前項でコピーしておいたGASのスクリプトIDを設定します。

-
[Settings]をクリックし、
Client IDとSecretをコピーします。
Client IDとSecretはOAuthライブラリで使用します。
以上でアプリの設定は完了です。
スクリプト プロパティの設定
OAuth処理に必要な情報をGASのスクリプト プロパティに追加します。
今回はプロパティ名をKEYSとし、値に以下のような内容を設定します。
{
    "serviceName": "Atlassian",
    "clientId": "前項でコピーしたClient ID",
    "secret": "前項でコピーしたSecret",
    "authUrl": "https://auth.atlassian.com/authorize",
    "scope": "前項で指定したスコープ",
    "tokenUrl": "https://auth.atlassian.com/oauth/token",
    "redirectUrl": "前項で設定したCallback URL"
}
- serviceName: 任意のサービス名
- clientId: 前項でコピーした
Client ID - secret: 前項でコピーした
Secret - scope: 前項で指定したスコープをスペース区切りで設定
"read:issue-details:jira read:field.default-value:jira read:field.option:jira read:field:jira read:group:jira"- リフレッシュトークンを利用したい場合は上記に
offline_accessも追加してください。アプリ側の設定は不要です。
- リフレッシュトークンを利用したい場合は上記に
- redirectUrl: 前項で設定したCallback URL
https://script.google.com/macros/d/{GASのスクリプトID}/usercallback
- GASの⚙️([プロジェクトの設定])アイコンをクリックします。
- [スクリプト プロパティを追加]をクリックします。
- プロパティと値を入力し、[スクリプト プロパティを保存]をクリックします。

GASへのOAuthライブラリ追加
GoogleがGitHubで配布しているgoogleworkspace/apps-script-oauthを使用します。
ライブラリの使用方法についてREADME.mdを参照しています。
前項で設定しているコールバック関数もREADME.mdを参照して設定しています。
-
GASの
< >([エディタ])アイコンをクリックします。 -
[ライブラリ]の
+ボタンをクリックします。

-
[スクリプト ID]に
1B7FSrk5Zi6L1rSxxTDgDEUsPzlukDsi4KGuTMorsTQHhGBzBkMun4iDFをコピペし、[検索]をクリックします。

-
[バージョン]を最新にし、[追加]をクリックします。
以上でOAuthライブラリの追加は完了です。
GASのコード作成
必要な処理のコードを作成します。
以下、今回のために作成したサンプルコードを紹介し、処理について解説します。
サンプルコード
展開してサンプルコードを表示する
const KEYS = JSON.parse(PropertiesService.getScriptProperties().getProperty('KEYS'));

/**
 * サービスを生成する
 */
function getService() {
  const service = OAuth2.createService(KEYS.serviceName)
    .setAuthorizationBaseUrl(KEYS.authUrl)
    .setTokenUrl(KEYS.tokenUrl)
    .setClientId(KEYS.clientId)
    .setClientSecret(KEYS.secret)
    .setCallbackFunction('authCallback')
    .setPropertyStore(PropertiesService.getUserProperties())
    .setScope(KEYS.scope)
    .setParam('response_type', 'code')
    .setParam('audience', 'api.atlassian.com')
    .setParam('prompt', 'consent');
  return service;
}

/**
 * サービスをリセットする
 */
function resetService() {
  OAuth2.createService(KEYS.serviceName)
    .setPropertyStore(PropertiesService.getUserProperties())
    .reset();
}

/**
 * コールバック関数
 */
function authCallback(request) {
  const service = getService();
  const isAuthorized = service.handleCallback(request);
  if (isAuthorized) {
    return HtmlService.createHtmlOutput('処理に成功しました。このタブを閉じてください。');
  } else {
    return HtmlService.createHtmlOutput('アクセスが拒否されました。このタブを閉じてください。');
  }
}

/**
 * 認可処理を実行する
 */
function getAuthorization() {
  const service = getService();
  if (service.hasAccess()){
    return Browser.msgBox('認可済みです。');
  }
  const authraizationUrl = service.getAuthorizationUrl();
  const html = '<a href="' + authraizationUrl + '" target="_blank">アプリの認可処理を行う</a><p>処理が完了したら閉じてください。</p>' ;
  const hyperLink = HtmlService.createHtmlOutput(html);
  return SpreadsheetApp.getUi().showModelessDialog(hyperLink, 'API連携');
}

/**
 * 認可をリセットする
 */
function resetAuthorization() {
  resetService();
  return Browser.msgBox('リセットしました。');
}

/**
 * アクセストークンの取得
 */
function getAccessToken() {
  const service = getService();
  return service.getAccessToken();
}

/**
 * リクエストを送信
 */
function sendRequest(method, resource, params) {
  const accessToken = getAccessToken();
  let options = {
    'method': method,
    'headers': {
      'Accept': 'application/json',
      'Authorization': 'Bearer ' + accessToken
    },
    'muteHttpExceptions': true
  };

  let url = resource;
  switch(method){
    case 'GET':
      if (params!==null){
        url += '?' + Object.keys(params).map(function(key) {
          return key + '=' + params[key];
        }).join('&');
      }
      break;

    case 'POST':
      options['headers']['Content-Type'] = 'application/json';
      options['payload'] = params;
      break;
  }

  const response = UrlFetchApp.fetch(url, options);
  const responseCode = response.getResponseCode();
  const responseBodyJson = response.getContentText();

  if ([200, 201].indexOf(responseCode) < 0){
    const error = responseCode + ' : ' + responseBodyJson;
    throw new Error(error);
  }

  if (responseBodyJson===""){
    return {'code': responseCode};
  } else {
    return JSON.parse(responseBodyJson);
  }
}

/**
 * cloudidの取得
 */
function getAccessibleResources() {
  const method = 'GET';
  const resource = 'https://api.atlassian.com/oauth/token/accessible-resources';
  const response = sendRequest(method, resource, null);
  return response;
}

/**
 * JQLで指定した条件にマッチするJira課題を取得
 */
function getIssuesbySearch(jql) {
  const method = 'POST';
  const resource = 'https://api.atlassian.com/ex/jira/' + (getAccessibleResources())[0].id + '/rest/api/3/search';
  const maxResults = 100;
  let startAt = 0;
  let total = 0;
  try{
    if (jql==""){
      throw new Error("jqlが設定されていません。設定して実行してください。");
    }

    let issues = [];
    do {
      let params = {
        "maxResults" : maxResults, // 1回に最大100件まで取得可能
        "startAt" : startAt,       // オフセット
        "jql" : jql                // JQL
      };
      const response = sendRequest(method, resource, JSON.stringify(params));
      issues = issues.concat(response.issues);
      total = response.total;
      startAt += maxResults;
    } while(total>startAt)

    return issues;
  } catch(e) {
    return {"error": e.message};
  }
}

/**
 * JQLで指定した条件にマッチするJira課題の取得とrawDataシートへの書き込み
 */
function updateIssuesSheet() {
  const jql = SpreadsheetApp.getActiveSpreadsheet().getSheetByName('config').getRange('A2').getValue();
  const issues = getIssuesbySearch(jql);
  let records = [];

  for (const issue of issues){
    const key = '=HYPERLINK("https://your-domain.atlassian.net/browse/' + issue.key + '","' + issue.key + '")';
    const issueType = issue.fields.issuetype.name;
    const summary = issue.fields.summary;
    const reporter = '=HYPERLINK("https://your-domain.atlassian.net/jira/people/' + issue.fields.reporter.accountId + '","' + issue.fields.reporter.displayName + '")';
    const assignee = '=HYPERLINK("https://your-domain.atlassian.net/jira/people/' + issue.fields.assignee.accountId + '","' + issue.fields.assignee.displayName + '")';
    const priority = issue.fields.priority.name;
    const dueDate = issue.fields.duedate;
    const status = issue.fields.status.name;
    const created = Utilities.formatDate(new Date(issue.fields.created), 'JST', 'yyyy-MM-dd');
    let resolutionDate = '';
    if (issue.fields.resolutiondate!=null){
      resolutionDate = Utilities.formatDate(new Date(issue.fields.resolutiondate), 'JST', 'yyyy-MM-dd');
    }
    records.push([key, issueType, summary, reporter, assignee, priority, dueDate, status, created, resolutionDate]);
  }
  records.unshift(['key', 'issuetype', 'summary', 'reporter', 'assignee', 'priority', 'duedate', 'status', 'created', 'resolutiondate']);

  const sheet = SpreadsheetApp.getActiveSpreadsheet().getSheetByName('rawData');
  sheet.getDataRange().clearContent();
  sheet.getRange(1,1,records.length,records[0].length).setValues(records);
}

/**
 * メニューの追加
 */
function onOpen() {
  let ui = SpreadsheetApp.getUi();
  ui.createMenu('Atlassian')
    .addSubMenu(
      ui.createMenu('API連携')
      .addItem('認可処理を実行する', 'getAuthorization')
      .addItem('リセットする', 'resetAuthorization')
    )
    .addSubMenu(
      ui.createMenu('シート管理')
      .addItem('rawDataシートを最新にする', 'updateIssuesSheet')
    )
  .addToUi();
}
処理の解説
追加したスクリプト プロパティの取得
以下でスクリプト プロパティに追加したKEYSの値を取得します。
const KEYS = JSON.parse(PropertiesService.getScriptProperties().getProperty('KEYS'));`
サービスの生成
OAuth処理に必要な値を設定し、サービスを生成します。
function getService() {
  const service = OAuth2.createService(KEYS.serviceName)
    .setAuthorizationBaseUrl(KEYS.authUrl)
    .setTokenUrl(KEYS.tokenUrl)
    .setClientId(KEYS.clientId)
    .setClientSecret(KEYS.secret)
    .setCallbackFunction('authCallback')
    .setPropertyStore(PropertiesService.getUserProperties())
    .setScope(KEYS.scope)
    .setParam('response_type', 'code')
    .setParam('audience', 'api.atlassian.com')
    .setParam('prompt', 'consent');
  return service;
}
setCallbackFunctionに設定しているauthCallbackは、サンプルコード内のコールバック関数の名前になります。
function authCallback(request) {
  const service = getService();
  const isAuthorized = service.handleCallback(request);
  if (isAuthorized) {
    return HtmlService.createHtmlOutput('処理に成功しました。このタブを閉じてください。');
  } else {
    return HtmlService.createHtmlOutput('アクセスが拒否されました。このタブを閉じてください。');
  }
}
また、公式ドキュメントの以下の記述に従い、3つのパラメーターをsetParamで設定しています。
response_type: (required) Set tocodeas you are requesting an authorization code (not a token).
audience: (required) Set this toapi.atlassian.com.
prompt: (required) Set toconsentso that the screen prompting the user to grant access will display.
また、以下のような記述があり、stateはOAuthライブラリで自動生成されるため設定していません。
state: (required for security) Set this to a value that is associated with the user you are directing to the authorization URL, for example, a hash of the user's session ID. Make sure that this is a value that cannot be guessed. You may be able to generate and validate this value automatically, if you are using an OAuth 2.0 client library or an authentication library with OAuth 2.0 support.
認可処理を行うためのリンクを表示
function getAuthorization() {
  const service = getService();
  if (service.hasAccess()){
    return Browser.msgBox('認可済みです。');
  }
  const authraizationUrl = service.getAuthorizationUrl();
  const html = '<a href="' + authraizationUrl + '" target="_blank">アプリの認可処理を行う</a><p>処理が完了したら閉じてください。</p>' ;
  const hyperLink = HtmlService.createHtmlOutput(html);
  return SpreadsheetApp.getUi().showModelessDialog(hyperLink, 'API連携');
}
認可処理用URLを取得し、そのURLへのリンクを含んだダイアログをGoogleスプレッドシートに表示させます。
cloudidの取得
OAuthでJira Cloudのapi-rest-api-3-search-postを実行する場合、
https://your-domain.atlassian.net/rest/api/3/search
ではなく
https://api.atlassian.com/ex/jira/{cloudid}/rest/api/3/search
というURLになり、cloudidが必要になります。
cloudidを取得するための処理がgetAccessibleResourcesになります。
function getAccessibleResources() {
  const method = 'GET';
  const resource = 'https://api.atlassian.com/oauth/token/accessible-resources';
  const response = sendRequest(method, resource, null);
  return response;
}
サンプルコードでは(getAccessibleResources())[0].idがcloudidになります。
JQLで指定した条件にマッチするJira課題の取得
Basic認証版ではapi-rest-api-3-search-get(GET)を使用していましたが、今回はapi-rest-api-3-search-post(POST)を使用しています。
これは
If the JQL query expression is too large to be encoded as a query parameter, use the POST version of this resource.
という記述に基づき、長いJQLにも対応できるようにPOSTのAPIに変更しました。
function getIssuesbySearch(jql) {
  const method = 'POST';
  const resource = 'https://api.atlassian.com/ex/jira/' + (getAccessibleResources())[0].id + '/rest/api/3/search';
  const maxResults = 100;
  let startAt = 0;
  let total = 0;
  try{
    if (jql==""){
      throw new Error("jqlが設定されていません。設定して実行してください。");
    }

    let issues = [];
    do {
      let params = {
        "maxResults" : maxResults, // 1回に最大100件まで取得可能
        "startAt" : startAt,       // オフセット
        "jql" : jql                // JQL
      };
      const response = sendRequest(method, resource, JSON.stringify(params));
      issues = issues.concat(response.issues);
      total = response.total;
      startAt += maxResults;
    } while(total>startAt)

    return issues;
  } catch(e) {
    return {"error": e.message};
  }
}
1回のリクエストで取得できる最大件数が100件のため、マッチしたJira課題が100件以上でも全て取得できるように do-while で処理を繰り返しています。
JQLで指定した条件にマッチするJira課題の取得とrawDataシートへの書き込み
function updateIssuesSheet() {
  const jql = SpreadsheetApp.getActiveSpreadsheet().getSheetByName('config').getRange('A2').getValue();
  const issues = getIssuesbySearch(jql);
  let records = [];

  for (const issue of issues){
    const key = '=HYPERLINK("https://your-domain.atlassian.net/browse/' + issue.key + '","' + issue.key + '")';
    const issueType = issue.fields.issuetype.name;
    const summary = issue.fields.summary;
    const reporter = '=HYPERLINK("https://your-domain.atlassian.net/jira/people/' + issue.fields.reporter.accountId + '","' + issue.fields.reporter.displayName + '")';
    const assignee = '=HYPERLINK("https://your-domain.atlassian.net/jira/people/' + issue.fields.assignee.accountId + '","' + issue.fields.assignee.displayName + '")';
    const priority = issue.fields.priority.name;
    const dueDate = issue.fields.duedate;
    const status = issue.fields.status.name;
    const created = Utilities.formatDate(new Date(issue.fields.created), 'JST', 'yyyy-MM-dd');
    let resolutionDate = '';
    if (issue.fields.resolutiondate!=null){
      resolutionDate = Utilities.formatDate(new Date(issue.fields.resolutiondate), 'JST', 'yyyy-MM-dd');
    }
    records.push([key, issueType, summary, reporter, assignee, priority, dueDate, status, created, resolutionDate]);
  }
  records.unshift(['key', 'issuetype', 'summary', 'reporter', 'assignee', 'priority', 'duedate', 'status', 'created', 'resolutiondate']);

  const sheet = SpreadsheetApp.getActiveSpreadsheet().getSheetByName('rawData');
  sheet.getDataRange().clearContent();
  sheet.getRange(1,1,records.length,records[0].length).setValues(records);
}
GoogleスプレッドシートのconfigシートA2セルに入力されている内容をJQLとして取得するようにしています。
updateIssuesSheet関数内のyour-domainはご自身のドメインに書き換えてください。
サンプルコードでは取得したJira課題の以下のフィールドの値をrawDataシートに書き込むようにしていますので、必要に応じて適宜カスタマイズしてください。
- キー
- 課題タイプ
- 要約
- 報告者
- 担当者
- 優先度
- 期日
- ステータス
- 作成日
- 解決日
メニューの追加
function onOpen() {
  let ui = SpreadsheetApp.getUi();
  ui.createMenu('Atlassian')
    .addSubMenu(
      ui.createMenu('API連携')
      .addItem('認可処理を実行する', 'getAuthorization')
      .addItem('リセットする', 'resetAuthorization')
    )
    .addSubMenu(
      ui.createMenu('シート管理')
      .addItem('rawDataシートを最新にする', 'updateIssuesSheet')
    )
  .addToUi();
}
}
Googleスプレッドシートに[Atlassian]という名前でメニューを追加しています。
OAuth処理を実行
-
Googleスプレッドシートに追加された[Atlassian]メニュー > [API連携] > [認可処理を実行する] をクリックします。

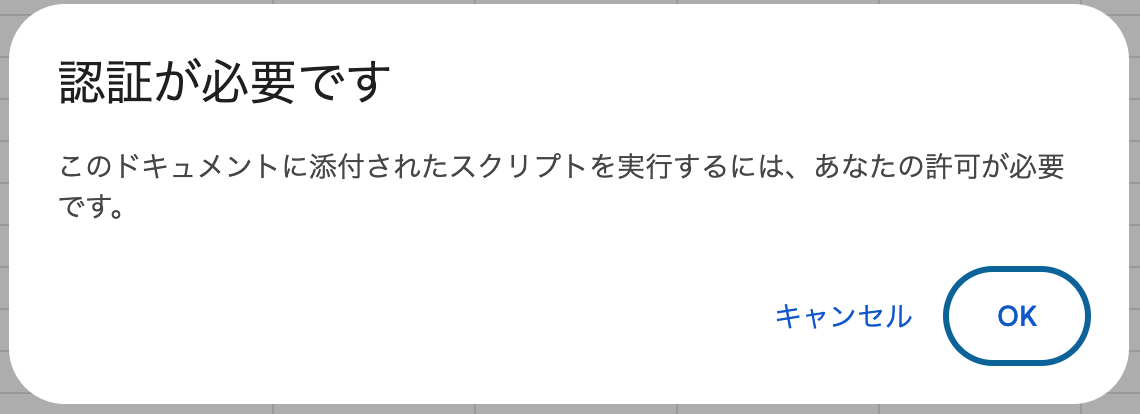
-
(初回のみ) 「認証が必要です」という画面が表示されますので[OK]をクリックして画面に従って認証を行い、認証後に再度[Atlassian]メニュー > [API連携] > [認可処理を実行する] をクリックします。

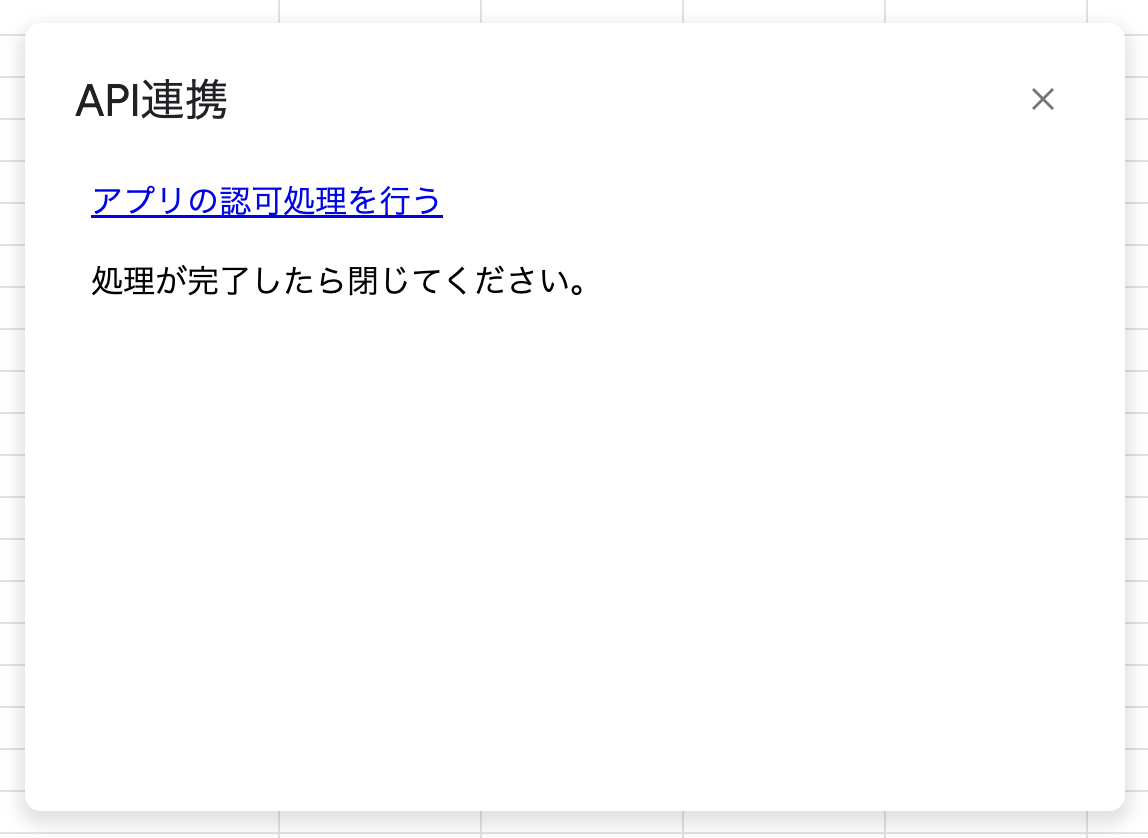
-
[アプリの認可処理を行う]をクリックします。
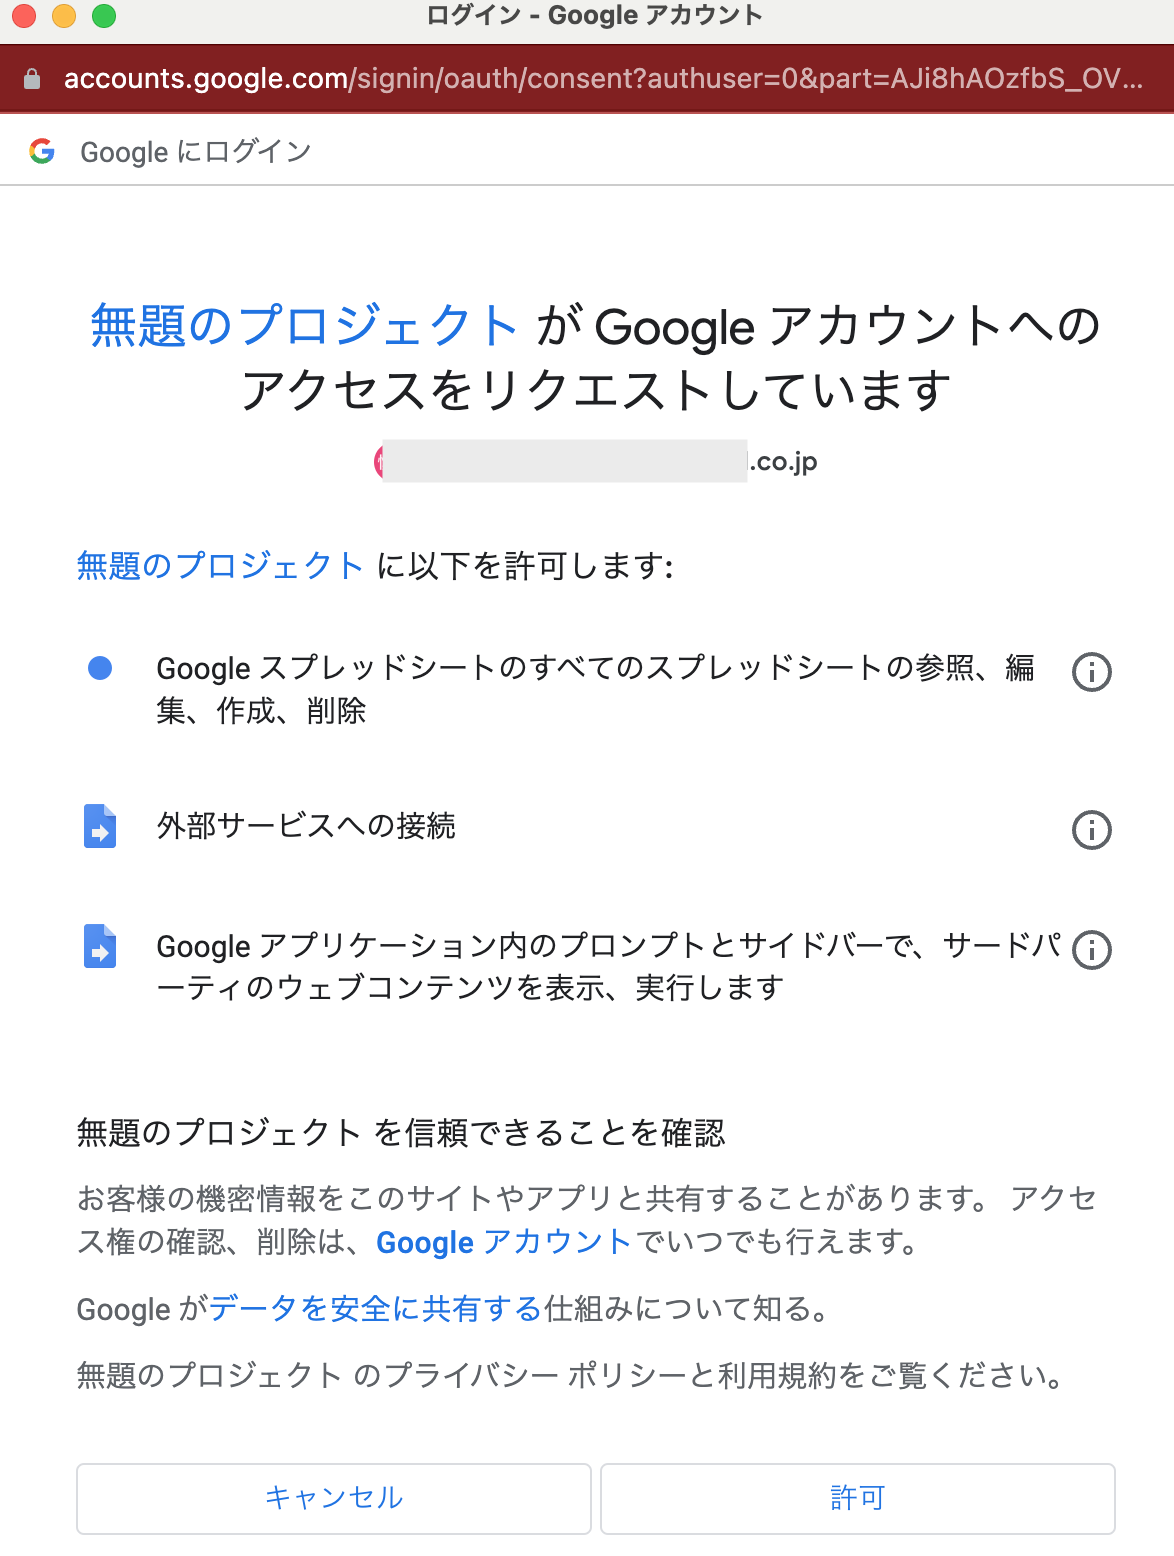
-
新しいタブでアプリの認可画面が開きますので内容を確認して[Accept]をクリックします。

-
「処理に成功しました。このタブを閉じてください。」と表示されたら☓ボタンをクリックしてタブを閉じます。
-
3の画面を右上の☓ボタンをクリックして閉じます。
以上で認可処理は完了です。
JQLで指定した条件にマッチするJira課題の取得
今回はJQLとして以下を入力します。
assignee = currentUser() AND created >= -30d order by created DESC
-
GoogleスプレッドシートのconfigシートA2セルにJQLを入力します。

-
Googleスプレッドシートの[Atlassian]メニュー > [シート管理] > [rawDataシートを最新にする] をクリックします。

-
処理が完了するとrawDataシートに取得したJira課題の情報が書き込まれます。

「Error: Access not granted or expired.」になる場合は認可処理を再度実行してください。
以上ですべての作業が完了です。
まとめ
今回はOAuthでJira Cloud REST APIを実行する方法を紹介させていただきました。
ブログを書きながら「OAuthと認証と認可が適切に使い分けできていないなぁ。。。」と感じていますので、今後理解を深めたいと思います。
私の所属部署ではJira課題の取得以外にも
- Atlassianユーザーグループのメンバー一括更新(追加・削除)
- Confluenceスペースと権限のリスト化
- Jiraフィールド情報のリスト化
などの機能を追加して業務ツールとして利用しています。
おすすめの利用方法があれば是非教えてください!
最後まで読んでいただきありがとうございました!