何をしたいか
静的サイトに Isso を使ってコメント機能を埋め込む。
動機は Pelican で作ったブログにコメントをつけたかったのが発端。
Isso とはなんぞや
a commenting server similar to Disqus
この一文に集約されている通り、Disqus の代替を目指すものらしい。
詳しい他のサービスとの比較とかはブログに書いた。
導入するとどうなるか
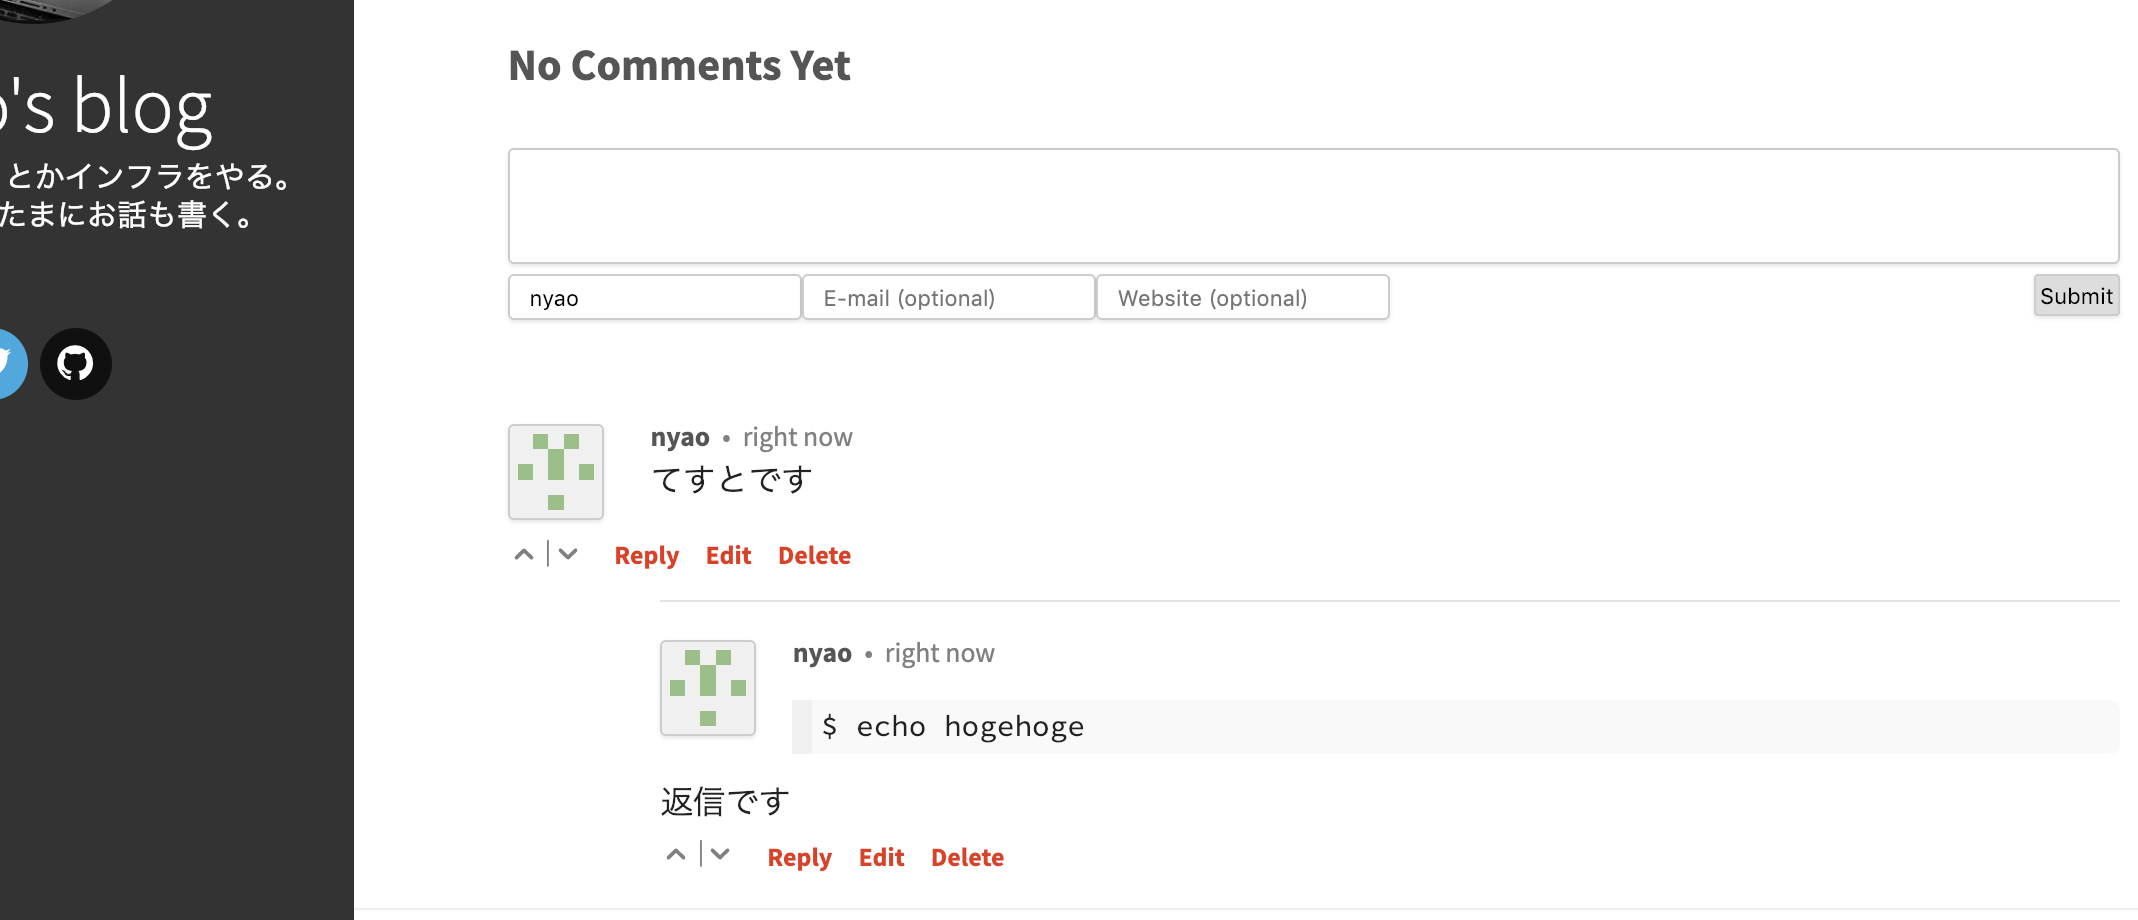
Isso からコメント機能を読み込む script タグを埋め込むことで、以下の画像のようなコメント機能を静的サイトに追加できる。

markdown も使えていいですね。
前提
- Isso プロセスの立ち上げに Docker (Compose) を使う
- Docker のインストール方法については割愛
- Isso プロセスの前に nginx をプロキシとして置く
- 通知メール配信用に使う SMTP サーバは別途必要
Docker, nginx の挙動は Ubuntu 18.04.1 LTS で確認してます。
下記手順では、サンプルとして blog.example.com ドメインで運用してるブログに対し、
Isso を isso.example.com というドメインでセットアップしています。
やること
- Docker で Isso セットアップ
- nginx で Isso コンテナにルーティング
- (おまけ) Let's Encrypt で SSL 化
- サイトにコメント枠追加タグを埋め込む
Docker で Isso セットアップ
Nextcloud の組織の人が作成したイメージがこちらにあった。
ただ、Docker Hub 公式イメージでないのがちょっと怖かったので、 Github 上からクローンしてコードを確認してからイメージをビルドした。
Github のソースはこちら。
Wonderfall/docker-isso
$ mkdir isso
$ cd isso
$ git clone https://github.com/Wonderfall/docker-isso.git build # build というディレクトリ名でクローン
一応記事執筆当時では、リポジトリに README.md の他下記ファイルがコミットされてました。
FROM alpine:3.8

ARG ISSO_VER=0.10.6

ENV GID=1000 UID=1000

RUN apk -U upgrade \
 && apk add -t build-dependencies \
    python-dev \
    libffi-dev \
    py2-pip \
    build-base \
 && apk add \
    python \
    py-setuptools \
    sqlite \
    libressl \
    ca-certificates \
    su-exec \
    tini \
 && pip install --no-cache cffi \
 && pip install --no-cache misaka==1.0.2 \
 && pip install --no-cache "isso==${ISSO_VER}" \
 && apk del build-dependencies \
 && rm -rf /tmp/* /var/cache/apk/*

COPY run.sh /usr/local/bin/run.sh

RUN chmod +x /usr/local/bin/run.sh

EXPOSE 8080

VOLUME /db /config

LABEL maintainer="Wonderfall <wonderfall@targaryen.house>"

CMD ["run.sh"]
# !/bin/sh
chown -R $UID:$GID /db /config
exec su-exec $UID:$GID /sbin/tini -- isso -c /config/isso.conf run
設定ファイルの準備
Isso は設定ファイルに
- コメント機能を追加するサイト
- コメントの管理方法(承認を必要とするか、メールを必須とするか等)
- SMTP サーバ
といったことを INI フォーマットで記述する。
先ほど作成 (mkdir) した isso ディレクトリ内にconfig フォルダを作成し、isso.conf に設定ファイルを記述する。
$ mkdir config
$ vim config/isso.conf
以下はサンプル。
[general]
; 先程の Dockerfile をそのまま使っているなら下記でよい
dbpath = /db/comments.db

; コメント機能を追加したいサイトのURL
host = https://blog.example.com

; コメントが投稿された際の通知方法。デフォルトは stdout
; smtp であればメールで通知される
notify = smtp

[server]
; 先程の Dockerfile をそのまま使っているなら下記でよい
listen = http://0.0.0.0:8080/

; コメント承認
[moderation]
; true ならコメント承認後に(ブログ上で)表示されるようになる
enabled = true

; notify = smtp を設定したなら下記で SMTP サーバ情報を設定する
[smtp]
username = noreply@example.com
password = p@ssword!
host = mail.example.com
port = 587

; none, starttls, ssl がそれぞれ設定可能
security = starttls

; セキュリティ関連の設定
[guard]
; セキュリティ機能を true で有効
enabled = true

; 同一ユーザが 1 分間で投稿できる上限数
ratelimit = 2

; 編集可能なうちに自身のコメントへ返信可能とするか
; コメント投稿者は一定時間自身のコメントを編集できるらしい
; この一定時間内にコメント投稿者へ自身のコメントに対し(同一スレッド上で)返信することを許可させるかの設定
reply-to-self = true

; 同一スレッドに同一ユーザが投稿できるコメント数上限
direct-reply = 3

; コメントに name の入力を必須とするなら true
require-author = true

; コメントにメールアドレスの入力を必須とするなら true
require-email = true
くわしくは Server Configuration を参照されたい。
メールアドレスとかのバリデーションは自前でやる必要があるらしい。
また、いくつかはクライアント側に埋め込むタグの設定と対応させる必要がある(後述)。
docker-compose.yml ファイルの作成
Docker Compose でコンテナを立ち上げるために isso ディレクトリに docker-compose.yml ファイルを作成する。
設定の詳細については割愛。
version: '3'

services:
  isso:
    build: ./build
    restart: always
    ports:
      - 127.0.0.1:8080:8080
    environment:
      - GID=1000
      - UID=1000
    volumes:
      - ./config:/config
      - ./db:/db
この時点で下記ディレクトリ構成になっている。
$ tree
.
├── build
│   ├── Dockerfile
│   ├── README.md
│   └── run.sh
├── config
│   └── isso.conf
└── docker-compose.yml
この状態で、isso ディレクトリ内で docker-compose up を実行すれば、Isso コンテナプロセスが立ち上がる。
$ docker-compose up -d # -d はデタッチ(バックグラウンド)起動
$ docker-compose logs -f # ログを確認したいときに実行
nginx の設定
nginx のセットアップ方法については割愛。(Ubuntu なら sudo apt-get install nginx でいいはず)
設定ファイルを用意する。(Ubuntu で apt-get を使って nginx をインストールしたなら /etc/nginx/conf.d/ 内に .conf 拡張子をつけたファイルを追加すればいいはず)
server {
  listen 80;
  server_name  isso.example.com;

  # 後述する Let's Encrypt による SSL 化のために使う
  location ^~ /.well-known/acme-challenge/ {
    root         /var/www/isso.example.com;
  }

  location / {
    proxy_redirect                          off;
    proxy_set_header Host                   $host;
    proxy_set_header X-Real-IP              $remote_addr;
    proxy_set_header X-Forwarded-Host       $host;
    proxy_set_header X-Forwarded-Server     $host;
    proxy_set_header X-Forwarded-For        $proxy_add_x_forwarded_for;
    proxy_set_header X-Forwarded-Proto      $scheme;
    proxy_pass  http://127.0.0.1:8080;
    break;
  }
}
設定ファイルの読み込みを忘れずに。
$ sudo nginx -t # 設定ファイルが正しいか検証
$ sudo service nginx reload
(おまけ) Let's Encrypt で SSL 化
先程の設定ファイルを反映できたら、Isso プロセスへ SSL で接続できるように Let's Encrypt で証明書を取得する。
Let's Encrypt 自体のセットアップはまた割愛する(けれども Ubuntu なら sudo apt-get install letsencrypt でいけるはず)。
$ sudo mkdir -p /var/www/isso.example.com # 先程の conf ファイルで設定した root ディレクトリを作成する
$ sudo letsencrypt certonly --webroot -w /var/www/isso.example.com -d isso.example.com -m mail@example.com --agree-tos -n
無事に Congratulations のログが表示されたら、先程の conf ファイルに下記を追記する。
server {
  listen       443;
  server_name  isso.example.com;

  ssl                  on;
  ssl_certificate      /etc/letsencrypt/live/isso.example.com/fullchain.pem;
  ssl_certificate_key  /etc/letsencrypt/live/isso.example.com/privkey.pem;
  ssl_protocols  SSLv2 SSLv3 TLSv1;
  ssl_ciphers  HIGH:!aNULL:!MD5;
  ssl_prefer_server_ciphers   on;

  location / {
    proxy_redirect                          off;
    proxy_set_header Host                   $host;
    proxy_set_header X-Real-IP              $remote_addr;
    proxy_set_header X-Forwarded-Host       $host;
    proxy_set_header X-Forwarded-Server     $host;
    proxy_set_header X-Forwarded-For        $proxy_add_x_forwarded_for;
    proxy_set_header X-Forwarded-Proto      $scheme;
    proxy_pass  http://127.0.0.1:8080;
    break;
  }
}
設定ファイルを nginx プロセスに反映する。
$ sudo nginx -t # 設定ファイルが正しいか検証
$ sudo service nginx reload
証明書が自動更新されるように必要に応じて cron も設定する。
$ sudo crontab -e # sudo を忘れずに
# 出力をメール通知したいならアドレスを設定
MAILTO=notify@example.com

0 6 * * 1 /usr/bin/letsencrypt renew && /usr/sbin/service nginx restart
crontab の書き方については割愛。上記設定では毎週月曜 am 6:00 に証明書の更新を試行する。
サイトにコメント枠追加タグを埋め込む
ここまでできたら、静的サイトに script タグを埋め込めむだけでコメント機能が追加できる。
先程サーバ側においた isso.conf に合わせてタグの data-* 属性部分を設定する(詳しくは Client Configuration を参照されたい)。
<!-- Isso -->
<script
    data-isso="//isso.example.com/"
    data-isso-reply-to-self="true"
    data-isso-vote="true"
    data-isso-vote-levels="0,5,10,25,100"
    data-isso-require-author="true"
    data-isso-require-email="true"
    src="//isso.example.com/js/embed.min.js"></script>
<section id="isso-thread"></section>
<noscript>
    <div>Please enable JavaScript to view comments.</div>
</noscript>
<!-- End Isso -->
できたもの
ブログに埋め込んだスクリーンショットはこんな感じです(設定がサンプルと多少違います)。

<section id="isso-thread"></section> タグの中にコメントが表示されるようなので、折りをみて CSS も調整したい。
(#isso-thread input[type=submit] { margin: ... } みたいな感じで装飾できるはず)
他
コメントの管理は送られてくるメール(SMTP サーバを設定している場合に限る)で行います。といっても、コメントごとの削除や承認(moderation の設定を enabled=true にしてる場合)のリンクがついてるだけです。
コメント一覧画面などはない1のですが、特に不自由しないかなと思ってます。
どうしてソーナノがいるんだろう。誰か教えて。