概要
Yellowfinのversion9ではダッシュボードの自由度が上がり、Javascriptを使って外部APIや自社サイトへ値をPOSTすることができるようになりました。そこで、今回はフォームを用意してレポートの値をフォームに写し、外部サイトにPOSTするというところを中心にやっていきます。(コード中のコメントでだいぶ補足してます・・・)
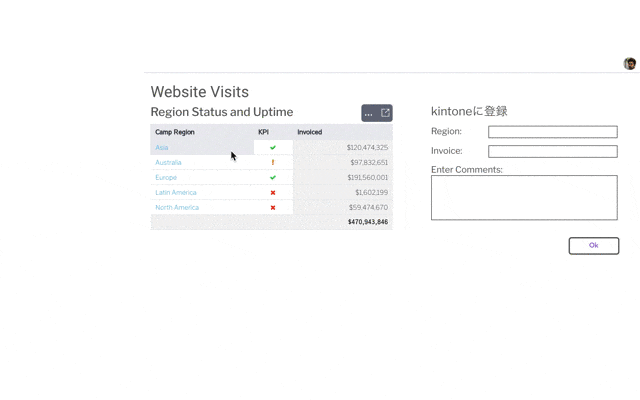
表示するレポートを選ぶ
レポートを検索し、ドロップすることで対象のレポートを表示します。
また、フォームはHTMLウィジェットをドラッグアンドドロップで配置して、コードモードで編集します。
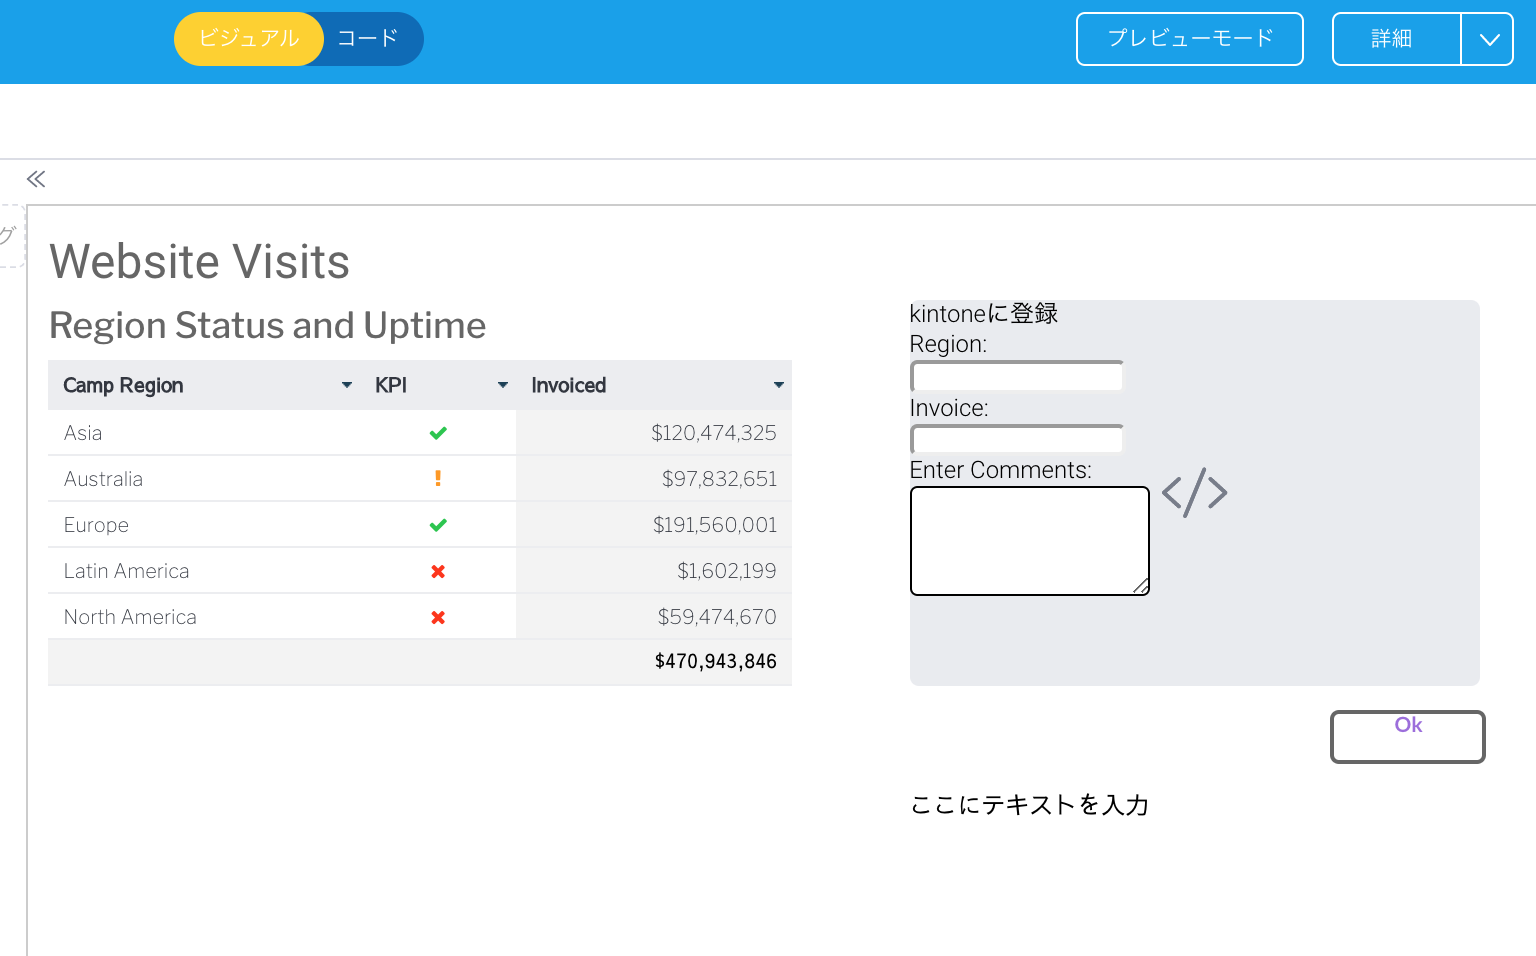
コードモードのHTMLタブ
コードモードではこのようになります。
レポートと、フォーム、ボタン、テキストのウィジェットを配置したあとにその中のname要素を変更する感じです。
dashboard.html
<canvas-area xmlns="http://www.w3.org/1999/xhtml" canvas-uuid="76a8ae2b-4f35-491a-9e3a-b8e66117ac97">
<report-output widget-uuid="dfdc880e-0216-4fdb-8d43-2caa21874aae" report-uuid="1bc0874b-2874-4dd5-87b5-4e1af27d9f7b" height="233" top="103" left="14" name="Sample" width="496" display-type="TABLE" style="z-index: 2"></report-output>
	<text-title-big widget-uuid="61cbf9ad-ffe2-41b3-98a4-c24ffc1b2526" width="547" height="69" left="14" top="18" line-spacing="40" character-spacing="0" rotation="0" name="Main Page Title" style="z-index: 3"><font xmlns="http:\/\/www.w3.org\/1999\/xhtml" color="#666666">Website Visits</font>
<br xmlns="http:\/\/www.w3.org\/1999\/xhtml" /></text-title-big>
	<text-title widget-uuid="c749399d-0a8d-4273-bab9-f3290f454a89" width="425" height="61" left="14" top="56" line-spacing="30" character-spacing="0" rotation="0" name="Title (4)" style="z-index: 10"><font xmlns="http:\/\/www.w3.org\/1999\/xhtml" style="font-size: 24px;" face="Libre Franklin" color="#666666">Region Status and Uptime</font>
<br xmlns="http:\/\/www.w3.org\/1999\/xhtml" /></text-title>
	<canvas-button widget-uuid="5acd6d3e-74b0-41d5-9744-fe2bb23cadb0" width="100" height="32" top="336" left="869" plugin-name="com.hof.mi.widgetcanvas.widgettemplate.CodeButtonCirclePurpleTemplate" text-color="#9C6ADE" name="Submit" style="background-color: #FFFFFF; border-radius: 6px; border: 2px solid rgb(102, 102, 102); z-index: 11; opacity: 1.0"></canvas-button>
	<custom-html class="requestForm" name="Form Container" widget-uuid="2e9bc2ad-54da-4a58-a374-5258e155372a" width="381" height="257" top="63" left="588" rotation="0" style="z-index: 7">
    	<div class="form-title">kintoneに登録</div>
    	<div class="form-row">
        	<div class="form-label">Region: </div>
        	<input type="text" name="pageTitle" />
    	</div>
    	<div class="form-row">
        	<div class="form-label">Invoice: </div>
        	<input type="text" name="exitRate" />
    	</div>
    	<div class="form-row">
        	<div class="form-row-label">Enter Comments:</div>
    	</div>
    	<div>
        	<textarea rows="5" name="comments"></textarea>
    	</div>
	</custom-html>
	<text-paragraph widget-uuid="cedea1aa-cc5f-4209-996d-256ed18ed5af" width="493" height="33" left="588" top="389" line-spacing="17.5" character-spacing="0" rotation="0" name="Response" style="z-index: 9"></text-paragraph>
</canvas-area>
JSタブ
この中で、マウスクリックの列を取得し、中身をフォームにコピーします。
ついでにボタンにイベントを仕込み、指定したURLにデータをPOSTしてレスポンスを表示しています。
jstab.js
let report = this.apis.canvas.select('Sample');//HTMLタブ中のreport-outputタグのnameの値をセットする
let button = this.apis.canvas.select('Submit');//canvas-buttonタグのnameの値をセットする
let responseContainer = this.apis.canvas.select('Response');//必要ではないが、responseを取得した際に表示させるtext要素
/* Add an event listener to the report table so when you click it prefills the form*/
report.addEventListener('click', (event) => {
	let pageTitle = this.apis.canvas.select('pageTitle');//form上の要素のnameを指定する
	let comments = this.apis.canvas.select('comments');
	let exitRate = this.apis.canvas.select("exitRate");
	let $row = $(event.target).closest('tr');//クリックした部分に一番近い行のデータを取得
	pageTitle.value = $row.find('td').get(0).innerText;//左から0番目の値を取得し、formに代入
	exitRate.value = $row.find('td').get(2).innerText;//左から2番目の値を取得し、formに代入
	comments.innerText = $row.find('td').get(2).innerText;//適当
})
/* Setup a click listener on the Ok button so it sends an API request to anywhere */
	button.addEventListener('click', () => {//クリック時のイベントを実装
    	let pageTitle = this.apis.canvas.select('pageTitle');
    	let comments = this.apis.canvas.select('comments');
    	let exitRate = this.apis.canvas.select("exitRate");
var sendurl = "http://localhost/test.php";//POSTしたいURLを指定、ここではphpの中でkintoneに登録し、returnで登録したidを取得しています。
var param = "data="+pageTitle.value+"_"+comments.value;
var xhr = new XMLHttpRequest();
xhr.onreadystatechange = function()
{
    var READYSTATE_COMPLETED = 4;
    var HTTP_STATUS_OK = 200;
    if( this.readyState == READYSTATE_COMPLETED
     && this.status == HTTP_STATUS_OK )
    {
        // レスポンスの表示URLなどは例です
        responseContainer.innerHTML = "確認はこちら: <a href=https://kintone.cybozu.com/k/135/show#record=" + this.responseText + " target='_blank'>https://kintone.cybozu.com/k/135/show#record=" + this.responseText + "</a>";
    }
}
xhr.open('POST', sendurl);
xhr.setRequestHeader('content-type', 'application/x-www-form-urlencoded;charset=UTF-8');
xhr.send( param );
});
CSSタブ
ついでにスタイルシートをいじって少し修飾します。
csstab.css
custom-html.requestForm {
	font-family: Libre Franklin;
}

custom-html.requestForm div.form-row {
	margin-top: 15px;
	display: flex;
}

custom-html.requestForm div.form-title {
	font-size: 24px;
	color: #666666;
}

custom-html.requestForm div.form-label {
	text-align: left;
	font-size: 18px;
	display: inline-block;
	width: 30%;
	overflow: hidden;
	text-overflow: ellipsis;
	white-space: nowrap;
	height: 25px;
	line-height: 25px;
	padding-right: 5px;
	color: #666666;
}

custom-html.requestForm div.form-row-label {
	font-size: 18px;
	color: #666666;
}

custom-html.requestForm input {
	width: calc(70%);
	padding: 0;
	font-size: 14px;
	border: 1px solid #666666;
	border-radius: 0;
	height: 23px;
}

custom-html.requestForm textarea {
	width: calc(100% - 6px);
	resize: none;
	font-size: 14px;
	border: 1px solid #666666;
	border-radius: 0;
}
こんな感じで
APIがあるサービスならそこにJSONでもbodyのテキストをつっこんで投げればよし、自社DBに値を突っ込みたいなら自社内のwebserverからそのDBに登録するスクリプトを介して登録すればよしと、間にひとつかます必要がありますが、ダッシュボード中のレポートの結果を見ながら、新しい値を登録したりといったこともできるようになりました。
アイデア次第ではかなりいろんなことができそうな気がしてきますね!