MCP Serverを動かす
MCP Serverのアプリ実装
Pythonの実行環境を立てて下記のPythonアプリを実装。
from typing import Any
import httpx
from mcp.server.fastmcp import FastMCP

# Initialize FastMCP server
mcp = FastMCP("weather")

# Constants
NWS_API_BASE = "https://api.weather.gov"
USER_AGENT = "weather-app/1.0"

async def make_nws_request(url: str) -> dict[str, Any] | None:
    """Make a request to the NWS API with proper error handling."""
    headers = {
        "User-Agent": USER_AGENT,
        "Accept": "application/geo+json"
    }
    async with httpx.AsyncClient() as client:
        try:
            response = await client.get(url, headers=headers, timeout=30.0)
            response.raise_for_status()
            return response.json()
        except Exception:
            return None

def format_alert(feature: dict) -> str:
    """Format an alert feature into a readable string."""
    props = feature["properties"]
    return f"""
Event: {props.get('event', 'Unknown')}
Area: {props.get('areaDesc', 'Unknown')}
Severity: {props.get('severity', 'Unknown')}
Description: {props.get('description', 'No description available')}
Instructions: {props.get('instruction', 'No specific instructions provided')}
"""

@mcp.tool()
async def get_alerts(state: str) -> str:
    """Get weather alerts for a US state.

    Args:
        state: Two-letter US state code (e.g. CA, NY)
    """
    url = f"{NWS_API_BASE}/alerts/active/area/{state}"
    data = await make_nws_request(url)

    if not data or "features" not in data:
        return "Unable to fetch alerts or no alerts found."

    if not data["features"]:
        return "No active alerts for this state."

    alerts = [format_alert(feature) for feature in data["features"]]
    return "\n---\n".join(alerts)

@mcp.tool()
async def get_forecast(latitude: float, longitude: float) -> str:
    """Get weather forecast for a location.

    Args:
        latitude: Latitude of the location
        longitude: Longitude of the location
    """
    # First get the forecast grid endpoint
    points_url = f"{NWS_API_BASE}/points/{latitude},{longitude}"
    points_data = await make_nws_request(points_url)

    if not points_data:
        return "Unable to fetch forecast data for this location."

    # Get the forecast URL from the points response
    forecast_url = points_data["properties"]["forecast"]
    forecast_data = await make_nws_request(forecast_url)

    if not forecast_data:
        return "Unable to fetch detailed forecast."

    # Format the periods into a readable forecast
    periods = forecast_data["properties"]["periods"]
    forecasts = []
    for period in periods[:5]:  # Only show next 5 periods
        forecast = f"""
{period['name']}:
Temperature: {period['temperature']}°{period['temperatureUnit']}
Wind: {period['windSpeed']} {period['windDirection']}
Forecast: {period['detailedForecast']}
"""
        forecasts.append(forecast)

    return "\n---\n".join(forecasts)

if __name__ == "__main__":
    # Initialize and run the server
    mcp.run(transport='stdio')
@mcp.toolが付与されたget_alertsとget_forecastがMCP Clientから呼び出されるツール。これらは内部で National Weather Service (NWS) APIという誰でも自由に利用できる天気情報APIを利用している。
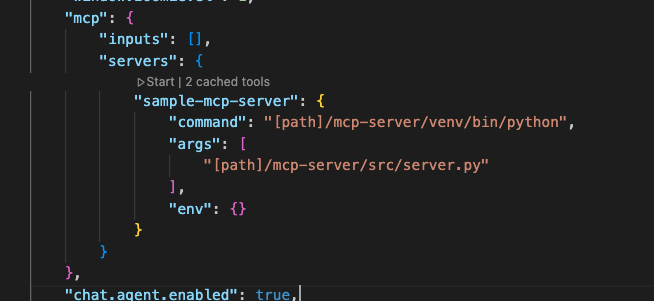
MCP Serverアプリの起動設定
VS Codeの「設定 > MCP > setting.json で編集」で setting.jsonを開いてmcpの起動設定をする。先程のserver.pyを起動すればOK。
{
    // 省略
    "mcp": {
        "inputs": [],
        "servers": {
            "sample-mcp-server": {
                "command": "[path]/mcp-server/venv/bin/python",
                "args": [
                    "[path]/mcp-server/src/server.py"
                ],
                "env": {}
            }
        }
    },
    // 省略
}
ちなみに、フォルダ構成は下記。mvp-server/src/server.pyをvenv/bin配下のpythonコマンドで実行。
% tree -L 3
.
├── README.md
└── mcp-server
    ├── README.md
    ├── requirements.txt
    ├── src
    │   └── server.py   // 実行対象
    └── venv
        ├── bin   // この配下のpythonコマンドを利用して実行
        ├── include
        ├── lib
        └── pyvenv.cfg
MCP Serverアプリの起動
先程のsetting.json上で「start」を実行。
起動すると下記のように実行ログが出力される。

MCP Serverを使う
今回、MCP ClientはGitHub Copilotエージェントです。GitHub CopilotのChatからNYの天気を聞いてみると応答してくれます。

ツールにより「Ran get_forecast」を展開してみると緯度経度が引数で天気情報が返却されていることが分かります。(server.pyのget_forecastが利用されてます)

MCPを理解する
MCP Client, Serverの種類
MCP Client
- Claude Desktop
- VSCode + GitHub Copilot AI Agent
前者は、Claude DesktopのUI(チャット機能)+ MCP Client機能を利用している。Claude DesktopにMCP Serverの起動設定を入れる。
最近は、Claude Desktop + Docker AI Agentの構成も取れる。Docker AI Agentを間に噛ませることで、MCP Serverの設定がDocker AI Agentに集約される。ClaudeでDocker AI AgentをMCP Serverとして指定し、Docker AI AgentでMCP Serverを選ぶことでDocker技術を利用して柔軟にMCP Serverを立てられる。
MCP Server
ファイルシステム、開発ツール、コミュニケーションツール、、、と多岐に渡る
通信方式
MCPはJSON-RPCを利用
MCPはJSON-RPC 2.0を利用。
MCP uses JSON-RPC 2.0 as its wire format.
JSON-RPCは下記の様なフォーマット。
{
  "jsonrpc": "2.0",
  "method": "get_user",
  "params": { "id": 123 },
  "id": 1
}
{
  "jsonrpc": "2.0",
  "result": {
    "id": 123,
    "name": "Alice",
    "email": "alice@example.com"
  },
  "id": 1
}
トランスポート層はBuilt-inで2種類の形式あり
MCPではTransportという概念がある。Transport層はMCPプロトコルのメッセージの送信のためにJSON-RPC形式に変換し、受信したJSON-RPCメッセージをMCPプロトコルメッセージに戻す役割を担う。
The transport layer is responsible for converting MCP protocol messages into JSON-RPC format for transmission and converting received JSON-RPC messages back into MCP protocol messages.
Built-InのTransportは2つある。
- Standard Input/Output (stdio)
- Server-Sent Events (SSE)
前者は標準入力/出力、後者はSSE HTTP POSTにてやりとりを行う。
出典
MCP公式DOC
VSCodeでMCPサーバーを起動して利用する方法が詳しく書いてあります
MCPサーバーのサンプルアプリ(公式DOC)
MCPとは(詳細に丁寧に書いてある)
MCPの仕組み(機能概要、transportのstdioの仕組みが分かりやすかった)