この記事の目的
Red Hat OpenShift Service on AWS (ROSA) を使って Keycloak のクラスター構成を作ってみたので,こちらに記録として残します.
公式ドキュメントに準じて作業を進めていきます.
こちらの記事を参照して AWS 上で Keycloak の OpenShift クラスター構成を作成することができます.
Kubernetes に不慣れな方でも動作確認ができるように詳細に手順を示すようにしています.
構成
サービスの紹介
Keycloak

Add authentication to applications and secure services with minimum effort.
No need to deal with storing users or authenticating users.
Keycloak provides user federation, strong authentication, user management, fine-grained authorization, and more.
Keycloak は,モダンなアプリケーションと API に対して一元的な認証・認可を提供するオープンソースの Identity and Access Management (IAM) ソリューションです.
今年の4月には Cloud Native Computing Foundation (CNCF) incubation project となりました.1
機能については以下の記事で詳しく紹介されています.
本記事では Keycloak の立ち上げに Keycloak Operator を利用します.
Keycloak Operator は Operator SDK による Keycloak 用の Kubernetes オペレーターです.2
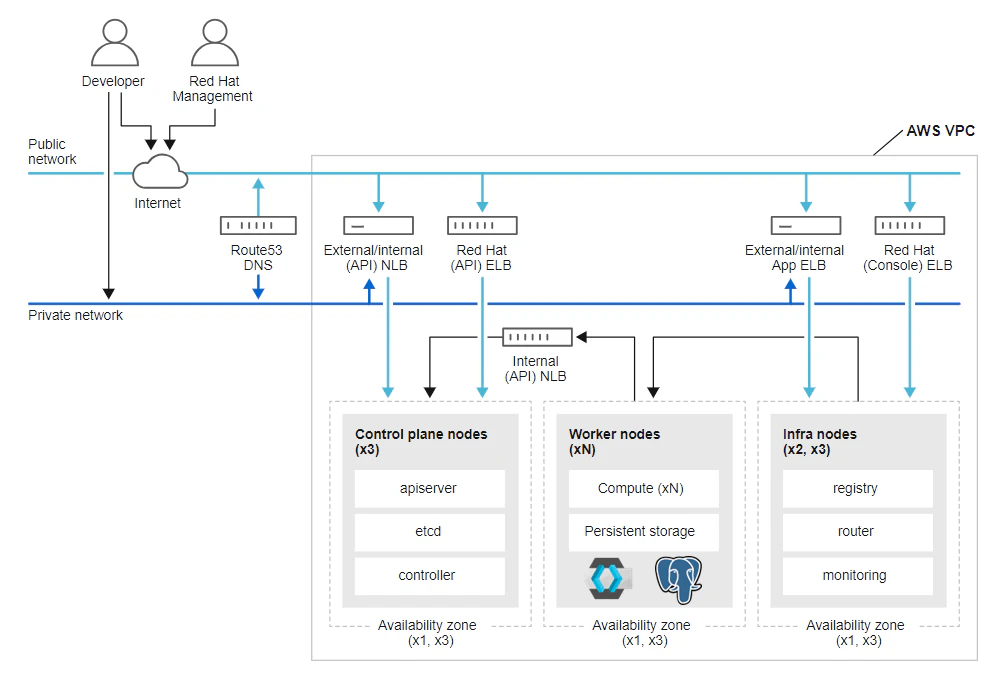
Red Hat OpenShift Service on AWS (ROSA)
Red Hat OpenShift Service on AWS (ROSA) is a managed service that you can use to build, scale, and deploy containerized applications with the Red Hat OpenShift enterprise Kubernetes platform on AWS. ROSA streamlines moving on-premises Red Hat OpenShift workloads to AWS, and offers tight integration with other AWS services.3
Red Hat OpenShift Service on AWS (ROSA) では,AWS と Red Hat が共同で OpenShift (エンタープライズ Kubernetes プラットフォーム) を提供・サポートしています.
AWS の ROSA Console にてサブスクリプションを管理し,Red Hat の Red Hat Hybrid Console と OpenShift Service on AWS Console で ROSA クラスターの管理とデプロイ作業を行います.
ROSA provides two cluster deployment models: ROSA with hosted control planes (ROSA with HCP) and ROSA classic. With ROSA with HCP, each cluster has a dedicated control plane that is isolated within Red Hat’s AWS account and managed by Red Hat. With ROSA classic, cluster control plane infrastructure is hosted in the customer’s AWS account.4
ROSA には2種類のクラスターモデルがあります.
- ROSA with HCP : ホスト型コントロールプレーンをもつ (Red Hat 所有 AWS アカウントでホストされる).
- ROSA classic : コントロールプレーンを自前 AWS アカウントでホストする.
Red Hat OpenShift Service on AWS (ROSA) with hosted control planes (HCP) offers a different way to create a managed Red Hat OpenShift Service on AWS (ROSA) cluster. ROSA with HCP offers a reduced-cost solution with focuses on reliability and efficiency. With a focus on efficiency, you can quickly create a new cluster and deploy applications in minutes.
ROSA with HCP requires only a minimum of two nodes making it ideal for smaller projects while still being able to scale to support larger projects and enterprises.5
ROSA with HCP は管理者がコントロールプレーンの存在を気にすることなく作業できる環境を提供するため,管理コストや予期せぬ誤操作を減らし,クラスターの構築時間を減らす優位性があります.
これから注目の ROSA with HCP ですが,現在日本 (東京 ap-northeast-1, 大阪 ap-northeast-3) ではサポートしていないため,本記事では ROSA classic を使用することとします.
今回の記事では ROSA CLI と OpenShift CLI を利用していきます.
Use the Red Hat OpenShift Service on AWS (ROSA) command-line interface (CLI), the rosa command, to create, update, manage, and delete ROSA clusters and resources.6
ROSA CLI は,ROSA クラスターを管理するために利用するコマンドラインインターフェース (CLI) です.
With the OpenShift CLI (oc), you can create applications and manage Red Hat OpenShift Service on AWS (ROSA) projects from a terminal. The OpenShift CLI is ideal in the following situations:
・Working directly with project source code
・Scripting ROSA operations
・Managing projects while restricted by bandwidth resources and the web console is unavailable7
OpenShift CLI はポッドの管理などに利用します.
動作確認環境
本記事では 3 種類の Web Console (以下) とコマンドを実行するローカル環境を利用しています.
- AWS Console
- Red Hat Hybrid Console
- Red Hat OpenShift Service on AWS Console
動作確認を行った環境情報を以下に示します.
| Name | Version |
|---|---|
| Windows 10 (LOCAL) | 22H2 |
| Ubuntu (WSL2, LOCAL) | 20.04 LTS |
| AWS CLI (LOCAL) | 2.15.0 |
| ROSA CLI (LOCAL) | 1.2.31 |
| OpenShift CLI (LOCAL) | 4.14.5 |
| OpenShift (ROSA) | 4.12.45 |
| Keycloak (ROSA) | 22.0.7.redhat-00001 |
| Keycloak Operator (ROSA) | 22.0.7-opr.1 |
| PostgreSQL (ROSA) | 16.1-bullseye |
構築を開始する前に以下も確認しておくことを推奨します.
- AWS アクセスキーを取得できるか
- IAM ロール/ポリシーを作成する権限があるか
- VPC を作成する権限があるか
- AWS Elastic IP に空きがあるか
- Red Hat アカウントは作成済みか
事前準備
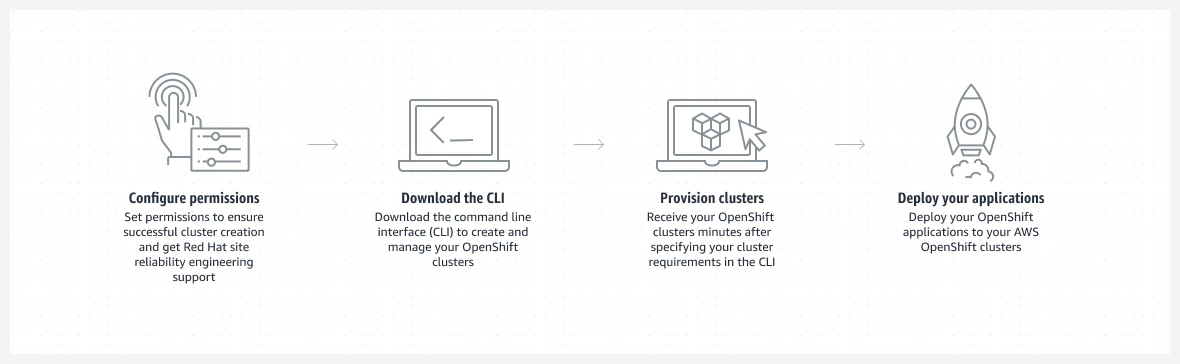
最も簡単に利用を開始するには AWS Console から始めます.
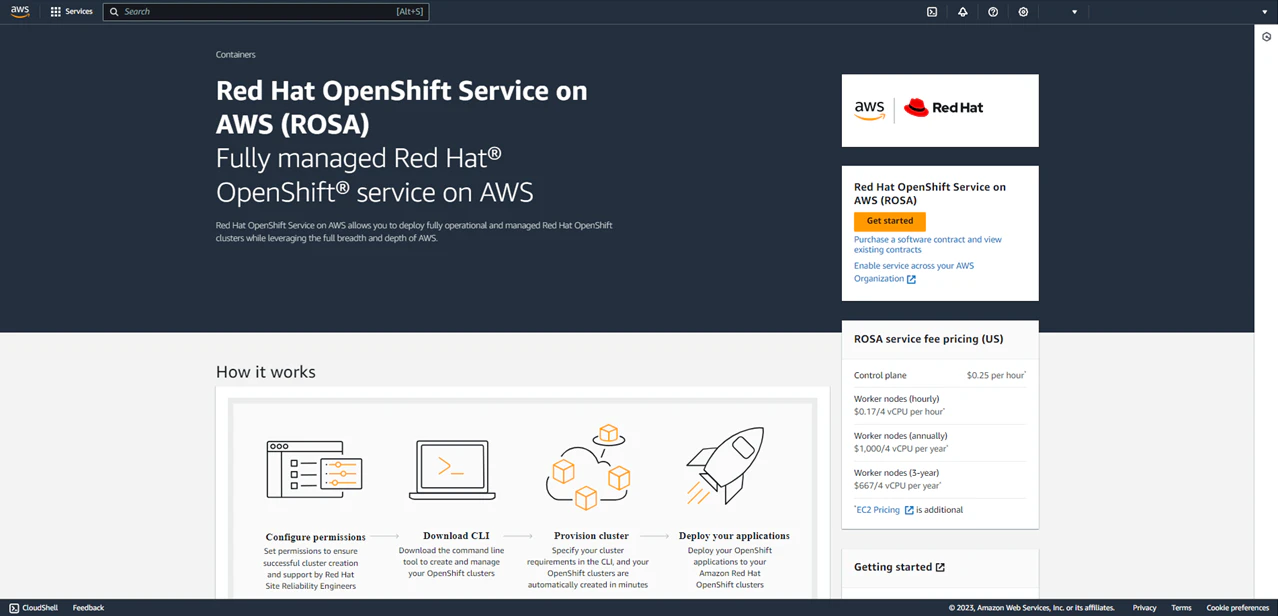
- AWS Console にて ROSA を有効化 (Red Hat Hybrid Console へのリンクが表示される)
- 最新版の AWS CLI, ROSA CLI をローカルにインストールして接続設定
- 最新版の OpenShift CLI をローカルにインストール
- 必要な IAM リソースを作成
# AWS CLI インストール
## curl (wget) でダウンロードしておく.
mkdir -p $HOME/installers/linux/aws-cli && cd $_ && \
curl "https://awscli.amazonaws.com/awscli-exe-linux-x86_64.zip" -o "awscliv2.zip" && \
mkdir -p $HOME/extracts && \
unzip awscliv2.zip -d $HOME/extracts && \
cd $HOME/extracts/aws && \
sudo ./install
## 確認
aws --version

# AWS CLI 接続設定
## アクセスキーの情報を入れていく.region も必須.
aws configure
> AWS Access Key ID [None]:
> AWS Secret Access Key [None]:
> Default region name [None]:
> Default output format [None]:
## 確認
aws configure list
# ROSA CLI インストール
## Red Hat Hybrid Console からダウンロードするか curl (wget) する
mkdir -p $HOME/installers/linux/rosa-cli && cd $_ && \
curl "https://mirror.openshift.com/pub/openshift-v4/clients/rosa/latest/rosa-linux.tar.gz" -o "rosa-linux.tar.gz" && \
mkdir -p $HOME/extracts/rosa/bin && \
tar -xvf rosa-linux.tar.gz --directory $HOME/extracts/rosa/bin
## PATH を通す
vim $HOME/.bashrc
> # Red Hat OpenShift Service on AWS (ROSA) CLI
> export ROSA_HOME=$HOME/extracts/rosa
> export PATH=$PATH:$ROSA_HOME/bin
source $HOME/.bashrc
## 確認.最新バージョンの確認も行われる.
rosa version

# ROSA CLI 接続設定
## Red Hat Hybrid Console からトークンを取得しておいてログイン
rosa login --token="xxx..."
## 確認
rosa whoami
rosa verify permissions
rosa verify quota

# OpenShift CLI インストール
mkdir -p $HOME/installers/linux/oc-cli && cd $_ && \
rosa download oc && \
mkdir -p $HOME/extracts/oc/bin && \
tar -xvf openshift-client-linux.tar.gz --directory $HOME/extracts/oc/bin
## PATH を通す
vim $HOME/.bashrc
> # Red Hat OpenShift CLI
> export OC_HOME=$HOME/extracts/oc
> export PATH=$PATH:$OC_HOME/bin
source $HOME/.bashrc
## 確認
oc version
rosa verify oc
続いて ROSA CLI を使って ROSA クラスターのプロビジョニングのために必要な IAM リソースを作成します.
リソースの作成方法は自動モード --mode auto と手動モード --mode manual がありますが,本記事では自動モードで実施します.
手動モードでは AWS CLI コマンドを逐次確認できるため,管理者にコマンドを渡してリソースの作成を委託することができます.8
- IAM アカウントのロールとポリシーを作成
- ユーザへの管理権限付与
rosa create account-roles --mode auto
> I: Logged in as 'xxx' on 'https://api.openshift.com'
> I: Validating AWS credentials...
> I: AWS credentials are valid!
> I: Validating AWS quota...
> I: AWS quota ok. If cluster installation fails, validate actual AWS resource usage against https://docs.openshift.com/rosa/rosa_getting_started/rosa-required-aws-service-quotas.html
> I: Verifying whether OpenShift command-line tool is available...
> I: Current OpenShift Client Version: 4.14.5
> I: Creating account roles
> I: By default, the create account-roles command creates two sets of account roles, one for classic ROSA clusters, and one for Hosted Control Plane clusters.
> In order to create a single set, please set one of the following flags: --classic or --hosted-cp
> I: Creating classic account roles using 'arn:aws:iam::xxxxxxxxxx:role/xxx'
> I: Created role 'ManagedOpenShift-ControlPlane-Role' with ARN 'arn:aws:iam::xxxxxxxxxx:role/ManagedOpenShift-ControlPlane-Role'
> I: Created role 'ManagedOpenShift-Worker-Role' with ARN 'arn:aws:iam::xxxxxxxxxx:role/ManagedOpenShift-Worker-Role'
> I: Created role 'ManagedOpenShift-Support-Role' with ARN 'arn:aws:iam::xxxxxxxxxx:role/ManagedOpenShift-Support-Role'
> I: Created role 'ManagedOpenShift-Installer-Role' with ARN 'arn:aws:iam::xxxxxxxxxx:role/ManagedOpenShift-Installer-Role'
> I: Creating hosted CP account roles using 'arn:aws:iam::xxxxxxxxxx:role/admin'
> I: Created role 'ManagedOpenShift-HCP-ROSA-Support-Role' with ARN 'arn:aws:iam::xxxxxxxxxx:role/ManagedOpenShift-HCP-ROSA-Support-Role'
> I: Created role 'ManagedOpenShift-HCP-ROSA-Worker-Role' with ARN 'arn:aws:iam::xxxxxxxxxx:role/ManagedOpenShift-HCP-ROSA-Worker-Role'
> I: Created role 'ManagedOpenShift-HCP-ROSA-Installer-Role' with ARN 'arn:aws:iam::xxxxxxxxxx:role/ManagedOpenShift-HCP-ROSA-Installer-Role'
> I: To create an OIDC Config, run the following command:
>         rosa create oidc-config
クラスターを構築する
OpenShift クラスターを構築していきます.
- クラスター用の VPC, Security Group, ELB, Route53 の作成
- クラスターに利用するノード EC2, EBS の作成
- クラスター用のロールを作成
- 認証に利用する OpenID Connect (OIDC) プロバイダーを構成
rosa create cluster を使うことでインタラクティブモードでクラスターを構築できますが,本記事では自動モード --mode auto で実施します.
自動モードでは以下のデフォルト値を使用します.9
| Nodes | Number | Instance Type | Volume | Purpose |
|---|---|---|---|---|
| Master Nodes | 3 | m5.2xlarge | EBS io1/350GB | Run services to control the Kubernetes cluster. |
| Infra Nodes | 2 | r5.xlarge | EBS gp3/300GB | Provide access from the outside of the cluster. |
| Worker Nodes | 2 | m5.xlarge | EBS gp3/300GB | Host application containers, grouped as pods. |
| Key | Value |
|---|---|
| Region | Based on the configuration for AWS CLI. |
| OpenShift Version | Latest version available to ROSA. |
| Network | CIDR |
|---|---|
| Machine | 10.0.0.0/16 |
| Service | 172.30.0.0/16 |
| Pod | 10.128.0.0/14 |
rosa create cluster --cluster-name rosa-kc-cluster --mode auto
> W: In a future release STS will be the default mode.
> W: --sts flag won t be necessary if you wish to use STS.
> W: --non-sts/--mint-mode flag will be necessary if you do not wish to use STS.
> I: Using arn:aws:iam::xxxxxxxxxx:role/ManagedOpenShift-Installer-Role for the Installer role
> I: Using arn:aws:iam::xxxxxxxxxx:role/ManagedOpenShift-ControlPlane-Role for the ControlPlane role
> I: Using arn:aws:iam::xxxxxxxxxx:role/ManagedOpenShift-Worker-Role for the Worker role
> I: Using arn:aws:iam::xxxxxxxxxx:role/ManagedOpenShift-Support-Role for the Support role
> I: Creating cluster 'rosa-kc-cluster'
> I: To view a list of clusters and their status, run 'rosa list clusters'
> I: Cluster 'rosa-kc-cluster' has been created.
> I: Once the cluster is installed you will need to add an Identity Provider before you can login into the cluster. See 'rosa create idp --help' for more information.
>
> Name:                       rosa-kc-cluster
> ID:                         xxxxxxxxxxxxxxxxxxxxxxxxxxxxxxxx
> External ID:
> Control Plane:              Customer Hosted
> OpenShift Version:
> Channel Group:              stable
> DNS:                        Not ready
> AWS Account:                xxxxxxxxxx
> API URL:
> Console URL:
> Region:                     ap-northeast-1
> Multi-AZ:                   false
> Nodes:
>  - Control plane:           3
>  - Infra:                   2
>  - Compute:                 2
> Network:
>  - Type:                    OVNKubernetes
>  - Service CIDR:            172.30.0.0/16
>  - Machine CIDR:            10.0.0.0/16
>  - Pod CIDR:                10.128.0.0/14
>  - Host Prefix:             /23
> Workload Monitoring:        Enabled
> Ec2 Metadata Http Tokens:   optional
> STS Role ARN:               arn:aws:iam::xxxxxxxxxx:role/ManagedOpenShift-Installer-Role
> Support Role ARN:           arn:aws:iam::xxxxxxxxxx:role/ManagedOpenShift-Support-Role
> Instance IAM Roles:
>  - Control plane:           arn:aws:iam::xxxxxxxxxx:role/ManagedOpenShift-ControlPlane-Role
>  - Worker:                  arn:aws:iam::xxxxxxxxxx:role/ManagedOpenShift-Worker-Role
> Operator IAM Roles:
>  - arn:aws:iam::xxxxxxxxxx:role/rosa-kc-cluster-xxxx-openshift-cloud-network-config-controller-clou
>  - arn:aws:iam::xxxxxxxxxx:role/rosa-kc-cluster-xxxx-openshift-machine-api-aws-cloud-credentials
>  - arn:aws:iam::xxxxxxxxxx:role/rosa-kc-cluster-xxxx-openshift-cloud-credential-operator-cloud-cred
>  - arn:aws:iam::xxxxxxxxxx:role/rosa-kc-cluster-xxxx-openshift-image-registry-installer-cloud-crede
>  - arn:aws:iam::xxxxxxxxxx:role/rosa-kc-cluster-xxxx-openshift-ingress-operator-cloud-credentials
>  - arn:aws:iam::xxxxxxxxxx:role/rosa-kc-cluster-xxxx-openshift-cluster-csi-drivers-ebs-cloud-creden
> Managed Policies:           No
> State:                      waiting (Waiting for OIDC configuration)
> Private:                    No
> Created:                    Dec 14 2023 02:38:53 UTC
> Details Page:               https://console.redhat.com/openshift/details/s/xxxxxxxxxxxxxxx
> OIDC Endpoint URL:          https://rh-oidc.s3.us-east-1.amazonaws.com/xxxxxxxxxxxxxxx (Classic)
>
> I: Preparing to create operator roles.
> I: Creating roles using 'arn:aws:iam::xxxxxxxxxx:role/admin'
> I: Created role 'rosa-kc-cluster-xxxx-openshift-ingress-operator-cloud-credentials' with ARN 'arn:aws:iam::xxxxxxxxxx:role/rosa-kc-cluster-xxxx-openshift-ingress-operator-cloud-credentials'
> I: Created role 'rosa-kc-cluster-xxxx-openshift-cluster-csi-drivers-ebs-cloud-creden' with ARN 'arn:aws:iam::xxxxxxxxxx:role/rosa-kc-cluster-xxxx-openshift-cluster-csi-drivers-ebs-cloud-creden'
> I: Created role 'rosa-kc-cluster-xxxx-openshift-cloud-network-config-controller-clou' with ARN 'arn:aws:iam::xxxxxxxxxx:role/rosa-kc-cluster-xxxx-openshift-cloud-network-config-controller-clou'
> I: Created role 'rosa-kc-cluster-xxxx-openshift-machine-api-aws-cloud-credentials' with ARN 'arn:aws:iam::xxxxxxxxxx:role/rosa-kc-cluster-xxxx-openshift-machine-api-aws-cloud-credentials'
> I: Created role 'rosa-kc-cluster-xxxx-openshift-cloud-credential-operator-cloud-cred' with ARN 'arn:aws:iam::xxxxxxxxxx:role/rosa-kc-cluster-xxxx-openshift-cloud-credential-operator-cloud-cred'
> I: Created role 'rosa-kc-cluster-xxxx-openshift-image-registry-installer-cloud-crede' with ARN 'arn:aws:iam::xxxxxxxxxx:role/rosa-kc-cluster-xxxx-openshift-image-registry-installer-cloud-crede'
> I: Preparing to create OIDC Provider.
> I: Creating OIDC provider using 'arn:aws:iam::xxxxxxxxxx:role/admin'
> ? Create the OIDC provider for cluster 'rosa-kc-cluster'? Yes
> I: Created OIDC provider with ARN 'arn:aws:iam::xxxxxxxxxx:oidc-provider/rh-oidc.s3.us-east-1.amazonaws.com/xxxxxxxxxxxxxxx'
> I: To determine when your cluster is Ready, run 'rosa describe cluster -c rosa-kc-cluster'.
> I: To watch your cluster installation logs, run 'rosa logs install -c rosa-kc-cluster --watch'.
出力に表示された rosa logs install を使ってクラスターの構築が終わるのを待ちます (30 分ほどかかります).
rosa logs install -c rosa-kc-cluster --watch
> ...
> I: Cluster 'rosa-kc-cluster' is now ready
次にクラスターを管理する admin ユーザーを作成し,oc login を使って OpenShift CLI でログインします.
rosa create admin --cluster=rosa-kc-cluster
> I: Admin account has been added to cluster 'rosa-kc-cluster'.
> I: Please securely store this generated password. If you lose this password you can delete and recreate the cluster admin user.
> I: To login, run the following command:
>
>    oc login https://api.rosa-kc-cluster.xxx.xxx.openshiftapps.com:9999 --username cluster-admin --password xxxxxxxxxx
>
> I: It may take several minutes for this access to become active.

oc login https://api.rosa-kc-cluster.xxx.xxx.openshiftapps.com:9999 --username cluster-admin --password xxxxxxxxxx
> Login successful.
>
> You have access to 100 projects, the list has been suppressed. You can list all projects with 'oc projects'
>
> Using project "default".
> Welcome! See 'oc help' to get started.
ここまで終わったら Red Hat OpenShift Service on AWS Console が使えるようになります.
rosa descibe cluster で Console URL から URL を取得して,作成した admin ユーザーでログインできます.
rosa describe cluster -c rosa-kc-cluster
> Name:                       rosa-kc-cluster
> ID:                         xxxxxxxxxx
> External ID:                xxxxxxxxxx
> Control Plane:              Customer Hosted
> OpenShift Version:          4.12.45
> Channel Group:              stable
> DNS:                        rosa-kc-cluster.xxx.xxx.openshiftapps.com
> AWS Account:                xxxxxxxxxx
> API URL:                    https://api.rosa-kc-cluster.xxx.xxx.openshiftapps.com:9999
> Console URL:                https://console-openshift-console.apps.rosa-kc-cluster.xxx.xxx.openshiftapps.com
> Region:                     ap-northeast-1
> Multi-AZ:                   false
> Nodes:
>  - Control plane:           3
>  - Infra:                   2
>  - Compute:                 2
> Network:
>  - Type:                    OVNKubernetes
>  - Service CIDR:            172.30.0.0/16
>  - Machine CIDR:            10.0.0.0/16
>  - Pod CIDR:                10.128.0.0/14
>  - Host Prefix:             /23
> Workload Monitoring:        Enabled
> Infra ID:                   rosa-kc-cluster-xxx
> Ec2 Metadata Http Tokens:   optional
> STS Role ARN:               arn:aws:iam::xxxxxxxxxx:role/ManagedOpenShift-Installer-Role
> Support Role ARN:           arn:aws:iam::xxxxxxxxxx:role/ManagedOpenShift-Support-Role
> Instance IAM Roles:
>  - Control plane:           arn:aws:iam::xxxxxxxxxx:role/ManagedOpenShift-ControlPlane-Role
>  - Worker:                  arn:aws:iam::xxxxxxxxxx:role/ManagedOpenShift-Worker-Role
> Operator IAM Roles:
>  - arn:aws:iam::xxxxxxxxxx:role/rosa-kc-cluster-xxx-openshift-cloud-network-config-controller-clou
>  - arn:aws:iam::xxxxxxxxxx:role/rosa-kc-cluster-xxx-openshift-machine-api-aws-cloud-credentials
>  - arn:aws:iam::xxxxxxxxxx:role/rosa-kc-cluster-xxx-openshift-cloud-credential-operator-cloud-cred
>  - arn:aws:iam::xxxxxxxxxx:role/rosa-kc-cluster-xxx-openshift-image-registry-installer-cloud-crede
>  - arn:aws:iam::xxxxxxxxxx:role/rosa-kc-cluster-xxx-openshift-ingress-operator-cloud-credentials
>  - arn:aws:iam::xxxxxxxxxx:role/rosa-kc-cluster-xxx-openshift-cluster-csi-drivers-ebs-cloud-creden
> Managed Policies:           No
> State:                      ready
> Private:                    No
> Created:                    Dec 14 2023 02:38:53 UTC
> Details Page:               https://console.redhat.com/openshift/details/s/xxxxxxxxxx
> OIDC Endpoint URL:          https://rh-oidc.s3.us-east-1.amazonaws.com/xxxxxxxxxx (Classic)
[Optional] ユーザーの追加
普段利用している Identity Provider (IdP) を利用して,クラスターを管理するユーザーを追加することができます.
(候補は GitHub, GitLab, Google や自前の LDAP, OpenID サービス等)
ここでは GitHub を利用してユーザーを追加します.10
- GitHub にログインして Organization (Free で良い) を作成
- ログインを許可したいユーザーを Organization に追加
-
rosa create idpコマンドを実行 - 出力に沿って設定 (途中指定される URL に接続する必要あり)
rosa create idp --cluster=rosa-kc-cluster --interactive
> I: Interactive mode enabled.
> Any optional fields can be left empty and a default will be selected.
> ? Type of identity provider: github
> ? Identity provider name: rosa-github
> ? Restrict to members of: organizations
> ? GitHub organizations: xxxxxxxxxx
> ? To use GitHub as an identity provider, you must first register the application:
>   - Open the following URL:
>     https://github.com/organizations/xxxxxxxxxx/settings/applications/xxxxxxxxxx
>   - Click on 'Register application'
> ? Client ID: xxxxxxxx
> ? Client Secret: [? for help] xxxxxxxx
> ? GitHub Enterprise Hostname (optional):
> ? Mapping method: claim
> I: Configuring IDP for cluster 'rosa-kc-cluster'
> I: Identity Provider 'rosa-github' has been created.
   It may take several minutes for this access to become active.
   To add cluster administrators, see 'rosa grant user --help'.

I: To log in to the console, open https://console-openshift-console.apps.rosa-kc-cluster.xxx.xxx.openshiftapps.com and click on 'xxx'.
Keycloak の構成
ここではまず新規プロジェクトを作成して Keycloak Operator をインストールします.
Red Hat OpenShift Service on AWS Console から新規プロジェクトを作成します.
Administrator で Home > Projects > Create Project
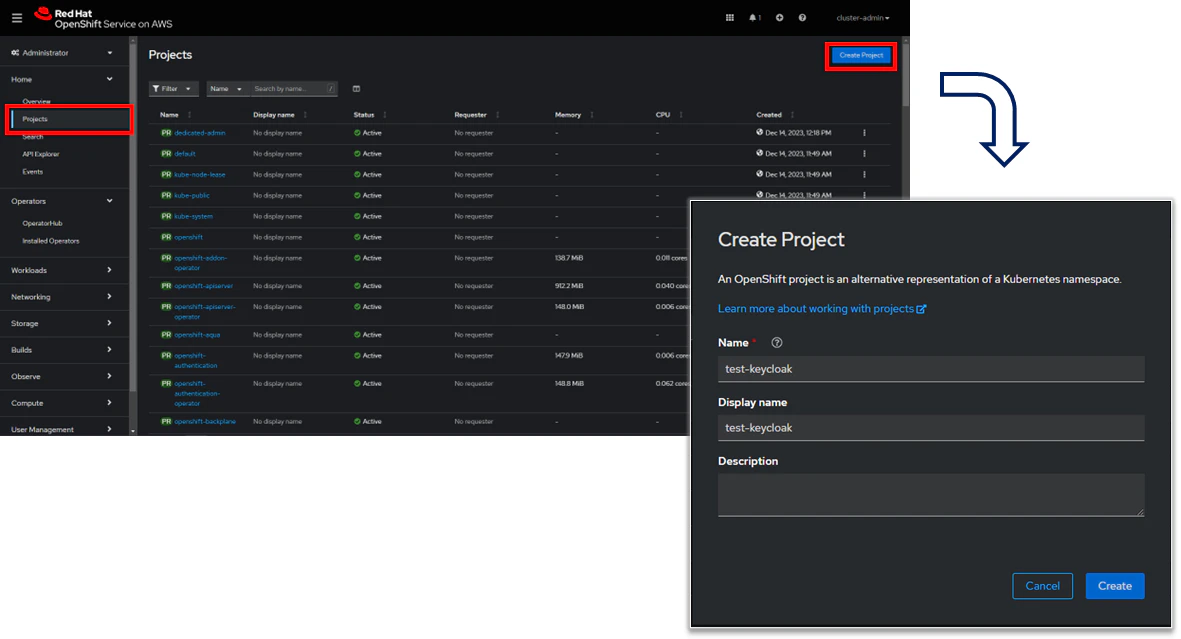
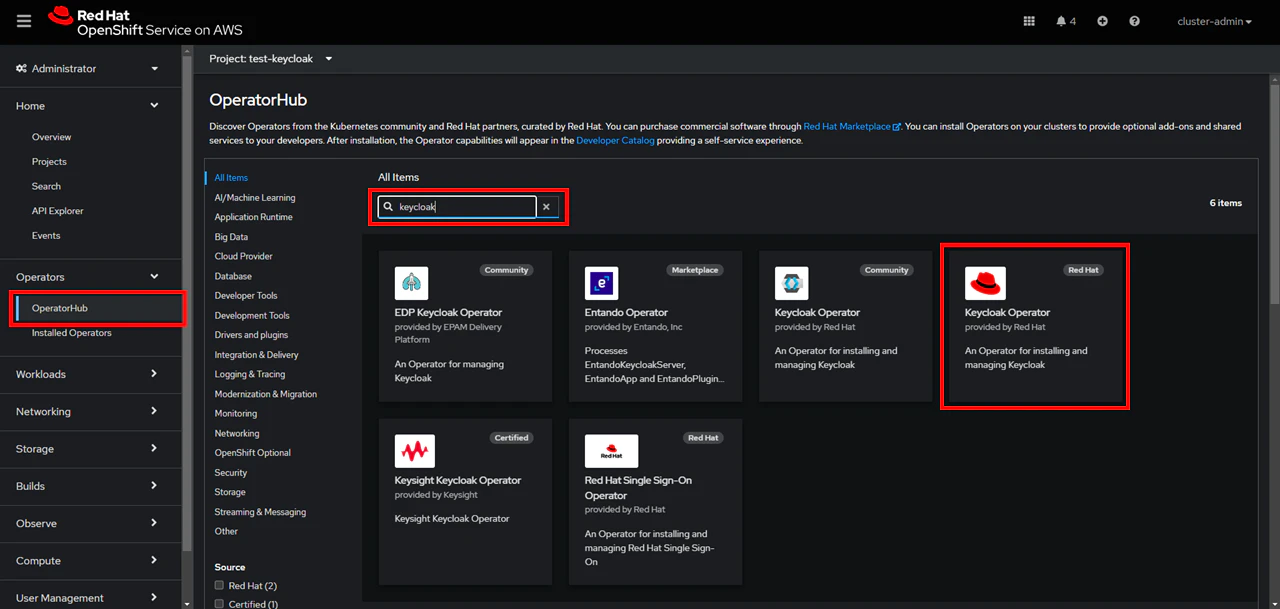
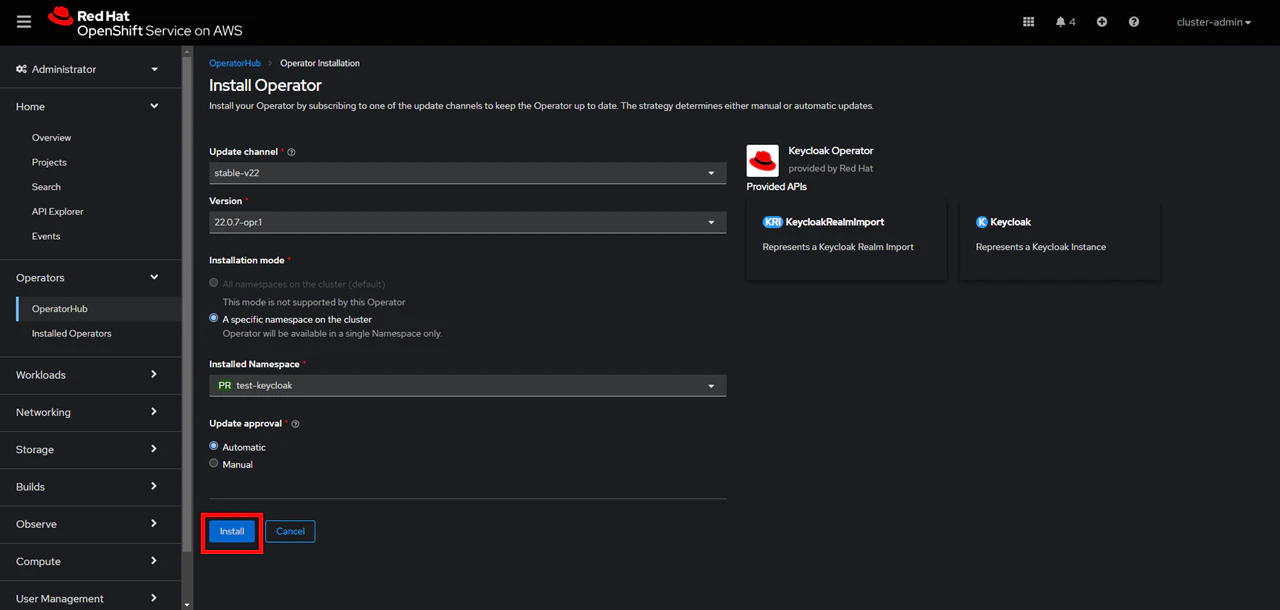
作成したプロジェクトを対象にして Operators > OperatorHub から Keycloak Operator を検索して選択,インストールします.
作成したプロジェクトに対して作業をするため,ローカルで作業プロジェクトに移動しておきます.
oc project test-keycloak
> Now using project "test-keycloak" on server "https://api.rosa-kc-cluster.xxx.xxx.openshiftapps.com:9999".
続いて本番環境 Keycloak を 1 台立ち上げていきます.
HTTPS を利用して Keycloak にアクセスするため証明書を準備します.
※ 本記事では自己署名証明書を利用しますが,実際の構築では正規に取得してください.
openssl req -newkey rsa:2048 -nodes -keyout key.pem -x509 -days 365 -out certificate.pem
準備ができたら oc create secret tls を使って Secret を作成します.
oc create secret tls example-tls-secret --cert certificate.pem --key key.pem
> secret/example-tls-secret created

# 確認
oc get secrets
Keycloak 用の YAML ファイルを書いて oc apply でポッドを作成します.
apiVersion: k8s.keycloak.org/v2alpha1
kind: Keycloak
metadata:
  name: openshift-kc
spec:
  instances: 1
  http:
    tlsSecret: example-tls-secret
  hostname:
    hostname: openshift-kc-test-keycloak.apps.rosa-kc-cluster.xxx.xxx.openshiftapps.com
oc apply -f openshift-kc.yaml
> keycloak.k8s.keycloak.org/openshift-kc created
ここで大切なのは hostname を [サービス名]-[プロジェクト名(ネームスペース)].apps.[クラスター名].xxx.xxx.openshiftapps.com とすることです.
クラスター構築時に作成された AWS Elastic Load Balancer (ELB) がルーティングを決め,ホスト名やサービス,使用ポートは Ingress によって管理されることになっています.
独自のルートを構成したい場合は以下の記事をご参照下さい.
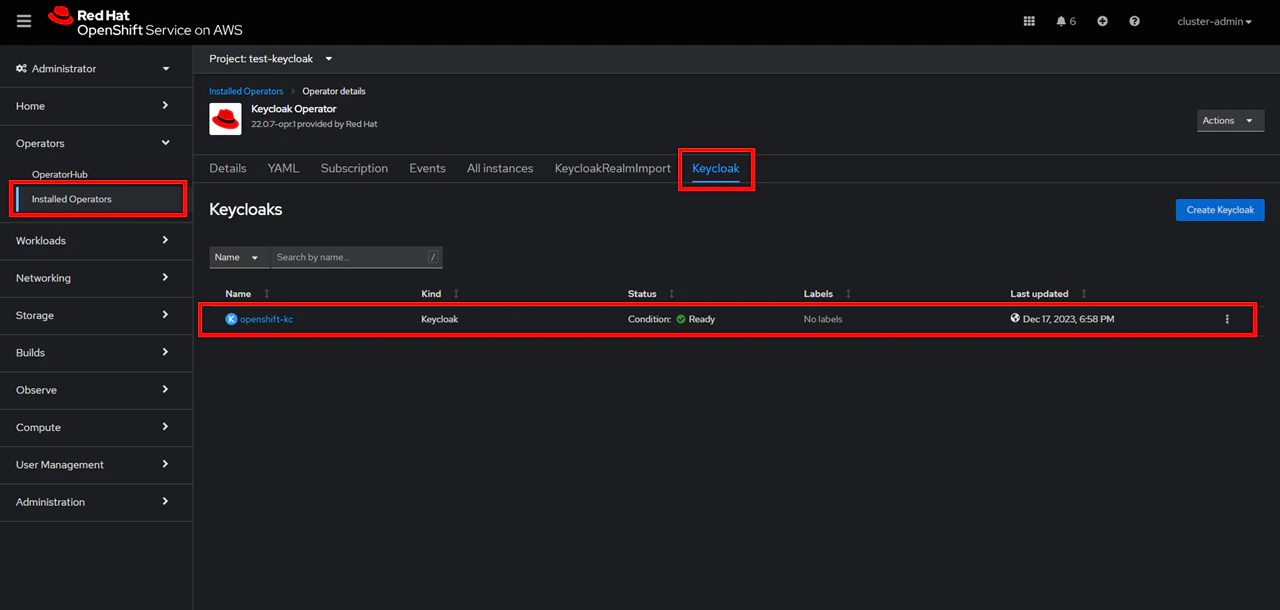
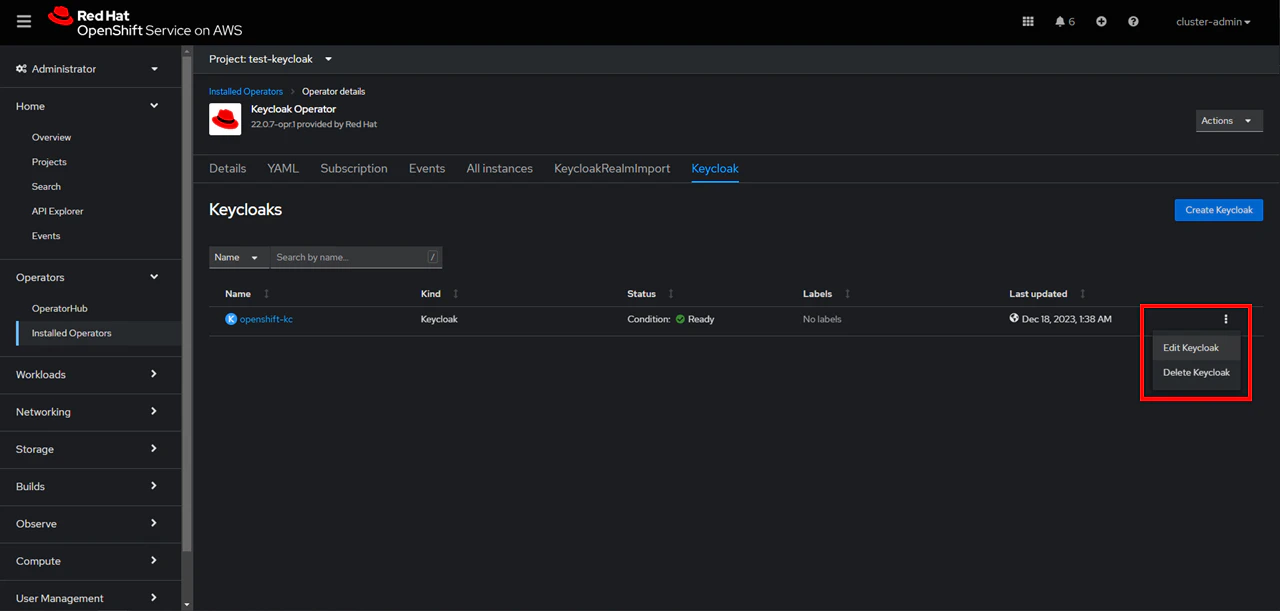
Operators > Installed Operators から Keycloak Operator を選択して Keycloak タブを確認すると作成した Keycloak が管理されて実行されていることがわかります.
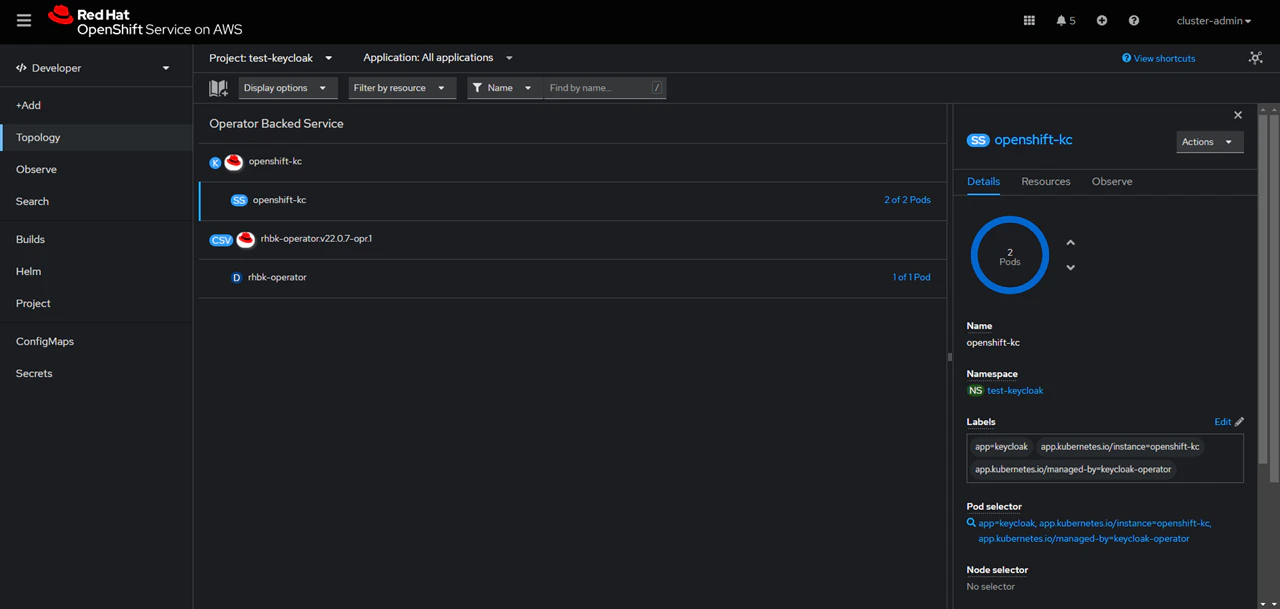
Administrator から Developer に変更して Topology を確認すると稼働している Keycloak のポッドを確認できます.
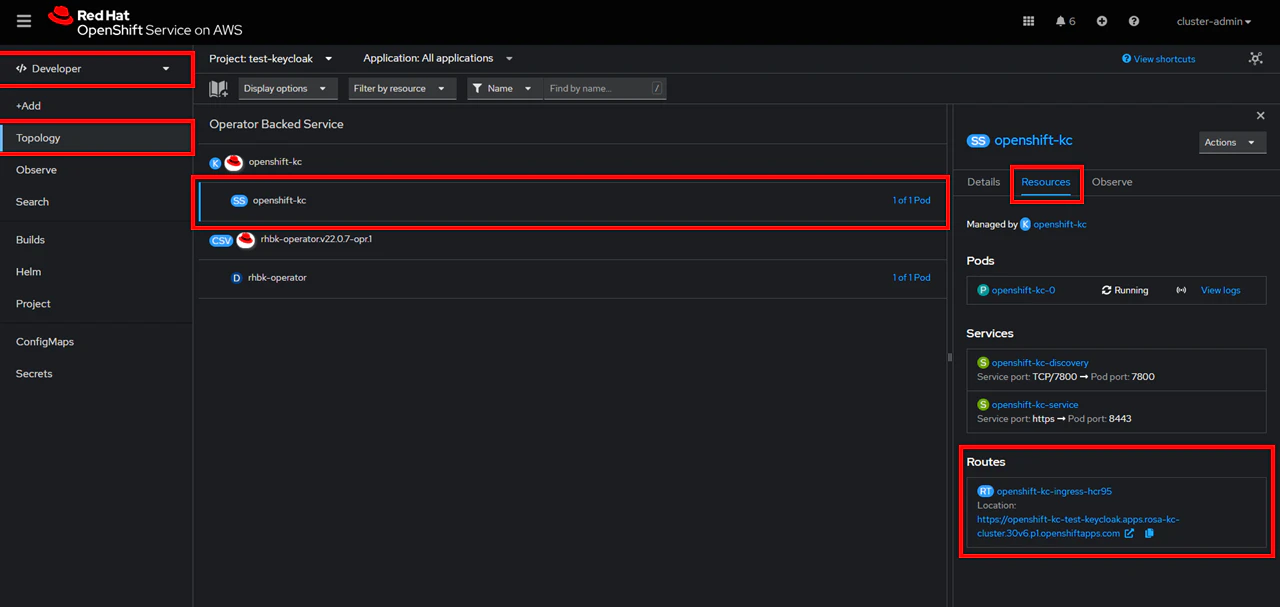
Routes を見ると hostname に指定した URL で Keycloak が公開されていることがわかります.
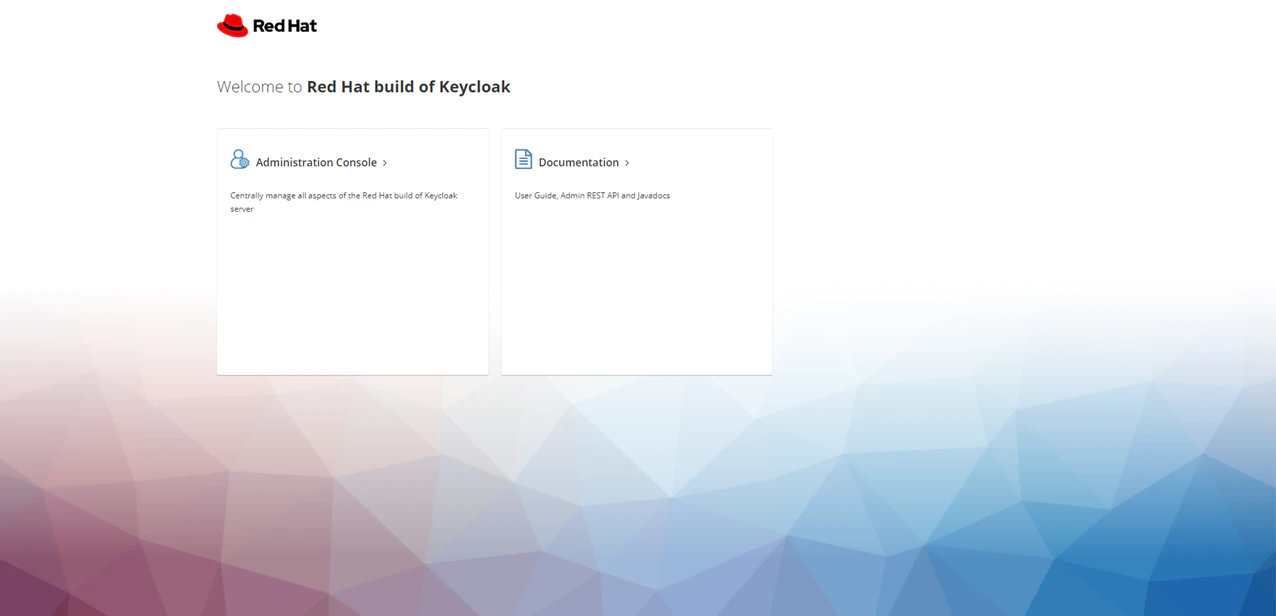
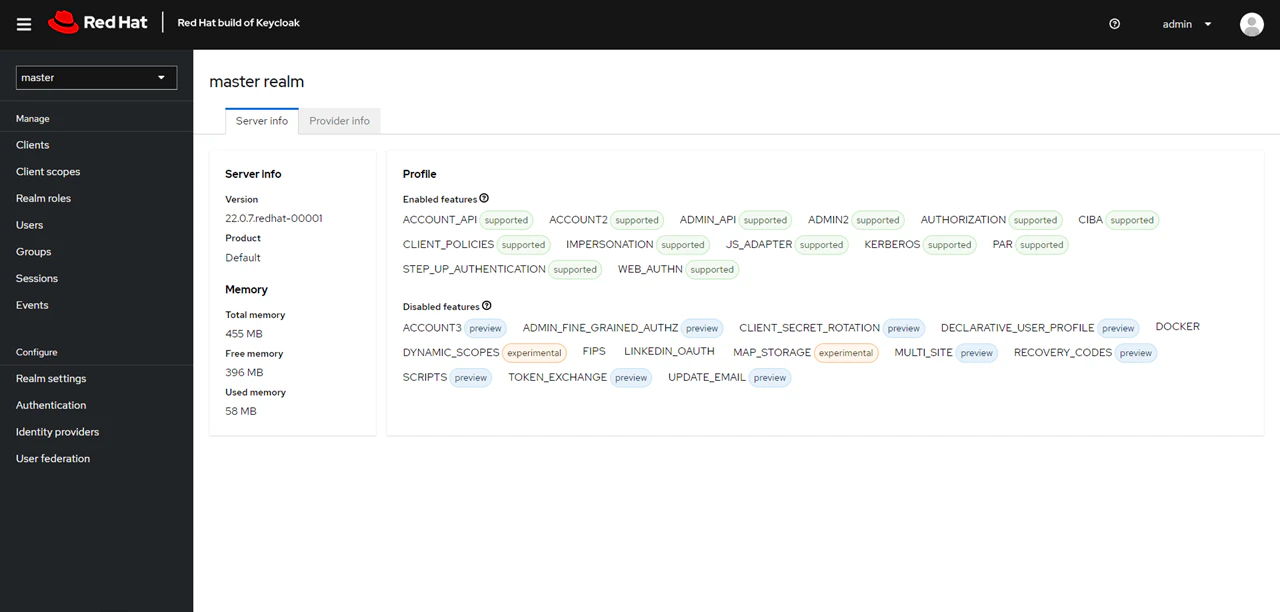
ここからリンクをクリックすると Keycloak トップ画面を表示できます.
Administration 用のユーザー名とパスワードは起動時に作成された Secret に保存されています.
以下のコマンドで確認してログインします.
oc get secrets
> ...
> openshift-kc-initial-admin    kubernetes.io/basic-auth              2      17m
> ...

oc get secret openshift-kc-initial-admin -o jsonpath='{.data.username}' | base64 --decode
> [ユーザー名]
oc get secret openshift-kc-initial-admin -o jsonpath='{.data.password}' | base64 --decode
> [パスワード]
以上で本番環境 Keycloak が 1 台準備できました.
次に Keycloak を複数台にしてみます.
方法は簡単で YAML ファイルの instances を編集して oc apply をするだけです.
apiVersion: k8s.keycloak.org/v2alpha1
kind: Keycloak
metadata:
  name: openshift-kc
spec:
  instances: 2
  http:
    tlsSecret: example-tls-secret
  hostname:
    hostname: openshift-kc-test-keycloak.apps.rosa-kc-cluster.xxx.xxx.openshiftapps.com
oc apply -f openshift-kc.yaml
> keycloak.k8s.keycloak.org/openshift-kc configured
ログを確認すると Infinispan11 による分散キャッシュの設定が行われていることがわかります.
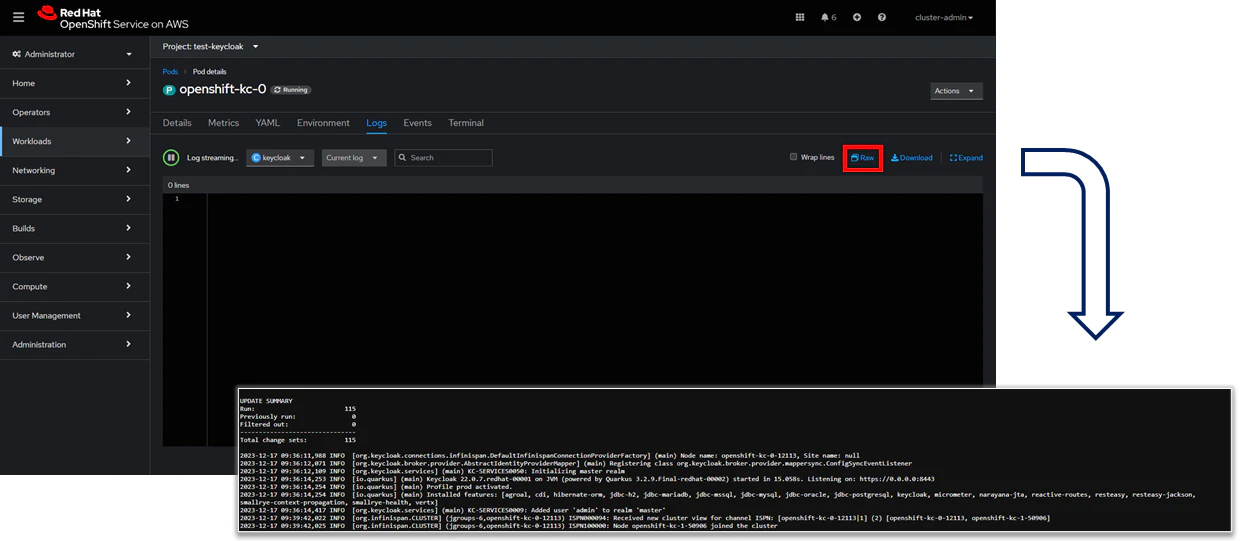
2023-12-17 09:39:42,022 INFO  [org.infinispan.CLUSTER] (jgroups-6,openshift-kc-0-12113) ISPN000094: Received new cluster view for channel ISPN: [openshift-kc-0-12113|1] (2) [openshift-kc-0-12113, openshift-kc-1-50906]
2023-12-17 09:39:42,025 INFO  [org.infinispan.CLUSTER] (jgroups-6,openshift-kc-0-12113) ISPN100000: Node openshift-kc-1-50906 joined the cluster
2023-12-17 09:39:42,026 INFO  [org.infinispan.CLUSTER] (jgroups-6,openshift-kc-0-12113) ISPN100000: Node openshift-kc-1-50906 joined the cluster
2023-12-17 09:39:42,471 INFO  [org.infinispan.CLUSTER] (jgroups-10,openshift-kc-0-12113) [Context=org.infinispan.PERMISSIONS] ISPN100002: Starting rebalance with members [openshift-kc-0-12113, openshift-kc-1-50906], phase READ_OLD_WRITE_ALL, topology id 2
...
2023-12-17 09:39:42,983 INFO  [org.infinispan.CLUSTER] (jgroups-10,openshift-kc-0-12113) [Context=work] ISPN100010: Finished rebalance with members [openshift-kc-0-12113, openshift-kc-1-50906], topology id 5
ポッド数は増えており hostname はそのままでアクセスできることがわかります.
また oc get pods を実行することで Keycloak は複数のワーカーノードに分散していることがわかります.
ワーカーノード数を超えた数の instances を指定した場合は,同じワーカーノード内で複数の Keycloak が立てられることも観察できます.
oc get pods -o wide
> NAME                           READY STATUS  RESTARTS AGE  IP             NODE                                            NOMINATED NODE  READINESS GATES
> openshift-kc-0                 1/1   Running 0        64m  10.xxx.xxx.xxx ip-10-0-xxx-xxx.ap-northeast-1.compute.internal <none>          <none>
> openshift-kc-1                 1/1   Running 0        2m6s 10.xxx.xxx.xxx ip-10-0-xxx-yyy.ap-northeast-1.compute.internal <none>          <none>
> rhbk-operator-xxxxxxxxxx-xxxxx 1/1   Running 0        168m 10.xxx.xxx.xxx ip-10-0-xxx-xxx.ap-northeast-1.compute.internal <none>          <none>
特筆するべきは,複数の Keycloak が自動でロードバランシングされて単一の URL で接続できる環境が提供されるところかと思います.
自前でヘッダー転送やセッションアフィニティーの設定を行わなくて済みます.
ここで Keycloak を冗長化をする際の NG パターンを 2 つ挙げます.
1) Topology の画面からポッド数を上げてしまう
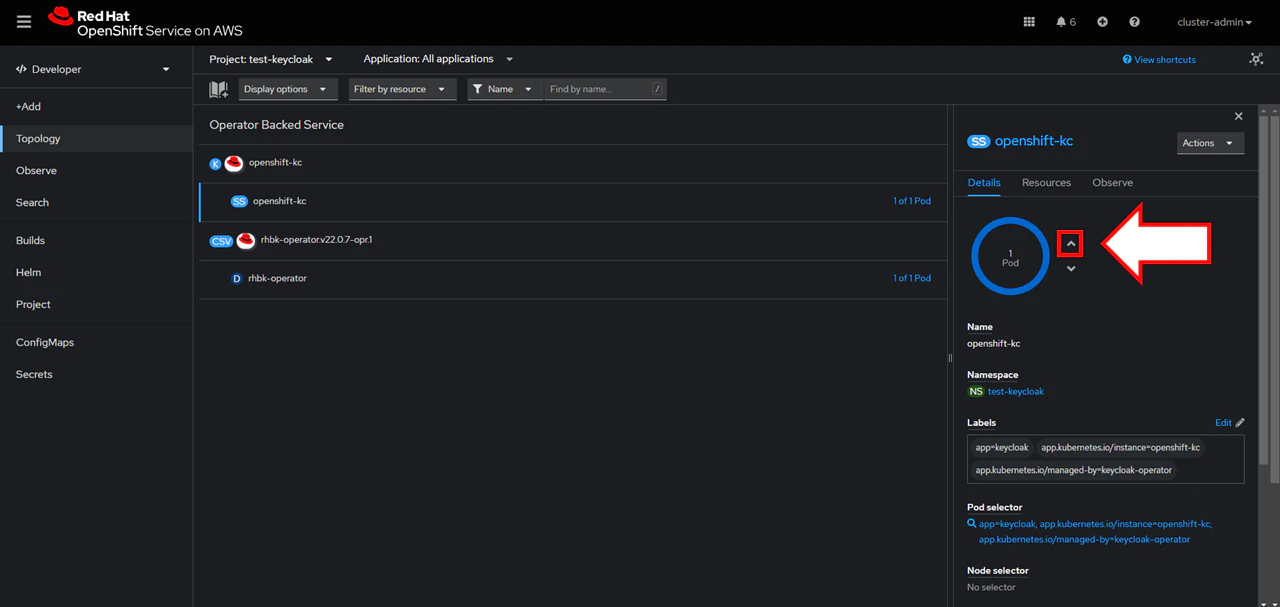
こちら一見すると非常に簡単にポッドを増やすことができるように思います.
しかし,追加されたポッドの Keycloak クラスター設定が正常に完了せずに 2 台目が立ち上がりません.
ここでポッド数を増減できるようにするには何らかの設定が必要に思われますが,筆者自身では見つけられませんでした.
2) 複数の YAML ファイルを複製して oc apply をしてしまう
例えば openshift-kc.yaml の metadata.name や hostname だけ openshift-kc-sub 等に書き換えて oc apply をするとします.
この場合 Keycloak は正常に立ち上がりますが,次の 2 つの問題点があります.
- 常に同一のワーカーノードにデプロイされてしまう.
- Keycloak はクラスター設定を行わない (独立した Keycloak として扱われる).
これを解決するためにはノードを指定するなどの対応を行わなければなりません.
やはり instances を編集してあげるのが簡単で良いように思います.
独自でビルドした Keycloak イメージの利用
上記では (Red Hat 社のカスタマイズがあるものの) 言わば素の Keycloak イメージを利用してポッド起動時に初期設定から実行していました.
しかし,ビジネスシーンでは起動の時間を短縮したいなどの要望があると思います.
その場合は,事前にコンテナビルド時に設定を含めておき YAML ファイルにイメージ指定する方法があります.12
ビルドする際のベースイメージは registry.redhat.io/rhbk から取得したものにすると良さそうです.13
apiVersion: k8s.keycloak.org/v2alpha1
kind: Keycloak
...
spec:
  instances: 1
  image: quay.io/my-company/my-keycloak:latest
...
永続用のデータベースとの接続
本番用 Keycloak クラスター構成に欠かせないのがデータベースです.
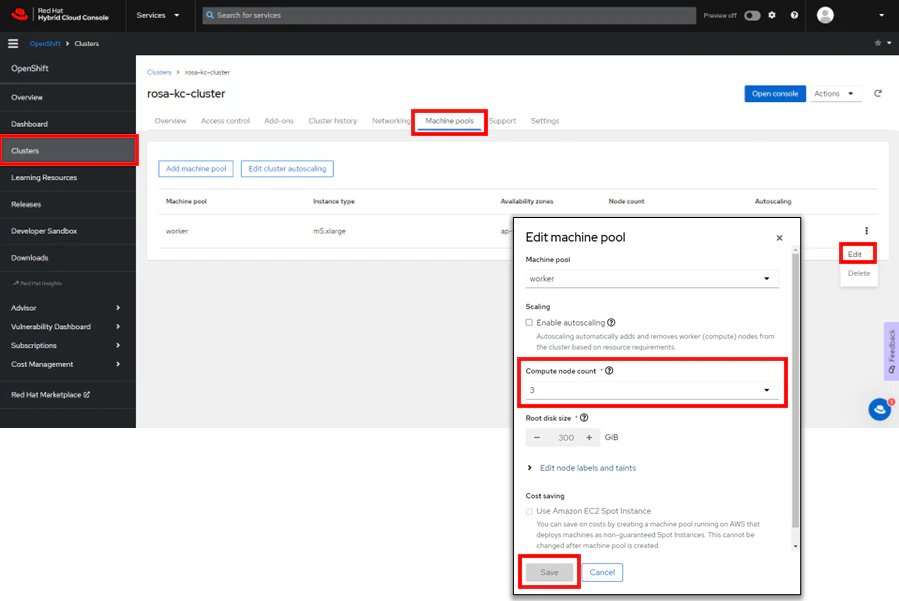
本記事ではワーカーノードを 1 つ増やして 3 つとし,その 1 つに PostgreSQL データベースを立てて接続します.14
※ 本来データベースは Keycloak のクラスターから切り離されて安全に管理されるべきですが,簡単のためにこの構成にしています.本番環境構築の際は,ROSA クラスター (Keycloak クラスターネームスペース) からアクセス可能なようにデータベースを構築し,適宜設定値を読み替えてください.
ワーカーノードは Red Hat Hybrid Console から増やします.
ワーカーノードが無事増えたことを確認します.
oc get machine -n openshift-machine-api
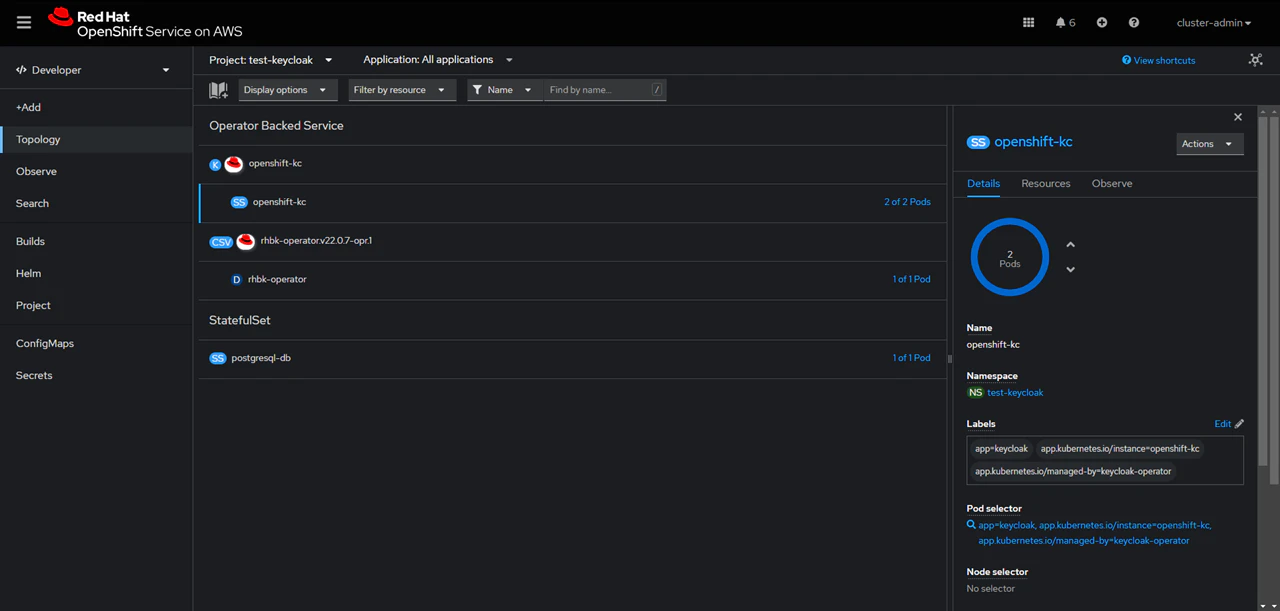
次に PostgreSQL 用の Kubernetes YAML を書いて oc apply します.
この時プロジェクトは test-keycloak を使って同一のネームスペースを利用するものとしています.
apiVersion: apps/v1
kind: StatefulSet
metadata:
  name: postgresql-db
spec:
  serviceName: postgresql-db-service
  selector:
    matchLabels:
      app: postgresql-db
  replicas: 1
  template:
    metadata:
      labels:
        app: postgresql-db
    spec:
      containers:
        - name: postgresql-db
          image: postgres:16.1-bullseye
          volumeMounts:
            - mountPath: /data
              name: cache-volume
          env:
            - name: POSTGRES_PASSWORD
              value: testpassword
            - name: PGDATA
              value: /data/pgdata
            - name: POSTGRES_DB
              value: keycloak
      volumes:
        - name: cache-volume
          emptyDir: {}
---
apiVersion: v1
kind: Service
metadata:
  name: postgres-db
spec:
  selector:
    app: postgresql-db
  type: LoadBalancer
  ports:
  - port: 5432
    targetPort: 5432
oc apply -f openshift-postgres.yaml
> statefulset.apps/postgresql-db created
> service/postgres-db created

oc get pods -o wide
> NAME                           READY STATUS  RESTARTS AGE  IP             NODE                                              NOMINATED NODE  READINESS GATES
> openshift-kc-0                 1/1   Running 0        101m 10.xxx.xxx.xxx ip-10-xxx-xxx-xxx.ap-northeast-1.compute.internal <none>          <none>
> openshift-kc-1                 1/1   Running 0        100m 10.xxx.xxx.xxx ip-10-xxx-xxx-yyy.ap-northeast-1.compute.internal <none>          <none>
> postgresql-db-0                1/1   Running 0        91s  10.xxx.xxx.xxx ip-10-xxx-xxx-zzz.ap-northeast-1.compute.internal <none>          <none>
> rhbk-operator-xxxxxxxxxx-xxxxx 1/1   Running 0        8h   10.xxx.xxx.xxx ip-10-xxx-xxx-xxx.ap-northeast-1.compute.internal <none>          <none>
続いて Keycloak が PostgreSQL に接続するための情報を入れた Secret を作成します.
PostgreSQL に登録済みのユーザー (Role) を指定しますが,ここではシステムユーザー postgres を利用します.
oc create secret generic keycloak-db-secret \
  --from-literal=username='postgres' \
  --from-literal=password='testpassword'
> secret/keycloak-db-secret created
では Keycloak 用の YAML を書き直して oc apply を行います.
apiVersion: k8s.keycloak.org/v2alpha1
kind: Keycloak
metadata:
  name: openshift-kc
spec:
  instances: 2
  db:
    vendor: postgres
    host: postgres-db
    usernameSecret:
      name: keycloak-db-secret
      key: username
    passwordSecret:
      name: keycloak-db-secret
      key: password
  http:
    tlsSecret: example-tls-secret
  hostname:
    hostname: openshift-kc-test-keycloak.apps.rosa-kc-cluster.xxx.xxx.openshiftapps.com
oc apply -f openshift-kc.yaml
> keycloak.k8s.keycloak.org/openshift-kc configured
各ポッドが問題なく起動完了したことが確認できます.
ここで PostgreSQL のログを確認すると以下のようなエラーが出ていることに気づきます.
2023-12-17 16:38:53.490 UTC [60] ERROR:  relation "migration_model" does not exist at character 25
2023-12-17 16:38:53.490 UTC [60] STATEMENT:  SELECT ID, VERSION FROM MIGRATION_MODEL ORDER BY UPDATE_TIME DESC
2023-12-17 16:38:56.650 UTC [60] ERROR:  relation "public.databasechangelog" does not exist at character 22
2023-12-17 16:38:56.650 UTC [60] STATEMENT:  SELECT COUNT(*) FROM public.databasechangelog
2023-12-17 16:38:56.949 UTC [62] ERROR:  relation "public.databasechangeloglock" does not exist at character 22
2023-12-17 16:38:56.949 UTC [62] STATEMENT:  SELECT COUNT(*) FROM public.databasechangeloglock
2023-12-17 16:38:56.979 UTC [60] ERROR:  relation "public.databasechangelog" does not exist at character 22
2023-12-17 16:38:56.979 UTC [60] STATEMENT:  SELECT COUNT(*) FROM public.databasechangelog
状態を確認するために PostgreSQL のポッドに入ってデータを確認してみます.15
# ポッドへアクセス
oc rsh -c postgresql-db pod/postgresql-db-0
# psql でログイン
> psql -U postgres -d postgres
# データベース一覧を確認
> postgres=# \l
>                                                       List of databases
>    Name    |  Owner   | Encoding | Locale Provider |  Collate   |   Ctype    | ICU Locale | ICU Rules |   Access privileges
> -----------+----------+----------+-----------------+------------+------------+------------+-----------+-----------------------
>  keycloak  | postgres | UTF8     | libc            | en_US.utf8 | en_US.utf8 |            |           |
>  postgres  | postgres | UTF8     | libc            | en_US.utf8 | en_US.utf8 |            |           |
>  template0 | postgres | UTF8     | libc            | en_US.utf8 | en_US.utf8 |            |           | =c/postgres
>      +
>            |          |          |                 |            |            |            |           | postgres=CTc/postgres
>  template1 | postgres | UTF8     | libc            | en_US.utf8 | en_US.utf8 |            |           | =c/postgres
>      +
>            |          |          |                 |            |            |            |           | postgres=CTc/postgres
> (4 rows)
# データベースを切り替え
> postgres=# \c keycloak
> You are now connected to database "keycloak" as user "postgres".
# テーブル一覧を確認
> keycloak=# \dt
>                      List of relations
>  Schema |             Name              | Type  |  Owner
> --------+-------------------------------+-------+----------
>  public | admin_event_entity            | table | postgres
>  public | associated_policy             | table | postgres
>  public | authentication_execution      | table | postgres
>  public | authentication_flow           | table | postgres
>  public | authenticator_config          | table | postgres
> ...
# テーブルの中身を確認
> keycloak=# select * from authentication_flow;
> ...
どうやらデータは正しく格納されているようです.
このエラーについてはいくつか議論されていますが問題ないとされているそうです.
So, the SQL errors during init are just some noise and the server was actually correctly installed. My issue was in the ingress rules to access it.16
より詳しく状況がわかったら追記しようと思います.
構築した Openshift 環境の削除
- ポッドの削除
- Keycloak Operator のアンインストール
- プロジェクトの削除
- Secret の削除
- ROSA クラスターに利用した OIDC Provider の削除
- ROSA クラスターに利用したロールの削除
- ROSA クラスターの削除
- クラスター横断の共通ロールの削除
必要に応じて上記を行います.
Keycloak ポッドの削除と Keycloak Operator のアンインストールは Installed Operator から行えます.
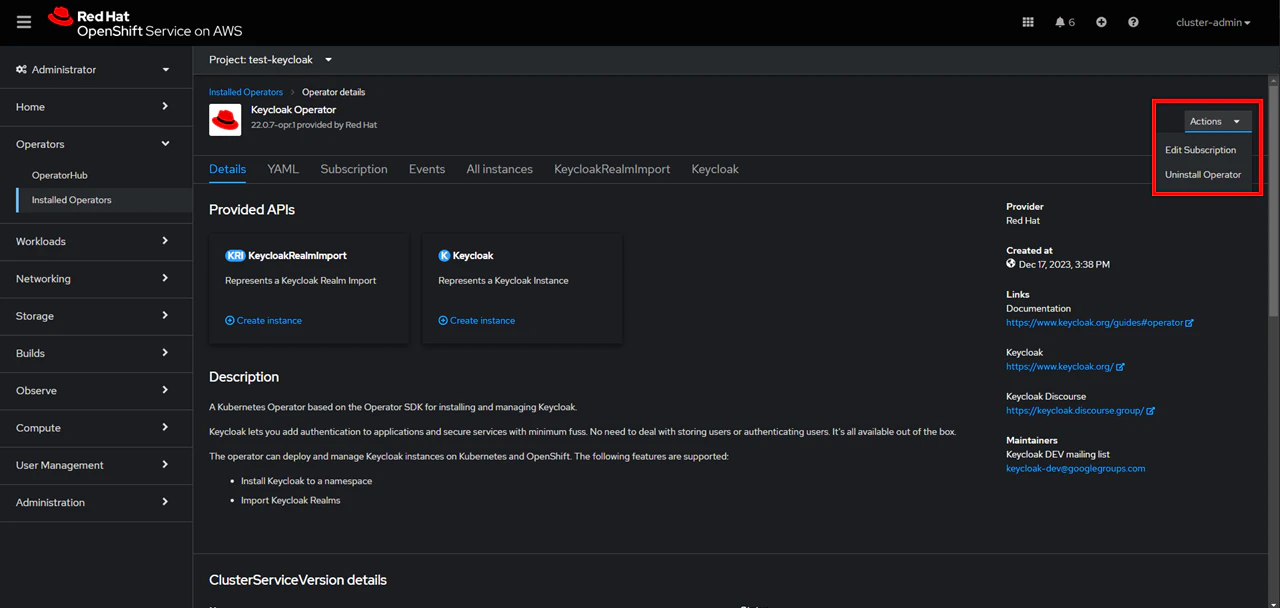
PostgreSQL ポッドは Topology から削除できます.

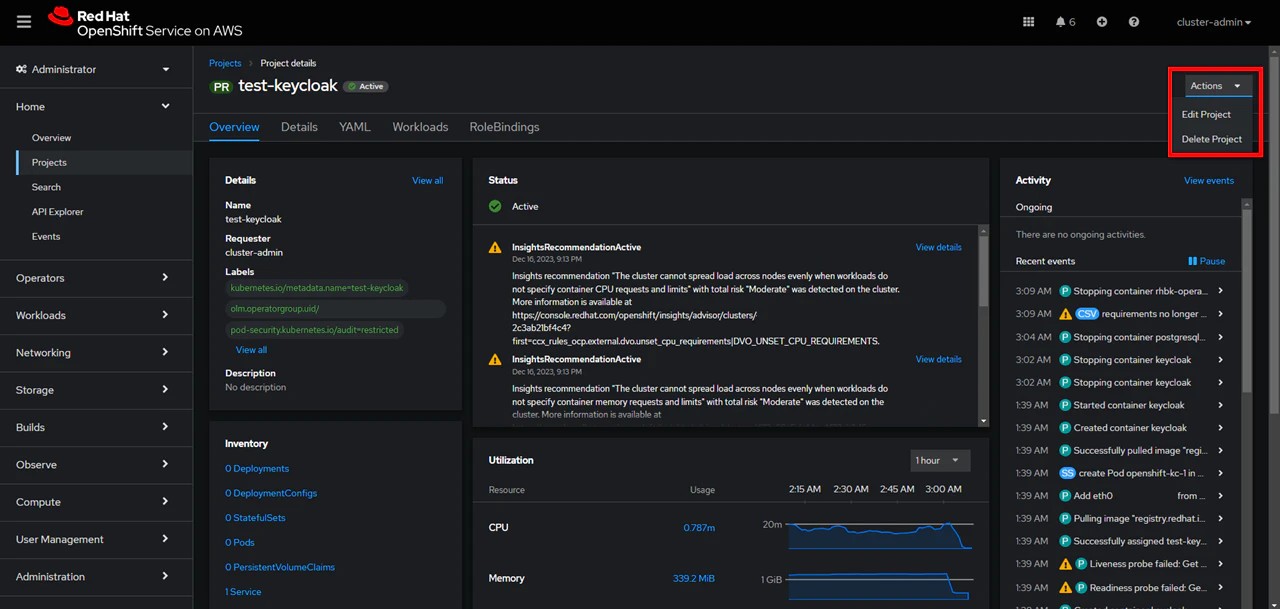
プロジェクトの削除は Home > Projects から行えます.
Secret の削除以降は次のコマンドで行っていきます.
# Secret の削除 (プロジェクトごと削除している場合は不要)
oc delete secret <secret-name>
# ROSA クラスターに利用した OIDC Provider の削除
rosa delete oidc-provider -c <cluster-name> --mode auto
# ROSA クラスターに利用したロールの削除
rosa delete operator-roles -c <cluster-name> --mode auto
# ROSA クラスターの削除
rosa delete cluster --cluster=<cluster-name> --watch
# クラスター横断の共通ロールの削除 (OpenShift の利用を完全に止める場合)
rosa delete account-roles --mode auto
まとめ
本記事では Red Hat OpenShift Service on AWS (ROSA) を利用して Keycloak のクラスター構築を試してみました.
Kubernetes の基礎的な知識や Red Hat サービスへの慣れは必要でしたが,通常 (ローカルマシンなどで) Keycloak の冗長構成を作成する作業と比べると比較的楽に実装できることがわかりました.
これから Keycloak を利用していく際には ROSA の利用も選択肢に入ってくると良いなと思います.
-
https://docs.aws.amazon.com/ROSA/latest/userguide/what-is-rosa.html ↩
-
https://docs.aws.amazon.com/ROSA/latest/userguide/rosa-deployment-options.html ↩
-
https://access.redhat.com/documentation/en-us/red_hat_openshift_service_on_aws/4/html-single/install_rosa_with_hcp_clusters/index#rosa-hcp-classic-comparison_rosa-hcp-sts-creating-a-cluster-quickly ↩
-
https://access.redhat.com/documentation/en-us/red_hat_openshift_service_on_aws/4/html/cli_tools/rosa-cli ↩
-
https://access.redhat.com/documentation/en-us/red_hat_openshift_service_on_aws/4/html/cli_tools/openshift-cli-oc ↩
-
https://docs.aws.amazon.com/ROSA/latest/userguide/getting-started-sts-manual.html ↩
-
https://cloud.redhat.com/learning/learn:getting-started-red-hat-openshift-service-aws-rosa/resource/resources:how-deploy-cluster-red-hat-openshift-service-aws-using-cli ↩
-
https://cloud.redhat.com/learning/learn:getting-started-red-hat-openshift-service-aws-rosa/resource/resources:setting-idp-red-hat-openshift-service-aws ↩
-
https://access.redhat.com/documentation/en-us/red_hat_build_of_keycloak/22.0/html-single/operator_guide/index#customizing-keycloak- ↩
-
https://access.redhat.com/documentation/en-us/red_hat_build_of_keycloak/22.0/html-single/server_guide/index#containers- ↩
-
https://access.redhat.com/documentation/en-us/red_hat_build_of_keycloak/22.0/html-single/operator_guide/index#basic-deployment-performing-a-basic-red-hat-build-of-keycloak-deployment ↩
-
https://access.redhat.com/documentation/ja-jp/openshift_container_platform/4.6/html/support/accessing-running-pods_investigating-pod-issues ↩
-
https://stackoverflow.com/questions/76017090/keycloak-on-k8s-installation-failure-with-error-relation-migration-model-doe ↩