この記事の目的
以前 Slack の拡張機能を調べたので,Mattermost の拡張機能も確認します.
本記事は Mattermost の起動方法,拡張機能の検証,Slack との比較をまとめたものです.
こちらの記事を参考にして,Mattermost サーバーの構築および Plugin や Apps framework の開発を行うことができます.
構成
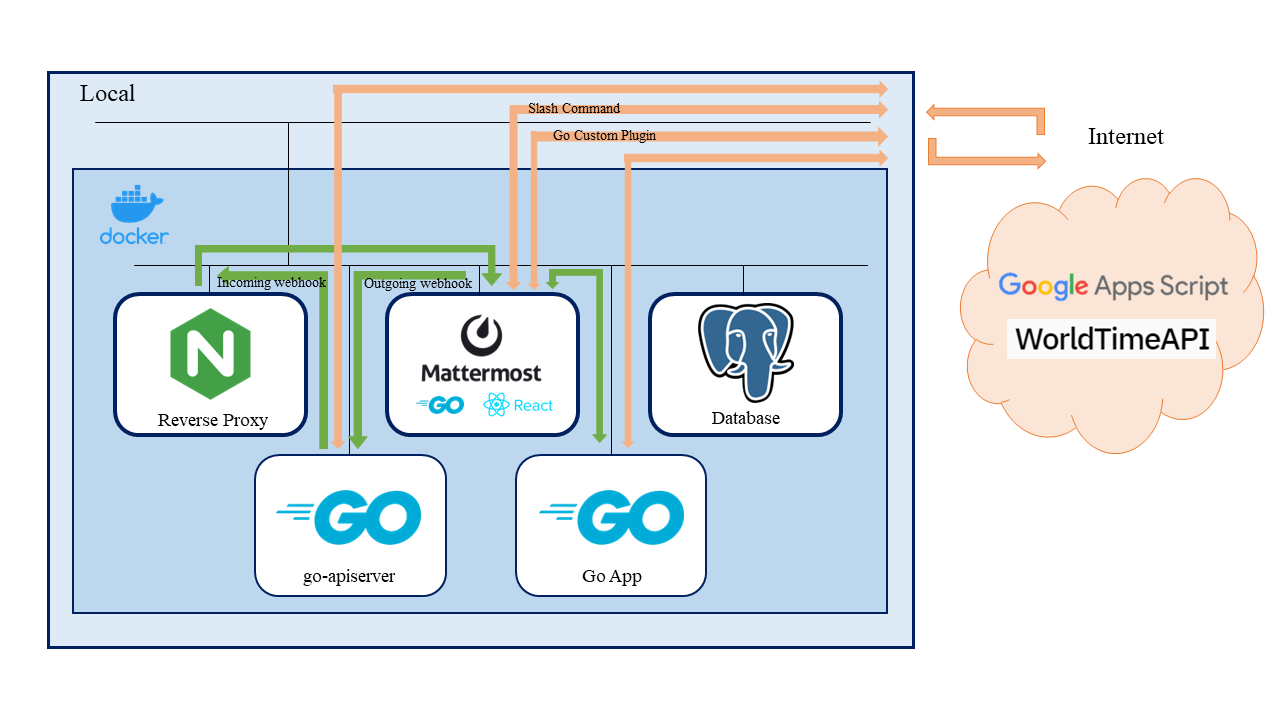
本記事では様々な経路・構成を用いて接続を検証しています.
(結果として図が複雑化してしまいましたが...) 通信経路の自由度が高いことがよくわかると思います.
サービスの紹介
Mattermost

Mattermost について,野村総合研究所が提供する aslead によって以下の様に説明されています.
Mattermostはオープンソースのチャットツールで、セルフホスティングでも、クラウドサービスとしても利用できます。
SaaSのチャットツールであるSlackの代替プロダクトとして利用することができ、使い方もSlackに似ているため、Slackを使用したことがあれば同じような感覚ですぐに使えるでしょう。
また、オープンソースのMattermostはカスタマイズなどの自由性があり、導入コストを抑えられる点も優れたポイントと言えます。1
Mattermost は組織や企業内部でのセキュアな OSS チャットツールを提供します.
ソースコードは Mattermost Inc. によって管理されており,認証認可に関する機能を追加することで有償での提供も行われています.2
Mattermost Inc. の有償サービスを利用する場合は,Mattermost Inc. によるプライベートクラウドまたは自組織で管理する self-hosted から選択することになります.
動作確認環境
動作確認を行った環境情報を以下に示します.
| Name | Version |
|---|---|
| Windows 11 | 22H2 |
| Ubuntu (WSL2) | 20.04.6 LTS |
| Docker | 20.10.17 |
| Docker Compose | v2.10.2 |
| Mattermost | Enterprise Edition 9.3.0 |
| Nginx | 1.24.0 |
| PostgreSQL | 16.1-bullseye |
| Go | 1.21.3 |
| React | 18.2.0 |
| github.com/mattermost/mattermost/server/public | v0.0.13 |
| github.com/mattermost/mattermost-plugin-apps | v1.2.2 |
Mattermost の起動
公式ドキュメントに従って立ち上げます.
公式では git clone から作業を始めますが,本記事では自前で docker-compose.yml と .env を作成します.
-
docker-compose.yml,docker-compose.nginx.yml,.env作成 - Nginx 用 config ファイル作成
- 永続化ボリューム作成
- 証明書発行
- コンテナ起動
mkdir -p $HOME/codes/GitHub/mattermost && cd $_ && \
vim docker-compose.yml
vim docker-compose.nginx.yml
vim .env
mkdir -p ./nginx/conf.d
vim ./nginx/conf.d/default.conf
docker-compose.yml では Git リポジトリのファイルから PostgreSQL ボリューム設定の修正 (/data を削除) が必要でした.
# https://docs.docker.com/compose/environment-variables/

version: "2.4"

services:
  postgres:
    image: postgres:${POSTGRES_IMAGE_TAG}
    restart: ${RESTART_POLICY}
    security_opt:
      - no-new-privileges:true
    pids_limit: 100
    read_only: true
    tmpfs:
      - /tmp
      - /var/run/postgresql
    volumes:
-      - ${POSTGRES_DATA_PATH}:/var/lib/postgresql/data
+      - ${POSTGRES_DATA_PATH}:/var/lib/postgresql
    environment:
      # timezone inside container
      - TZ

      # necessary Postgres options/variables
      - POSTGRES_USER
      - POSTGRES_PASSWORD
      - POSTGRES_DB

  mattermost:
    depends_on:
      - postgres
    image: mattermost/${MATTERMOST_IMAGE}:${MATTERMOST_IMAGE_TAG}
    restart: ${RESTART_POLICY}
    security_opt:
      - no-new-privileges:true
    pids_limit: 200
    read_only: ${MATTERMOST_CONTAINER_READONLY}
    tmpfs:
      - /tmp
    volumes:
      - ${MATTERMOST_CONFIG_PATH}:/mattermost/config:rw
      - ${MATTERMOST_DATA_PATH}:/mattermost/data:rw
      - ${MATTERMOST_LOGS_PATH}:/mattermost/logs:rw
      - ${MATTERMOST_PLUGINS_PATH}:/mattermost/plugins:rw
      - ${MATTERMOST_CLIENT_PLUGINS_PATH}:/mattermost/client/plugins:rw
      - ${MATTERMOST_BLEVE_INDEXES_PATH}:/mattermost/bleve-indexes:rw
      # When you want to use SSO with GitLab, you have to add the cert pki chain of GitLab inside Alpine
      # to avoid Token request failed: certificate signed by unknown authority
      # (link: https://github.com/mattermost/mattermost-server/issues/13059 and https://github.com/mattermost/docker/issues/34)
      # - ${GITLAB_PKI_CHAIN_PATH}:/etc/ssl/certs/pki_chain.pem:ro
    environment:
      # timezone inside container
      - TZ

      # necessary Mattermost options/variables (see env.example)
      - MM_SQLSETTINGS_DRIVERNAME
      - MM_SQLSETTINGS_DATASOURCE

      # necessary for bleve
      - MM_BLEVESETTINGS_INDEXDIR

      # additional settings
      - MM_SERVICESETTINGS_SITEURL

+      #  enable plugin uploads
+      - MM_PLUGINSETTINGS_ENABLEUPLOADS

# If you use rolling image tags and feel lucky watchtower can automatically pull new images and
# instantiate containers from it. https://containrrr.dev/watchtower/
# Please keep in mind watchtower will have access on the docker socket. This can be a security risk.
#
#  watchtower:
#    container_name: watchtower
#    image: containrrr/watchtower:latest
#    restart: unless-stopped
#    volumes:
#      - /var/run/docker.sock:/var/run/docker.sock
version: "2.4"

services:
  nginx:
    depends_on:
      - mattermost
    container_name: nginx_mattermost
    image: nginx:${NGINX_IMAGE_TAG}
    restart: ${RESTART_POLICY}
    security_opt:
      - no-new-privileges:true
    pids_limit: 100
    read_only: true
    tmpfs:
      - /var/run
      - /var/cache
      - /var/log/nginx
    volumes:
      - ${NGINX_CONFIG_PATH}:/etc/nginx/conf.d:ro
-      - ${NGINX_DHPARAMS_FILE}:/dhparams4096.pem
+      - ${NGINX_DHPARAMS_FILE}:/dhparam.pem
      - ${CERT_PATH}:/cert.pem:ro
      - ${KEY_PATH}:/key.pem:ro
      - shared-webroot:/usr/share/nginx/html
    environment:
      # timezone inside container
      - TZ
    ports:
      - ${HTTPS_PORT}:443
      - ${HTTP_PORT}:80
  mattermost:
    ports:
      - ${CALLS_PORT}:${CALLS_PORT}/udp
      - ${CALLS_PORT}:${CALLS_PORT}/tcp

# Shared volume for Let's Encrypt certificate renewal with a webroot
volumes:
  shared-webroot:
    name: shared-webroot

# This network name is being used for Let's Encrypt certificate renewal
networks:
  default:
    name: mattermost
.env では
-
DOMAINはローカル環境で作業するのでlocalhostとしておきます. -
xxx_IMAGE_TAGはお好みのものを指定します.Mattermost は Mattermost Enterprise Edition を利用しても無料で使い続けることができます. - 永続化ボリュームと証明書の配置場所も適宜修正します.
- Plugin を System Console からアップロード&有効化できるようにしたいので
MM_PLUGINSETTINGS_ENABLEUPLOADSを設定しておきます.
# Domain of service
- DOMAIN=mm.example.com
+ DOMAIN=localhost

# Container settings
## Timezone inside the containers. The value needs to be in the form 'Europe/Berlin'.
## A list of these tz database names can be looked up at Wikipedia
## https://en.wikipedia.org/wiki/List_of_tz_database_time_zones
TZ=UTC
RESTART_POLICY=unless-stopped

# Postgres settings
## Documentation for this image and available settings can be found on hub.docker.com
## https://hub.docker.com/_/postgres
## Please keep in mind this will create a superuser and it's recommended to use a less privileged
## user to connect to the database.
## A guide on how to change the database user to a nonsuperuser can be found in docs/creation-of-nonsuperuser.md
- POSTGRES_IMAGE_TAG=13-alpine
- POSTGRES_DATA_PATH=./volumes/db/var/lib/postgresql/data
+ POSTGRES_IMAGE_TAG=16.1-bullseye
+ POSTGRES_DATA_PATH=${HOME}/volumes/mattermost/db/var/lib/postgresql

POSTGRES_USER=mmuser
POSTGRES_PASSWORD=mmuser_password
POSTGRES_DB=mattermost

# Nginx
## The nginx container will use a configuration found at the NGINX_MATTERMOST_CONFIG. The config aims
## to be secure and uses a catch-all server vhost which will work out-of-the-box. For additional settings
## or changes ones can edit it or provide another config. Important note: inside the container, nginx sources
## every config file inside */etc/nginx/conf.d* ending with a *.conf* file extension.

## Inside the container the uid and gid is 101. The folder owner can be set with
## `sudo chown -R 101:101 ./nginx` if needed.
- NGINX_IMAGE_TAG=alpine
+ NGINX_IMAGE_TAG=1.24.0

## The folder containing server blocks and any additional config to nginx.conf
NGINX_CONFIG_PATH=./nginx/conf.d
- NGINX_DHPARAMS_FILE=./nginx/dhparams4096.pem
+ NGINX_DHPARAMS_FILE=${HOME}/.ssh/mattermost/dhparam.pem

- CERT_PATH=./volumes/web/cert/cert.pem
- KEY_PATH=./volumes/web/cert/key-no-password.pem
+ CERT_PATH=${HOME}/.ssh/mattermost/cert.pem
+ KEY_PATH=${HOME}/.ssh/mattermost/key.pem
#GITLAB_PKI_CHAIN_PATH=<path_to_your_gitlab_pki>/pki_chain.pem
#CERT_PATH=./certs/etc/letsencrypt/live/${DOMAIN}/fullchain.pem
#KEY_PATH=./certs/etc/letsencrypt/live/${DOMAIN}/privkey.pem

## Exposed ports to the host. Inside the container 80, 443 and 8443 will be used
HTTPS_PORT=443
HTTP_PORT=80
CALLS_PORT=8443

# Mattermost settings
## Inside the container the uid and gid is 2000. The folder owner can be set with
## `sudo chown -R 2000:2000 ./volumes/app/mattermost`.
- MATTERMOST_CONFIG_PATH=./volumes/app/mattermost/config
- MATTERMOST_DATA_PATH=./volumes/app/mattermost/data
- MATTERMOST_LOGS_PATH=./volumes/app/mattermost/logs
- MATTERMOST_PLUGINS_PATH=./volumes/app/mattermost/plugins
- MATTERMOST_CLIENT_PLUGINS_PATH=./volumes/app/mattermost/client/plugins
- MATTERMOST_BLEVE_INDEXES_PATH=./volumes/app/mattermost/bleve-indexes
+ MATTERMOST_CONFIG_PATH=${HOME}/volumes/mattermost/app/mattermost/config
+ MATTERMOST_DATA_PATH=${HOME}/volumes/mattermost/app/mattermost/data
+ MATTERMOST_LOGS_PATH=${HOME}/volumes/mattermost/app/mattermost/logs
+ MATTERMOST_PLUGINS_PATH=${HOME}/volumes/mattermost/app/mattermost/plugins
+ MATTERMOST_CLIENT_PLUGINS_PATH=${HOME}/volumes/mattermost/app/mattermost/client/plugins
+ MATTERMOST_BLEVE_INDEXES_PATH=${HOME}/volumes/mattermost/app/mattermost/bleve-indexes

## Bleve index (inside the container)
MM_BLEVESETTINGS_INDEXDIR=/mattermost/bleve-indexes

## This will be 'mattermost-enterprise-edition' or 'mattermost-team-edition' based on the version of Mattermost you're installing.
MATTERMOST_IMAGE=mattermost-enterprise-edition
- MATTERMOST_IMAGE_TAG=7.8
+ MATTERMOST_IMAGE_TAG=9.3.0

## Make Mattermost container readonly. This interferes with the regeneration of root.html inside the container. Only use
## it if you know what you're doing.
## See https://github.com/mattermost/docker/issues/18
MATTERMOST_CONTAINER_READONLY=false

## The app port is only relevant for using Mattermost without the nginx container as reverse proxy. This is not meant
## to be used with the internal HTTP server exposed but rather in case one wants to host several services on one host
## or for using it behind another existing reverse proxy.
APP_PORT=8065

## Configuration settings for Mattermost. Documentation on the variables and the settings itself can be found at
## https://docs.mattermost.com/administration/config-settings.html
## Keep in mind that variables set here will take precedence over the same setting in config.json. This includes
## the system console as well and settings set with env variables will be greyed out.

## Below one can find necessary settings to spin up the Mattermost container
MM_SQLSETTINGS_DRIVERNAME=postgres
MM_SQLSETTINGS_DATASOURCE=postgres://${POSTGRES_USER}:${POSTGRES_PASSWORD}@postgres:5432/${POSTGRES_DB}?sslmode=disable&connect_timeout=10

## Example settings (any additional setting added here also needs to be introduced in the docker-compose.yml)
MM_SERVICESETTINGS_SITEURL=https://${DOMAIN}

+ ## Enable Plugin Uploads
+ MM_PLUGINSETTINGS_ENABLEUPLOADS=true
Plugins のアップロード容量に合せて client_max_body_size も調整しておきます.
# mattermost
# config can be tested on https://www.ssllabs.com/ssltest/ and a good nginx config generator
# can be found at https://ssl-config.mozilla.org/

# proxy cache
proxy_cache_path /var/cache/nginx levels=1:2 keys_zone=mattermost_cache:10m max_size=3g inactive=120m use_temp_path=off;

# upstream used in proxy_pass below
upstream backend {
    # ip where Mattermost is running; this relies on a working DNS inside the Docker network
    # and uses the hostname of the mattermost container (see service name in docker-compose.yml)
    server mattermost:8065;
    keepalive 64;
}

# vhosts definitions
server {
    server_name _;
    listen 80 default_server;
    listen [::]:80 default_server;

    # redirect all HTTP requests to HTTPS with a 301 Moved Permanently response.
    return 301 https://$host$request_uri;
}

server {
    server_name _;
    listen 443 ssl http2 default_server;
    listen [::]:443 ssl http2 default_server;

    # logging
    access_log /var/log/nginx/mm.access.log;
    error_log /var/log/nginx/mm.error.log warn;

    # gzip for performance
    gzip on;
    gzip_vary on;
    gzip_proxied any;
    gzip_comp_level 6;
    gzip_types text/plain text/css text/xml application/json application/javascript application/rss+xml application/atom+xml image/svg+xml;

    ## ssl
-    ssl_dhparam /dhparams4096.pem;
+    ssl_dhparam /dhparam.pem;
    ssl_session_timeout 1d;
    ssl_session_cache shared:MozSSL:10m;
    ssl_session_tickets off;

    # intermediate configuration
    ssl_protocols TLSv1.2 TLSv1.3;
    ssl_ciphers ECDHE-ECDSA-AES128-GCM-SHA256:ECDHE-RSA-AES128-GCM-SHA256:ECDHE-ECDSA-AES256-GCM-SHA384:ECDHE-RSA-AES256-GCM-SHA384:ECDHE-ECDSA-CHACHA20-POLY1305:ECDHE-RSA-CHACHA20-POLY1305:DHE-RSA-AES128-GCM-SHA256:DHE-RSA-AES256-GCM-SHA384;
    ssl_prefer_server_ciphers off;

    # certs sent to the client in SERVER HELLO are concatenated in ssl_certificate
    ssl_certificate /cert.pem;
    ssl_certificate_key /key.pem;

    # enable TLSv1.3's 0-RTT. Use $ssl_early_data when reverse proxying to prevent replay attacks.
    # https://nginx.org/en/docs/http/ngx_http_ssl_module.html#ssl_early_data
    ssl_early_data on;

    # OCSP stapling
    ssl_stapling on;
    ssl_stapling_verify on;
    #resolver 1.1.1.1;

    # verify chain of trust of OCSP response using Root CA and Intermediate certs
    #ssl_trusted_certificate /etc/ssl/certs/ca-certificates.crt;

    ## security headers
    # https://securityheaders.com/
    # https://scotthelme.co.uk/tag/security-headers/
    add_header X-Frame-Options "SAMEORIGIN" always;
    add_header X-XSS-Protection "1; mode=block" always;
    add_header X-Content-Type-Options "nosniff" always;
    add_header Referrer-Policy no-referrer;
    add_header Strict-Transport-Security "max-age=63072000" always;
    add_header Permissions-Policy "interest-cohort=()";

    ## locations
    # ACME-challenge
    location ^~ /.well-known {
        default_type "text/plain";
        root /usr/share/nginx/html;
        allow all;
    }

    # disable Google bots from indexing this site
    location = /robots.txt {
        add_header Content-Type text/plain;
        return 200 "User-agent: *\nDisallow: /\n";
    }

    location ~ /api/v[0-9]+/(users/)?websocket$ {
        proxy_set_header Upgrade $http_upgrade;
        proxy_set_header Connection "upgrade";
-        client_max_body_size 50M;
+        client_max_body_size 200M;
        proxy_set_header Host $http_host;
        proxy_set_header X-Real-IP $remote_addr;
        proxy_set_header X-Forwarded-For $proxy_add_x_forwarded_for;
        proxy_set_header X-Forwarded-Proto $scheme;
        proxy_set_header X-Frame-Options SAMEORIGIN;
        proxy_set_header Early-Data $ssl_early_data;
        proxy_buffers 256 16k;
        proxy_buffer_size 16k;
        client_body_timeout 60;
        send_timeout 300;
        lingering_timeout 5;
        proxy_connect_timeout 90;
        proxy_send_timeout 300;
        proxy_read_timeout 90s;
        proxy_http_version 1.1;
        proxy_pass http://backend;
    }

    location / {
-        client_max_body_size 50M;
+        client_max_body_size 200M;
        proxy_set_header Connection "";
        proxy_set_header Host $http_host;
        proxy_set_header X-Real-IP $remote_addr;
        proxy_set_header X-Forwarded-For $proxy_add_x_forwarded_for;
        proxy_set_header X-Forwarded-Proto $scheme;
        proxy_set_header X-Frame-Options SAMEORIGIN;
        proxy_set_header Early-Data $ssl_early_data;
        proxy_buffers 256 16k;
        proxy_buffer_size 16k;
        proxy_read_timeout 600s;
        proxy_cache mattermost_cache;
        proxy_cache_revalidate on;
        proxy_cache_min_uses 2;
        proxy_cache_use_stale timeout;
        proxy_cache_lock on;
        proxy_http_version 1.1;
        proxy_pass http://backend;
    }
}
.env で設定したように永続化ボリュームは $HOME/volumes/mattermost 配下に作成します.
mkdir -p $HOME/volumes/mattermost/app/mattermost/{config,data,logs,plugins,client/plugins,bleve-indexes}
sudo chown -R 2000:2000 $HOME/volumes/mattermost/app/mattermost
次に (自己署名) 証明書発行します.
mkdir -p $HOME/.ssh/mattermost && cd $_ && \
openssl req -newkey rsa:2048 -nodes -keyout key.pem -x509 -days 365 -out cert.pem
openssl dhparam -out dhparam.pem 4096
起動します.
cd $HOME/codes/GitHub/mattermost
docker compose -f docker-compose.yml -f docker-compose.nginx.yml up -d
https://localhost で接続すると Mattermost に接続できます.
本記事ではテストユーザーとして以下を使用します.
- Email address:
test@example.foobar.com - Username:
mattermost-test - Password:
test-password
またサンプル Organization を test-org としておきます.
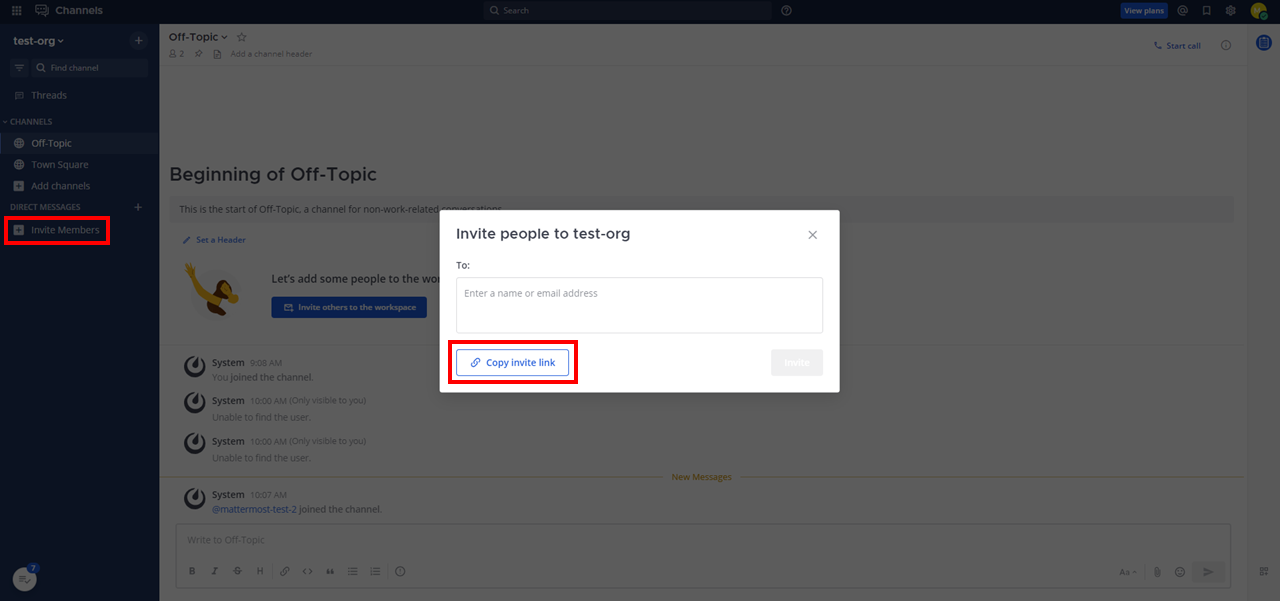
ユーザー追加
Mattermost のワークスペースにユーザーを追加する方法には
- 招待メールを送信する
- Invite Link を発行して渡す
があります.
ユーザーの招待に関する設定/制限は System Console > Signup/Email から行います.
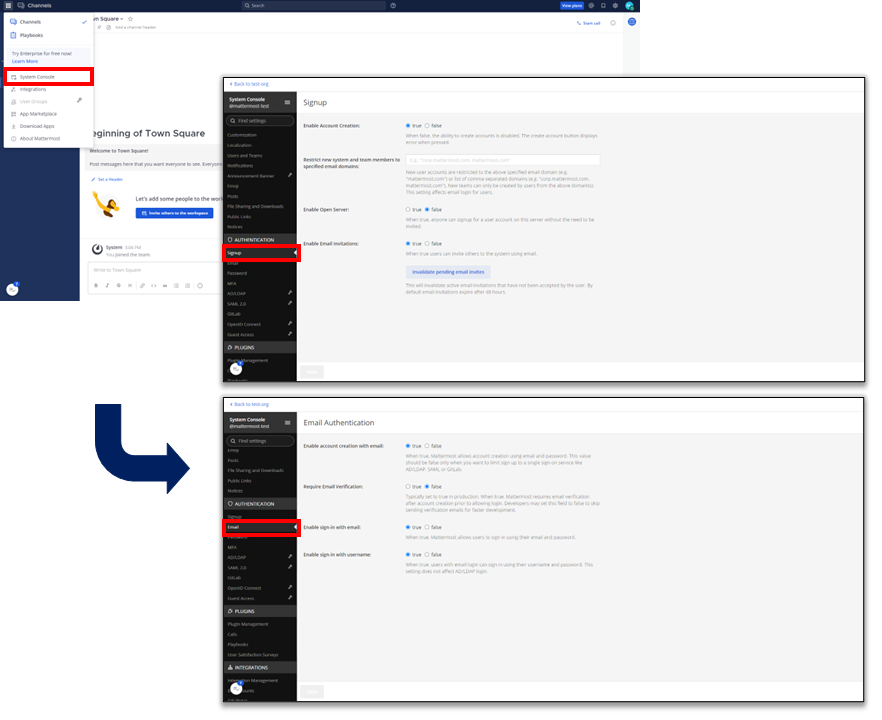
- ユーザー追加の可/不可
- ユーザー登録なしでの利用可/不可
- メールによる招待の可/不可
- 招待可能なメールアドレスドメイン登録
- Eメールでの有効化の要/不要
- ユーザ名でのログイン可/不可
- メールアドレスでのログイン可/不可
有効化されていない招待を一括ですべて無効化する機能もあります.
LDAP/SSO/OIDC によるログインは Mattermost Professional を利用しないと有効化できません.
ただし,GitLab での認証は Free 版でも有効化することができるようです.3
GitLab 連携については後に別記事で触れようと思います.
GitLab を利用しておらず Mattermost サーバーをメールアドレスを送信できないクローズドな環境で利用することを想定している場合は,Eメールでの有効化が不要になっていることを確認後 invite link を渡してユーザー追加することができます.
本記事での追加ユーザーは以下で設定しておきます.
- Email address:
test-2@example.foobar.com - Username:
mattermost-test-2 - Password:
test-password-2
Slack と Mattermost の比較
機能
特定のチャンネル・チャットにメッセージを送る
Slack, Mattermost ともに Incoming Webhook および API を利用して実現できます.
特定のチャンネルでメッセージを検索する
Slack, Mattermost ともに API を利用して実現できます.
特定のチャンネルからいろいろなサービスの処理を発生させる
Slack では
- スラッシュコマンド
- Event API
Mattermost では
- スラッシュコマンド
- Outgoing Webhook
- カスタムプラグイン (Apps Framework)
を用いて実現できます.
自動で処理を発生させたい場合,Slack の Event API は様々なイベントに応じて処理を発火させることができますが,Mattermost の Outgoing Webhook では特定文字の投稿にのみ発火させることができます.
スラッシュコマンド (Mattermost ではカスタムプラグインによる機能追加を含む) を使えば,Slack・Mattermost どちらもユーザーの任意のタイミングで任意の処理を発生させることができます.
高級なメッセージ投稿 (Interactivity)
Slack, Mattermost ともに専用の独自サーバーを構築して連携することで,ボタンやモーダルを利用したチャット+αのやり取りを実現することができます.
公開されているプラグイン
Marketplace (Slack, Mattermost) で公開されているプラグインの種類はともに豊富で,(筆者の目線では) 特に遜色がありません.
チャット画面の見た目の変更
Mattermost では React/Redux フレームワークを用いて広範囲の画面変更を行うことができますが,Slack は公式で提供されている設定可能な範囲にとどまります.
ネットワーク構成
Mattermost は self-hosted することで閉じたネットワーク内で全ての機能を完結させることができますが,Slack は SaaS なので完全に閉じることはできません.
利用開始のしやすさ
Slack に比べると Mattermost はチャットツール用のサーバーそのものの導入が必要になります.
Slack はメールアドレスとインターネット環境があれば OK なので,Mattermost は若干ハードルが高いです.
Webhooks
Mattermost supports webhooks to easily integrate external applications into the server.
- Incoming webhooks: Mattermost の任意のチャンネルにメッセージ/DM を送信する
- Outgoing webhooks: 外部アプリ/サーバーに Mattermost からリクエストを送信し,レスポンスを受信/処理してもらう
Mattermost では上記いずれの webhook もサポートしています.
Slack は Incoming webhook のみサポートしているため明確な機能差です.
(正確に言うと Slack にもありましたが非推奨になりました4)
Slack の機能に近いところだと Event API が相当しますが,
- Mattermost の Outgoing Webhook は指定チャンネルに投稿されるメッセージの特定文字列を基準に発火する
- Slack の Event API は特定のメッセージの投稿だけでなく,ユーザの追加など様々なイベントを基準にして発火する
という差があります.
Outgoing webhooks はパブリックチャンネルでのみ有効で,プライベートチャンネルで同じ動作をしたい場合はスラッシュコマンドを使うことになります.
スラッシュコマンドと比較してユーザーが無意識に発火するようにしておくことができるので,(様々な倫理的問題はさておき.パブリックチャンネル only なので多少はOK?) ロギングやデータ収集を自動で行うなどの利用方法が考えられます.
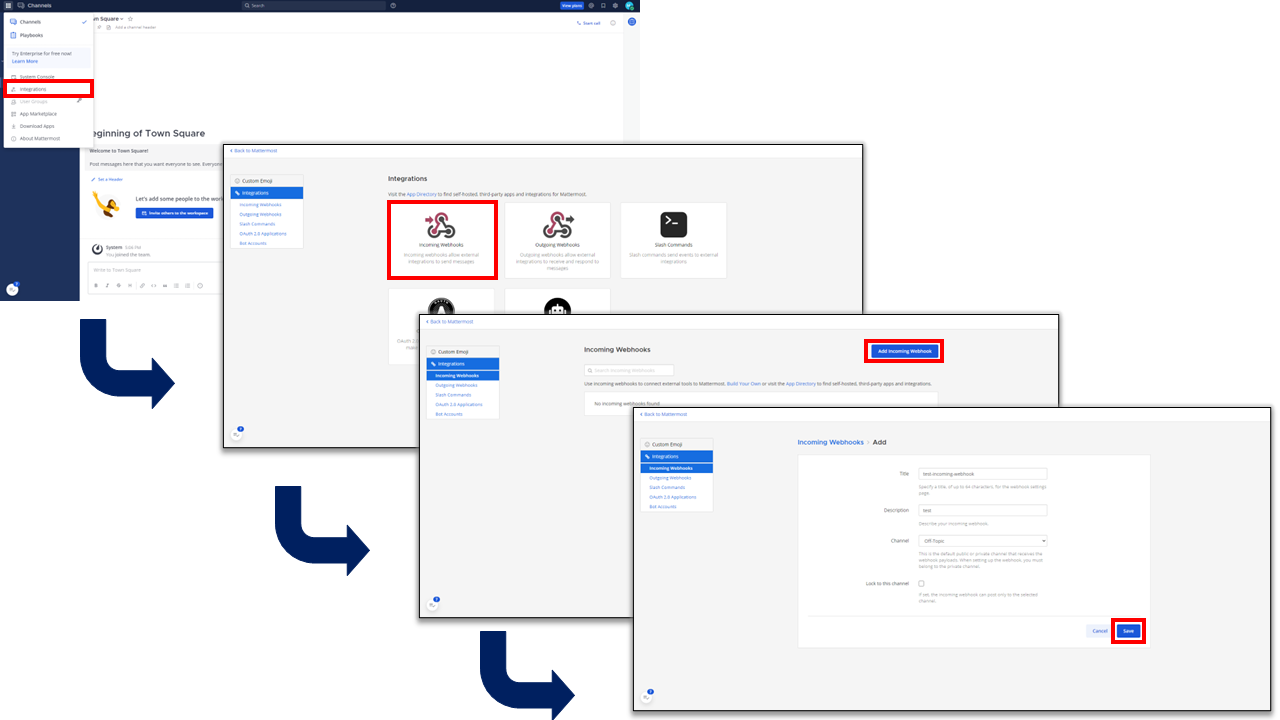
Incoming webhooks を使う
Incoming webhook を利用するために宛先 URL を発行します.
URL 発行は Slack 同様に簡単に行えます.
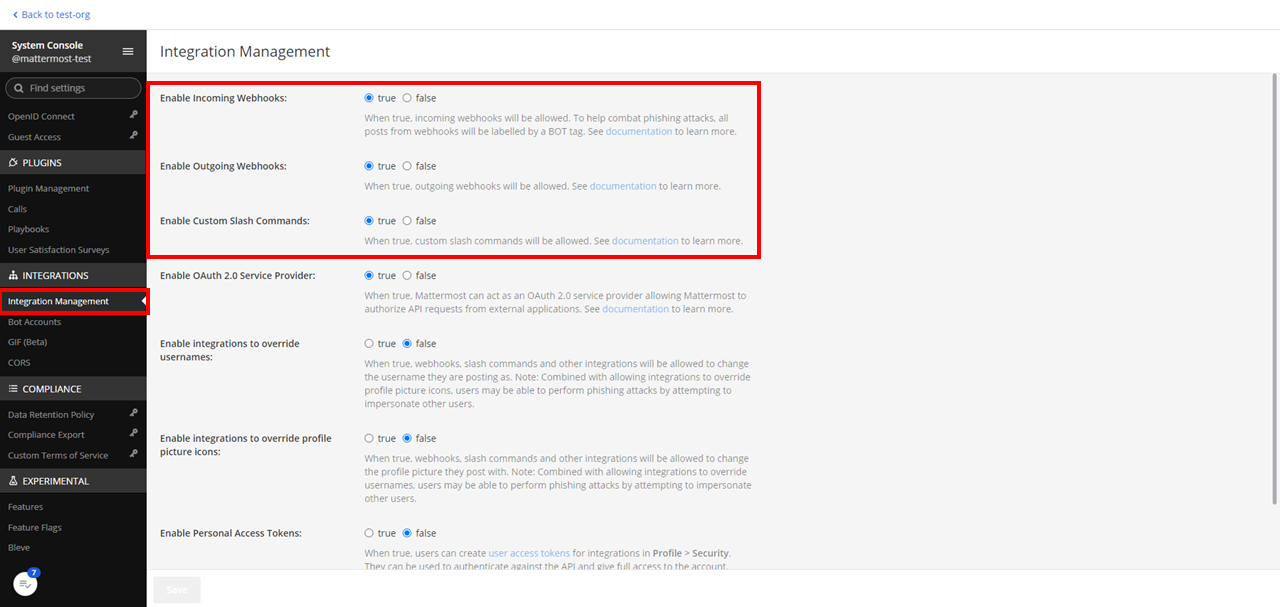
System Console > Integration Management から Webhook が有効になっていることを確認し,Integrations > Incoming Webhooks から作成していきます.
(この後 Outgoing Webhook やスラッシュコマンドも使うので有効であることも確認しておきます)
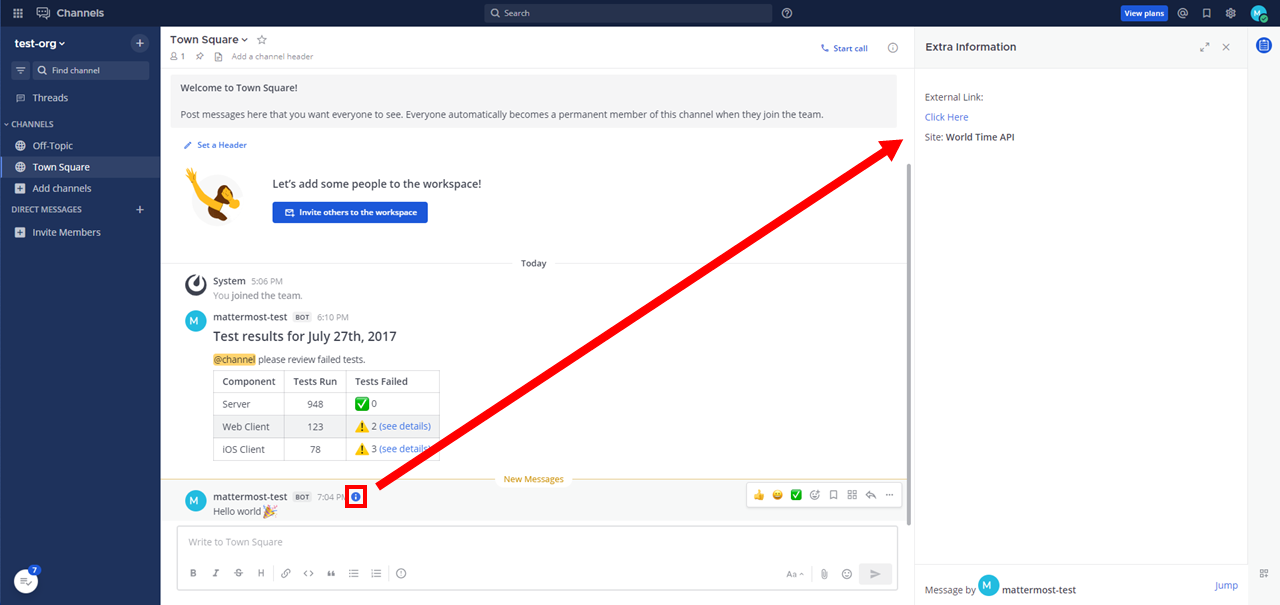
URL を取得したら POST してメッセージを投稿できます.
リクエストボディを構成するフィールドは Slack を強く意識して合わせに行っているようです.
text フィールドはマークダウンをサポートし,@here などのメンションを含めることができます.表などを表現したい場合も \n を駆使して text フィールドに含めます.
channel フィールドを使うと webhook 作成時に指定した宛先チャンネル以外にも投稿できます.
props フィールドを活用することでメッセージに付加情報を含めることができます.
Slack の Interactivity & Shortcuts と比較すると機能が少ないように見えますが,その分機能習熟なども必要なくスッと受け入れられる範囲としては適度かなと思います.
curl -X POST 'https://localhost/hooks/xxxxxxxxxx' \
--insecure \
-H "Content-Type: application/json" \
-d @- << EOF
{
  "channel": "town-square",
  "text": "Hello world :tada:",
  "props": {
    "card": "External Link:\n\n [Click Here](https://worldtimeapi.org/)\n\nSite: **World Time API**"
  }
}
EOF
ただし,Slack と異なりスレッド返信 (Slack では ts 値を使った) はサポートしていないようです.
Outgoing webhooks を使う
Outgoing Webhook の設定には外部 Web アプリの準備とともに,Mattermost 側に Web アプリとの通信を許可する設定が必要になります.
また,Webhook 処理を発火させるための発火ワードを決めて Mattermost に登録することになります.
Web アプリ側からのレスポンスは Incoming Webhook と同じ構成を取ることで Mattermost にメッセージを投稿することができます.
特に response_type フィールドを comment に設定すると発火元のメッセージにスレッド返信することができます.5
response_type フィールドのデフォルト値である post では新規投稿を返すことになっていますが,text を含むデータを Mattermost に返さなければメッセージ投稿をしないようにすることもできます.
ここでは Slack の例で示した Event API と同じ動作を再現し,Outgoing Webhook から呼び出された Web アプリが Incoming Webhook を使って Mattermost にメッセージを投稿するようにします.
加えて response_type フィールドを comment に設定して発火元の投稿にも返信を行います.
返信内容は WorldTimeAPI の返答値 (datetime) とします.
ただし,本記事の構成では Mattermost をインターネット公開していないため Google Apps Script (GAS) 等のサービス側から Mattermost に向かっての通信はできないことに注意します.
本記事の Incoming/Outgoing Webhook 構成ではクローズドな環境を想定し,Mattermost および Web アプリをローカルのコンテナで起動します.
各コンテナで名前解決をするため localhost は封印し,Mattermost と同じ Docker Network に配置した Golang コンテナ上に API サーバを立てて通信を行います.
まずは API サーバを作成します.
url_mattermost には先ほど設定した Incoming Webhook を指定しますが localhost ではなく,リバースプロキシのコンテナ名である nginx_mattermost を利用します.
# コーディング
mkdir -p $HOME/codes/GitHub/mattermost/go && cd $_ && \
vim main.go
# API サーバ立ち上げ
docker run --rm \
--name go-apiserver \
--network mattermost \
-p 8081:8081 \
-it -v $HOME/codes/GitHub/mattermost/go:/go/src \
golang:1.21.3 go run ./src/main.go
package main

import (
	"fmt"
	"log"
    "net/http"
    "encoding/json"
	"io/ioutil"
	"bytes"
	"crypto/tls"
)

type Response struct {
	Datetime string `json:"datetime"`
}

type Request struct {
	Text          string
	Channel       string
	Response_Type string
}

func Handler(w http.ResponseWriter, r *http.Request) {
	// WorldTimeAPI Response
	url_time := "http://worldtimeapi.org/api/timezone/Asia/Tokyo"
	res_time, err_time := http.Get(url_time)
	if err_time != nil {
		fmt.Println(err_time)
    }

	defer res_time.Body.Close()
	rbody, _ := ioutil.ReadAll(res_time.Body)
	var response Response
	json.Unmarshal(rbody, &response)

	// Mattermost Request
	// url_mm := "https://localhost/hooks/xxxxxxxxxx"
	url_mm := "https://nginx_mattermost/hooks/xxxxxxxxxx"
	channel_mm := "town-square"
	response_type := "comment"

	request := &Request{Text: response.Datetime, Channel: channel_mm, Response_Type: response_type}
	jsonData, _ := json.Marshal(request)
	http.DefaultTransport.(*http.Transport).TLSClientConfig = &tls.Config{InsecureSkipVerify: true}
	req, _ := http.NewRequest("POST", url_mm, bytes.NewBuffer(jsonData))
	req.Header.Set("Content-Type", "application/json")
	var client = &http.Client{}
	res_mm, err_mm := client.Do(req)
	if err_mm != nil {
		fmt.Println(err_mm)
    }
	defer res_mm.Body.Close()

	w.WriteHeader(http.StatusOK)
	// w.Write([]byte(fmt.Sprintf("Datetime: %s", request.Text)))
	fmt.Fprint(w, bytes.NewBuffer(jsonData).String())
}

func HandlerIco(w http.ResponseWriter, r *http.Request) {}

func handleRequests() {
	http.HandleFunc("/", Handler)
	http.HandleFunc("/favicon.ico", HandlerIco)
    log.Fatal(http.ListenAndServe(":8081", nil))
}

func main() {
    handleRequests()
}
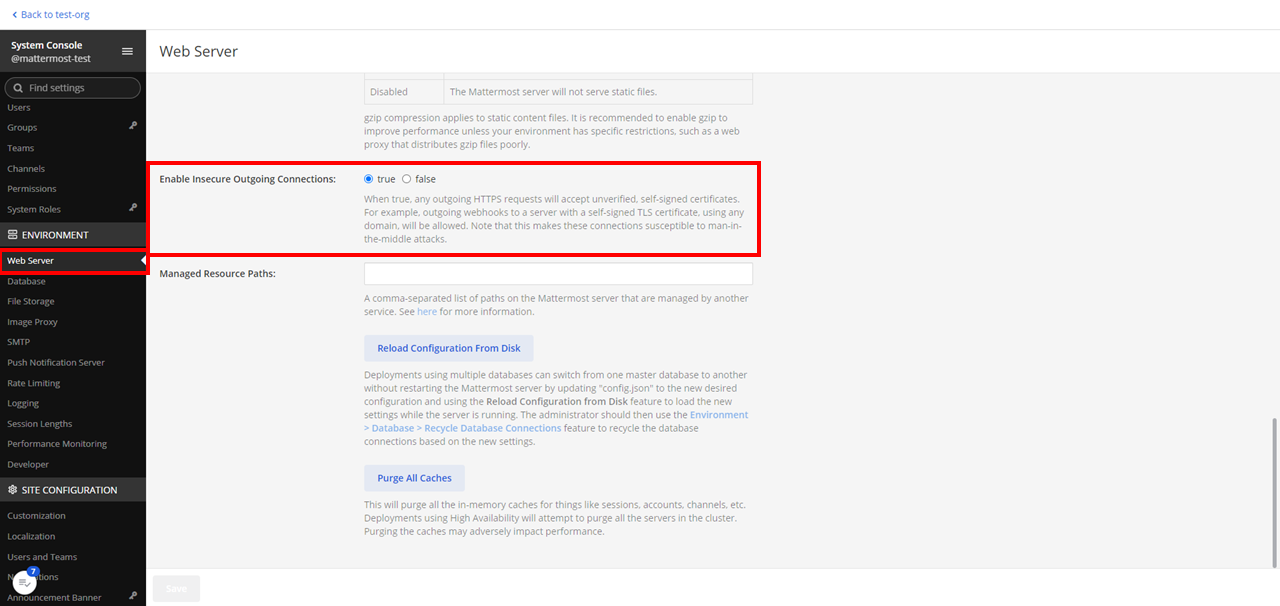
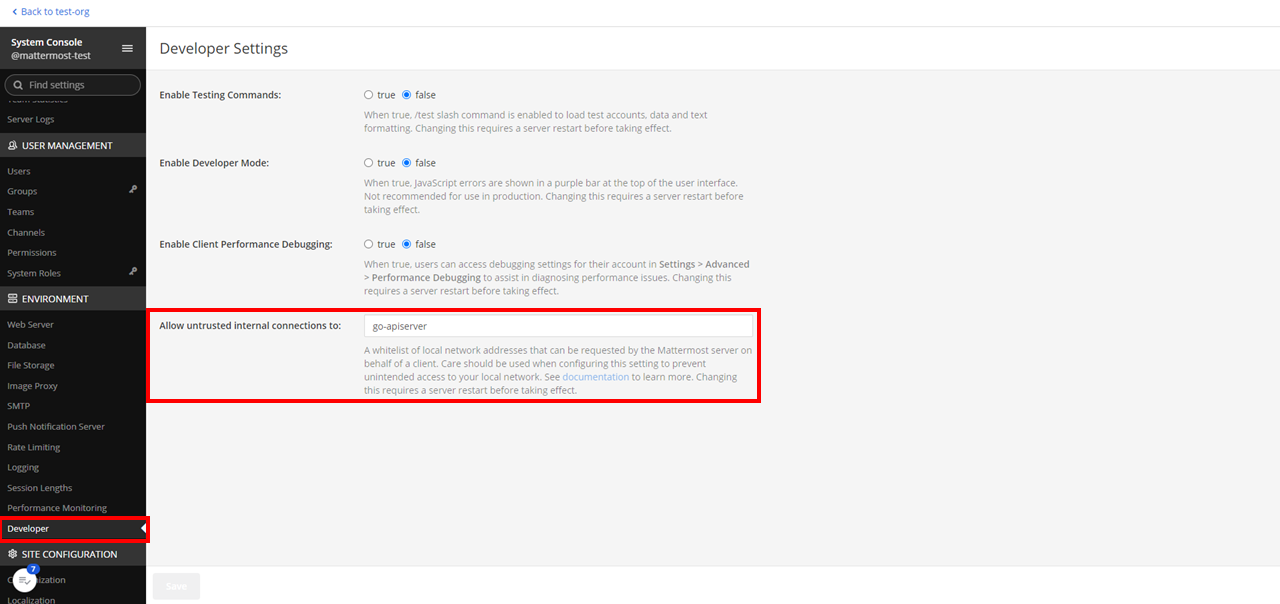
System Console > Web Server から insecure オプションで接続できるようになっていることを確認し,System Console > Developer から先ほど作成した go-apiserver (ドメイン名) または docker network inspect mattermost で確認できる IP アドレスをホワイトリストに設定しておきます.
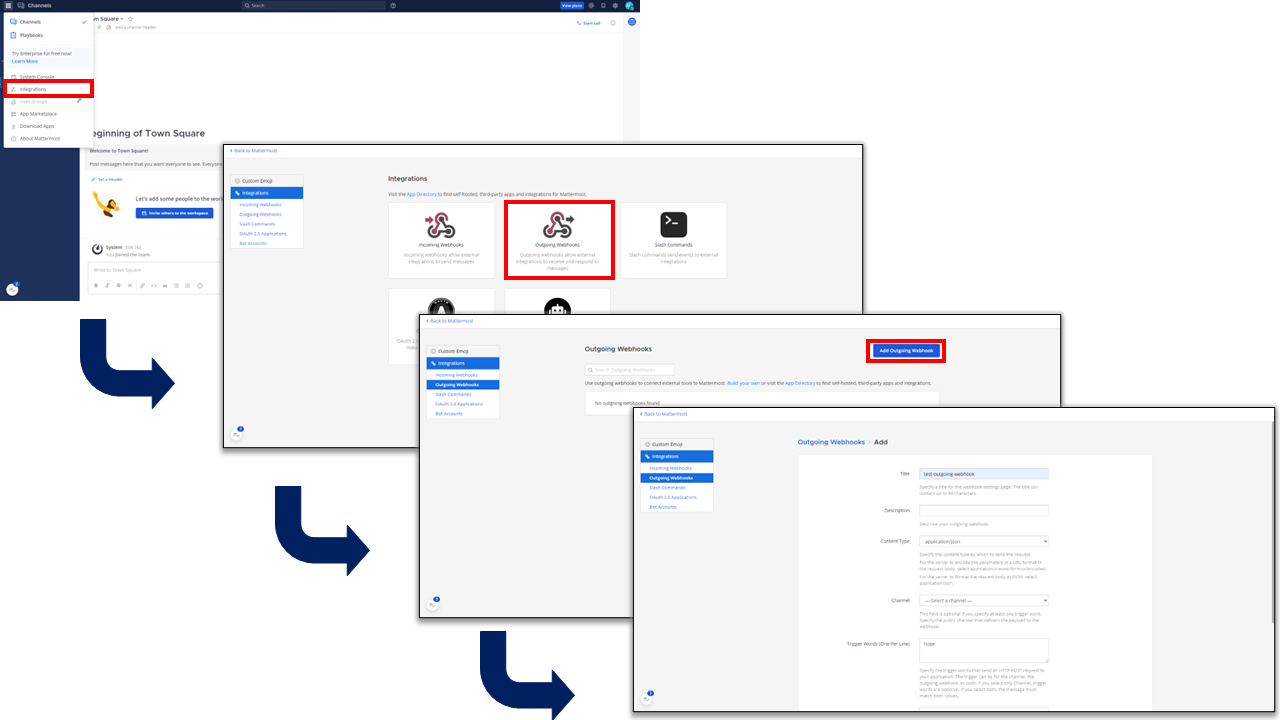
ここまで終わったら Integrations > Outgoing Webhooks から Webhook を作成していきます.
Callback URLs には http://go-apiserver:8081 を設定しておきます.
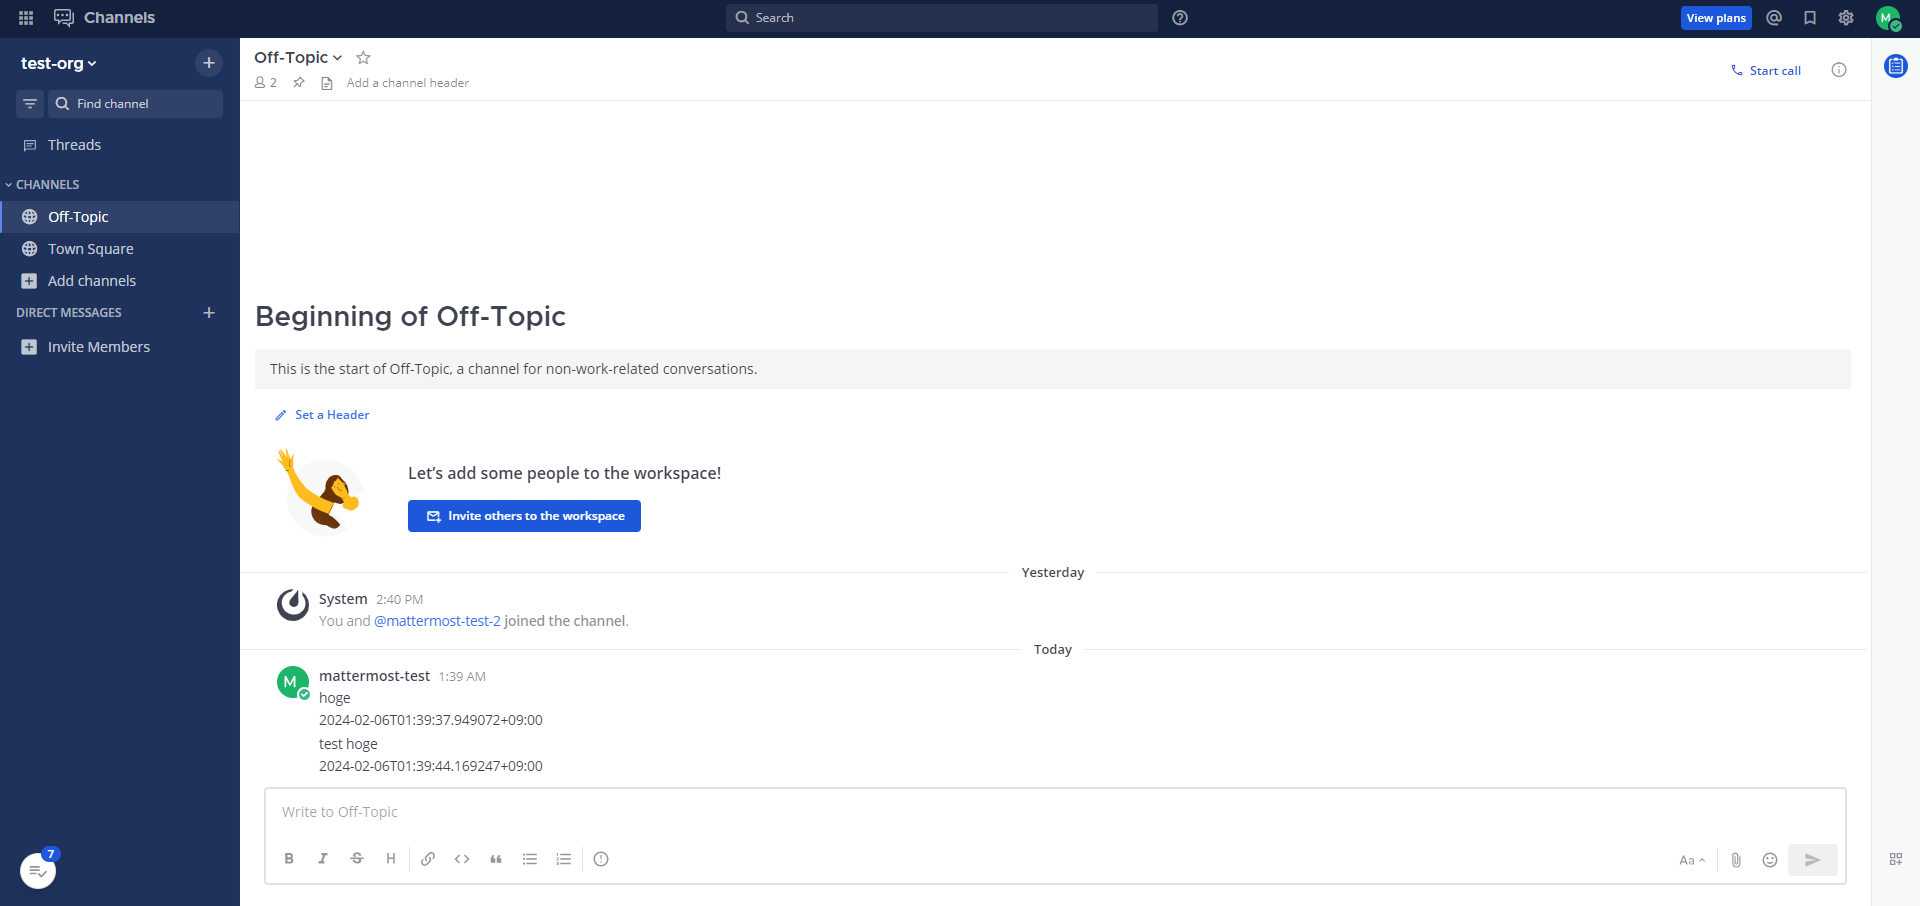
Webhook 起動条件はメッセージの最初の単語が hoge であった場合としておきます.
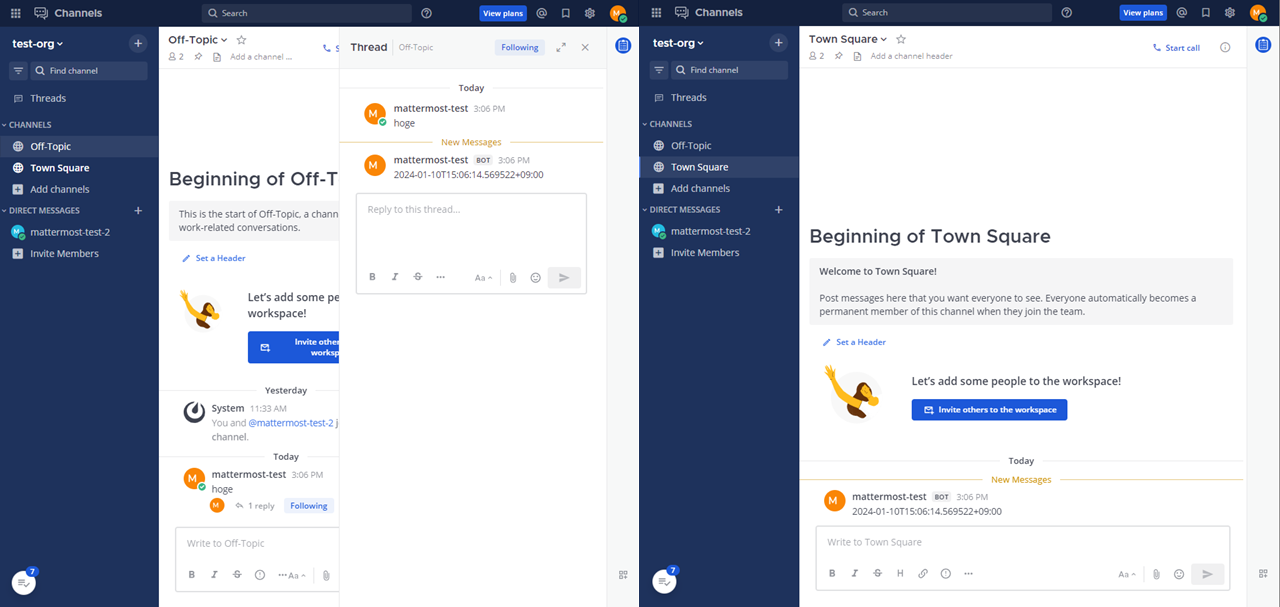
Off-Topic チャンネルで hoge と投稿してみるとスレッド返信で WorldTimeAPI の datetime が返ってきていると同時に,Incoming Webhook にて Town Square チャンネルにも同時刻の結果が送信されていることがわかります.
go-apiserver コンテナを停止し,
-
w.Write([]byte(fmt.Sprintf("Datetime: %s", request.Text)))のコメントアウトを外す -
fmt.Fprint(w, bytes.NewBuffer(jsonData).String())をコメントアウト
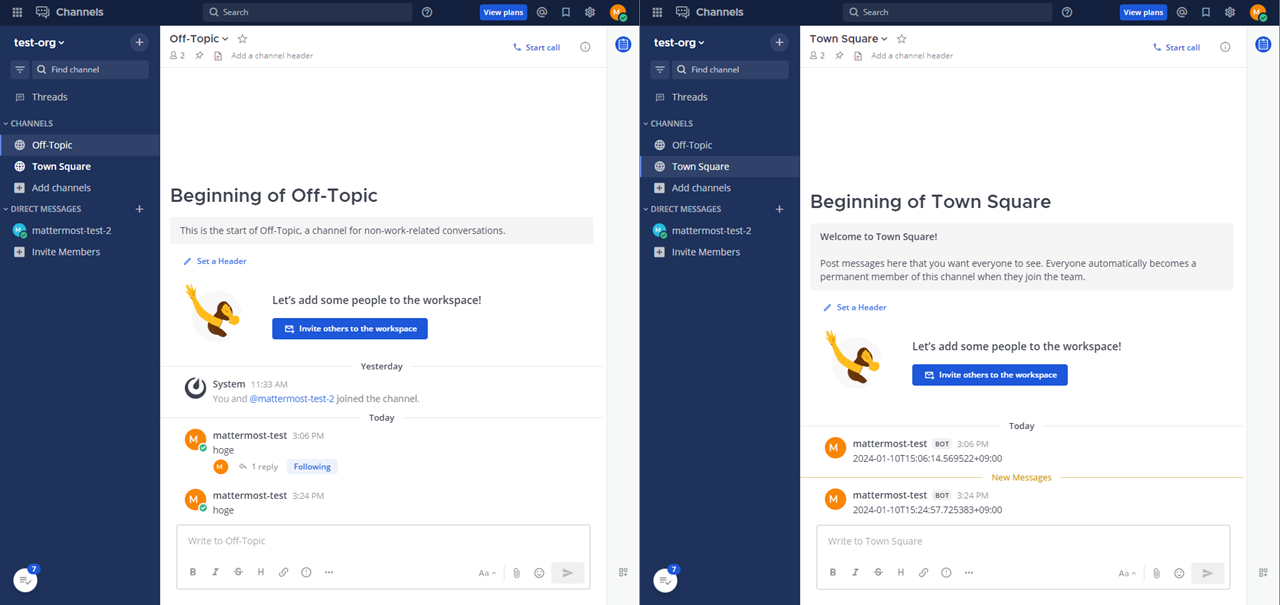
をしてコンテナを再起動し,再び Off-Topic チャンネルで hoge と投稿してみると Incoming Webhook の処理は行われるものの Outgoing Webhook に対するレスポンスには返信情報がないため Town Square チャンネルのみに投稿されることが確認できます.
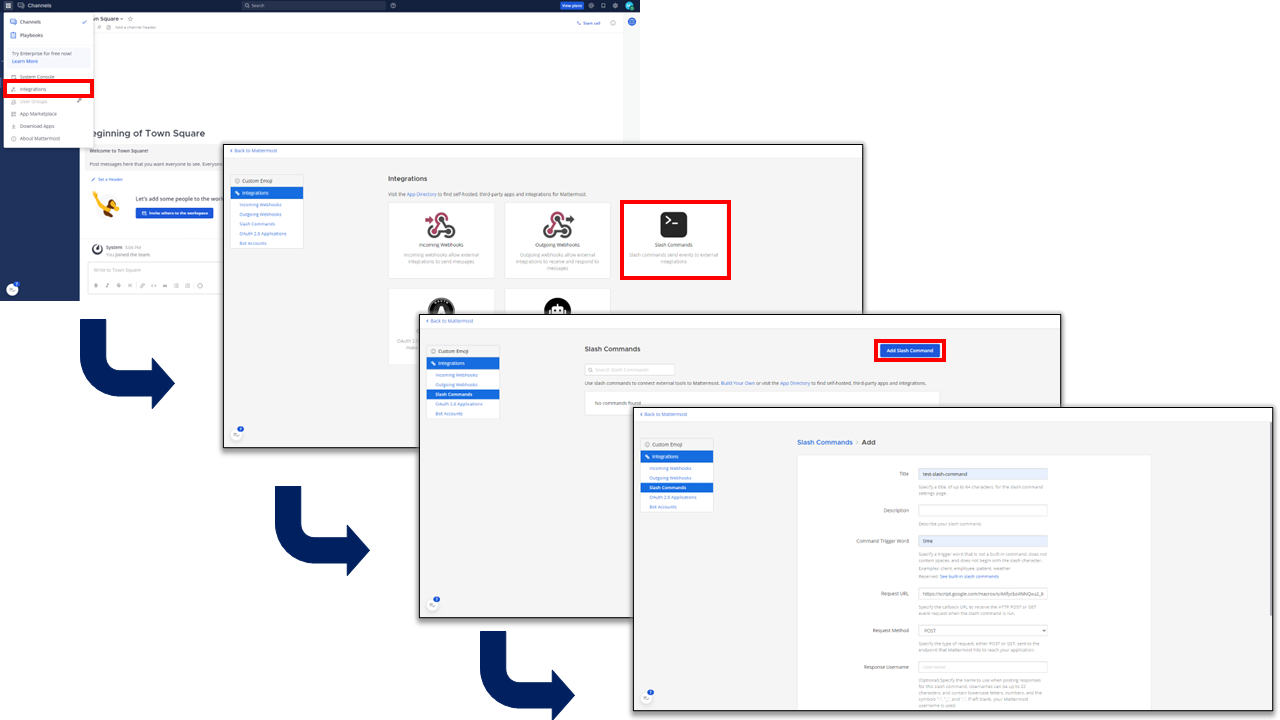
Slash Commands
Slack と同様に Mattermost でもスラッシュコマンドを提供しています.
Outgoing webhooks と異なりプライベートチャンネルや DM でも利用できます.
組み込み済みのスラッシュコマンドがいくつか準備されているので,既存のもの以上の機能が欲しい場合は新規に登録します.
本記事では Slack でのスラッシュコマンド と同じように Google Apps Script (GAS) で WorldTimeAPI を叩くアプリを作成し,Slack のメッセージ作成ボックスから /time コマンドを打ち込むことで WorldTimeAPI の datetime を取得します.
また,引数には任意の timezones6 を付与できるものとし,引数がない場合は Asia/Tokyo で問い合わせを行うものとします.
サーバー側で接続を検証するための token は,スラッシュコマンド作成後画面に表示されます.
最初は適当な Request URL を入力しておいて,token を取得後サーバーを立てて URL を発行してからスラッシュコマンドの Request URL を変更する手順で作業します.
function doPost(e) {
  const url = "http://worldtimeapi.org/api/timezone/";
  const token = e.parameter.token;
  const timezone = e.parameters.text[0] || "Asia/Tokyo";

  // Verification
  if (token === "xxxxxxxxxxxxxxxxxxxx") {

    // Access WorldTimeAPI
    const res = UrlFetchApp.fetch(url + timezone);
    const jsonRes = JSON.parse(res);
    return ContentService.createTextOutput(JSON.stringify(jsonRes.datetime));

  } else {
    throw new Error("Invalid request.");
  }
}
以上で /time コマンドが Mattermost から使えるようになります.
スラッシュコマンドの実行結果 (応答) はスラッシュコマンド実行者にのみ表示されます.
スラッシュコマンドは Slack とほぼ同じ感覚で構築・利用することができました.
API
Mattermost では上記のほかにも API を公開しており,
などチャットツールとしてやりたいことは大方実行することができます.
API を利用するには適切な権限が付与されている必要があります.
公式ドキュメントを参照し,System Console > Permisions の All Members あるいは System Administrators から API を叩くユーザーに権限が割り振られているかを確認してください.
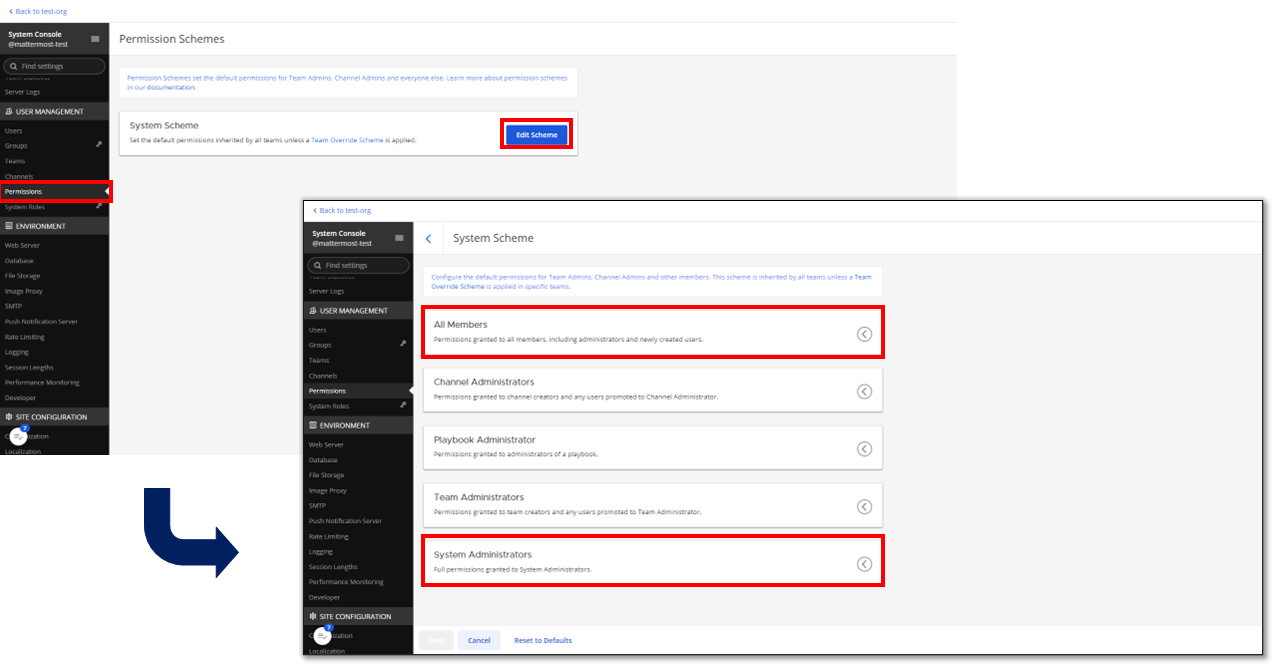
なお,カスタム Role や Group による権限管理は残念ながら Enterprise を利用しなければできません.
OSS 版では System Admin か Member のいずれかのロールを使うことになります.
# ログイン,レスポンスヘッダに session token が含まれる.以降 Bearer token としてリクエストヘッダに含める
curl -i -d '{"login_id":"mattermost-test","password":"test-password"}' \
https://localhost/api/v4/users/login --insecure

# ユーザー検索
curl -i -H 'Authorization: Bearer xxxxxxxxxx' \
-d '{"term":"test"}' https://localhost/api/v4/users/search --insecure

# チャンネル検索
curl -i -H 'Authorization: Bearer xxxxxxxxxx' \
https://localhost/api/v4/channels --insecure

# メッセージ投稿,channel_id はチャンネル検索結果を参照する,props を入れることもできる
curl -i -H 'Authorization: Bearer xxxxxxxxxx' \
-d '{"channel_id":"7twzyknxibn9zm917m5hppeyxw", "message":"Hello world 2 :tada:", "props": {"card": "External Link:\n\n [Click Here](https://worldtimeapi.org/)\n\nSite: **World Time API**"}}' \
https://localhost/api/v4/posts --insecure

# メッセージ返信,メッセージ投稿時のレスポンスに含まれる id を root_id とすることでぶら下げる
curl -i -H 'Authorization: Bearer xxxxxxxxxx' \
-d '{"channel_id":"7twzyknxibn9zm917m5hppeyxw", "message":"Hello world 3 :tada:", "root_id": "xnjma8dkebd4dgt78kbt6qmuxy"}' \
https://localhost/api/v4/posts --insecure
また WebSocket もサポートしており,こちらは別の記事で動作検証を行いたいと思います.
Plugins

Mattermost では Plugin (プラグイン)と Apps framework の概念によって,Slack での Interactivity & Shortcuts に相当する拡張機能を提供します.
プラグインでは,Mattermost でのイベントに応じたサービス間連携や Mattermost の画面コンポーネントの実装,チャンネルへの自動応答などを組み込むことで Mattermost の機能追加や使用感の改善を行います.
デフォルト状態で GitHub, GitLab, Jira といったサービスとの連携を行うプラグインの有効化が可能ですが,その他にも Marketplace から欲しい機能を検索して取り込んだり,自作のカスタムプラグインを仕込むことが可能です.
カスタムプラグインでは
- Go によるサーバーコンポーネント
- React/Redux フレームワークを利用した Javascript による (主に) フロントエンドコンポーネント
の一方または両方の実装を行います.
本記事では公式の mattermost-plugin-starter-template から 2 種類のリポジトリを作成し,上記のそれぞれでカスタムプラグインの開発を試します.
(Marketplace から既存のプラグインを検索して組み込む例は Apps framework で示します.)
- (1) Go による WorldTimeAPI への問い合わせ & チャットへの応答プラグイン
- (2) React/Redux フレームワークによるアラート発動ボタンの実装プラグイン
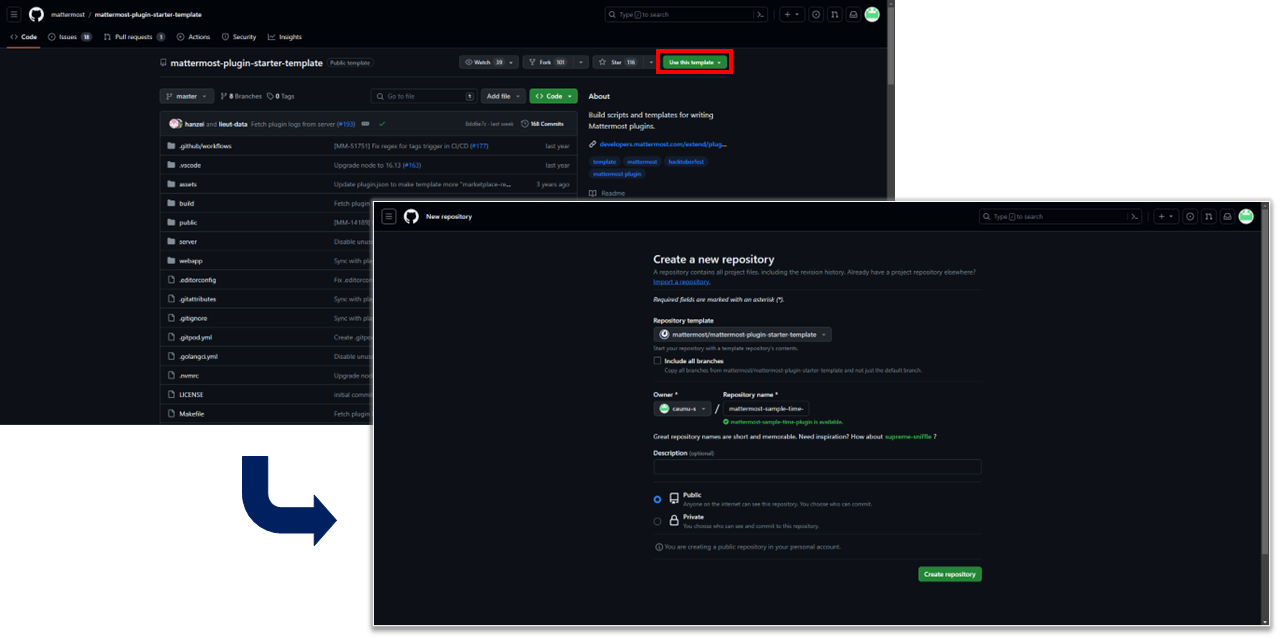
# (1) サンプルプラグイン
cd $HOME/codes/GitHub/ && \
git clone https://github.com/caunu-s/mattermost-sample-time-plugin.git && \
cd mattermost-sample-time-plugin

# (2) サンプルプラグイン
cd $HOME/codes/GitHub/ && \
git clone https://github.com/caunu-s/mattermost-sample-alert-plugin.git && \
cd mattermost-sample-alert-plugin
(1) Go による WorldTimeAPI への問い合わせ & チャットへの応答プラグイン
/webapp は使わないので削除しておきます.
/server/plugin.go では Plugin の構造体を定義するほか,プラグインのエンドポイントに接続したときのレスポンスなどが記載されています.
レスポンス部分だけ少し書き直しておきます.
...
func (p *Plugin) ServeHTTP(c *plugin.Context, w http.ResponseWriter, r *http.Request) {
	fmt.Fprint(w, "Hello, WorldtimeAPI!")
}
...
プラグインで行う追加の処理については Hooks を参考にして実装していきます.
例えば MessageWillBePosted は以下の実装をします.
MessageWillBePosted(c *plugin.Context, post *model.Post) (*model.Post, string)
投稿されたメッセージに "hoge" が含まれる場合 WorldTimeAPI に問い合わせを行い,投稿されたメッセージに datetime を付記します.
実装は以下の記事を参考にしています.
package main

import (
	"fmt"
	"strings"
    "net/http"
    "encoding/json"
	"io/ioutil"

	"github.com/mattermost/mattermost/server/public/model"
	"github.com/mattermost/mattermost/server/public/plugin"
)

type Response struct {
	Datetime string `json:"datetime"`
}

func (p *Plugin) MessageWillBePosted(c *plugin.Context, post *model.Post) (*model.Post, string) {
	if strings.Index(post.Message, "hoge") == -1 {
		return post, ""
	}

	p.API.LogDebug("Request WorldtimeAPI")

	url_time := "http://worldtimeapi.org/api/timezone/Asia/Tokyo"
	res_time, err_time := http.Get(url_time)
	if err_time != nil {
		fmt.Println(err_time)
    }
	defer res_time.Body.Close()
	rbody, _ := ioutil.ReadAll(res_time.Body)
	var response Response
	json.Unmarshal(rbody, &response)

	post.Message = fmt.Sprintf("%s\n%s", post.Message, response.Datetime)
	return post, ""
}
plugin.json を書き換えます.
{
    "id": "com.example.my-go-plugin",
    "name": "My Go Plugin",
    "description": "A plugin to enhance Mattermost by Golang.",
    "homepage_url": "https://github.com/caunu-s/mattermost-sample-time-plugin",
    "support_url": "https://github.com/caunu-s/mattermost-sample-time-plugin/issues",
    "icon_path": "assets/starter-template-icon.svg",
    "version": "0.1.0",
    "min_server_version": "9.3.0",
    "server": {
        "executables": {
            "linux-amd64": "server/dist/plugin-linux-amd64"
        }
    }
}
go.mod は削除しておき,改めて作成します.
go mod init github.com/caunu-s/mattermost-sample-time-plugin
go mod tidy
最後に Makefile を作成します (テストなどは一旦無視します).
PLUGIN_ID ?= com.example.my-go-plugin
PLUGIN_VERSION ?= 0.1.0
BUNDLE_NAME ?= $(PLUGIN_ID)-$(PLUGIN_VERSION).tar.gz

.PHONY: server
server:
	mkdir -p ./server/dist
	GOOS=linux GOARCH=amd64 go build -o ./server/dist/plugin-linux-amd64 ./server
	tar -czvf ./server/dist/$(BUNDLE_NAME) ./server/dist/plugin-linux-amd64 plugin.json;
make します.
make server
これで com.example.my-go-plugin-0.1.0.tar.gz ができたはずなので Mattermost に設定します.
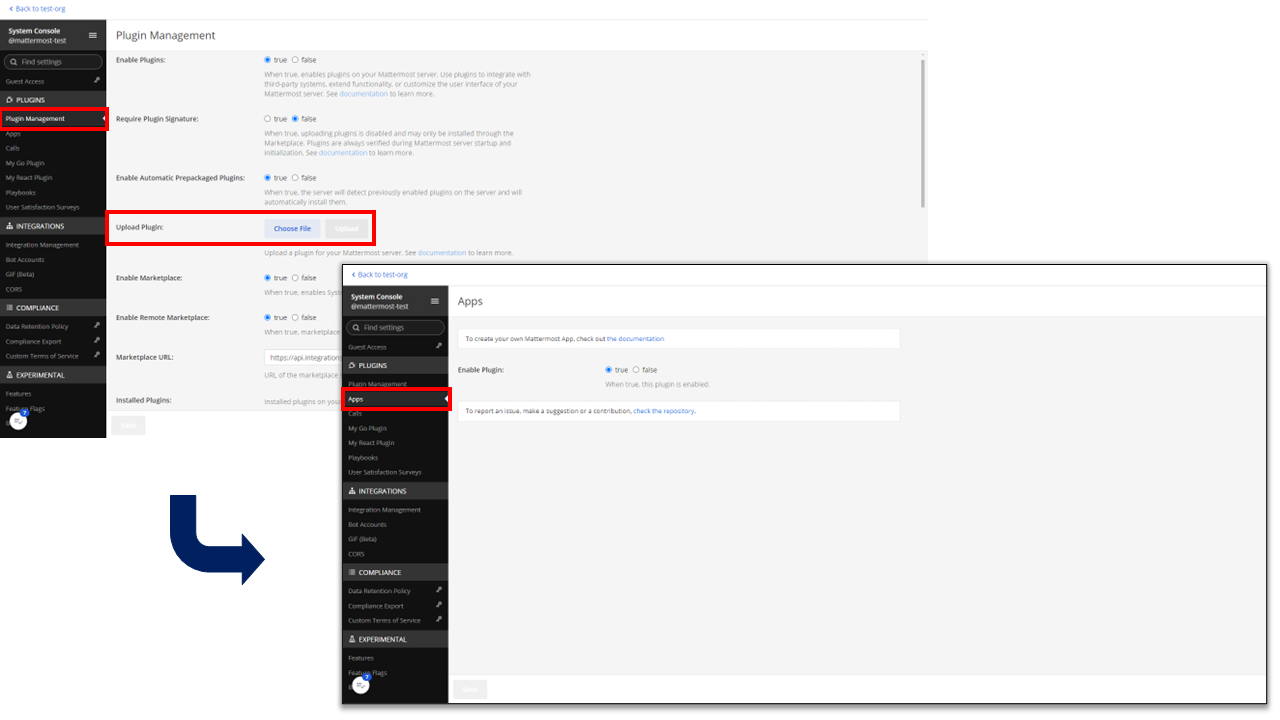
System Console > Plugin Management から Enable Plugin が true となっていることを確認し,Upload Plugin から先ほど作成した com.example.my-go-plugin-0.1.0.tar.gz をインストールします.
完了したらサイドバーに "My Go Plugin" が見えるようになるので移動して Enable Plugin を true にします.
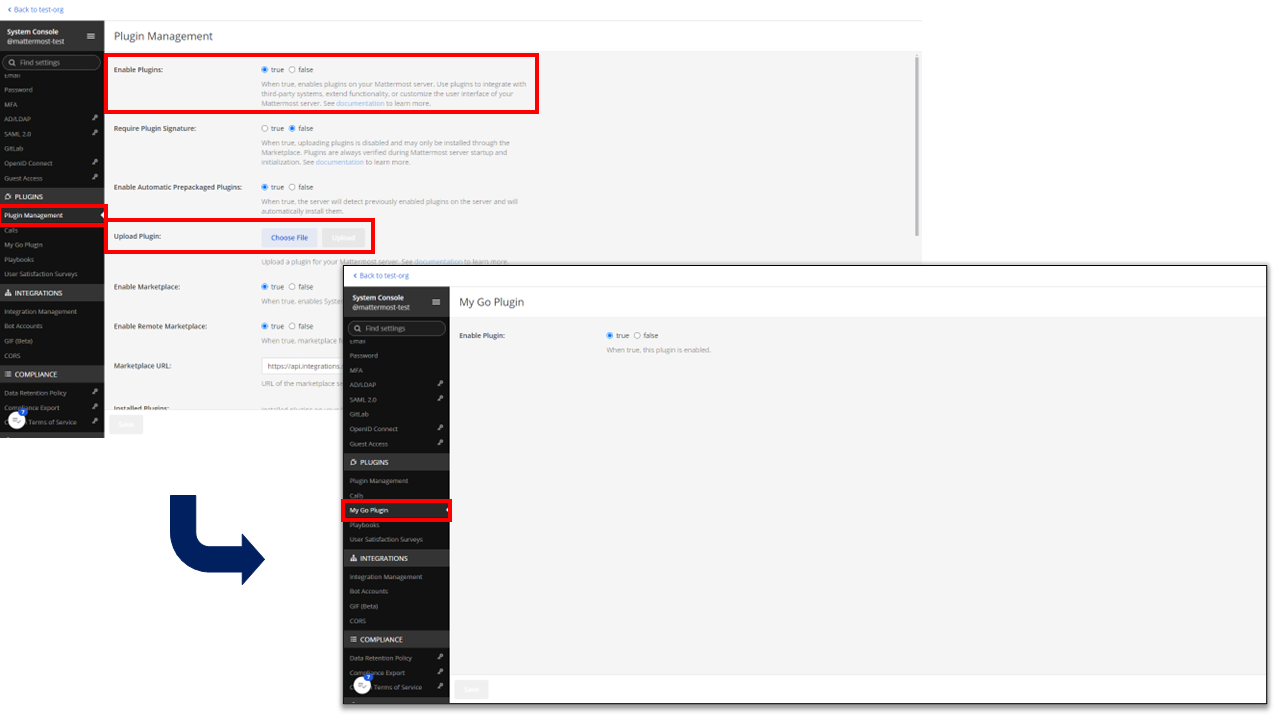
適当なチャンネルで hoge を含むメッセージ投稿を試すと,メッセージの投稿にあわせて WorldTimeAPI の Datetime が付記されることがわかります.
なお https://localhost/plugins/com.example.my-go-plugin に接続すると,HTTP サーバーとしての応答を確認できます.

(2) React/Redux フレームワークによるアラート発動ボタンの実装プラグイン
ここでは公式ドキュメントを参考に,プラグインでのボタンの組み込みとボタンクリック時の alert 発動を実装します.
/server は使わないので削除しておきます.
また,今回は /webapp もすべて削除してから開発を開始します.
# working dir 作成
mkdir webapp
cd webapp

# npm install
npm install --save-dev @babel/core @babel/preset-env @babel/preset-react babel-loader webpack webpack-cli
npm install --save react
続いて /webapp/webpack.config.js を作成します.
var path = require('path');

module.exports = {
    entry: [
        './src/index.jsx',
    ],
    resolve: {
        modules: [
            'src',
            'node_modules',
        ],
        extensions: ['*', '.js', '.jsx'],
    },
    module: {
        rules: [
            {
                test: /\.(js|jsx)$/,
                exclude: /node_modules/,
                use: {
                    loader: 'babel-loader',
                    options: {
                        presets: ['@babel/preset-react',
                            [
                                "@babel/preset-env",
                                {
                                    "modules": "commonjs",
                                    "targets": {
                                        "node": "current"
                                    }
                                }
                            ]
                        ],
                    },
                },
            },
        ],
    },
    externals: {
        react: 'React',
    },
    output: {
        path: path.join(__dirname, '/dist'),
        publicPath: '/',
        filename: 'main.js',
    },
};
/webapp/src/index.jsx で Plugin を実装していきます.
registerChannelHeaderButtonAction を利用してプラグインによるボタンを配置します.
/**
    * Add a button to the channel header. If there are more than one buttons registered by any
    * plugin, a dropdown menu is created to contain all the plugin buttons.
    * Accepts the following:
    * - icon - React element to use as the button's icon
    * - action - a function called when the button is clicked, passed the channel and channel member as arguments
    * - dropdownText - string or React element shown for the dropdown button description
    * - tooltipText - string or React element shown for tooltip appear on hover
*/
registerChannelHeaderButtonAction([icon action dropdownText tooltipText])
import React from 'react';

const Icon = () => <i className='icon fa fa-plug'/>;

class HelloWorldPlugin {
    initialize(registry, store) {
        registry.registerChannelHeaderButtonAction(
            <Icon />,
            () => {
                alert("Hello World!");
            },
            "Hello World",
        );
    }
}

window.registerPlugin('com.example.my-react-plugin', new HelloWorldPlugin());
最後に plugin.json と Makefile を準備して tar.gz を作成していきます.
{
    "id": "com.example.my-react-plugin",
    "name": "My React Plugin",
    "description": "A plugin to enhance Mattermost by React.",
    "homepage_url": "https://github.com/caunu-s/mattermost-sample-alert-plugin",
    "support_url": "https://github.com/caunu-s/mattermost-sample-alert-plugin/issues",
    "icon_path": "assets/starter-template-icon.svg",
    "version": "0.1.0",
    "min_server_version": "9.3.0",
    "webapp": {
        "bundle_path": "webapp/dist/main.js"
    }
}
PLUGIN_ID ?= com.example.my-react-plugin
PLUGIN_VERSION ?= 0.1.0
BUNDLE_NAME ?= $(PLUGIN_ID)-$(PLUGIN_VERSION).tar.gz

.PHONY: webapp
webapp:
	tar -czvf ./webapp/dist/$(BUNDLE_NAME) ./webapp/dist/main.js plugin.json;
# webpack, /webapp/dist/main.js が作成される
./node_modules/.bin/webpack --mode=production

# tar.gz 作成
cd ..
make webapp
これで com.example.my-react-plugin-0.1.0.tar.gz ができたので Mattermost に設定します.
Mattermost 画面右側のバーに Hello World ボタンができており,クリックすると alert が表示されます.

Apps framework
Apps framework ではプラグイン実装における一般的なユースケースを実現するインタフェースをカバーした Apps Plugin を活用し,Apps Plugin と任意の言語/環境で作成した HTTP サーバーを連携することで Mattermost の機能拡張や使用感の改善を行います.7
処理を Mattermost サーバーから切り離すことで,拡張性が上がるだけでなく「各サーバーの死活監視のコストは上がる v.s Mattermost サーバーの負荷を下げられる」などのバランスを考慮して導入することになると思います.
また,HTTP サーバーの冗長構成と組み合わせることも考えられます.
公式ドキュメントで紹介されているサンプル (mattermost-enterprise-edition:7.9.0) では MM_FEATUREFLAGS_AppsEnabled=true の環境変数を設定することで Apps Plugin を有効化していますが,mattermost-enterprise-edition:9.3.0 現在では Marketplace から利用可能状況を確認し,GitHub の releases から取得した tar.gz を導入して有効化する手順に変わっています.
公式ではGo, Python, Typescript での Apps framework 利用例を準備していますが,本記事では golang/hello-world を参考に WorldTimeAPI と連携を行う App をたちあげます.
# コーディング
mkdir -p $HOME/codes/GitHub/mattermost-sample-time-app && cd $_ && \
vim docker-compose.yml
vim main.go

# Go モジュール準備
go mod init github.com/caunu-s/mattermost-sample-time-app
go mod tidy

# 起動
docker compose up
アイコン (icon.png) は いらすとやさんから利用させていただきます.
実装方法の詳細は Golang driver のドキュメントと mattermost-plugin-apps モジュールのドキュメントをご覧ください.
version: "3.9"
networks:
  default:
    name: "mattermost"
services:
  mattermost-apps-datetime:
    container_name: mattermost-apps-datetime
    image: "golang:1.21.3"
    restart: "unless-stopped"
    working_dir: "/app"
    ports:
      - "4000:4000"
    volumes:
      - "./:/app"
    command: "bash -c 'go run .'"
package main

import (
	_ "embed"
	"encoding/json"
	"fmt"
	"log"
	"net/http"
	"io/ioutil"

	"github.com/mattermost/mattermost-plugin-apps/apps"
	"github.com/mattermost/mattermost-plugin-apps/utils/httputils"
)

//go:embed icon.png
var IconData []byte

var Manifest = apps.Manifest{
	AppID: "datetime",
	Version: "v0.1.0",
	DisplayName: "Datetime All over The World",
	Icon: "icon.png",
	HomepageURL: "https://github.com/caunu-s/mattermost-sample-time-app",
	RequestedPermissions: []apps.Permission{
		apps.PermissionActAsBot,
		apps.PermissionActAsUser,
	},
	RequestedLocations: []apps.Location{
		apps.LocationChannelHeader,
		apps.LocationCommand,
	},
	Deploy: apps.Deploy{
		HTTP: &apps.HTTP{
			RootURL: "http://mattermost-apps-datetime:4000",
		},
	},
}

var Bindings = []apps.Binding{
	{
		Location: apps.LocationChannelHeader,
		Bindings: []apps.Binding{
			{
				Location: "send-button",
				Icon:     "icon.png",
				Label:    "check datetime",
				Form:     &SendForm,
			},
		},
	},
	{
		Location: "/command",
		Bindings: []apps.Binding{
			{
				Icon:        "icon.png",
				Label:       "datetime",
				Description: "Datetime app",
				Hint:        "[send]",
				Bindings: []apps.Binding{
					{
						Label: "send",
						Form:  &SendForm,
					},
				},
			},
		},
	},
}

var SendForm = apps.Form{
	Title: "Datetime All over The World",
	Icon:  "icon.png",
	Fields: []apps.Field{
		{
			Type: "text",
			Name: "Timezone",
		},
	},
	Submit: apps.NewCall("/send").WithExpand(apps.Expand{
		ActingUserAccessToken: apps.ExpandAll,
		ActingUser:            apps.ExpandID,
	}),
}

type Response struct {
	Datetime string `json:"datetime"`
}

func main() {
	http.HandleFunc("/manifest.json",
		httputils.DoHandleJSON(Manifest))
	http.HandleFunc("/static/icon.png",
		httputils.DoHandleData("image/png", IconData))
	http.HandleFunc("/bindings",
		httputils.DoHandleJSON(apps.NewDataResponse(Bindings)))
	http.HandleFunc("/send", Send)

	addr := ":4000"
	fmt.Println("Listening on", addr)
	fmt.Println("Use '/apps install http http://mattermost-apps-datetime" + addr + "/manifest.json' to install the app")
	log.Fatal(http.ListenAndServe(addr, nil))
}

func Send(w http.ResponseWriter, req *http.Request) {
	c := apps.CallRequest{}
	json.NewDecoder(req.Body).Decode(&c)

	url := "http://worldtimeapi.org/api/timezone/"
	v, ok := c.Values["Timezone"]
	if ok && v != nil {
		url += fmt.Sprintf("%s", v)
	} else {
		url += "Asia/Tokyo"
	}

	res_time, _ := http.Get(url)
	defer res_time.Body.Close()
	rbody, _ := ioutil.ReadAll(res_time.Body)
	var response Response
	json.Unmarshal(rbody, &response)

	httputils.WriteJSON(w,
		apps.NewTextResponse(string(response.Datetime)))
}
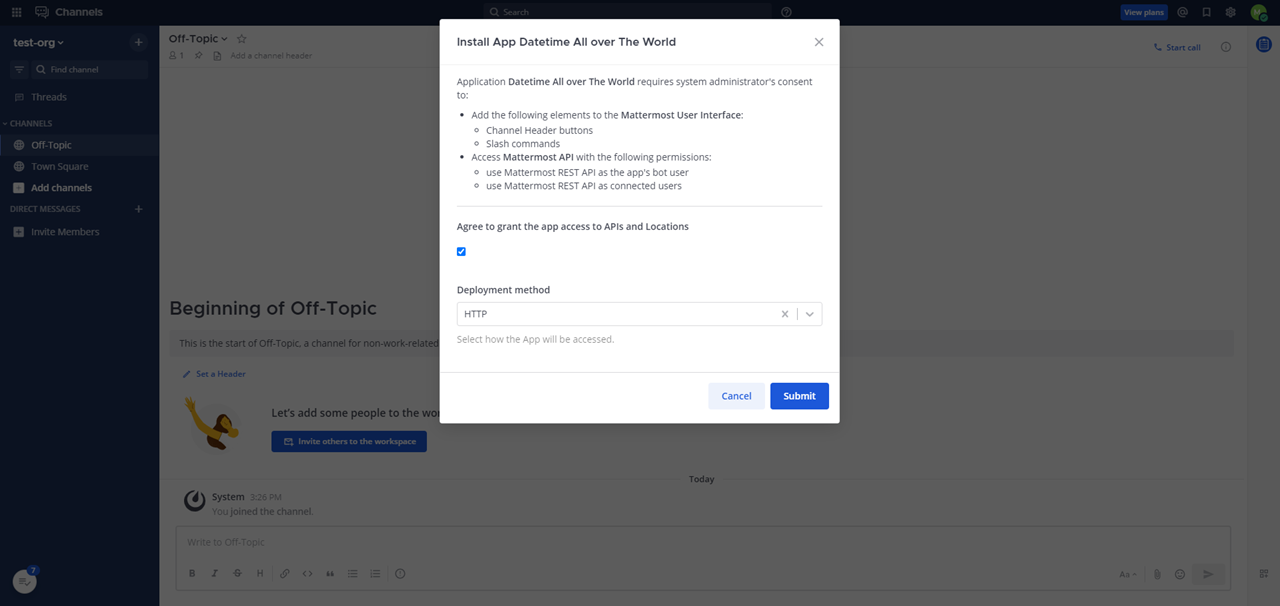
本構成では App との疎通のため Mattermost 側で Allow untrusted internal connections に mattermost-apps-datetime を書き加えて Mattermost を再起動する必要があります.

# 再起動
cd $HOME/codes/GitHub/mattermost
docker compose -f docker-compose.yml -f docker-compose.nginx.yml restart
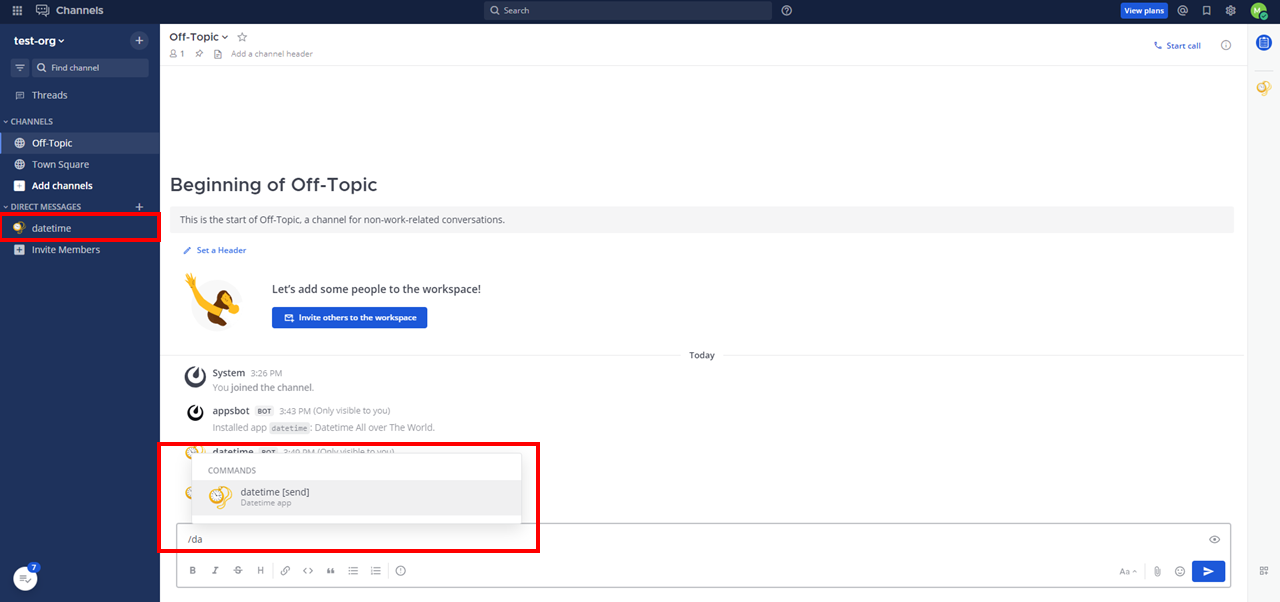
Mattermost 再起動後,スラッシュコマンド /apps install http http://mattermost-apps-datetime:4000/manifest.json を Mattermost で実行することでインストールします.
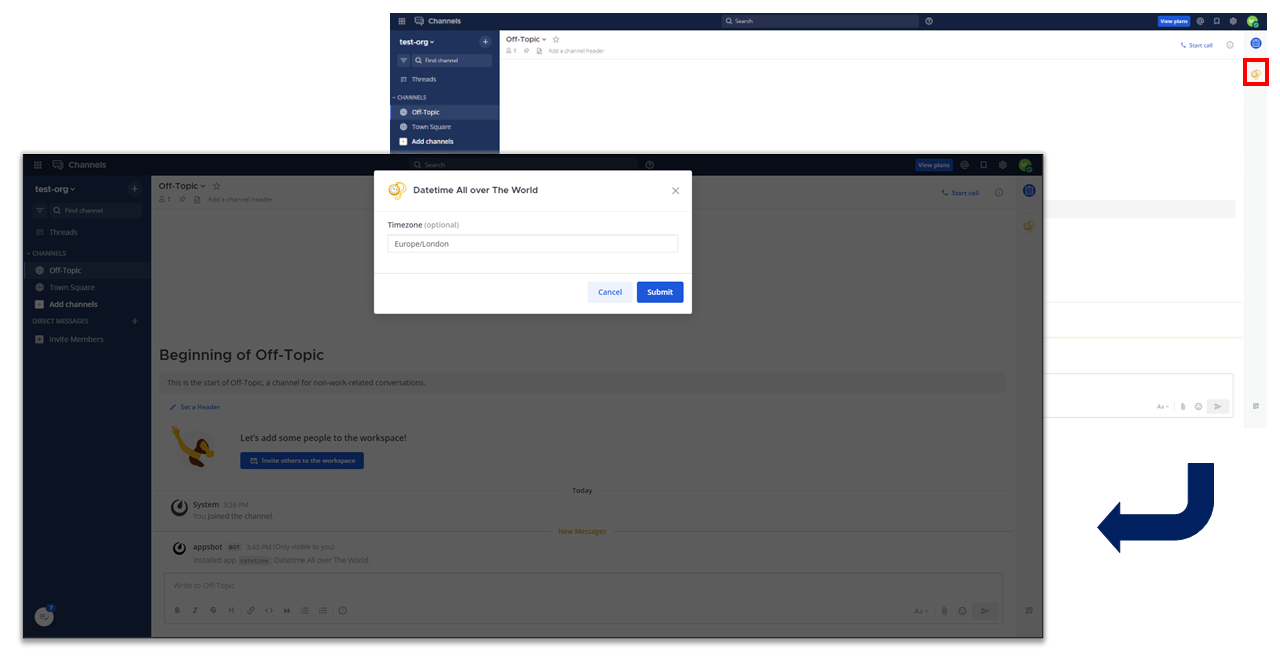
Mattermost 画面右側のバーに Datetime ボタンができ,クリックするとモーダルが表示されます.
任意の Timezone を入力することができ,入力がなければ Asia/Tokyo で実行されます.
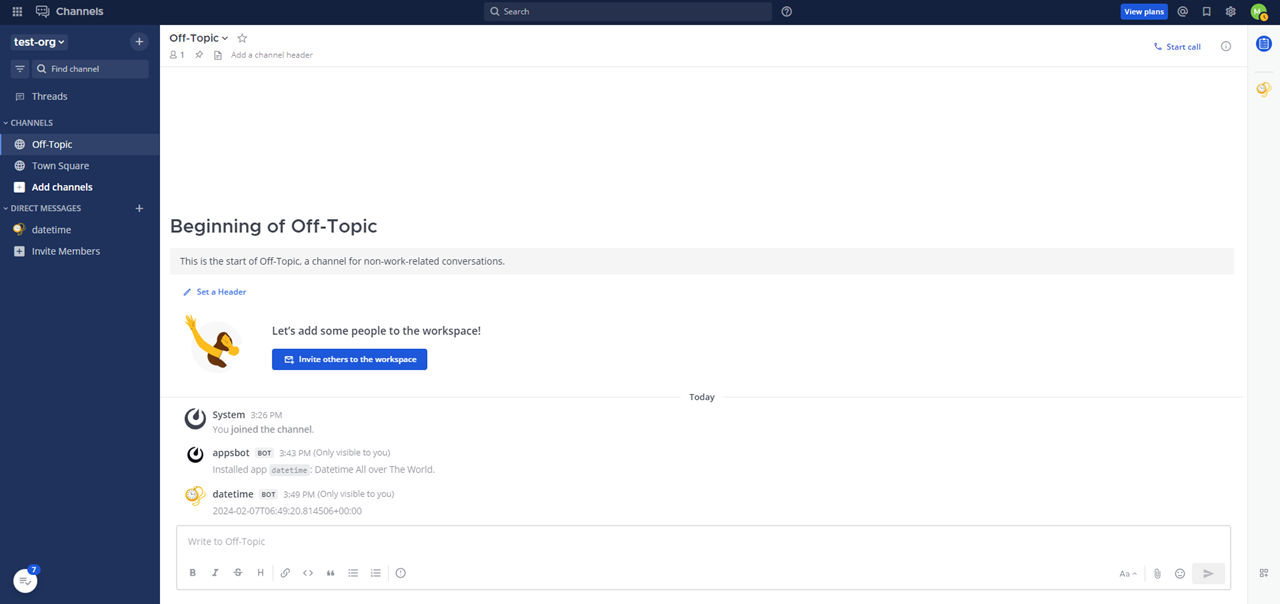
Bot ユーザーが作成されており,スラッシュコマンド /datetime からも実行可能であることも確認できます.
まとめ
かなりの長文になってしまいましたが,一通り触ってみた感想としては Mattermost の拡張性はかなり高いです.
無償で閉じた環境でのチャットサーバーとして稼働できるという点において,通信要件に関する制御はかなり細かくできると感じました.
一方で,やはりインターネット上でも日本語での説明は足りないと感じています.
興味を持たれた方は是非触ってみていただいて,日本でもコミュニティがより活性化するといいなと思います.