この記事の目的
Youtube に公開されている Enhancing Security through MidPoint and SIEM Integration Webinar by Atricore に触発されて Wazuh と midPoint の連携の動作確認をしてみました。
本記事ではその結果を残しつつ、感じたことを書こうと思います。
midPoint とは
MidPoint is a comprehensive Identity Governance and Administration (IGA) platform. It is used by the organizations around the world to deal with Identity Provisioning, Identity Governance & Compliance and also Access Management.1
midPoint は OSS の ID 管理 (IGA: Identity Governance and Administration) システムです。
クラウド活用や自社/顧客従業員管理などの大規模な ID ライフサイクルに対して強力な自動化・集約アプローチとして機能します。2
midPoint (2024年12月最新版) の基本情報および最新動向に関して詳細にご紹介している OpenStandia Advent Calendar が並行して企画されております。
midPoint に興味がある方はコチラをご覧ください!
https://qiita.com/advent-calendar/2024/midpoint-by-openstandia
Wazuh とは
Wazuh is a free and open source platform used for threat prevention, detection, and response. It is capable of protecting workloads across on-premises, virtualized, containerized, and cloud-based environments.3
Wazuh はログ監視や脅威検知のためのエージェントとダッシュボードを提供する XDR または SIEM 向け OSS です。
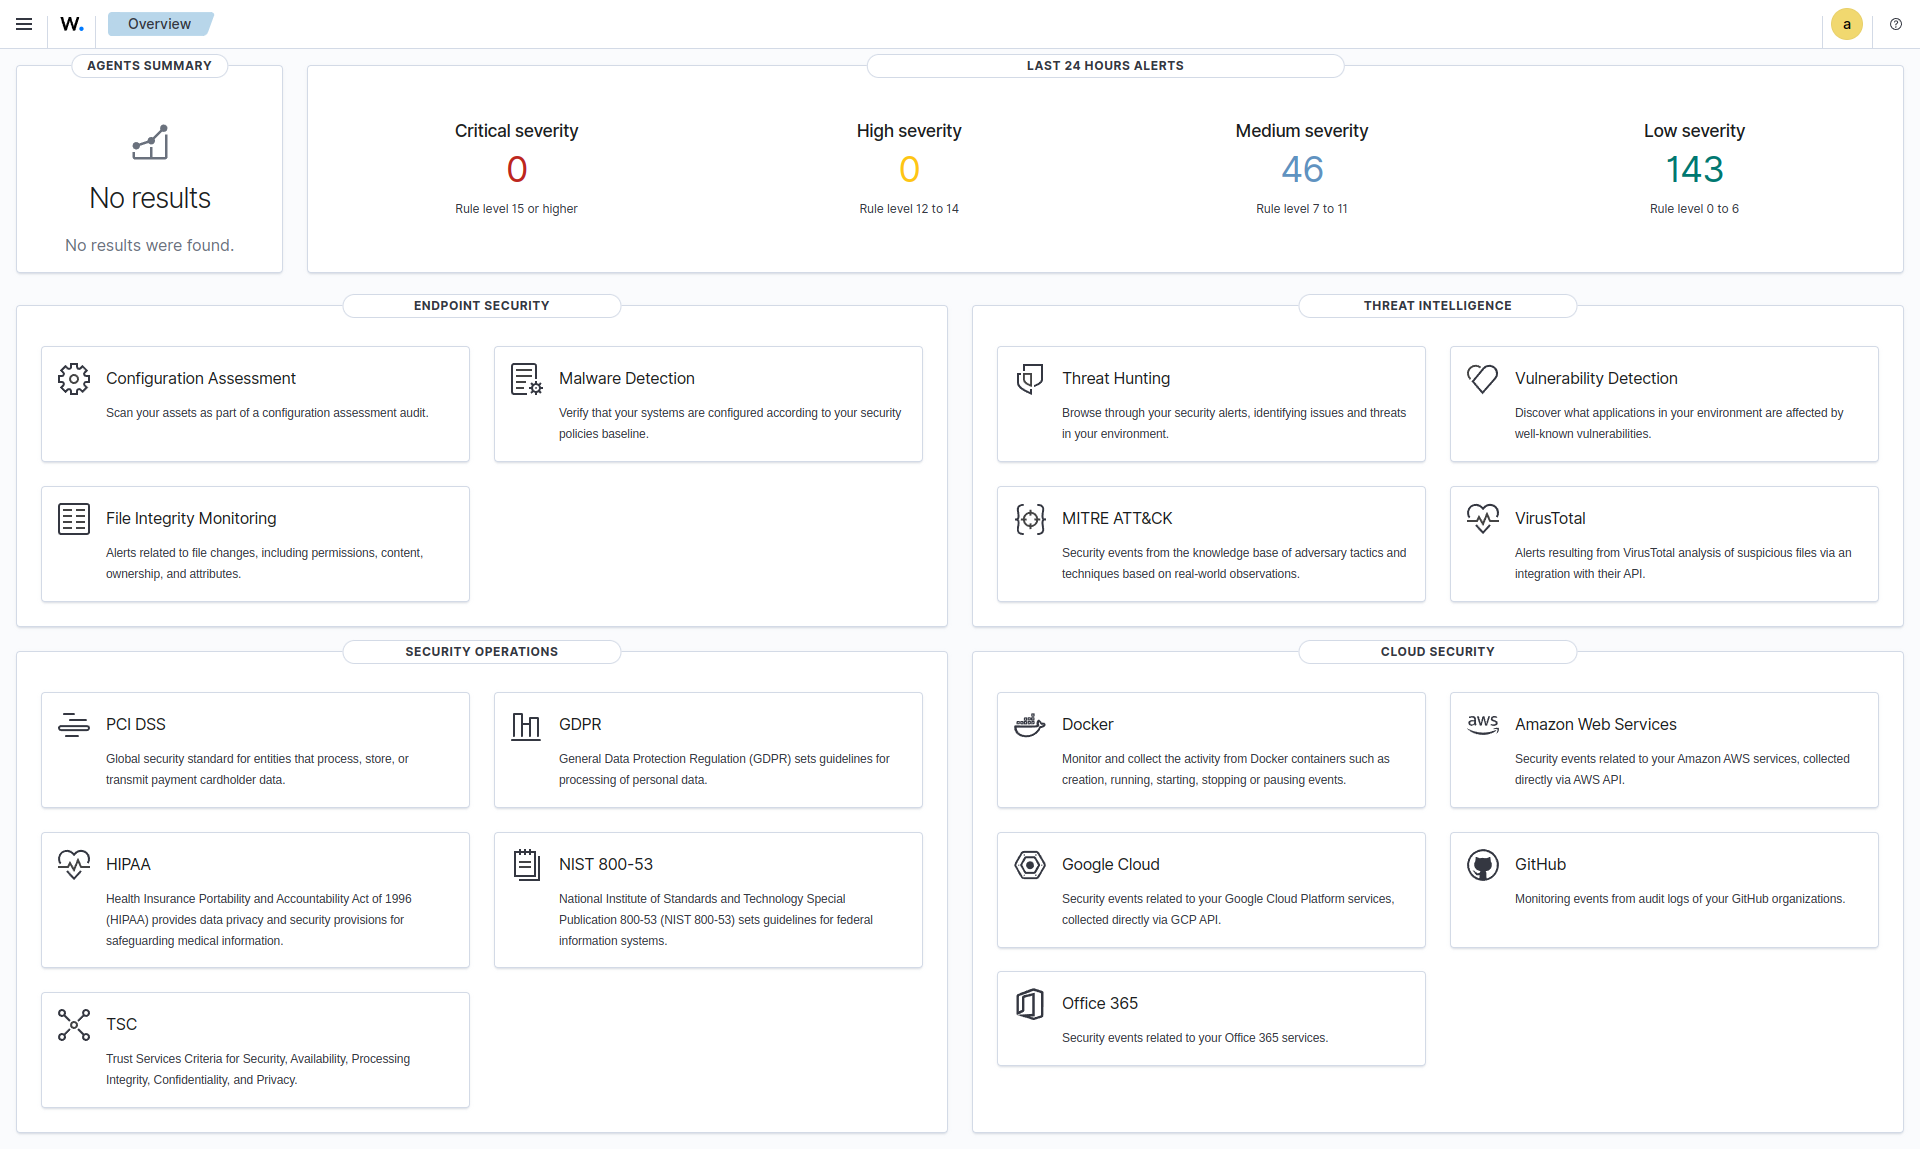
公式 HP によると以下のユースケースが想定されています。4
| エンドポイントセキュリティ | 脅威への対応補助 | セキュリティオペレーション | クラウドセキュリティ |
|---|---|---|---|
| 構成評価 (誤り設定検知) |
脅威検知&自動排除 | インシデントへの対応 | コンテナランタイム監視 |
| マルウェア検出 (異常動作検知) |
ログデータ分析&可視化 | コンプライアンス順守状況の可視化 | ベストプラクティスとの比較 |
| ファイル整合性監視 | 脆弱性検出 | IT 衛生管理 ※訳が難しい |
クラウド活用でのセキュリティ保全促進 |
ログデータ分析、構成評価、侵入検知&脅威排除など動的なユースケースが想定されていますが、これらは ElasticStack5 の活用によって実現されています。
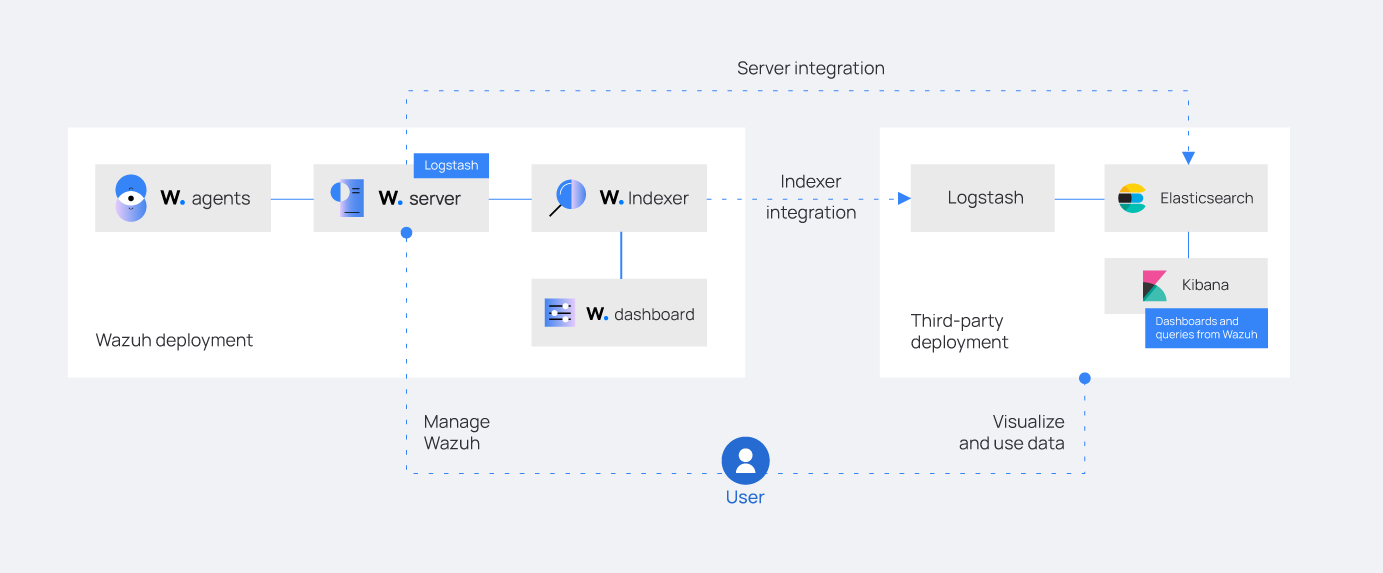
既にホストしている ElasticStack との統合 (ElasticSearch が親、Wazuh が子)も v4.5 までは公式に提供されていました6。
現在ではこの方式は管理されておらず、外部 ElasticSearch 連携は Logstash を前提としたアーキテクチャ (Wazuh が親、ElasticSearch が子) にする方針のようです。7
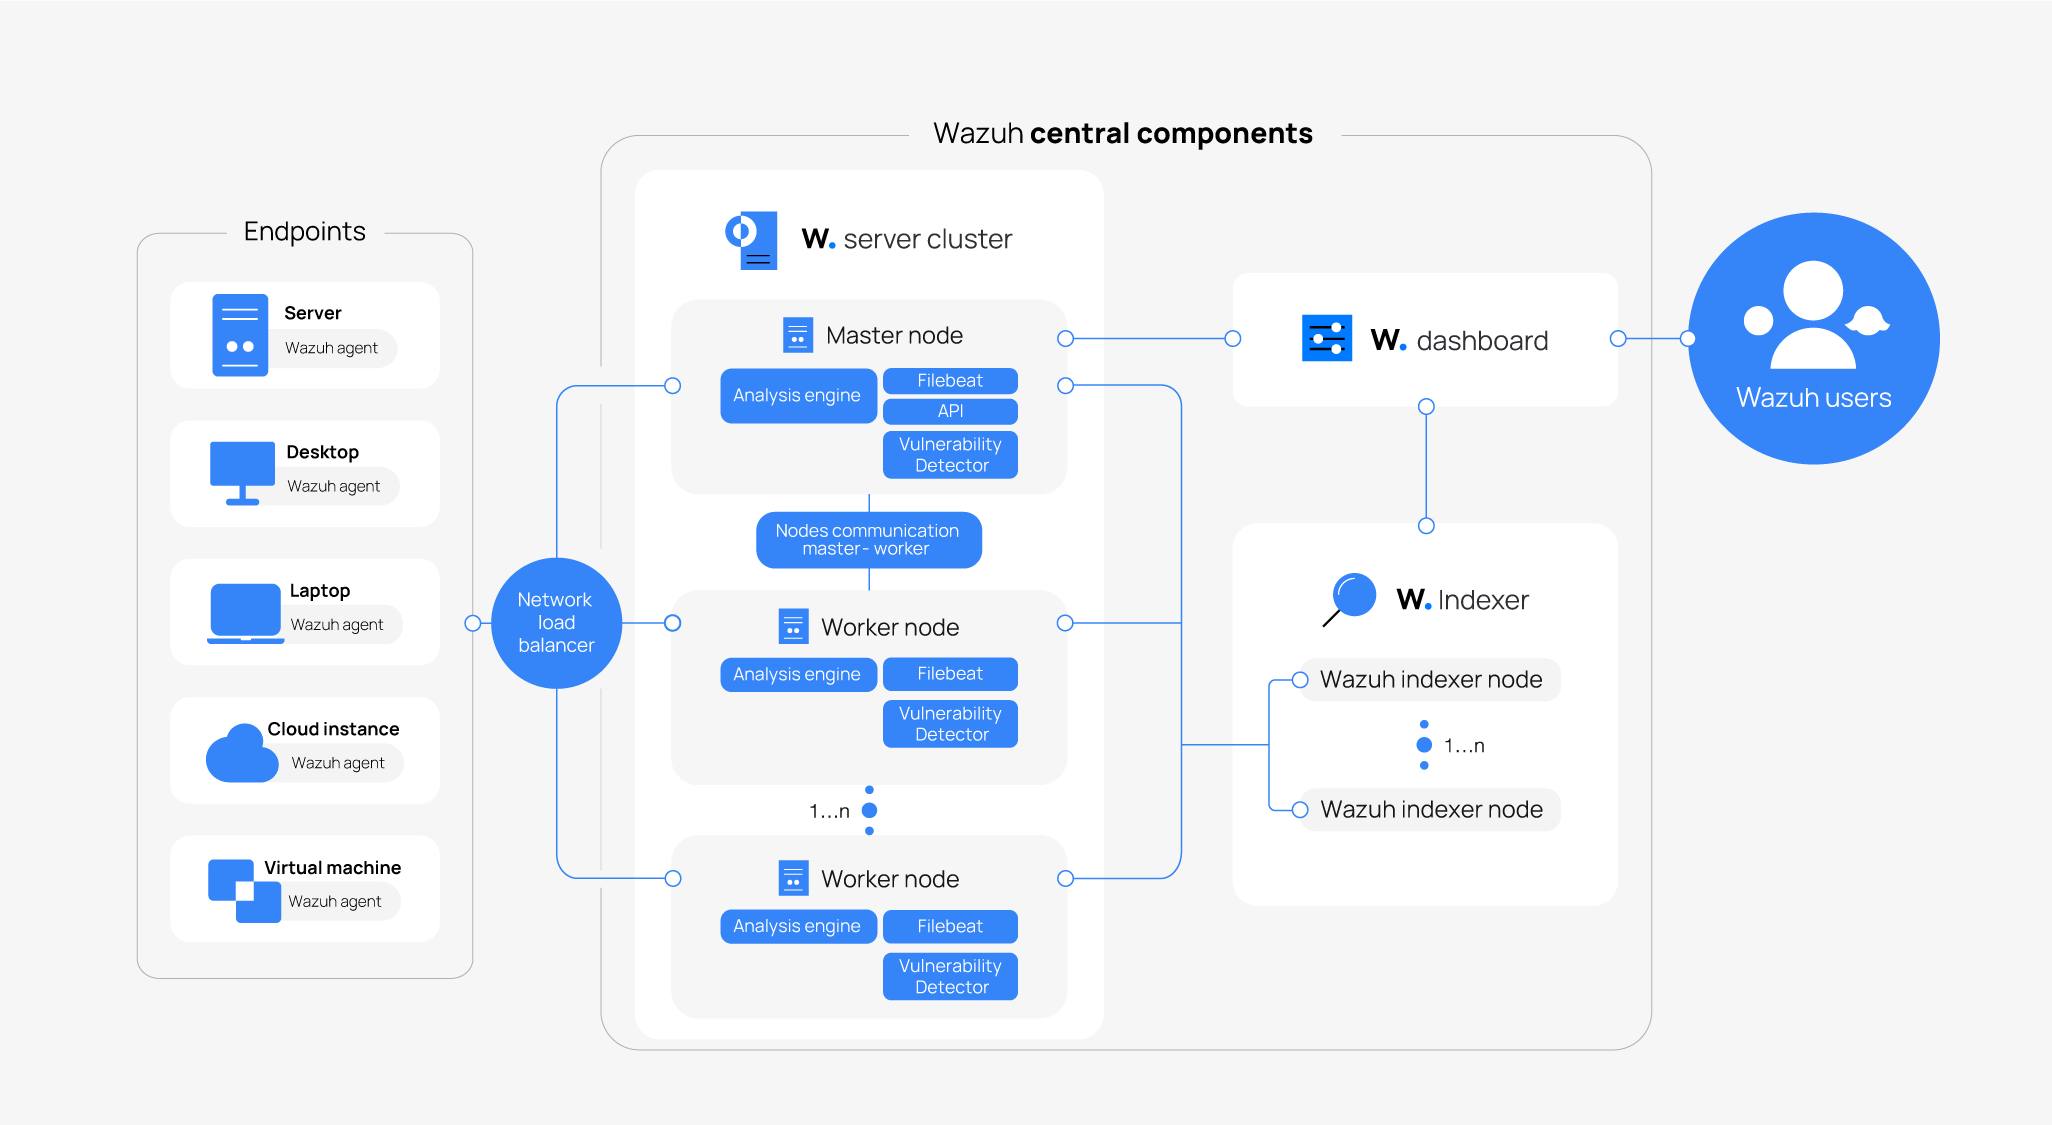
以下では構成要素を軽く説明します。
Wazuh indexer
OpenSearch (Elasticsearch) です。
データ管理・活用基盤を提供します。
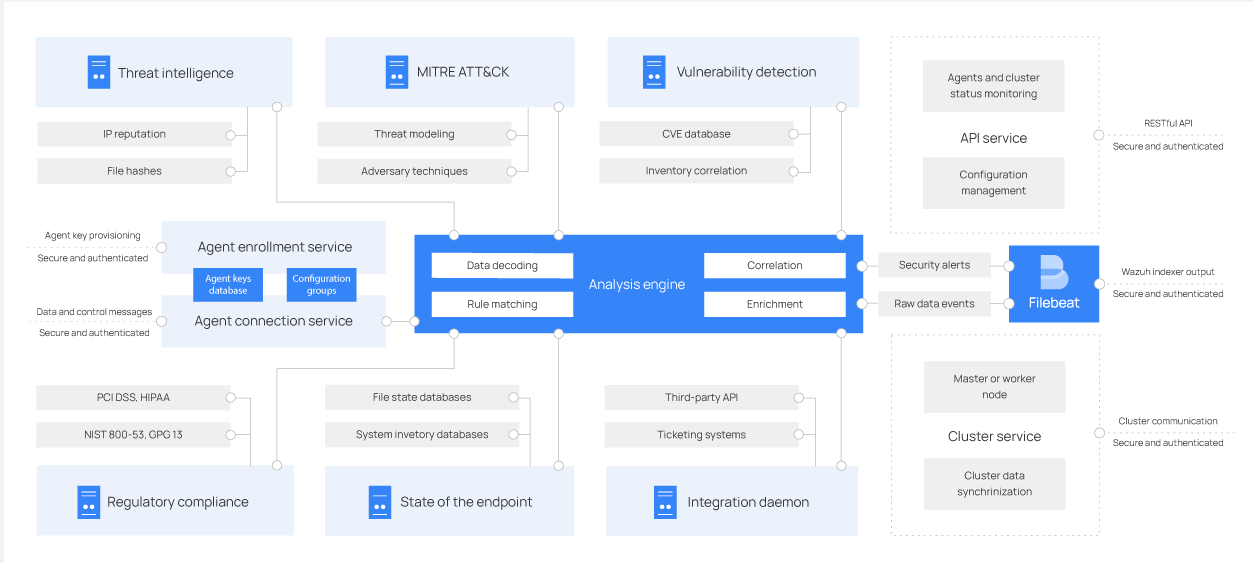
Wazuh server
監視対象にて起動した agent から受け取ったデータを処理します。
大きく分類すると以下の 3 つの要素があります。
- agent 連携
- データ分析、アラート
- indexer 連携
ServiceNow, Jira, PagerDuty や Slack などとも統合できるみたいです。
Wazuh dashboard
Kibana です。
ダッシュボード、データ探索機能を提供します。
admin でログインすれば各種設定を行うこともできます。
Wazuh agents
PC 端末などで起動し、ファイルシステムの監視、ログの収集、システム構成のスキャンなどを行って server へ通知します。
SSH で接続することで agent をインストールしない方法もあるみたいです8。
midPoint x Wazuh で何がうれしいのか。
記事冒頭で紹介した Webinar では以下のように説明されていました。
先ほど述べたユースケースを「一つの監視対象システムとして」midPoint に適用した感じですね。
インストール
まずは midPoint から起動します。
基本的にはEvolveum 公式で配布されている docker-compose.yml を使いますが、ログ出力状況を見やすくしたいので midPoint のボリュームを docker volume からローカルに変更します。
version: "3.3"

services:
  midpoint_data:
    image: postgres:16-alpine
    environment:
     - POSTGRES_PASSWORD=db.secret.pw.007
     - POSTGRES_USER=midpoint
     - POSTGRES_INITDB_ARGS=--lc-collate=en_US.utf8 --lc-ctype=en_US.utf8
    networks:
     - net
    volumes:
     - midpoint_data:/var/lib/postgresql/data

  data_init:
    image: evolveum/midpoint:${MP_VER:-latest}-alpine
    command: >
      bash -c "
      cd /opt/midpoint ;
      bin/midpoint.sh init-native ;
      echo ' - - - - - - ' ;
      bin/ninja.sh -B info >/dev/null 2>/tmp/ninja.log ;
      grep -q \"ERROR\" /tmp/ninja.log && (
      bin/ninja.sh run-sql --create --mode REPOSITORY  ;
      bin/ninja.sh run-sql --create --mode AUDIT
      ) ||
      echo -e '\\n Repository init is not needed...' ;
      "
    depends_on:
     - midpoint_data
    environment:
     - MP_SET_midpoint_repository_jdbcUsername=midpoint
     - MP_SET_midpoint_repository_jdbcPassword=db.secret.pw.007
     - MP_SET_midpoint_repository_jdbcUrl=jdbc:postgresql://midpoint_data:5432/midpoint
     - MP_SET_midpoint_repository_database=postgresql
     - MP_INIT_CFG=/opt/midpoint/var
    networks:
     - net
    volumes:
-    - midpoint_home:/opt/midpoint/var
+    - ./midpoint_home:/opt/midpoint/var

  midpoint_server:
    image: evolveum/midpoint:${MP_VER:-latest}-alpine
    container_name: midpoint_server
    hostname: midpoint-container
    depends_on:
      data_init:
        condition: service_completed_successfully
      midpoint_data:
        condition: service_started
    command: [ "/opt/midpoint/bin/midpoint.sh", "container" ]
    ports:
      - 8080:8080
    environment:
     - MP_SET_midpoint_repository_jdbcUsername=midpoint
     - MP_SET_midpoint_repository_jdbcPassword=db.secret.pw.007
     - MP_SET_midpoint_repository_jdbcUrl=jdbc:postgresql://midpoint_data:5432/midpoint
     - MP_SET_midpoint_repository_database=postgresql
     - MP_SET_midpoint_administrator_initialPassword=Test5ecr3t
     - MP_UNSET_midpoint_repository_hibernateHbm2ddl=1
     - MP_NO_ENV_COMPAT=1
    networks:
     - net
    volumes:
-    - midpoint_home:/opt/midpoint/var
+    - ./midpoint_home:/opt/midpoint/var

networks:
  net:
    driver: bridge

volumes:
  midpoint_data:
- midpoint_home:
echo MP_VER=4.8.5 > .env
docker compose up -d
以下のコンテナを起動します。
| イメージ | バージョン |
|---|---|
| evolveum/midpoint | 4.8.5-alpine |
| postgres | 16-alpine |
http://localhost:8080/midpoint でアクセスし、administrator/Test5ecr3t でシステム管理者としてログインできます。
続けて Wazuh を起動します。
Installation guide に記載してある手順は yum や apt を使う前提となっていますが、ソースから make することも docker (※ agent は除く) で起動することも可能です。
筆者は ArchLinux を使っており、今回は docker を使うことにします。起動にはルート権限を必要とします。
git clone https://github.com/wazuh/wazuh-docker.git -b v4.9.2
cd wazuh-docker/single-node
sudo docker-compose -f generate-indexer-certs.yml run --rm generator

sudo ls config/wazuh_indexer_ssl_certs
> admin-key.pem
> admin.pem
> root-ca.key
> root-ca-manager.key
> root-ca-manager.pem
> root-ca.pem
> wazuh.dashboard-key.pem
> wazuh.dashboard.pem
> wazuh.indexer-key.pem
> wazuh.indexer.pem
> wazuh.manager-key.pem
> wazuh.manager.pem

sudo docker-compose up -d
以下のコンテナを起動します。
| イメージ | バージョン |
|---|---|
| wazuh/wazuh-dashboard | 4.9.2 |
| wazuh/wazuh-manager | 4.9.2 |
| wazuh/wazuh-indexer | 4.9.2 |
https://localhost に接続するとダッシュボードが開きます。
admin/SecretPassword でシステム管理者としてログインできます。
次に agent を入れます。今回は同じ端末内で起動することとします。
ArchLinux では AUR 使う方法がある910のですが pacman にも対応したとのことなので pacman を使います。
sudo pacman --noconfirm -Syu curl gcc make sudo wget expect gnupg perl-base perl fakeroot python brotli automake autoconf libtool gawk libsigsegv nodejs base-devel inetutils cmake
curl -Ls https://github.com/wazuh/wazuh/archive/v4.9.2.tar.gz | tar zx
cd wazuh-4.9.2
./install.sh
対話式にインストールが進みます。
 Wazuh v4.9.2 (Rev. 40921) Installation Script - https://www.wazuh.com

 You are about to start the installation process of Wazuh.
 You must have a C compiler pre-installed in your system.

  - System: Linux DESKTOP-ARCH0001 6.12.4-arch1-1 (arch 0.0)
  - User: root
  - Host: DESKTOP-ARCH0001


  -- Press ENTER to continue or Ctrl-C to abort. --

egrep: warning: egrep is obsolescent; using grep -E
egrep: warning: egrep is obsolescent; using grep -E
egrep: warning: egrep is obsolescent; using grep -E

1- What kind of installation do you want (manager, agent, local, hybrid or help)? agent

  - Agent (client) installation chosen.

2- Choose where to install Wazuh [/var/ossec]:

    - Installation will be made at  /var/ossec .

3- Configuring Wazuh.

  3.1- What's the IP Address or hostname of the Wazuh server?: 127.0.0.1

   - Adding Hostname localhost

  3.2- Do you want to run the integrity check daemon? (y/n) [y]:

   - Running syscheck (integrity check daemon).

  3.3- Do you want to run the rootkit detection engine? (y/n) [y]:

   - Running rootcheck (rootkit detection).

  3.5 - Do you want to enable active response? (y/n) [y]:

   - Active response enabled.

  3.6- Remote upgrades use packages signed by the system maintainer. The
       corresponding certificate (or root certificate) must be installed
       in the system in order to verify the WPK packages. By default,
       the root certificate by Wazuh is installed.

   - Do you want to add more certificates? (y/n)? [n]:

  3.7- Setting the configuration to analyze the following logs:

    -- journald
    -- /var/ossec/logs/active-responses.log

 - If you want to monitor any other file, just change
   the ossec.conf and add a new localfile entry.
   Any questions about the configuration can be answered
   by visiting us online at https://documentation.wazuh.com/.
終了したら sudo systemctl start wazuh-agent して完了です。
midPoint と連携してみる
目標: midPoint で出力されたログの出力を元に Wazuh ダッシュボードで可視化を行う
まずは midPoint から audit ログを出力する設定をします。
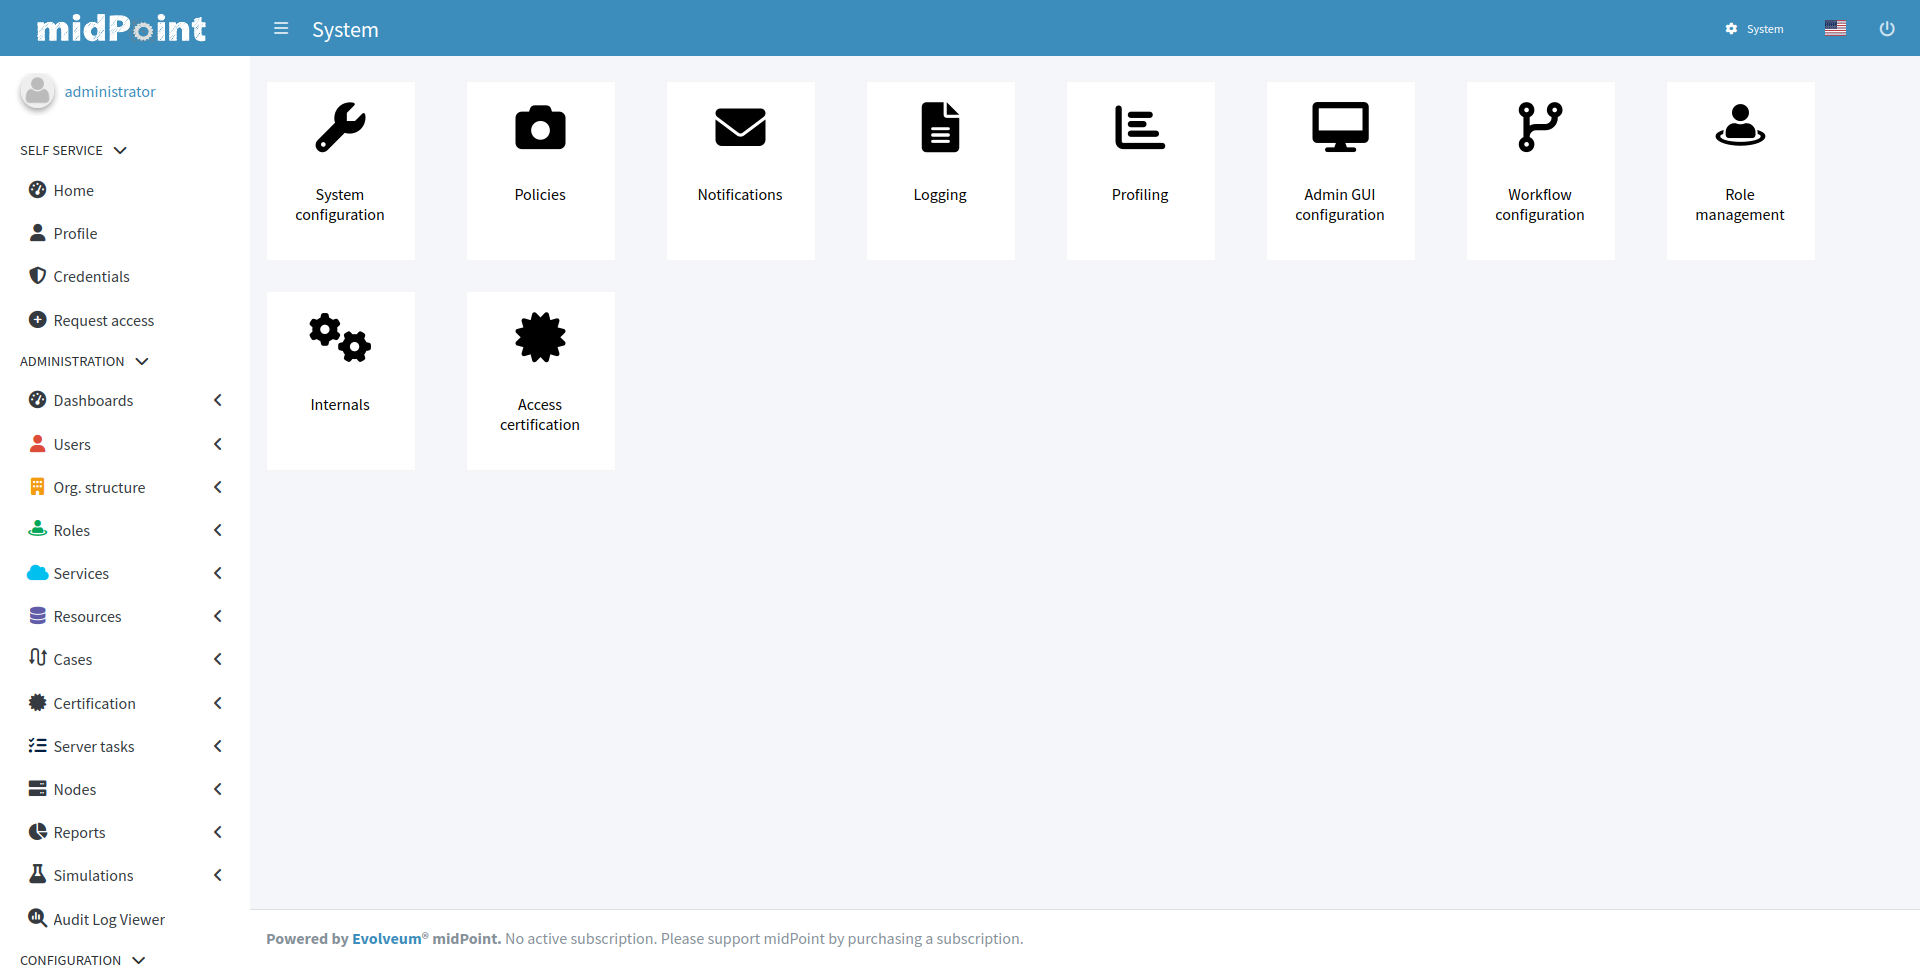
System > Logging
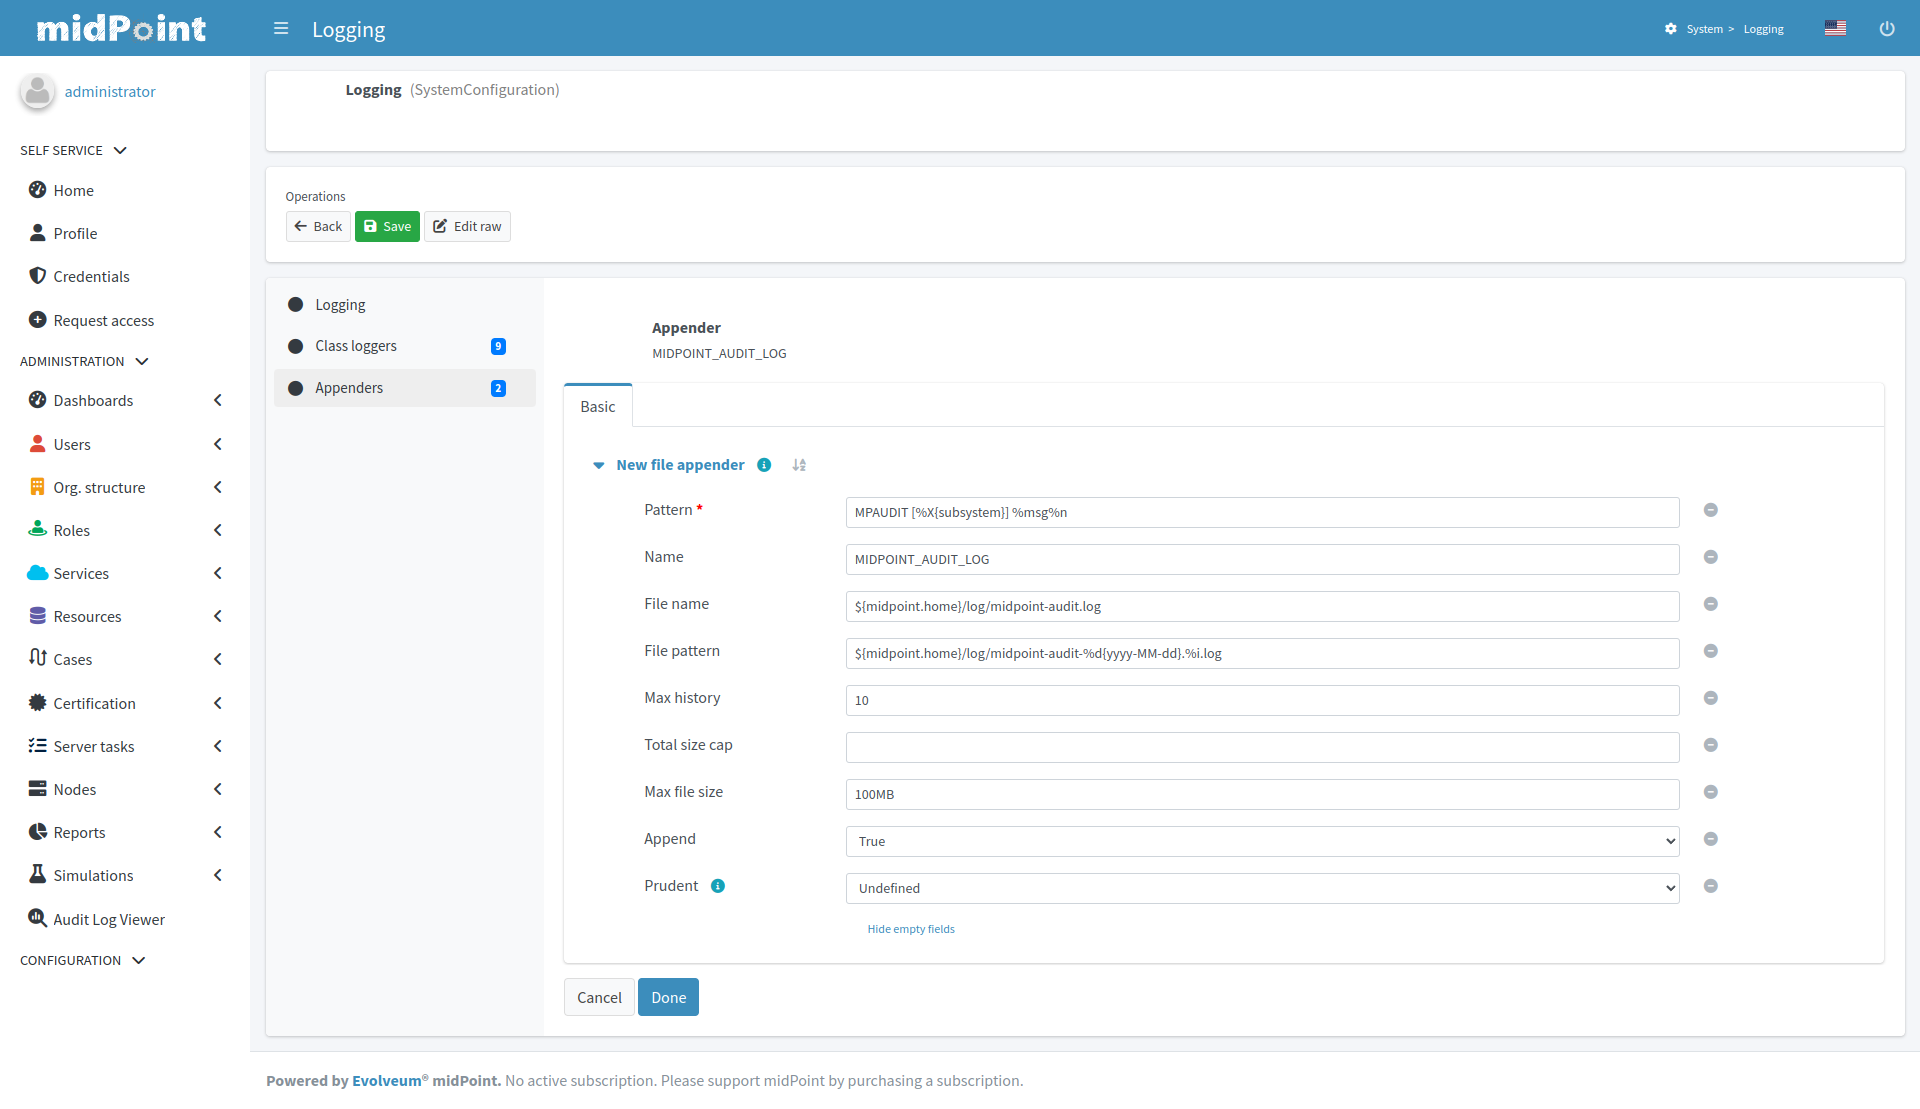
Appenders からログファイル名、出力内容、ファイルサイズ設定を記載し、MIDPOINT_AUDIT_LOG として保存します。
MPAUDIT [%X{subsystem}] %msg%n
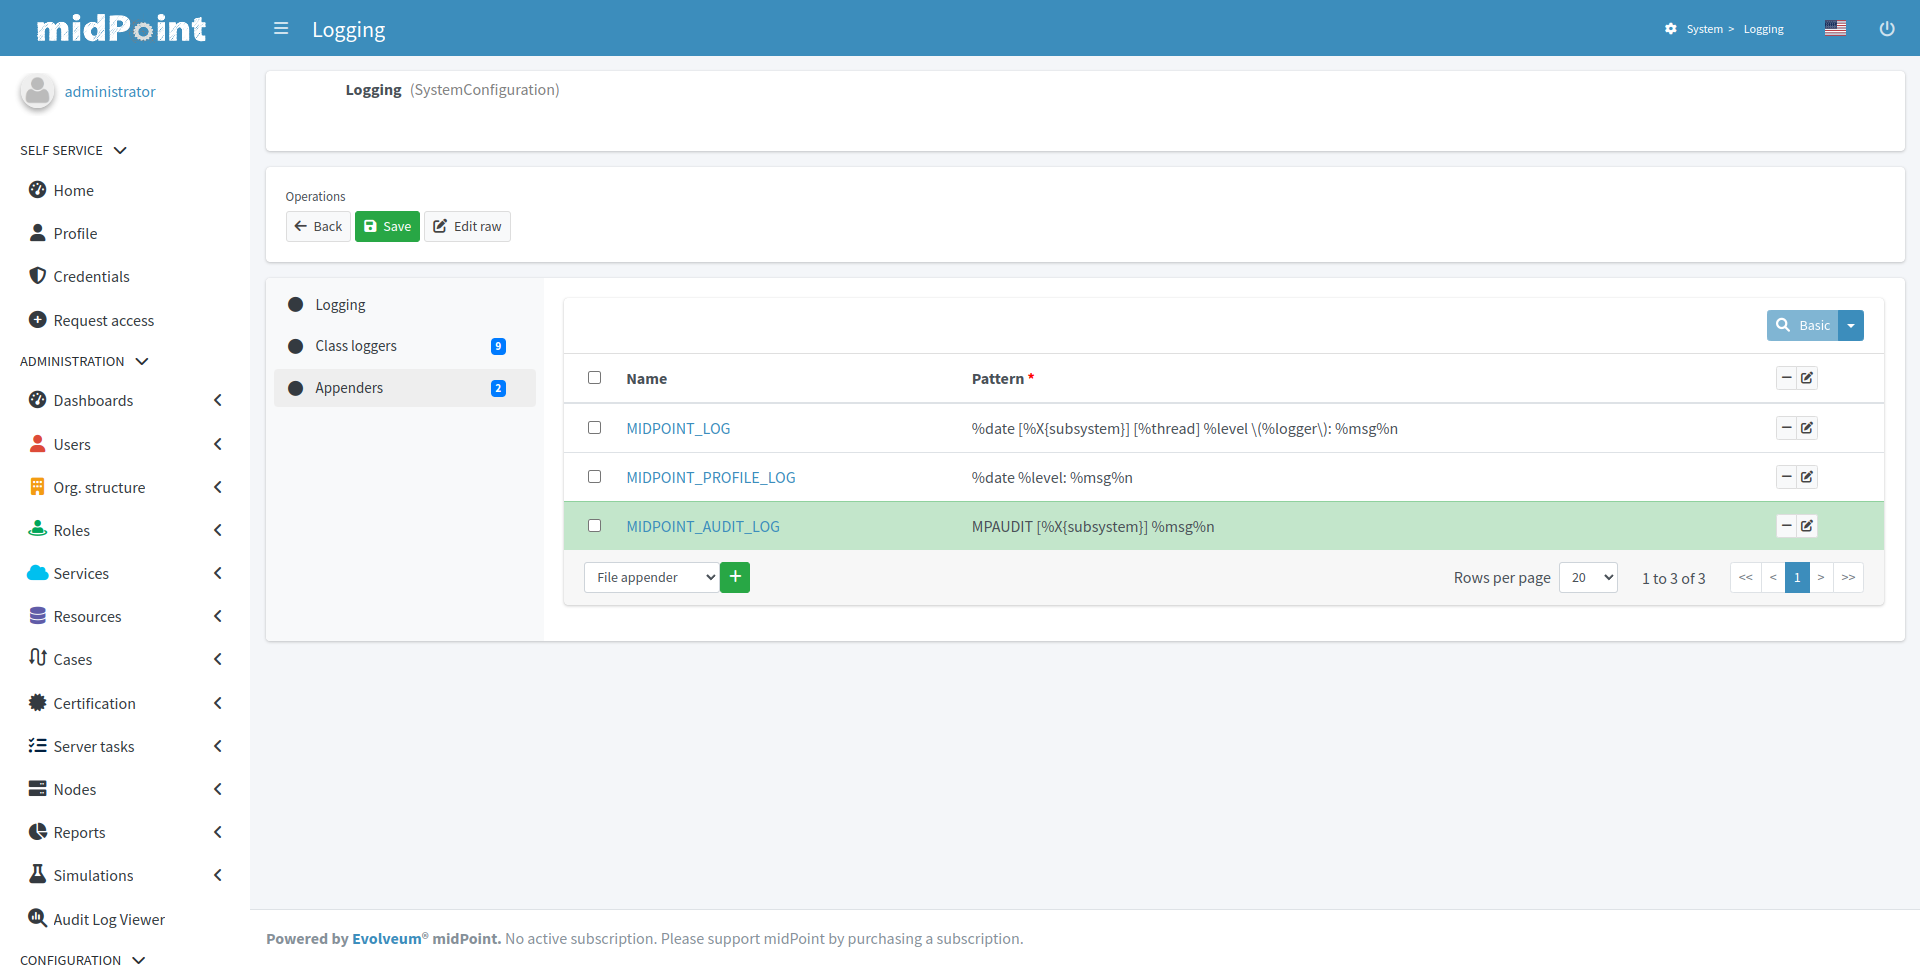
Logging で先ほど作成した MIDPOINT_AUDIT_LOG を有効化します。
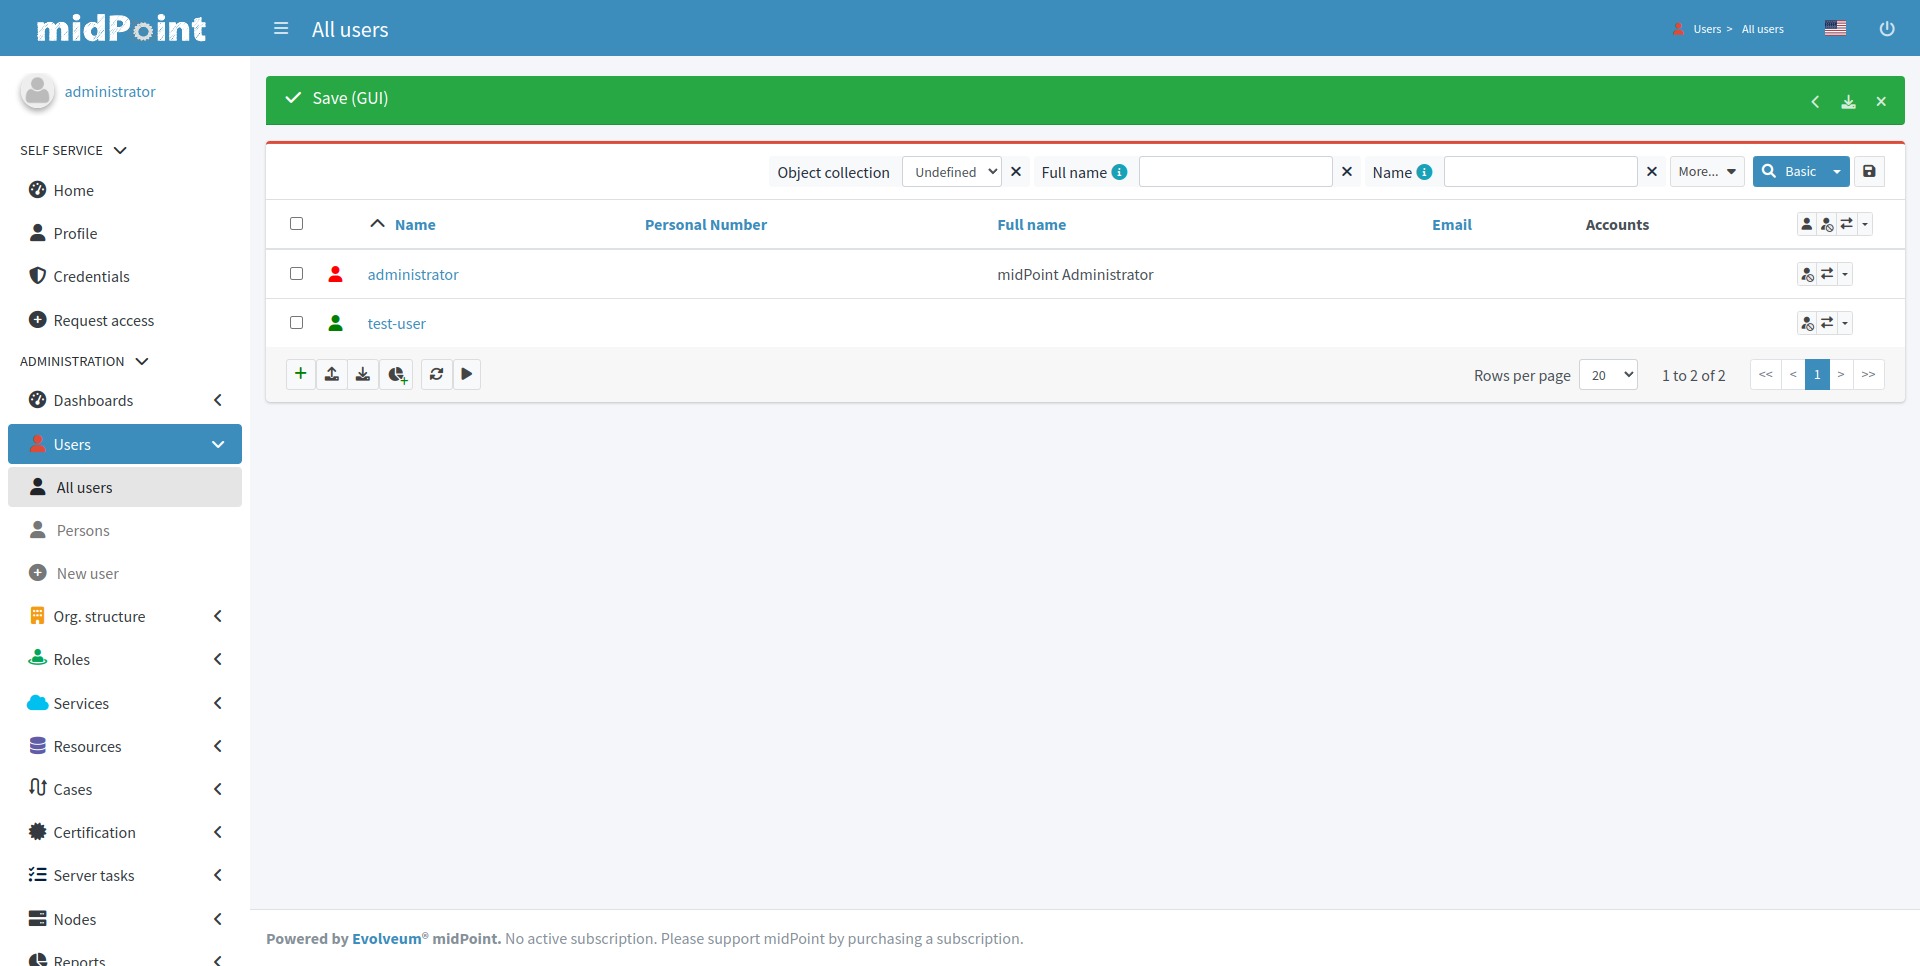
後で使いたいのでテストユーザも作成しておきます。
ログが出力されていることを確認しておきましょう。
pwd
> /home/caunu-s/Downloads

cat ./midpoint_home/log/midpoint-audit.log
> MPAUDIT [REPOSITORY] 2024-12-19T07:15:38.757+0000 eid=1734592538757-9226-1, et=MODIFY_OBJECT, es=EXECUTION, sid=A7728EBDC17F59456861FBCE98D0B01E, rid=47f58d4a-8b2c-42ca-b2fb-02ee8846396c, tid=1734592538657-9226-1, toid=null, hid=midpoint-container, nid=DefaultNode, raddr=172.18.0.1, I=UserType:00000000-0000-0000-0000-000000000002(user), EP=UserType:00000000-0000-0000-0000-000000000002(user), epm=null, T=SystemConfigurationType:00000000-0000-0000-0000-000000000001(systemConfiguration), TO=null, D=[00000000-0000-0000-0000-000000000001:MODIFY], ch=http://midpoint.evolveum.com/xml/ns/public/common/channels-3#user, o=SUCCESS, p=null, m=
> MPAUDIT [REPOSITORY] 2024-12-19T07:19:52.334+0000 eid=1734592792334-9226-1, et=ADD_OBJECT, es=REQUEST, sid=A7728EBDC17F59456861FBCE98D0B01E, rid=9b28f47d-4ed6-4fe0-8d23-b92f80807a82, tid=1734592792289-9226-1, toid=null, hid=midpoint-container, nid=DefaultNode, raddr=172.18.0.1, I=UserType:00000000-0000-0000-0000-000000000002(user), EP=UserType:00000000-0000-0000-0000-000000000002(user), epm=null, T=UserType:69bb4508-d123-4b15-a258-2b4631be1369(user), TO=null, D=[69bb4508-d123-4b15-a258-2b4631be1369:ADD], ch=http://midpoint.evolveum.com/xml/ns/public/common/channels-3#user, o=null, p=null, m=
> MPAUDIT [REPOSITORY] 2024-12-19T07:19:52.528+0000 eid=1734592792528-9226-1, et=ADD_OBJECT, es=EXECUTION, sid=A7728EBDC17F59456861FBCE98D0B01E, rid=9b28f47d-4ed6-4fe0-8d23-b92f80807a82, tid=1734592792289-9226-1, toid=null, hid=midpoint-container, nid=DefaultNode, raddr=172.18.0.1, I=UserType:00000000-0000-0000-0000-000000000002(user), EP=UserType:00000000-0000-0000-0000-000000000002(user), epm=null, T=UserType:69bb4508-d123-4b15-a258-2b4631be1369(user), TO=null, D=[69bb4508-d123-4b15-a258-2b4631be1369:ADD], ch=http://midpoint.evolveum.com/xml/ns/public/common/channels-3#user, o=SUCCESS, p=null, m=
続いて、Wazuh の設定をしていきます。
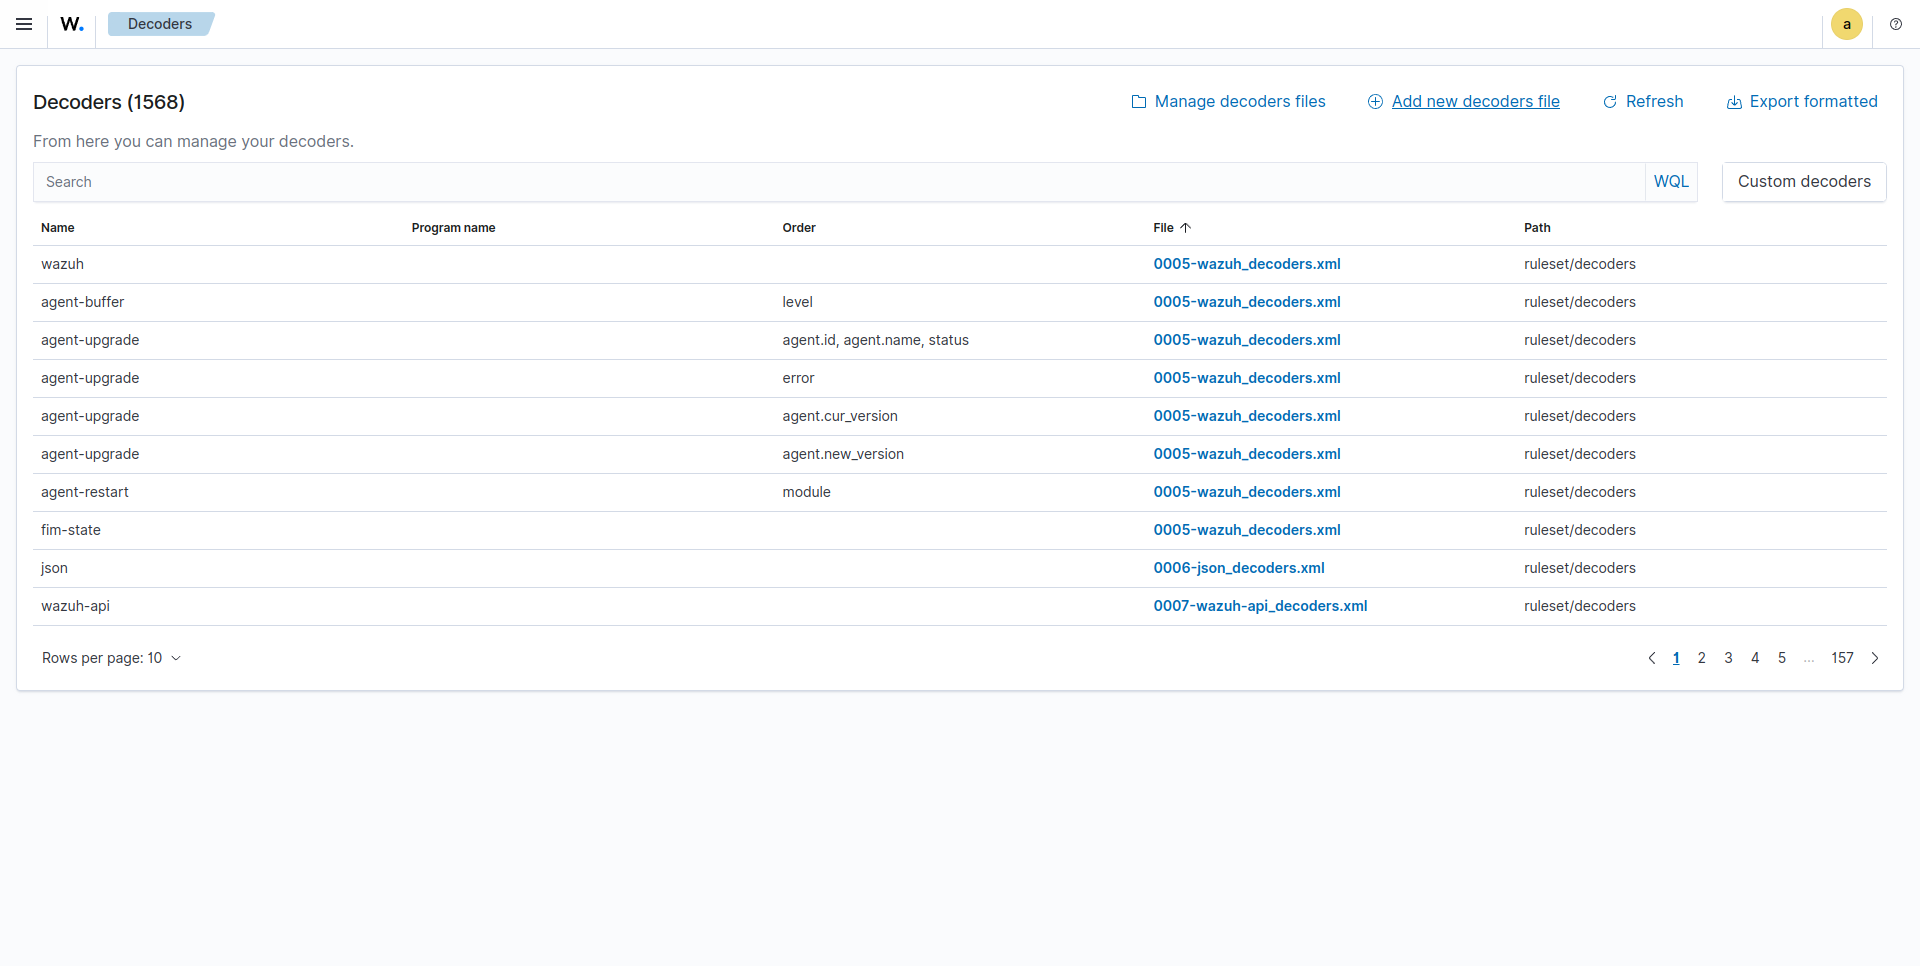
ログファイルをパースするための decoder を設定します。
Server management > Decorders
右上の Add new decoders file から設定可能です。
ここでは Webinar で利用されていた midpoint_decoder.xml をそのまま使います。
<decoder name="midpoint">
    <prematch>^MPAUDIT</prematch>
</decoder>

<decoder name="midpoint_trail">
  <parent>midpoint</parent>
  <!-- extract subsystem and timestamp from event -->
  <regex offset="after_parent">^ [(\S+)] (\d+-\d+-\d+T\d+:\d+:\d+.\d+\p\d+)</regex>
  <order>subsystem,timestamp</order>
</decoder>

<decoder name="midpoint_trail">
  <parent>midpoint</parent>
  <!-- extract event, task and other attributes -->
  <regex offset="after_parent">^ \.* eid=(\S+), et=(\S+), es=(\S+), sid=(\S+), rid=\S+, tid=(\S+), toid=(\S+), hid=(\S+), nid=(\S+), raddr=(\S+)</regex>
  <order>event_id,event_type,event_stage,session_id,task_id,task_oid,host_id,node_id,src_ip</order>
</decoder>

<decoder name="midpoint_trail">
  <parent>midpoint</parent>
  <!-- channel, outcome and principal -->
  <regex offset="after_parent">^ \.* ch=http://midpoint.evolveum.com/xml/ns/public/common/channels-3#(\S+), o=(\S+), p=(\S*)</regex>
  <order>channel,outcome,principal</order>
</decoder>

<decoder name="midpoint_trail">
  <parent>midpoint</parent>
  <!-- epm -->
  <regex offset="after_parent">^ \.* epm=(\S+)</regex>
  <order>effective_privilege_modification</order>
</decoder>

<decoder name="midpoint_trail">
  <parent>midpoint</parent>
  <!-- initiator data -->
  <regex offset="after_parent">^ \.* I=(\S+):(\S+)\((\S+)\)</regex>
  <order>initiator_type,initiator_oid,initiator_name</order>
</decoder>

<decoder name="midpoint_trail">
  <parent>midpoint</parent>
  <!-- effective principal data -->
  <regex offset="after_parent">^ \.* EP=(\S+):(\S+)\((\S+)\)</regex>
  <order>effective_principal_type,effective_principal_oid,effective_principal_name</order>
</decoder>

<decoder name="midpoint_trail">
  <parent>midpoint</parent>
  <!-- target owner data -->
  <regex offset="after_parent">^ \.* TO=(\S+):(\S+)\((\S+)\)</regex>
  <order>target_owner_type,target_owner_oid,target_owner_name</order>
</decoder>

<decoder name="midpoint_trail">
  <parent>midpoint</parent>
  <!-- target data -->
  <regex offset="after_parent">^ \.* T=(\S+):(\S+)\((\S+)\)</regex>
  <order>target_type,target_oid,target_name</order>
</decoder>

<decoder name="midpoint_trail">
  <parent>midpoint</parent>
  <!-- target data (shadows) -->
  <regex offset="after_parent">^ \.* T=PRV\(oid=(\S+), targetType={\S+}(\S+), targetName=(\S+)\)</regex>
  <order>target_oid,target_type,target_name</order>
</decoder>

<decoder name="midpoint_trail">
  <parent>midpoint</parent>
  <!-- message -->
  <regex offset="after_parent">^ \.*, m=(\.+)</regex>
  <order>message</order>
</decoder>
decoder 追加画面ではパースが想定通り行われるかテストすることもできます。
良さそうなので保存します。
次にログ検知ルールを作成していきます。
decoder にて midpoint-audit.log における et は event_type に格納するようにしました。
この値を対象にログ検知を仕掛けてみようと思います。
Server management > Rules
右上の Add new rules file から設定可能です。
<group name="midpoint">
    <rule id="100900" level="4">
        <decoded_as>midpoint</decoded_as>
        <description>Midpoint Audit messages grouped.</description>
    </rule>

    <rule id="100910" level="4">
        <if_sid>100900</if_sid>
        <field name="event_type">ADD_OBJECT</field>
        <description>Midpoint object added.</description>
    </rule>

    <rule id="100920" level="4">
        <if_sid>100900</if_sid>
        <field name="event_type">MODIFY_OBJECT</field>
        <description>Midpoint object modified.</description>
    </rule>

    <rule id="100930" level="4">
        <if_sid>100900</if_sid>
        <field name="event_type">DELETE_OBJECT</field>
        <description>Midpoint object deleted.</description>
    </rule>

    <rule id="100940" level="4">
        <if_sid>100900</if_sid>
        <field name="event_type">CREATE_SESSION</field>
        <description>Midpoint session created.</description>
    </rule>
</group>
midpoint ルールグループとして管理し event_type が ADD_OBJECT, MODIFY_OBJECT, DELETE_OBJECT, CREATE_SESSION の場合で発火するようにしてみました。
最後に agent の設定を行います。
agent の設定ファイル ossec.conf にてログファイルとフォーマットを指定する追記を行います。
  <localfile>
    <location>/home/caunu-s/Downloads/midpoint_home/log/midpoint-audit.log</location>
    <lof_format>syslog</log_format>
  </localfile>
agent を再起動します。
sudo systemctl restart wazuh-agent
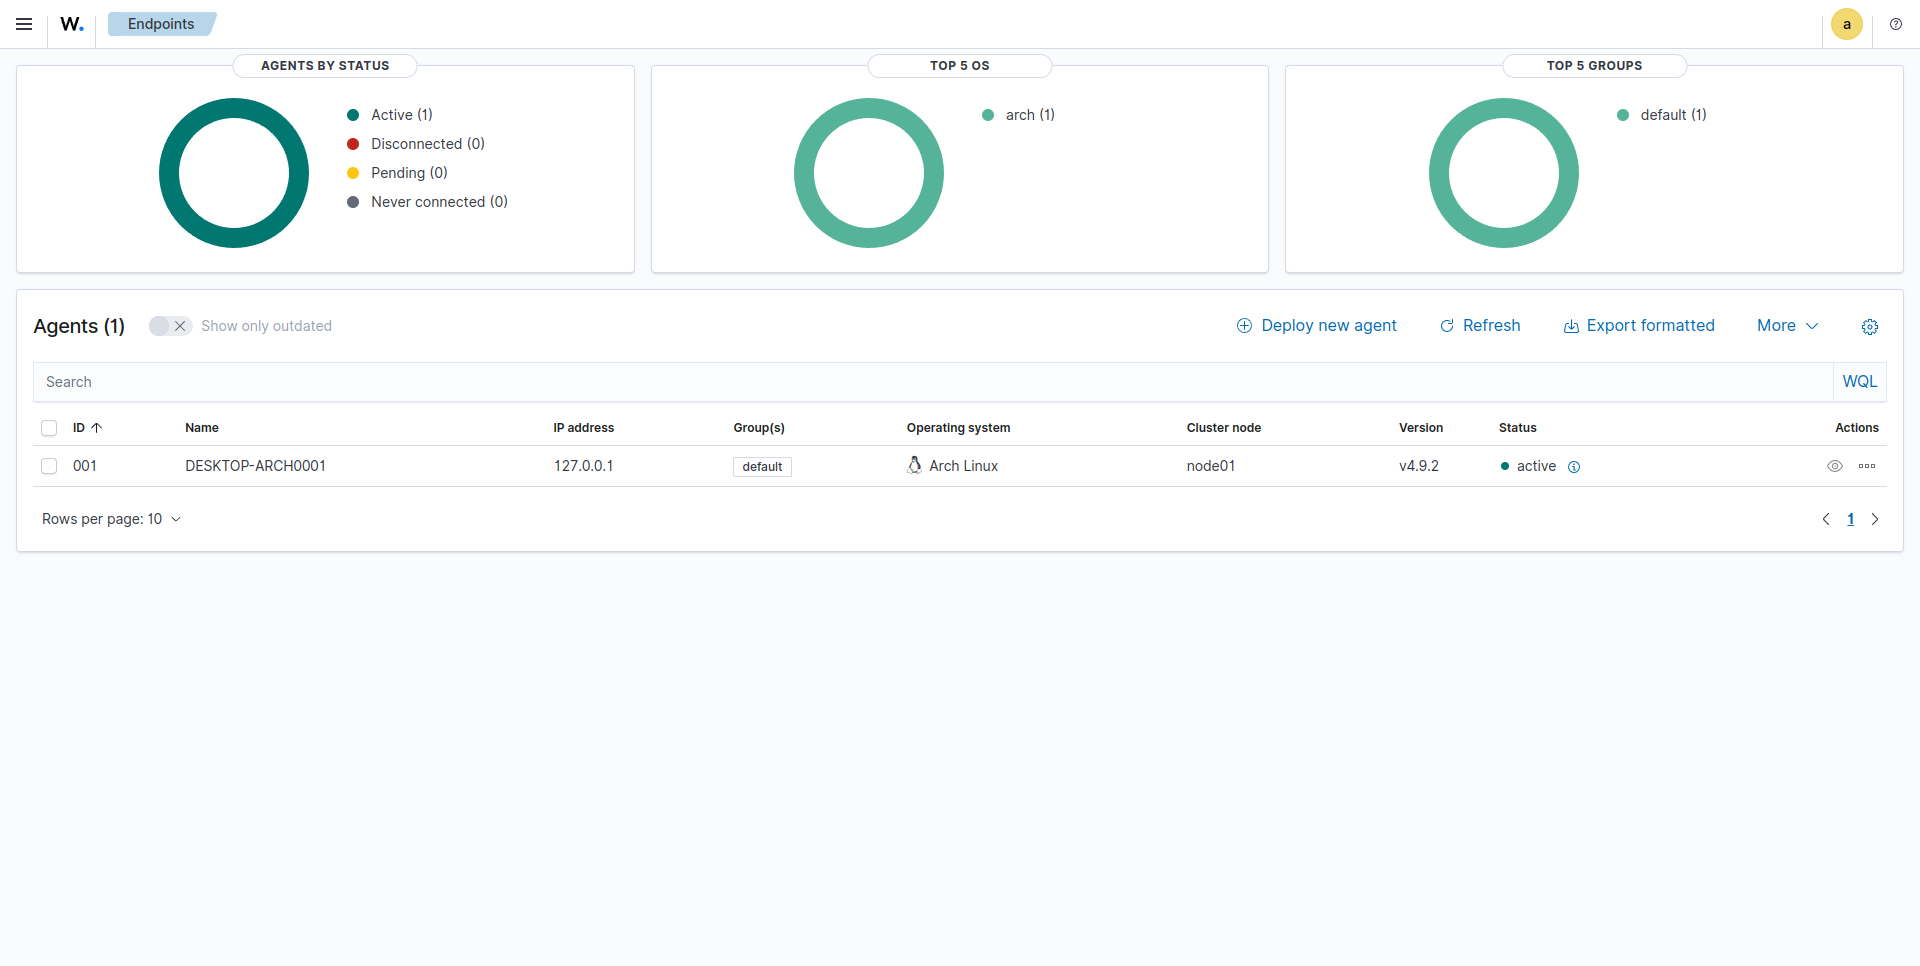
agent との接続が正しく行われていればダッシュボードからも agent の状態を確認できるはずです。
Server > Endpoints Summary
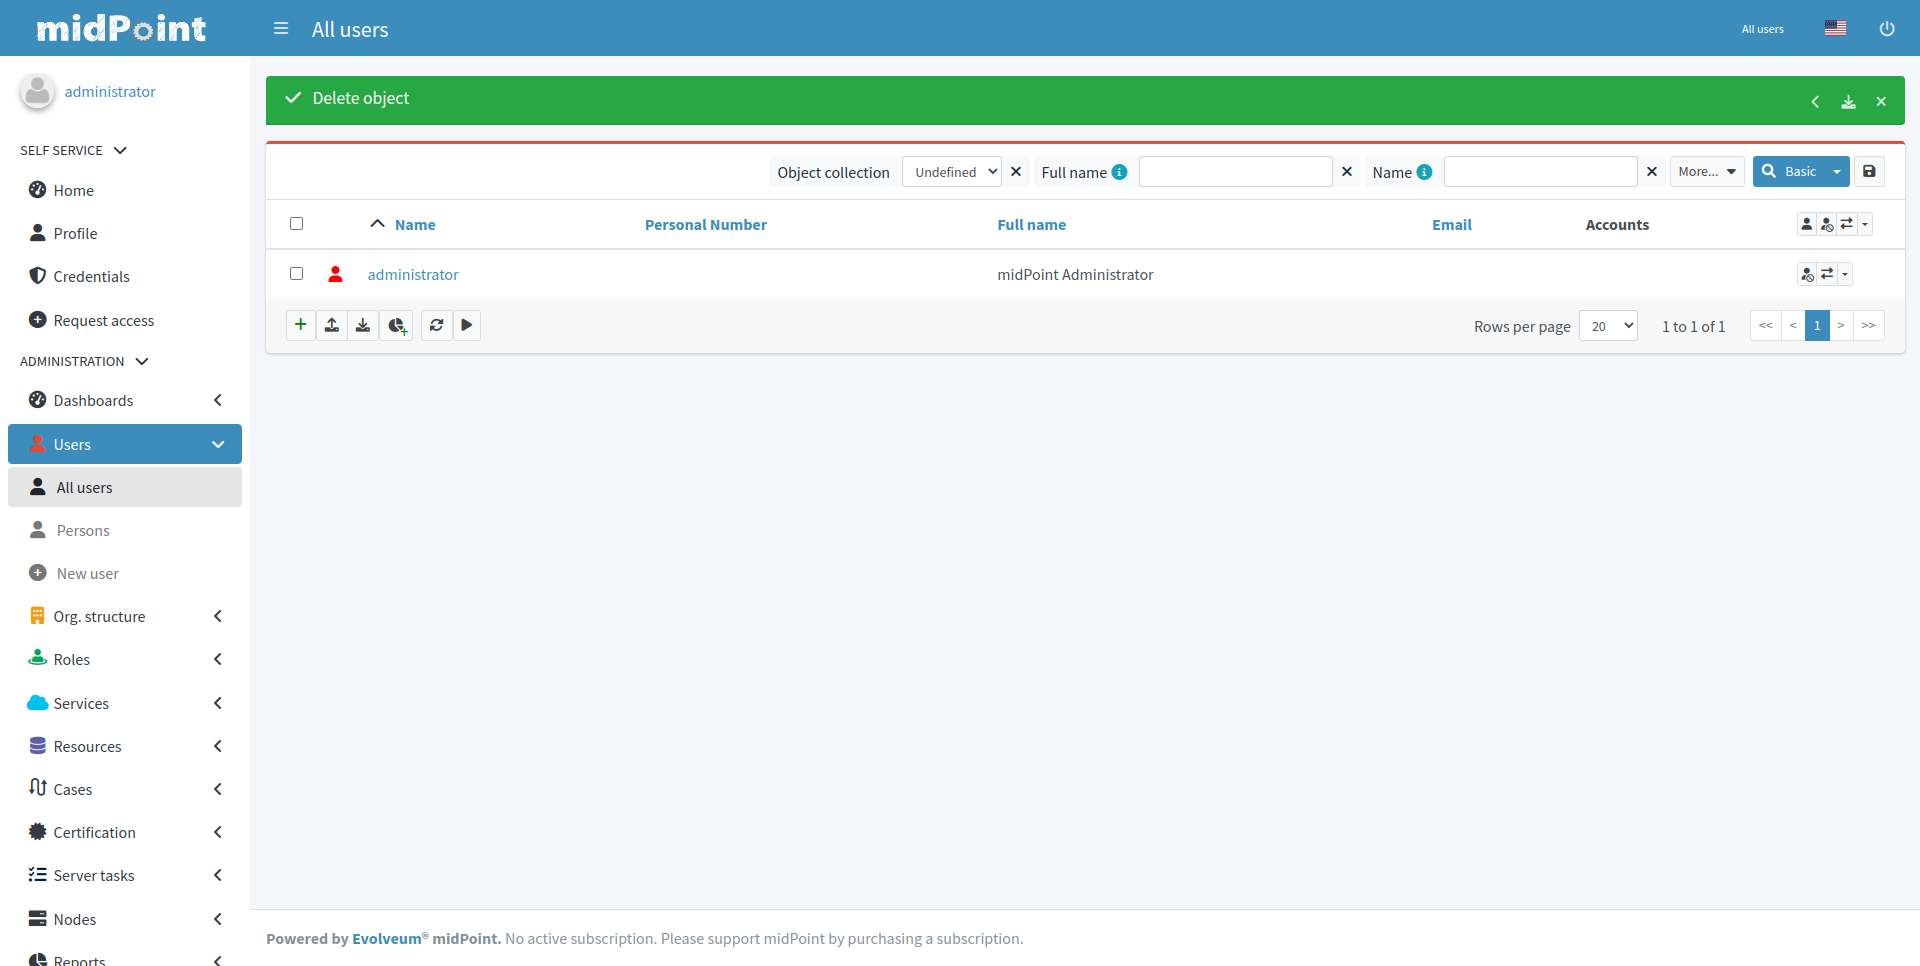
では midPoint でログを吐き出しましょう。
簡単に、先ほど作成したユーザを削除してみます。
それでは Wazuh でデータを確認してみます。
何度か試してみましたが、ちゃんとリアルタイムで検出できていそうですね!
触ってみて感じたこと
まず、Wazuh は設定次第ではいろいろなことが自動化できるツールだなと感じました。
今回は検知後に自動で処理を行う動作は行いませんでしたが、作り次第では多くのワークフローをカバーできそうです。
ただし、ワークフロー管理ツールを求めて Wazuh を使うのは難しいのかなとも思いました。
第一に ElasticStack への慣れ (index や Query DSL 等) が必要です。
ダッシュボードは作りこめるならかなり良さそうですが、Discover や Visualize の使い方をマスターしていないといけません。
また、今回は midPoint 連携を試しましたが、midPoint のためだけに導入するのはコストに見合っていないかなと感じます。11
多くのシステムを統合管理・監視したい場合において、midPoint も仲間に入れるという見方をしておくことにします。
-
midPoint は IGA Platform に相当し、常に ID 情報を監視・同期して一貫性を保持します。 ↩
-
まとめると「指定した箇所」を「ルールと照らして異常を確認」し、「異常を検出したらその対応までをサポート」する動きをします。 ↩
-
厳密には OpenSearch を使っています。 ↩
-
https://documentation.wazuh.com/4.5/deployment-options/elastic-stack/index.html ↩
-
index の管理は必要ですが、ElasticSearch への影響は少なくなるため良い方針に思いました。一方で莫大な量のデータが連携される前提にある環境へそのままの適用は少し難しいのかもしれません。既に ElasticSearch へログ集約を進めている環境であれば、リアルタイム性の欲しい一部だけを適用するのが良いかもです。 ↩
-
運用フェーズだとユースケースはあまり思い浮かばないですが、開発中で立てたり消したりを繰り返すサーバとか、スペック的にどうしても常駐プロセスを置きたくないとかの理由があるリモート端末とかに適用したい場合...には役に立つかもしれません。 ↩
-
ログの grep に慣れてしまっているだけかもしれませんが... ↩


