この記事は J2complexed Advent Calendar 2016 の14日目の記事です。
みなさんはパグと仲良くできていますか?
パグはかわいいですね。なによりもマークアップの効率が良くなります!
Pugは以前までJadeと名乗っていましたが、Pugの方がいいですね。いいセンスをしてます。
詳しくは公式を見ていただいたほうが、いいと思います!

Pugの簡単な紹介
PugはJST (JavaScript Templates)って言われてるJavaScriptで動くテンプレートエンジンです。
Expressでも動かすことができます。(動かしたことはありませんが)
Express でのテンプレート・エンジンの使用
Githubに載っている例を見てみると、書き方がわかると思います。
doctype html
html(lang="en")
  head
    title= pageTitle
    script(type='text/javascript').
      if (foo) bar(1 + 5)
  body
    h1 Pug - node template engine
    #container.col
      if youAreUsingPug
        p You are amazing
      else
        p Get on it!
      p.
        Pug is a terse and simple templating language with a
        strong focus on performance and powerful features.
これが、こうなります。
<!DOCTYPE html>
<html lang="en">
  <head>
    <title>Pug</title>
    <script type="text/javascript">
      if (foo) bar(1 + 5)
    </script>
  </head>
  <body>
    <h1>Pug - node template engine</h1>
    <div id="container" class="col">
      <p>You are amazing</p>
      <p>Pug is a terse and simple templating language with a strong focus on performance and powerful features.</p>
    </div>
  </body>
</html>
この例でわかるところといえば、以下でしょうか。
- 閉じタグがいらない
- インデントが重要
- classやidはCSSセレクタと同じ
- 属性は()の中で書く
- if文で分岐ができる
- 変数を使える
- .を付けると、次のインデントは文字列としてそのまま出力できる
- divは省略できる
例にはありませんでしたが、for文も書けますよ!
Pugでテンプレートをつくる
Pugについて理解が深まったところで、さらに仲良くなるためにテンプレートの用意です。
※ これは自己流なので、よりよい方法をご存じの方、情報をお待ちしてます
簡単に概要を説明すると、まず、 パーツのpug を用意して、 レイアウトのpug に読み込ませます。
次に 設定ファイルのpug を 実際にhtml化するpug に読み込ませて、 レイアウトのpug を継承させます。
・・・なんだかごちゃごちゃしてますが、用意するファイルはこんな感じです。
index.pug         ・・・ 実際にhtml化するpug
_config.pug       ・・・ 設定ファイルのpug
_layout.pug       ・・・ レイアウトのpug
include/          ・・・ パーツのpugのディレクトリ
  _inc_head.pug
  _inc_header.pug
  _inc_nav.pug
  _inc_footer.pug
パーツを用意
パーツを分けておきます。Pugはincludeで別のpugやhtmlを読み込むことができるので、いろいろと使いまわすことができるのです。
_inc_head.pug
headタグ内のパーツです。pageというオブジェクトから値を受け取ってセットしています。
keyやcss_path、domainも変数です。
meta(charset="utf-8")
meta(http-equiv="X-UA-Compatible", content="IE=edge")
meta(name="viewport", content="width=device-width, initial-scale=1.0")
meta(name="format-detection", content="telephone=no")

title #{page.title}

meta(content=page.description, name="description")
meta(content=page.keywords, name="keywords")
meta(content=page.title, property="og:title")
meta(content=page.description, property="og:description")
meta(content=domain + page.image, property="og:image")
meta(content=domain + page.url, property="og:url")
meta(content=(key == "top" ? "website" : "article"), property="og:type")
meta(content="ja_JP", property="og:locale")

link(rel="stylesheet", href=css_path+"/style.css")
script(src="https://code.jquery.com/jquery-1.11.2.min.js")
_inc_header.pug
次にheaderタグのパーツです。
pages、image_pathも変数です。
header
  .header_logo
    if key=='top'
      h1
        a(href=pages.top.url)
          img(src=image_path+"/shared/header_logo.png" alt=pages.top.name)
    else
      p
        a(href=pages.top.url)
          img(src=image_path+"/shared/header_logo.png" alt=pages.top.name)
_inc_nav.pug
次にnavタグのパーツです。
content_d_stateも変数で、状況に応じて出力するタグの内容が変わったりすることもテンプレートに埋め込んでおけます。便利。
nav
  ul
    li
      a(href=pages.content_a.url)
        img(src=image_path+"/shared/nav_content_a.png", alt=pages.content_a.name)
    li
      a(href=pages.content_b.url)
        img(src=image_path+"/shared/nav_content_b.png", alt=pages.content_b.name)
    li
      a(href=pages.content_c.url)
        img(src=image_path+"/shared/nav_content_c.png", alt=pages.content_c.name)
    if content_d_state=="public"
      li
        a(href=pages.content_d.url)
          img(src=image_path+"/shared/nav_content_d_public.png" alt=pages.content_d.name)
    else if content_d_state=="comingsoon"
      li
        img(src=image_path+"/shared/nav_content_d_comingsoon.png" alt=pages.content_d.name+" Coming Soon...")
_inc_nav.pug
次にfooterタグのパーツです。
js_pathも変数です。
footer
  p
    small copyright
script(type='text/javascript' src=js_path+"/js/functions.js")
設定ファイルを用意
titleやページのurlなど、変更があったときにファイルが分かれていると不便ですよね。
そんなときのために、変数をまとめてあります。
var で変数が宣言できます。
- var image_path = 'assets/img'
- var css_path = 'assets/css'
- var js_path = 'assets/js'
- var domain = 'https://example.com/'
- var content_d_state = "comingsoon"
-
  var pages = {
    top : {
      url : 'index.html',
      name : 'トップページ',
      title : 'トップページ',
      description : 'トップページです',
      keywords : 'トップページ',
      image : 'assets/img/ogp.jpg'
    },
    content_a : {
      url : 'content_a.html',
      name : 'コンテントA',
      title : 'コンテントA',
      description : 'コンテントAです',
      keywords : 'コンテントA',
      image : 'assets/img/ogp.jpg'
    },
    content_b : {
      url : 'content_b.html',
      name : 'コンテントB',
      title : 'コンテントB',
      description : 'コンテントBです',
      keywords : 'コンテントB',
      image : 'assets/img/ogp.jpg'
    },
    content_c : {
      url : 'content_c.html',
      name : 'コンテントC',
      title : 'コンテントC',
      description : 'コンテントCです',
      keywords : 'コンテントC',
      image : 'assets/img/ogp.jpg'
    },
    content_d : {
      url : 'content_d.html',
      name : 'コンテントD',
      title : 'コンテントD',
      description : 'コンテントDです',
      keywords : 'コンテントD',
      image : 'assets/img/ogp.jpg'
    }
  }
レイアウトファイルを用意
レイアウトっていうと分かりにくいかもしれませんが、パーツを組み合わせる骨組みみたいなものです。
ここで、 block という新しい言葉が出てきます。
ブロックに vars や contents という名前を付けておいて、あとで読み込む事ができます。
doctype html
block vars
html(lang="ja")
  head
    include _inc_head.pug

  body(class=key)
    .l_contents
      include _inc_header.pug
      include _inc_nav.pug
      block contents
    include _inc_footer.pug
実際にHTMLにするファイルを用意
extendでレイアウトファイルを継承してます。
継承後にblockでレイアウト側に送るイメージです。
extends _layout.pug

block vars
  include ./template/_config.pug
  - var key = "top"
  - var page = pages[key]

block contents
  h2 page.title
  .keyvisual_container
    p.keyvisual_image
      img(src=image_path+"/top/top_keyvisual.jpg", alt="")
gulpで実行
package.jsonから必要なものをインストールします。
見慣れないものが混じっているかもしれませんが、入れましょう。
{
  "name": "love-pug",
  "version": "1.0.0",
  "description": "i love pug",
  "main": "index.js",
  "scripts": {
    "gulp": "gulp"
  },
  "keywords": [
    "pug"
  ],
  "author": "j2complexed",
  "license": "ISC",
  "devDependencies": {
    "browser-sync": "^2.18.5",
    "gulp": "^3.9.1",
    "gulp-plumber": "^1.1.0",
    "gulp-pug": "^3.2.0",
    "node-notifier": "^4.6.1"
  }
}
上記のファイルを用意したらコマンドでインストールです。
$ npm install
次にgulpを実行するための設定をします。
このままコピペです。
const gulp = require('gulp');
const browserSync = require("browser-sync");
const plumber = require('gulp-plumber');
const pug = require('gulp-pug');
const notifier = require('node-notifier');

const errorHandler = function(error) {
    notifier.notify({
      message: 'しっぱいしたワン',
      title: 'パグ',
      appIcon: __dirname + '/pug.png',
    }, function () {
      console.log(error.message);
    });
  };

gulp.task('browser-sync', () => {
    browserSync({
        server: {
            baseDir: "./dist/"
        }
    });
    gulp.watch("./*.html", browserSync.reload);
});

gulp.task('views', function() {
  return gulp.src(['views/**/*.pug', '!views/**/_*.pug'])
    .pipe(plumber({errorHandler: errorHandler}))
    .pipe(pug({pretty: true}))
    .pipe(gulp.dest('dist/'));
});

gulp.task('watch', () => {
  gulp.watch(['./views/**/*.pug'], () => {
    gulp.start(['views']);
  });
});

gulp.task('default', ['browser-sync', 'views', 'watch']);
あとはコマンドで実行です。
$ npm run gulp
そうすると、distというディレクトリにindex.htmlができて、ブラウザが起動し http://localhost:3000/ が開いたと思います。
cssとかはないので、崩れているとは思いますが。
<!DOCTYPE html>
<html lang="ja">
  <head>
    <meta charset="utf-8">
    <meta http-equiv="X-UA-Compatible" content="IE=edge">
    <meta name="viewport" content="width=device-width, initial-scale=1.0">
    <meta name="format-detection" content="telephone=no">
    <title>トップページ</title>
    <meta content="トップページです" name="description">
    <meta content="トップページ" name="keywords">
    <meta content="トップページ" property="og:title">
    <meta content="トップページです" property="og:description">
    <meta content="https://example.com/assets/img/ogp.jpg" property="og:image">
    <meta content="https://example.com/index.html" property="og:url">
    <meta content="website" property="og:type">
    <meta content="ja_JP" property="og:locale">
    <link rel="stylesheet" href="assets/css/style.css">
    <script src="https://code.jquery.com/jquery-1.11.2.min.js"></script>
  </head>
  <body class="top">
    <div class="l_contents">
      <header>
        <div class="header_logo">
          <h1><a href="index.html"><img src="assets/img/shared/header_logo.png" alt="トップページ"></a></h1>
        </div>
      </header>
      <nav>
        <ul>
          <li><a href="content_a.html"><img src="assets/img/shared/nav_content_a.png" alt="コンテントA"></a></li>
          <li><a href="content_b.html"><img src="assets/img/shared/nav_content_b.png" alt="コンテントB"></a></li>
          <li><a href="content_c.html"><img src="assets/img/shared/nav_content_c.png" alt="コンテントC"></a></li>
          <li><img src="assets/img/shared/nav_content_d_comingsoon.png" alt="コンテントD Coming Soon..."></li>
        </ul>
      </nav>
      <h2>page.title</h2>
      <div class="keyvisual_container">
        <p class="keyvisual_image"><img src="assets/img/top/top_keyvisual.jpg" alt=""></p>
      </div>
    </div>
    <footer>
      <p><small>copyright</small></p>
    </footer>
    <script type="text/javascript" src="assets/js/js/functions.js"></script>
  </body>
</html>
どうでしょう!テンプレートが完成です!
他のページを作るときには、 extends _layout.pug と include _config.pug のディレクトリに気をつけて貰えば、コピペでテンプレートを使うことができます!
もっと仲良くなりたい人のために
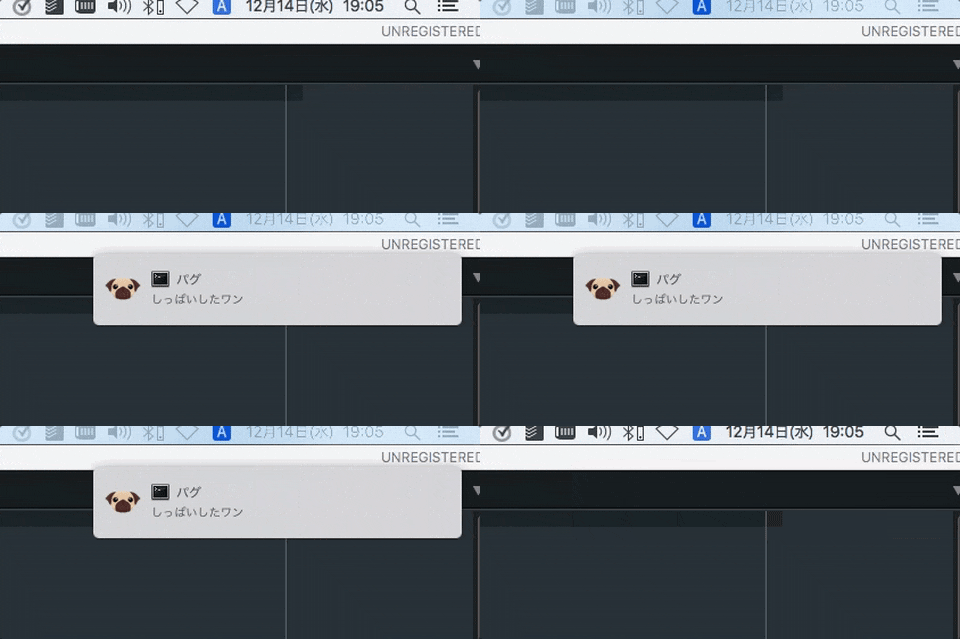
先ほどの gulpfile.js でお気づきかもしれませんが、コンパイルに失敗すると、パグが失敗したことを通知で教えてくれます。

よくgulpに監視させて、オートリロードとかにしてるとエラーしてるのに気がつかなくて修正が反映されなくて焦ることが合ったかもしれませんが、これで大丈夫です!
エラーでささくれた気持ちもパグで癒やされること間違いなしですよ!
※ 読み込むアイコン画像は各自で用意してくださいね!