はじめに
SpringBootとPostgreSQLの開発環境をdockerで動くようにし、
Hello Worldを表示させるところまでを解説します。
今回はGradleを使用し、vscode上でリモートコンテナに接続して実行という形になっています。
eclipse等を使用せず、vscodeで開発したい!という方向けになっています。
DBの初期データ等は用意していないので、ご自身の作成したいアプリに合わせて用意してください。
環境
| 環境 | バージョン |
|---|---|
| Docker | 20.10.17 |
| Openjdk | 17 |
| Spring Boot | 3.1.0 |
| Gradle | 3.6.3 |
ディレクトリ構成
下記では今回のディレクトリ構成を示しています。
current/
      ├ .devcontainer/
              ├ devcontainer.json
              ├ docker-compose.yml
      ├ SpringProject/
      ├ docker-compose.yml
      ├ Dockerfile
dockerを動かすのに必要なファイルを作成
Dockerfile
FROM openjdk:17
RUN microdnf install findutils
EXPOSE 8080

WORKDIR /srv

COPY . /srv
- Javaをコンテナにインストールしてport8080を指定している。
- 作業ディレクトリを/srvに指定
なお2行目の
RUN microdnf install findutils
このコマンドはGladleのプロジェクトをビルドする際に必要
具体的にはこのコマンドがないと、
sh gladlew build
このコマンドを叩いた時にエラーが出る。
docker-compose.yml
version: '3.6'
services:
  web:
    build:
      context: .
      dockerfile: Dockerfile
    container_name: web
    ports:
      - 8080:8080
    tty: true
    volumes:
      - .:/srv:cached
    working_dir: /srv
    depends_on:
      - db

  db:
    image: postgres:15.3
    ports:
      - 5432:5432
    environment:
      - POSTGRES_USER=root
      - POSTGRES_PASSWORD=password
      - POSTGRES_DB=postgres
    volumes:
      - postgres:/var/lib/postgresql/data

volumes:
  postgres:
- web : Dockerfileのコンテナを作成
- db : PostgreSQL バージョン15.3のコンテナを作成する。
.devcontainerを作成
今回はwebコンテナ内にJavaをインストールしているため、SpringBootの実行等はwebコンテナの中で行う必要があります。
流れとしては、VSCodeでwebコンテナにリモート接続し、リモート接続した状態でSpringBootをRunまたはBuildするという手順が必要です。
.devcontainerはリモート接続する際の設定ファイルになっています。
下記の2つのファイルが必要になっています。
- devcontainer.json
- docker-compose.yml
devcontainer.json
// For format details, see https://aka.ms/devcontainer.json. For config options, see the README at:
// https://github.com/microsoft/vscode-dev-containers/tree/v0.158.0/containers/docker-existing-docker-compose
// If you want to run as a non-root user in the container, see .devcontainer/docker-compose.yml.
{
	"name": "Existing Docker Compose (Extend)",

	// Update the 'dockerComposeFile' list if you have more compose files or use different names.
	// The .devcontainer/docker-compose.yml file contains any overrides you need/want to make.
	"dockerComposeFile": [
		"../docker-compose.yml",
		"docker-compose.yml"
	],

	// The 'service' property is the name of the service for the container that VS Code should
	// use. Update this value and .devcontainer/docker-compose.yml to the real service name.
	"service": "web",

	// The optional 'workspaceFolder' property is the path VS Code should open by default when
	// connected. This is typically a file mount in .devcontainer/docker-compose.yml
	"workspaceFolder": "/srv",

	// Set *default* container specific settings.json values on container create.
	"settings": {
		"terminal.integrated.shell.linux": null
	},

	// Add the IDs of extensions you want installed when the container is created.
	"extensions": [
		"MS-CEINTL.vscode-language-pack-ja",
		"vscjava.vscode-java-pack"
	]

	// Use 'forwardPorts' to make a list of ports inside the container available locally.
	// "forwardPorts": [],

	// Uncomment the next line if you want start specific services in your Docker Compose config.
	// "runServices": [],

	// Uncomment the next line if you want to keep your containers running after VS Code shuts down.
	// "shutdownAction": "none",

	// Uncomment the next line to run commands after the container is created - for example installing curl.
	// "postCreateCommand": "apt-get update && apt-get install -y curl",

	// Uncomment to connect as a non-root user if you've added one. See https://aka.ms/vscode-remote/containers/non-root.
	// "remoteUser": "vscode"
}
ここで重要なのはextensionsの欄です。
リモート接続した際のVSCodeに入れる拡張機能を設定しています。
今回は日本語化する拡張機能とJavaの拡張機能を追加しています。
docker-compose.yml
version: '3.6'
services:
  # Update this to the name of the service you want to work with in your docker-compose.yml file
  app:
    # If you want add a non-root user to your Dockerfile, you can use the "remoteUser"
    # property in devcontainer.json to cause VS Code its sub-processes (terminals, tasks,
    # debugging) to execute as the user. Uncomment the next line if you want the entire
    # container to run as this user instead. Note that, on Linux, you may need to
    # ensure the UID and GID of the container user you create matches your local user.
    # See https://aka.ms/vscode-remote/containers/non-root for details.
    #
    # user: vscode

    # Uncomment if you want to override the service's Dockerfile to one in the .devcontainer
    # folder. Note that the path of the Dockerfile and context is relative to the primary
    # docker-compose.yml file (the first in the devcontainer.json "dockerComposeFile"
    # array). The sample below assumes your primary file is in the root of your project.
    #
    # build:
    #   context: .
    #   dockerfile: .devcontainer/Dockerfile

    volumes:
      # Update this to wherever you want VS Code to mount the folder of your project
      - .:/srv:cached

      # Uncomment the next line to use Docker from inside the container. See https://aka.ms/vscode-remote/samples/docker-from-docker-compose for details.
      # - /var/run/docker.sock:/var/run/docker.sock

    # Uncomment the next four lines if you will use a ptrace-based debugger like C++, Go, and Rust.
    # cap_add:
    #   - SYS_PTRACE
    # security_opt:
    #   - seccomp:unconfined

    # Overrides default command so things don't shut down after the process ends.
    command: /bin/sh -c "while sleep 1000; do :; done"
volumes:の部分は適宜お好みに合わせて、変更してください。
今回の場合では./demo:/srv:cachedの方が使い勝手かもしれません。
個人的に全てのファイルをリモート上に持っていきたいので、上記の書き方になっています。
またローカル上のVSCodeにDev Containersは必須となっているため、入れていない人はインストールしましょう。
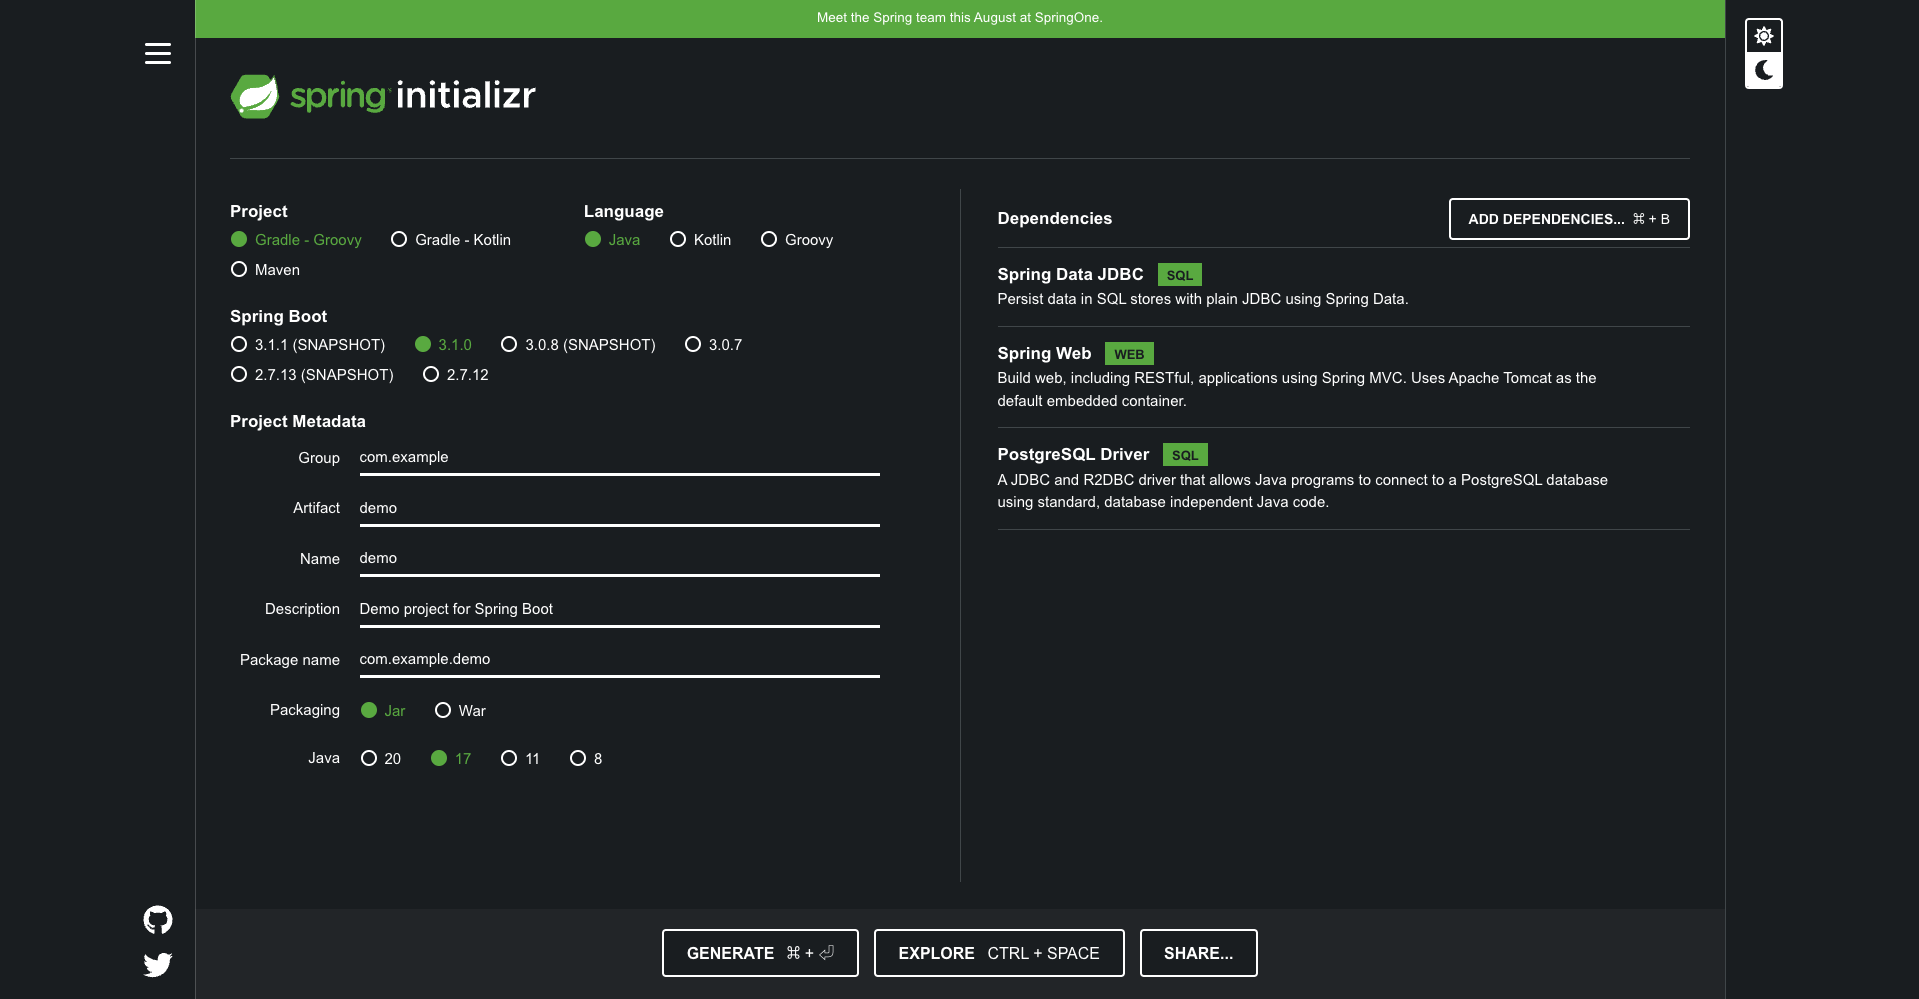
Spring Bootのプロジェクトを作成
このリンク先でSpring Bootのプロジェクトを作成します。
今回は以下の内容で設定し、GENERATEをクリックしています。
Dependenciesはプロジェクトに合わせて設定してください。今回は最低限のものを入れています。
ダウンロードフォルダにzipファイルが格納されます。
VSCodeで開く
zipファイルを展開後、Dockerfileを用意しているプロジェクトにドラッグ&ドロップでフォルダを追加

build.gradleを編集
以下のようにbuild.gradleファイルを編集
plugins {
	id 'java'
	id 'org.springframework.boot' version '3.1.0'
	id 'io.spring.dependency-management' version '1.1.0'
}

group = 'com.example'
version = '0.0.1-SNAPSHOT'
sourceCompatibility = '17'

repositories {
	mavenCentral()
}

dependencies {
	implementation 'org.springframework.boot:spring-boot-starter-data-jdbc'
	implementation 'org.springframework.boot:spring-boot-starter-web'
	runtimeOnly 'org.postgresql:postgresql'
	testImplementation 'org.springframework.boot:spring-boot-starter-test'
}

+ //この部分を追加
+ bootRun {
+    sourceResources sourceSets.main
+ }

tasks.named('test') {
	useJUnitPlatform()
}
bootRun部分を記述することにより、ビルドをした際にHTMLファイルの編集も反映してくれる。
また説明は省略しますが、Spring BootではThymeleafを使用する方が望ましい場合もあります。
Hello Worldを表示
VSCodeの実行とデバックを押下し、Javaをクリックする。
springbootの起動が始まり大量のログが表示されます。
ブラウザ(chromeなど)で、localhost:8080/index.htmlにアクセスすると、用意していた画面が表示されます。
最後に
駆け足になりましたが、自分は上記の手順で環境構築を行うことができました。
慣れたエディタで開発できるのはすごく便利ですね。