ゼロから作るDeep Learning (2)
――自然言語処理編をkerasで再現してみた。
書籍で使用しているソースコードはこちらで公開されています。
numpyでごりごり実装しているので、比較してみると面白いかも。
中身の詳細な説明は本を見てください。
なお、ここでは、google colabで実装していく。
4章 word2vecの高速化
今回のモデル
書籍内では、3章で作成したCBoWモデルに対し、以下の改良を加える。
- Embedding
- Negative Sampling
Embeddingについては、前回時点でone-hotによる実装をサボって導入済みなので、主にNegative Samplingを自前で実装する。
タイトルで続きを匂わせている通り、次回に続きますが、おかしい点がありそうなためです。ご承知頂いた上でご拝読ください。
二値分類モデルへの帰着
まず、Negative Samplingの導入にあたっては、語彙数により計算量が膨れ上がるSoftmaxの計算部分を軽くする必要がある。
そこで、「周辺文脈から何の単語が出現したか」を当てる多値分類から「周辺文脈と単語を与えて、文脈中に単語が出現したか」を当てる二値分類のモデルへと変換する。
モデルの構造としては、単語(ターゲット)とその周辺文脈(コンテキスト)に対して、同じEmbeddingを使用し、かつそれぞれに異なる処理をする必要がある。
これは、自前でkerasのAPIを用いてモデル構造を記述する。
Negative Samplingの実装
Negative Samplingは、周辺文脈から出現「しない」単語をとってきて、これを負例として学習に使用することで、モデルの汎化性能を上げることが目的のテクニックである。
Negative samplingは、自前でコーパス中の語の確率頻度分布を作成し、その分布に従ってサンプリングすればよい。
ここでは、学習前に、Negative Samplingを行ったデータを用意する。
(途中で気付いたが、書籍内の実装と同様に、loss関数を定義した方がよさそう。このやり方だと順伝播時の計算が冗長になる上、考察にある通りおそらく精度に影響する。)
ちなみに、keras.preprocessing.sequence.make_sampling_tableという確率分布を作成する関数も用意されているが、これは頻度ランクベースで確率を作成し、大分仕様が異なるため、ここでは使用しない。
また、keras.preprocessing.sequence.skipgramという、名が表す通りSkip-gram用の関数もある。これはターゲットとコンテキスト内の1語の1:1関係のデータを作るもので、CBoWのためのコンテキスト全てとターゲットのN:1の関係のデータを作ることはできないみたい。
今回沼ったポイント
- 内積計算時に軸方向(axis)を間違えて学習がうまくいかなくなる
- 1次元になるはずの出力層が(入力の次元と同じ)100次元に
- 学習時にエラーを吐くも、上記の間違いに気づかず、たまたま同じだったbatch_sizeの仕様によるものだと勘違いする
- batch_sizeで割り切れない数のデータ数は学習時に受け付けないのかと思いこむ(そんな訳ない)
- データの端数を切り捨てる処理を入れて無理やり実装し、1時間以上の学習の後、lossの変動や分散表現による類似度がおかしいというところでやっと気付く
少し腑に落ちないのが、
入力が10次元、出力層が5次元であれば、学習データがN個の場合、入力の次元が(n, 10)、出力の次元は(n, 1)となるはずで、
出力の次元が(n, 10)のように増えた場合、学習データが足らなくなるはずなんだけど、kerasのmodelのfitやtrain_on_batchによる学習自体はできてしまった。
kerasがデータの次元を適切に変換しているのだとは思うが、一体どういう仕様なんだ・・。
実装
# 必要なものを導入
!apt-get install graphviz
!pip install -q keras pydot

import copy
import matplotlib.pyplot as plt
import numpy as np
import os
import pickle
import urllib
from IPython.display import SVG

import keras.backend as K
from keras.models import Model
from keras.layers import Input, Embedding, Lambda, Reshape, Dot, Dense
from keras.optimizers import Adam
from keras.preprocessing import sequence
from keras.preprocessing.text import Tokenizer
from keras.utils import np_utils
from keras.utils.vis_utils import model_to_dot

# パラメータの設定
ptb_data_name = 'ptb.train.txt'
ptb_data_url = 'https://raw.githubusercontent.com/tomsercu/lstm/master/data/'

window_size = 5
hidden_size = 100
batch_size = 100
max_epoch = 10
negative_sample_size = 5

# PTBコーパスの取得
if not os.path.exists(ptb_data_name):
  urllib.request.urlretrieve(os.path.join(ptb_data_url, ptb_data_name), ptb_data_name)

# コーパス読込
# 整形の仕方は書籍と合わせて、余計なことはしない
corpus = [open(ptb_data_name).read().replace('\n', '<eos>').strip()]
tokenizer = Tokenizer(filters='', lower=False)
tokenizer.fit_on_texts(corpus)
corpus = tokenizer.texts_to_sequences(corpus)

# 次元数 = 語彙数
# (後続処理で、空文字分の0が増えるため+1する)
vocab_size = len(tokenizer.word_index) + 1

# データを作成
# コンテキスト
contexts = list()
for sentence in corpus:
  L = len(sentence)
  # 各word(target)ごとにcontextを求める
  for idx, word in enumerate(sentence):
    contexts.append([sentence[i] for i in range(idx-window_size, idx+window_size+1) if i != idx and 0 <= i < L])

# 端のcontextは0で穴埋めする
contexts = sequence.pad_sequences(contexts, maxlen=window_size*2)

# ターゲット
targets = np.array([[w] for s in corpus for w in s])

# モデル定義
# 入力
context_input = Input(shape=(window_size*2, ), name='context_input')
target_input = Input(shape=(1, ), name='target_input')
# embedding
embed = Embedding(output_dim=hidden_size, input_dim=vocab_size)
context_embed = embed(context_input)
target_embed = embed(target_input)
# コンテキストの隠れ層
context_hidden = Lambda(lambda x: K.mean(x, axis=1), output_shape=(hidden_size,))(context_embed)
# いれないと内積の計算時に次元が合わないので入れる
target_hidden = Reshape((hidden_size, ))(target_embed)
# コンテキストとターゲットの内積
embed_dot = Dot(axes=1, normalize=True)([context_hidden, target_hidden])
# 出力
output = Dense(1, activation='sigmoid', name='output')(embed_dot)
# モデルの入出力と最適化定義
model = Model(inputs=[context_input, target_input], outputs=[output])
model.compile(optimizer='adam', loss='binary_crossentropy')

# モデルの図示
SVG(model_to_dot(model, show_shapes=True).create(prog='dot', format='svg'))

# 語の頻度確率分布の作成
word_prob = list()
# 頻度
for word, idx in tokenizer.word_index.items():
  word_prob.append(tokenizer.word_counts[word])
# 頻度分布の補正
word_prob = np.power(word_prob, 0.75)
# 頻度確率分布に変換
word_prob = word_prob / np.sum(word_prob)

def _negative_sampling(idx):
  p = copy.deepcopy(word_prob)
  p[idx-1] = 0
  p = p / p.sum()
  return np.random.choice(word_prob.shape[0], size=negative_sample_size, replace=False, p=p)

# 学習
# epochごとにnegative samplingするため、forで学習を書く
np.random.seed(529)

hist = {'loss': list()}
L = targets.shape[0]

# コンテキストをnegative sampling分かさまし
contexts_train = np.repeat(contexts, negative_sample_size+1, axis=0)
# 正解ラベル作成
output_train = np.array(([1]+[0]*negative_sample_size)*L).reshape(L*(negative_sample_size+1), 1)
L = contexts_train.shape[0]

for epoch in range(1, max_epoch+1):
  # negative_sanpling
  ns = np.apply_along_axis(_negative_sampling, 1, targets)
  # negative samplingしたデータを追加
  targets_train = np.concatenate((targets, ns), axis=1).reshape(L, 1)

  # 学習
  loss = model.fit({'context_input':contexts_train, 'target_input':targets_train},
                   {'output':output_train},
                   initial_epoch=epoch-1, epochs=epoch, batch_size=batch_size)
  hist['loss'].append(loss.history['loss'][0])

# 損失のプロット
train_loss = hist['loss']
plt.plot(np.arange(len(train_loss)), train_loss, label='train')
plt.xlabel('epochs')
plt.ylabel('loss')
plt.legend()
plt.show()

def cos_similarity(x, y, eps=1e-8):
    nx = x / (np.sqrt(np.sum(x ** 2)) + eps)
    ny = y / (np.sqrt(np.sum(y ** 2)) + eps)
    return np.dot(nx, ny)

# w2v取得
w2v = model.get_weights()[0]

# 類似語の取得
for query in ['you', 'year', 'car', 'toyota']:
  query_id = tokenizer.word_index[query]
  query_vec = w2v[query_id]

  similarity = np.zeros(vocab_size)
  for i in range(vocab_size):
    similarity[i] = cos_similarity(w2v[i], query_vec)

  print(query)
  c = 0
  for i in (-1 * similarity).argsort():
    word = list(tokenizer.word_index)[i-1]
    if word == query:
      continue
    print(' %s: %s' % (word, similarity[i]))
    c += 1
    if c >= 5:
      break
  print()
結果
モデルの学習時間は以下の通り。ちなみにGPU使用。
実装自体はあまり高速化できてないが、GPUを使うと学習は早くなる。
CPU times: user 2h 33min 39s, sys: 16min 6s, total: 2h 49min 45s
Wall time: 2h 20min 8s
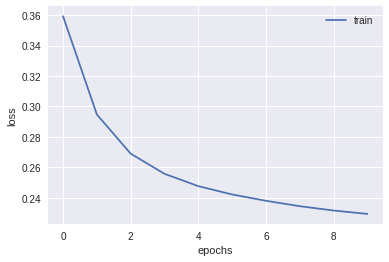
損失の推移
データ数が多く、epochごとの損失だと情報が粗いので、callbackを使用してbatchごとの損失を記録した方がよいですね。
各単語の類似度TOP5
単語のチョイスは、書籍の例をそのまま引用しました。
you
| 単語 | cos類似度 |
|---|---|
| we | 0.8196783661842346 |
| they | 0.8014479279518127 |
| i | 0.6913294792175293 |
| happened | 0.3806400001049042 |
| anybody | 0.3682156205177307 |
year
| 単語 | cos類似度 |
|---|---|
| week | 0.849526584148407 |
| month | 0.838659942150116 |
| spring | 0.6549350023269653 |
| summer | 0.6158247590065002 |
| century | 0.565712571144104 |
car
| 単語 | cos類似度 |
|---|---|
| franchisee | 0.44339868426322937 |
| apparel | 0.41125908493995667 |
| themselves | 0.38756901025772095 |
| collectors | 0.38260385394096375 |
| greene | 0.37970584630966187 |
toyota
| 単語 | cos類似度 |
|---|---|
| feeding | 0.4180729389190674 |
| inspired | 0.41410624980926514 |
| performance | 0.41233065724372864 |
| pickens | 0.385670930147171 |
| foes | 0.36995476484298706 |
考察
書籍内でうまく行った例がうまくいってなかったり、「you」の例ではうまくいっているように見えるが、コサイン類似度が0.8と飛び抜けていたり、違和感がある。
書籍内の実装では、各sampleの損失計算時にNegative Samplingをしているが、自分の実装では事前に各sampleにNegative Samplingしたデータを用意しているのが原因な気がする。
batchへ分割する際に、元データがシャッフルされるため、元々の正例とNegative Samplingした負例が紐付かなくなる。そうすると、batchごとに頻出語が固まりやすくなり、偏った学習が起きやすくなるのではないか。
参考
公式リファレンス見て実装したので、特筆するものはなし
